Making Technical Contributions
Preface FOR CURRENT EDITORS: All changes to the site, from editing core Jekyll files like _layouts or _includes and making structural edits, to minor typo fixes, need to be done via a Pull Request (PR). This guide walks users through the process. This is essential to both reduce errors, and to ensure that translated pages stay in sync.
This Wiki has two main components. The first walks users through the process of fixing site content with the GitHub GUI interface. The second walks users through making more in-depth technical contributions.
Both Atom and VSCode integrate with Git, so it's easy to both edit the files locally as well as branch, commit, push, and pull code.
Visualizing the branch structure can sometimes be useful, and GitKraken does this ok.
All of the curly-braces in our site code are part of the Liquid templating system. Jekyll also provides a few additional Liquid commands.
In this section, I will walk through a minor change.
A user opens up an issue, noting a bit of confusion about part of our Project Scholarship page.

I visit the issue and the process begins. I'm the editor who is going to fix this! First, I assign myself to the ticket. I do so by clicking on the "gear" icon next to Assignees, and clicking my own name. This is important because as I work on this, I don't want anybody else to do so - otherwise we'll duplicate work, and possibly have to fix conflicts between our edits!
Now that there is an issue that you are working on, I need to open up a new branch. On the main repository page for the Programming Historian, I open up a new branch. I do so by using the drop-down menu from the current branch and typing in a new name.
An ideal name is the name of the issue. In my case, the issue was #637, so the branch should be called Issue-637.

You will now notice that the drop-down menu reads "Issue-637," not gh-pages. It now currently says that "This branch is even with gh-pages." That's because I haven't made any changes yet.
Let's make the change. In this case, I open up the markdown file: research.md at https://github.com/programminghistorian/jekyll/blob/Issue-637/research.md. Notice that on the page, I am still on the Issue-637 branch.

Now I click the "edit" button (the pencil in recent versions of the interface) to make my edits. In this case, I am adding in the coordinates for our managing editor's e-mail address.
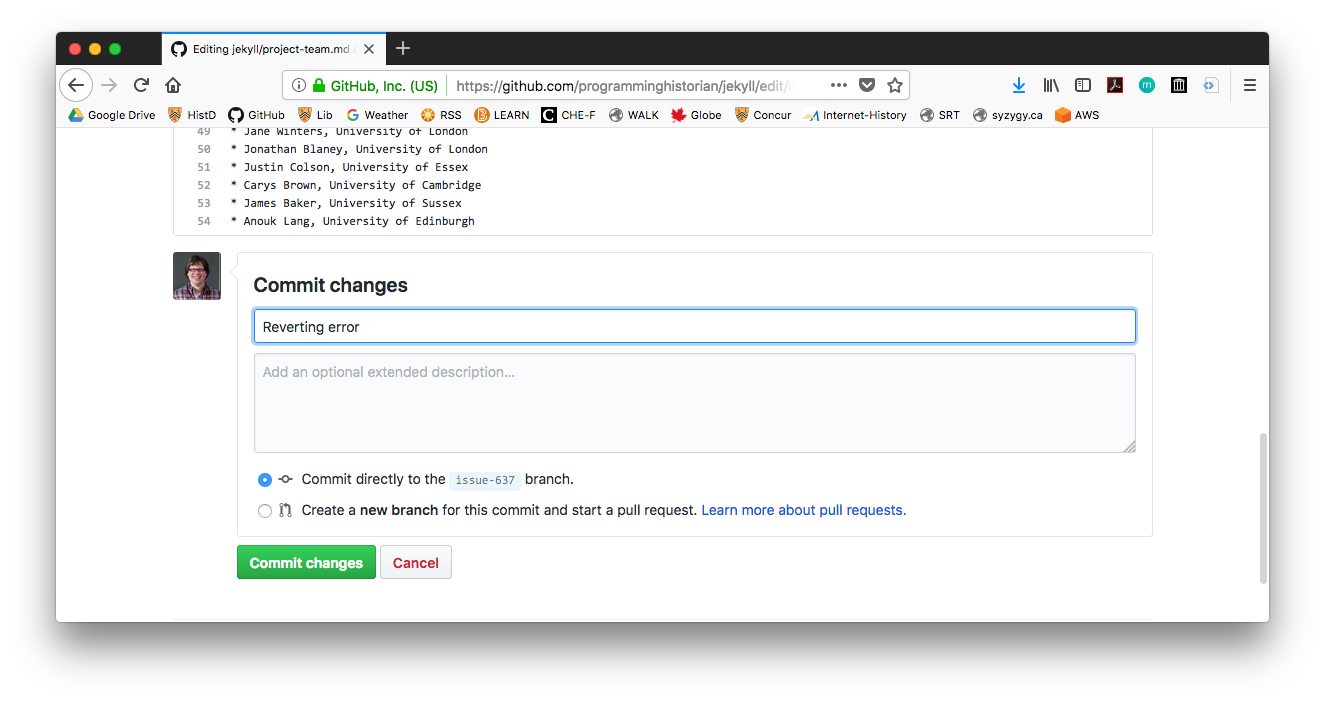
I then scroll down, and I can put information on the changes. Note that my title refers to the Issue #, and my extended description provides further detail.

Make sure that the "Commit directly to the Issue-637 branch" radio icon is selected.
Imagine that we've committed our changes to the Issue-637 branch, we go away from our system, but then suddenly realize later on that we need to add to the Pull Request. Alternatively, during the next stage, changes might be requested.
The first thing we need to do is to go back to the repository on GitHub.com and make sure we are still on issue-637.
In the case below, we see that we are back on gh-pages. We need to manually select Issue-637 again from the drop down menu.

I can tell that it is working, because after selecting that I now see "This branch is 1 commit ahead of gh-pages." Now I can go and make my additional change, making sure to also continue pushing it to the Issue-637 branch.
Now I go back to the main repository page. You can see that Issue-637 was recently pushed, and is now "1 commit ahead of gh-pages." Or more if we've done more than one change. Our next step is to open up a pull request, so we can incorporate these changes into the main repository.
Click on "Pull Request" as seen in the image below.

I then fill out the template. For title, I decide to put: "Updating contact information on research page, closes #637." This both describes the pull request, and will close the issue when it is merged.
In the text, I describe what the change does. I then add a "reviewer" as a Spanish-language editor, so that they are notified and update their version accordingly. If the change is an edit that requires some member of a team, but not a specific person, to review and add a translation, you may do so by setting the reviewer to:
- programminghistorian/spanish-team
- programminghistorian/english-team
- programminghistorian/french-team
- programminghistorian/technical-team
This will send a notification to all members of that team, and any one of them may then sign off on the review.

I now click "Create pull request."
We now have a pull request! The next steps will be standardized:
- Checks will complete. Travis-CI will build the site, to check for broken links or any other errors that might have happened.
- A live preview of the website incorporating your pull request will be generated on Netlify.
- Reviews will be carried out. A language-team member will make note of the changes and begin to stage their own changes.
- Other team members might weigh in and ask for further changes.
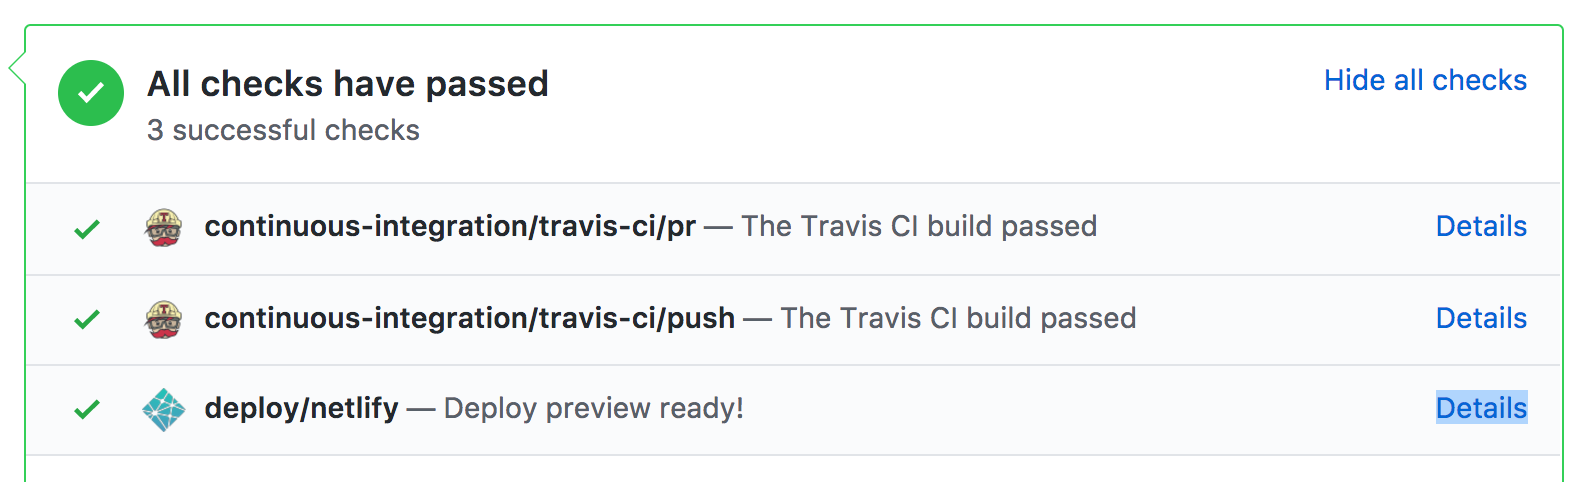
To look at your changes online, scroll to the bottom of the pull request page and click the "Show all checks" link. In the list of checks, you should see several for Netlify. One of the Netlify options should be called deploy/netlify.

Clicking on the "details" link in this row will open up a temporary version of the Programming Historian site hosted on <netlify.com> based on your pull request. Note that the URL will show the number of the pull request:

When you create a pull request, Travis CI will build the code and check for errors in metadata or broken links. If your site passes, you will see the following in the status checks near the bottom of the PR page:

However, if there is a problem, this check will show up as Failed. Click on "Details", and then click on "the build" on the following page:

Scroll to the bottom of the Travis report to see the listed errors:

Most of the checks have self-explanatory error messages, and many of them will refer to a broken link that has gone stale since last uploading files. But there are a few more confusing Jekyll errors that occur when you have errors in your YAML formatting:
YAML Exception reading ...: could not find expected ':' while scanning a simple key at line 10 column 1
You probably forgot to put a colon : correctly in one of the lines in your YAML header.
YAML Exception reading ...: mapping values are not allowed in this context at line...
You have improperly indented one or more lines in the YAML header.
YAML Exception reading ...: (<unknown>): did not find expected key while parsing a block mapping at line...
You have incorrectly nested single and/or double quotes (", ') in one of your YAML lines. This most often happens in the title or abstract sections. To avoid this, use the "pipe" syntax for adding in blocks of text that might contain double or single quotes:
abstract: |
  Here's text with "quote marks anywhere we want
Also check to see that you are properly escaping quote marks when you use them in figure captions:
{% include figure.html caption="This caption contains \"quote\" marks" %}
If you're asked to review a PR, you can start the process by scrolling to the bottom of the pull request page and clicking the "Add your review" link. This will open up a page showing all of the changes in the pull request. Clicking the button "Review changes" will open a menu where you can add comments and choose the review type.

If the PR is complete without any additional changes, then select "Approve" and click "Submit Review". If the author needs to make changes, then instead you can select "Request Changes" and explain your choice.
If you want to make changes to the PR yourself, then follow the instructions below on "Responding to a PR review". Don't forget to come back to the review and add your final approval once the PR is ready with your edits.
Let's imagine a change request comes in:
Change requested: let's mention Jessica's name in the text, rather than just a nebulous "managing editor."
I agree, so I decide to go back and edit the branch. I go back to the main repository page, and now have to re-select the branch. I repeat the steps as above: select the branch, find the file, edit the file, and then commit the change on branch Issue-637 again.

When I go back to the pull request, it has been automatically updated!

We are now ready for the merge. Once a representative from all the relevant teams has noted the change and the checks have passed, hit the big green button. Once it is merged, the Pull Request will have an option to delete your branch. Please do so.
Your change will now be live.
If you intend to make a technical contribution to the underlying templates for this site, please make sure you follow the best practices outlined here.
(If you are looking to make a contribution or edit to the content of a lesson, see our contributor guidelines instead.)
This brief guide assumes that you are generally familiar with git, GitHub, and Jekyll. PH has two great introductions to these technologies:
If you have any questions about this guide, or about a potential technical contribution, create an issue and tag the technical team lead for PH, @mdlincoln.
We welcome contributions from everyone via Pull Request. To start that process, fork the repository so you can begin coding in your own copy of it.
This site is built via Jekyll, using GitHub Pages as a hosting service. This means that all code in this GitHub repo is processed by GitHub servers to produce the HTML pages that readers see. If you want to preview what this generated site looks like on your own computer, you need to make sure you are using the same versions of Jekyll and its dependencies that GitHub does.
- Set up Jekyll dependencies.
- Fork the programming historian repository, and clone that fork to your local machine.
- Ensure you have the "bundler" gem installed by running the command:
gem install bundler
-
cdinto your clone of the PH repository, and run the commandbundle install. This will install all the additional necessary gems to keep you up to date with the gem versions being used on GitHub, and by the rest of the team. - Run
bundle exec jekyll serve --watchto generate the site and start a local webserver. You can then preview the local version of the site by going tohttp:https://localhost:4000in your web browser.
Once you've made your edits, push them back to your fork of the repository and open a pull request.
(Note: if you want to make a live preview of your changes for others to look at, see "Modifying baseurl in _config.yml" below.)
We use Travis CI and htmlproofer to check that the site builds properly, and that none of the internal or external links on the site are broken. When you make a pull request (and, as a collaborator, when you push any commit), Travis will automatically try to build the site and check for problems. This usually takes a minute or two, and the results will appear as a green check mark, or a red X.

If your build has an error, you can click on the "Details" button and then "the build" to view the build logs (see above for screenshots). If you scroll to the bottom, you'll see an error report that may list URLs that led to unresponsive pages. If you can see how to fix it, then do! Otherwise, one of the PH editors will help resolve the problem. All build and broken-link errors must be fixed before any changes can be merged in to the site.
The Programming Historian repository is currently integrated with the static site building service Netlify. Much like the Travis CI integration tests the internal and external linking structure of our site every time a new commit is pushed to the repository, Netlify offers a live web preview of pull requests and branches.
The site is currently mirrored at the address http:https://ph-dev.netlify.com. Any branches or pull requests are deployed on custom-named subdomains. For example, if you have opened a pull request with the number #123, then the live preview will be published at http:https://deploy-preview-123--ph-dev.netlify.com.
You don't need to memorize this pattern, however. If you open a new pull request, you will see a panel below the comments section that displays the status of Travis CI and Netlify builds. To open the Netlify build, click on "Show all checks", and then click on the "Details" link for the Netlify check. There might be several options for Netlify, but you want the one that reads "deploy/netlify":
Some files in this repository have non-ASCII characters such as ñ. Some earlier versions of Git and OS X get confused by these Unicode characters, and will register that a file has changed when, in fact, none has. These errors can be addressed by running the following command:
git config --global core.precomposeunicode trueWhen in doubt, do not git add files with special characters unless you are certain that you have created or modified them.