Sections and chapters
Introduction
Documents usually have some form of “logical structure”: division into chapters, sections, sub-sections etc. to organize their content. LaTeX supports the creation of a document structure and also enables customization of sectioning and numbering. The commands available to organize a document depend on the document class being used, although the simplest form of organization, sectioning, is available in all formats.
Basic example
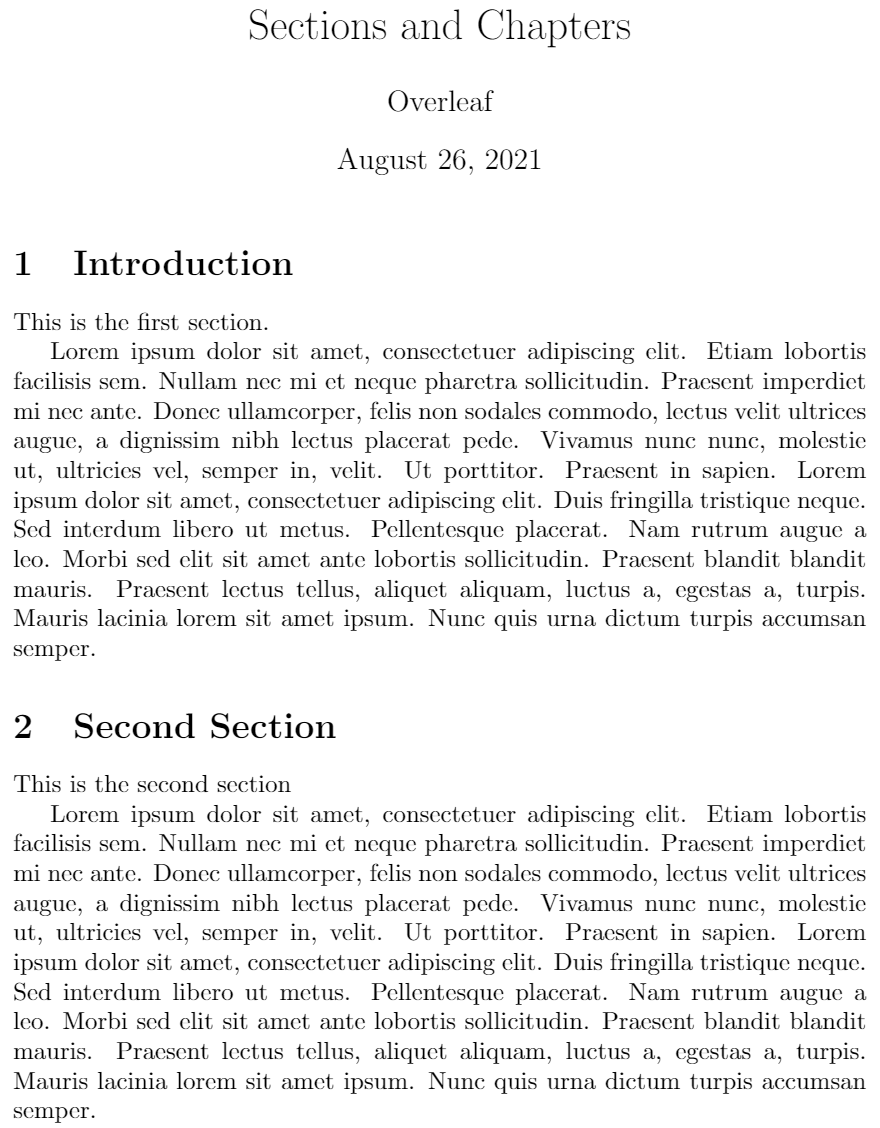
Let’s begin with a basic example to demonstrate the \section{section title} command, which marks the beginning of a new section called section title. Section numbering is automatic and can be customized, or disabled.
\documentclass{article}
\usepackage{blindtext}

\title{Sections and Chapters}
\author{Overleaf}
\date{\today}

\begin{document}
\maketitle
\section{Introduction}

This is the first section.

\blindtext

\section{Second Section}
This is the second section

\blindtext
\end{document}
Open this example in Overleaf.
This example produces the following output:

Document sectioning
LaTeX can organize, number, and index chapters and sections of document. There are up to 7 levels of depth for defining sections depending on the document class:
| -1 | \part{part}
|
| 0 | \chapter{chapter}
|
| 1 | \section{section}
|
| 2 | \subsection{subsection}
|
| 3 | \subsubsection{subsubsection}
|
| 4 | \paragraph{paragraph}
|
| 5 | \subparagraph{subparagraph}
|
Usually, \section is the top-level document command in most documents. However, in reports or books, and similar long documents, this would be \chapter or \part.
Numbered and unnumbered sections
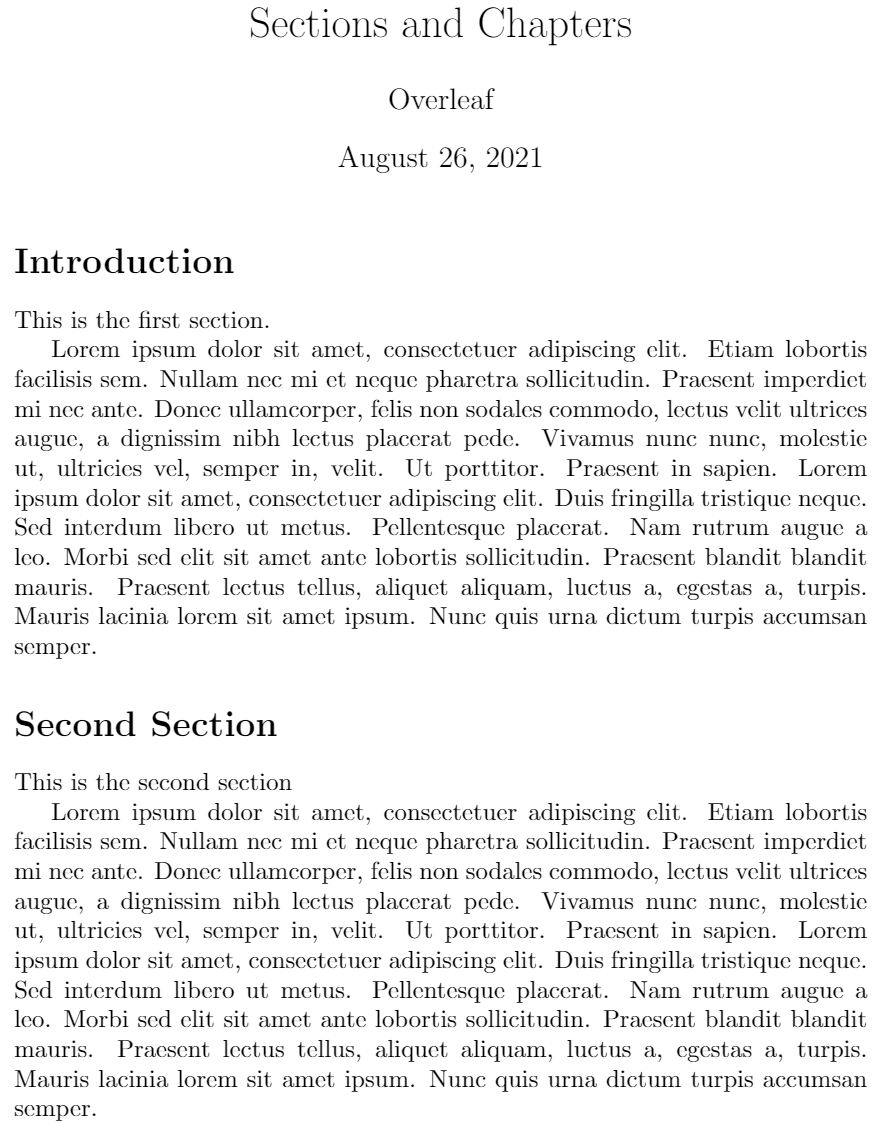
To get an unnumbered chapter, section, subsection, etc. add an asterisk (*) at the end of the command, before the opening curly brace. These will not go into the table of contents. Here is our first example (above) but this time using \section* instead of \section:
\documentclass{article}
\usepackage{blindtext}

\title{Sections and Chapters}
\author{Overleaf}
\date{\today}

\begin{document}
\maketitle
\section*{Introduction}

This is the first section.

\blindtext

\section*{Second Section}
This is the second section

\blindtext
\end{document}
Open this example in Overleaf.
This example produces the following output:

Unnumbered sections in the table of contents
To add an unnumbered section to the table of contents, use the \addcontentsline command like this:
\addcontentsline{toc}{section}{Title of the section}
Here is an example using \addcontentsline but see the article Table of contents for further information and examples.
\documentclass{article}
\title{Sections and Chapters}
\author{Overleaf}
\date{\today}

\begin{document}
\maketitle
\tableofcontents

\newcommand\shortlorem{Lorem ipsum dolor sit amet, consectetur adipiscing elit, sed do eiusmod tempor incididunt ut labore et dolore magna aliqua. Ut enim ad minim veniam, quis nostrud exercitation ullamco laboris nisi ut aliquip ex ea commodo consequat.}

\section{Introduction}
This is the first section (numbered).

\shortlorem
\addcontentsline{toc}{section}{Unnumbered Section}
\section*{Unnumbered Section}
An unnumbered section

\shortlorem

\section{Second section}
The second numbered section.

\shortlorem
\end{document}
Open this example in Overleaf.
This example produces the following output:

Document chapters and sections in a book/report
As mentioned before, \chapter can be used in books and reports.
The report class
Below you can see an example report using text taken the Overleaf article An Introduction to LuaTeX (Part 1): What is it—and what makes it so different?
\documentclass{report}
\title{Sections and Chapters}
\author{Overleaf}
\date{\today}
\begin{document}
\maketitle
\tableofcontents
\chapter{An Introduction to Lua\TeX}

\section{What is it—and what makes it so different?}
Lua\TeX{} is a \textit{toolkit}—it contains sophisticated software tools and components with which you can construct (typeset) a wide range of documents. The sub-title of this article also poses two questions about Lua\TeX: What is it—and what makes it so different? The answer to “What is it?” may seem obvious: “It’s a \TeX{} typesetting engine!” Indeed it is, but a broader view, and one to which this author subscribes, is that Lua\TeX{} is an extremely versatile \TeX-based document construction and engineering system.

\subsection{Explaining Lua\TeX: Where to start?}
The goal of this first article on Lua\TeX{} is to offer a context for understanding what this TeX engine provides and why/how its design enables users to build/design/create a wide range of solutions to complex typesetting and design problems—perhaps also offering some degree of “future proofing”

\chapter{Lua\TeX: Background and history}
\section{Introduction}
Lua\TeX{} is, in \TeX{} terms, “the new kid on the block” despite having been in active development for over 10 years.

\subsection{Lua\TeX: Opening up \TeX’s “black box”}
Knuth’s original \TeX{} program is the common ancestor of all modern \TeX{} engines in use today and Lua\TeX{} is, in effect, the latest evolutionary step: derived from the pdf\TeX{} program but with the addition of some powerful software components which bring a great deal of extra functionality.
\end{document}
Open this example in Overleaf (using lualatex)
This example produces the following output—here we show pages 2–4, where the page images have been overlapped to ease presentation:

The book class
The following example reproduces text from the report example but with \documentclass{book}, containing parts, chapters, sections, subsections and sub-subsections. If you open the example in Overleaf you should see that sub-subsections produced by \subsubsection are not numbered. That is by design of the book class: if you want to change this behavior, add the following command to your document preamble:
\setcounter{secnumdepth}{3}
\documentclass{book}
\title{Sections and Chapters}
\author{Overleaf}
\date{\today}
\begin{document}
\maketitle
\tableofcontents
\part{History of Lua\TeX}

\chapter{An Introduction to Lua\TeX}

\section{What is it—and what makes it so different?}
Lua\TeX{} is a \textit{toolkit}—it contains sophisticated software tools and components with which you can construct (typeset) a wide range of documents. The sub-title of this article also poses two questions about Lua\TeX: What is it—and what makes it so different? The answer to “What is it?” may seem obvious: “It’s a \TeX{} typesetting engine!” Indeed it is, but a broader view, and one to which this author subscribes, is that Lua\TeX{} is an extremely versatile \TeX-based document construction and engineering system.

\subsection{Explaining Lua\TeX: Where to start?}
The goal of this first article on Lua\TeX{} is to offer a context for understanding what this TeX engine provides and why/how its design enables users to build/design/create a wide range of solutions to complex typesetting and design problems—perhaps also offering some degree of “future proofing”

\chapter{Lua\TeX: Background and history}
\section{Introduction}
Lua\TeX{} is, in \TeX{} terms, “the new kid on the block” despite having been in active development for over 10 years.

\subsection{Lua\TeX: Opening up \TeX’s “black box”}
Knuth’s original \TeX{} program is the common ancestor of all modern \TeX{} engines in use today and Lua\TeX{} is, in effect, the latest evolutionary step: derived from the pdf\TeX{} program but with the addition of some powerful software components which bring a great deal of extra functionality.

\subsubsection{How Lua\TeX{} processes \texttt{\string\directlua}: A first look}
The ⟨code⟩ provided to \verb|\directlua{<code>}| is first converted to tokens using the processes and calculations discussed above; that sequence of tokens is stored in a token list.
\end{document}
To see the output, open this example in Overleaf (it uses lualatex)
Customize chapters and sections
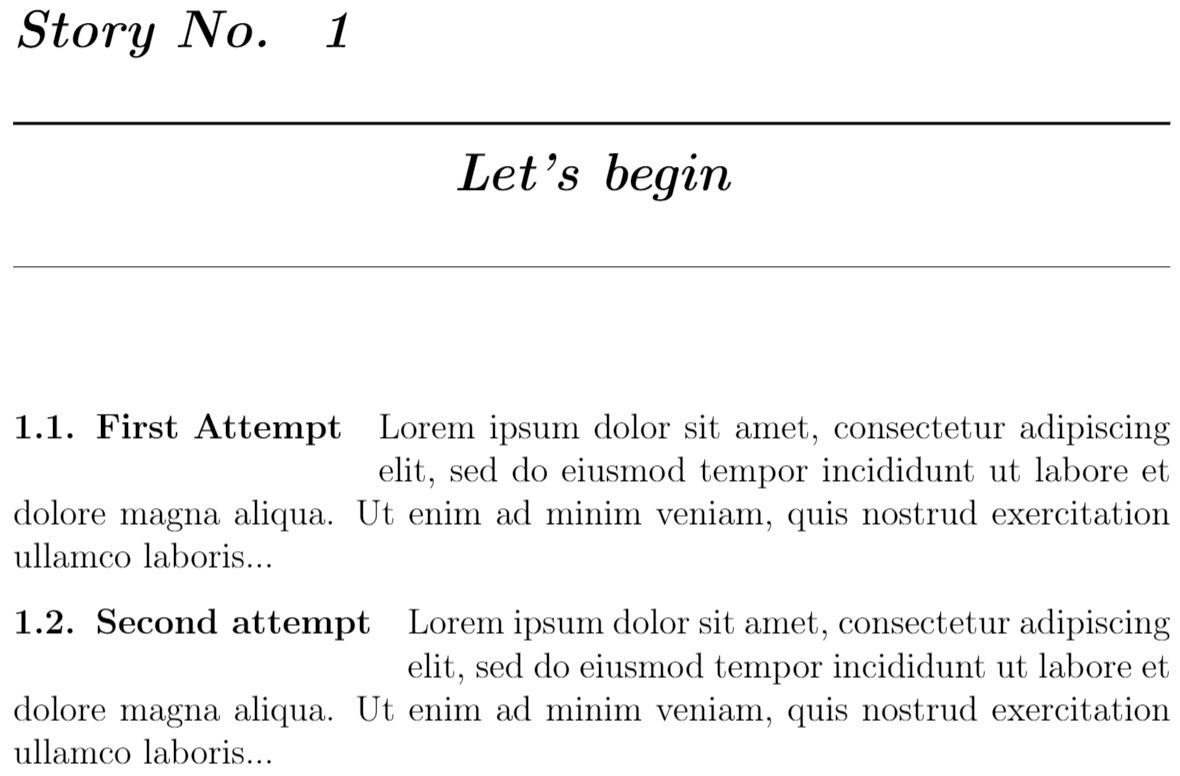
You can use the titlesec package to customize chapters, sections and subsections style in an easy way.
\documentclass[a4paper,12pt]{book}
\usepackage[T1]{fontenc}
\usepackage{titlesec}

\titleformat
{\chapter} % command
[display] % shape
{\bfseries\Large\itshape} % format
{Story No. \ \thechapter} % label
{0.5ex} % sep
{
    \rule{\textwidth}{1pt}
    \vspace{1ex}
    \centering
} % before-code
[
\vspace{-0.5ex}%
\rule{\textwidth}{0.3pt}
] % after-code


\titleformat{\section}[wrap]
{\normalfont\bfseries}
{\thesection.}{0.5em}{}

\titlespacing{\section}{12pc}{1.5ex plus .1ex minus .2ex}{1pc}

\begin{document}
\chapter{Let's begin}
\section{First Attempt}

Lorem ipsum dolor sit amet, consectetur adipiscing elit, sed do
eiusmod tempor incididunt ut labore et dolore magna aliqua. Ut
enim ad minim veniam, quis nostrud exercitation ullamco laboris...

\section{Second attempt}

Lorem ipsum dolor sit amet, consectetur adipiscing elit, sed do
eiusmod tempor incididunt ut labore et dolore magna aliqua. Ut
enim ad minim veniam, quis nostrud exercitation ullamco laboris...

\end{document}
Open this titlesec example in Overleaf.
This example produces the following output:

titlesec commands
There are two general commands:
\titleformat{<command>}[<shape>]{<format>}{<label>}{<sep>}{<before-code>}[<after-code>]
where [<shape>] and [<after-code>] are optional parameters, and:
<command>is the sectioning command to be redefined:\part,\chapter,\section,\subsection,\subsubsection,\paragraphor\subparagraph.<shape>is sectioning paragraph shape; possible values are:hang,block,display,runin,leftmargin,rightmargin,drop,wrapandframe.<format>is the format to be applied to the title, label, and text; for example\normalfont\Large\bfseries<label>specify sectioning label.<sep>is the horizontal separation between label and title body and it must be a length and not be empty.<before-code>is code preceding the title body.<after-code>is code following the title body.
and
\titlespacing{<command>}{<left>}{<before-sep>}{<after-sep>}
where:
<left>increases the left margin.<before-sep>is the vertical space before the title.<after-sep>is the separation between title and non-sectioning text.
The starred version of this command (\titlespacing*) kills the indentation of the paragraph following the title.
Further reading
For more information see:
- Creating a document in LaTeX
- Bold, italics and underlining
- Table of contents
- Cross referencing sections and equations
- Management in a large project
- Multi-file LaTeX projects
- Hyperlinks
- Page numbering
- Single sided and double sided documents
- Multiple columns
- Counters
- Font sizes, families, and styles
titlesecpackage manual
Overleaf guides
- Creating a document in Overleaf
- Uploading a project
- Copying a project
- Creating a project from a template
- Using the Overleaf project menu
- Including images in Overleaf
- Exporting your work from Overleaf
- Working offline in Overleaf
- Using Track Changes in Overleaf
- Using bibliographies in Overleaf
- Sharing your work with others
- Using the History feature
- Debugging Compilation timeout errors
- How-to guides
- Guide to Overleaf’s premium features
LaTeX Basics
- Creating your first LaTeX document
- Choosing a LaTeX Compiler
- Paragraphs and new lines
- Bold, italics and underlining
- Lists
- Errors
Mathematics
- Mathematical expressions
- Subscripts and superscripts
- Brackets and Parentheses
- Matrices
- Fractions and Binomials
- Aligning equations
- Operators
- Spacing in math mode
- Integrals, sums and limits
- Display style in math mode
- List of Greek letters and math symbols
- Mathematical fonts
- Using the Symbol Palette in Overleaf
Figures and tables
- Inserting Images
- Tables
- Positioning Images and Tables
- Lists of Tables and Figures
- Drawing Diagrams Directly in LaTeX
- TikZ package
References and Citations
- Bibliography management with bibtex
- Bibliography management with natbib
- Bibliography management with biblatex
- Bibtex bibliography styles
- Natbib bibliography styles
- Natbib citation styles
- Biblatex bibliography styles
- Biblatex citation styles
Languages
- Multilingual typesetting on Overleaf using polyglossia and fontspec
- Multilingual typesetting on Overleaf using babel and fontspec
- International language support
- Quotations and quotation marks
- Arabic
- Chinese
- French
- German
- Greek
- Italian
- Japanese
- Korean
- Portuguese
- Russian
- Spanish
Document structure
- Sections and chapters
- Table of contents
- Cross referencing sections, equations and floats
- Indices
- Glossaries
- Nomenclatures
- Management in a large project
- Multi-file LaTeX projects
- Hyperlinks
Formatting
- Lengths in LaTeX
- Headers and footers
- Page numbering
- Paragraph formatting
- Line breaks and blank spaces
- Text alignment
- Page size and margins
- Single sided and double sided documents
- Multiple columns
- Counters
- Code listing
- Code Highlighting with minted
- Using colours in LaTeX
- Footnotes
- Margin notes
Fonts
Presentations
Commands
Field specific
- Theorems and proofs
- Chemistry formulae
- Feynman diagrams
- Molecular orbital diagrams
- Chess notation
- Knitting patterns
- CircuiTikz package
- Pgfplots package
- Typesetting exams in LaTeX
- Knitr
- Attribute Value Matrices
Class files
- Understanding packages and class files
- List of packages and class files
- Writing your own package
- Writing your own class