Drawing shapes with IMDraw
So far we've only been drawing sprites. What about circles, triangles, rectangles and others? That's what we'll do in this part.
Generally, there are two major ways of approaching graphics.
The, so called, immediate mode just let's you issue drawing commands. Each drawing command specifies the kind of an object you want to draw along with all of it's parameters. At the beginning of each frame, the screen must be cleared and a new scene must be drawn using the drawing commands. For example, the following pseudo-code draws two squares and a moving circle on the screen.
circle_x = 0

while true do
    circle_x += 10

    clear_screen(0, 0, 0)
    draw_rectangle(10, 10, 50, 50, red)
    draw_rectangle(50, 50, 100, 100, green)
    draw_circle(circle_x, 100, 40, blue)

    update_screen()
end
The other approach, so called retained mode is different. Instead of issuing drawing commands, retained mode let's you create objects that are retained and stay on the screen until destroyed. The drawing itself is managed by the library. Here's the same program written in the retained mode style.
create_rectangle(10, 10, 50, 50, red)
create_rectangle(50, 50, 100, 100, green)
circle = create_circle(0, 100, 40, blue)

func update() begin
    circle.x += 10
end

on_update(update)
run_program()
As you can see, we're not in control of the drawing, not even in control of the main loop. Retained mode is usually event driven. That's why we needed to create the update function to move the circle across the screen.
The benefit of the immediate mode is full control and flexibility. Want to hide an objects? Simply don't draw it. Want to draw one object multiple times? No problem. The drawback is performance since the whole scene has to be submitted to the graphics library each frame.
The benefit of the retained mode is the performance and easier optimizations on the library side. The drawback is that it's harder to use and less flexible.
Pixel uses a mixture of both of these styles. It allows creating and retaining sprites, but doesn't manage the drawing. Instead, it's up to you to draw them on the screen. This approach gives both the flexibility and the performance.
With primitive graphics, Pixel takes one more step towards the immediate mode. Having used the sprite API in Pixel, one might expect that the primitive graphics API would be similar. There would be functions such as NewPolygon, NewCircle and so on, returning appropriate objects with appropriate drawing methods. This would be one way to do it. However, it'd get quite cumbersome to use, when dealing with lots of objects based on some simple geometric data. Instead, Pixel takes a different approach.
There's a package in the Pixel library for drawing primitive graphics called imdraw. As the name suggests, it's got something to do with the immediate mode. Let's just get straight to the code! Let's start with the typical Pixel boilerplate.
package main

import (
	"github.com/faiface/pixel"
	"github.com/faiface/pixel/pixelgl"
	"golang.org/x/image/colornames"
)

func run() {
	cfg := pixelgl.WindowConfig{
		Title:  "Pixel Rocks!",
		Bounds: pixel.R(0, 0, 1024, 768),
		VSync:  true,
	}
	win, err := pixelgl.NewWindow(cfg)
	if err != nil {
		panic(err)
	}

	for !win.Closed() {
		win.Clear(colornames.Aliceblue)
		win.Update()
	}
}

func main() {
	pixelgl.Run(run)
}
Now we need to import the imdraw package.
import (
	"github.com/faiface/pixel"
	"github.com/faiface/pixel/imdraw"
	"github.com/faiface/pixel/pixelgl"
	"golang.org/x/image/colornames"
)
The imdraw package exports a type called IMDraw. The IMDraw object is funny, because it's a retained object that contained methods similar to the immediate mode drawing functions. As we'll see later, this lets us use it in both immediate and retained style.
Thus, let's create an IMDraw object.
	win, err := pixelgl.NewWindow(cfg)
	if err != nil {
		panic(err)
	}

	imd := imdraw.New(nil)
The imdraw.New constructor takes one argument, an optional picture. The picture can be used to draw pictured (or textured, whichever you prefer) polygons. Since we'll only be drawing primitive shapes in this part, we just pass nil as the picture.
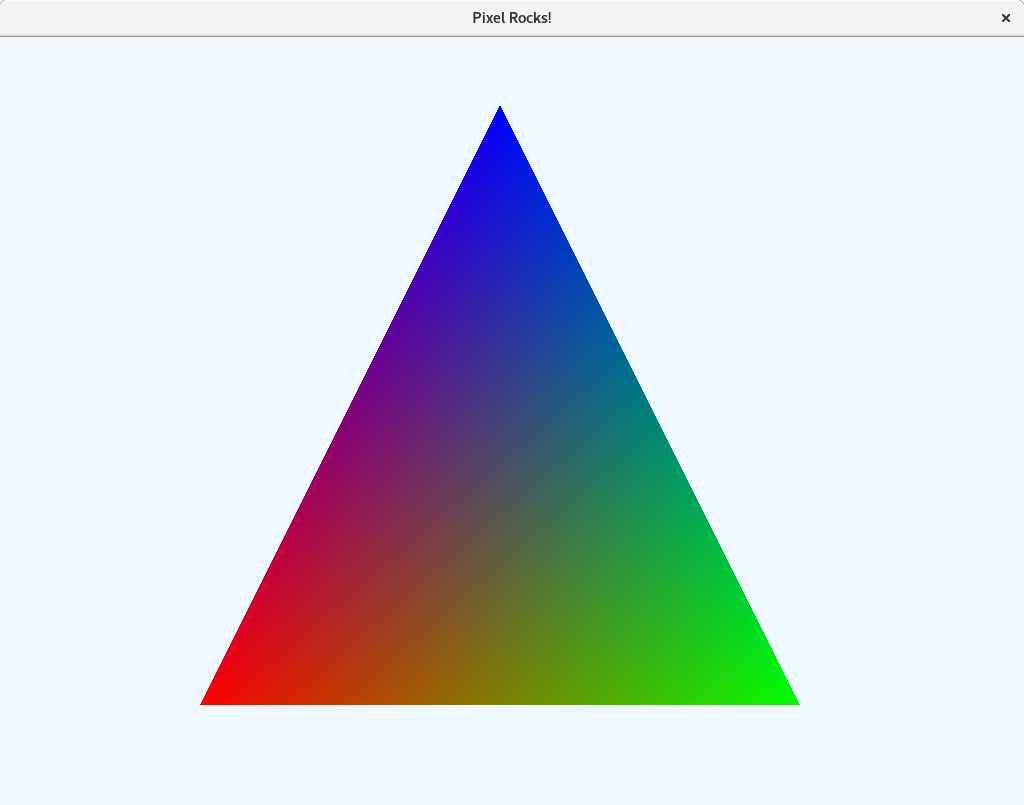
First, we'll draw the typical OpenGL "hello, world" program: the red-green-blue triangle. It's quite simple with IMDraw. Here we draw the triangle to the imd object.
	imd := imdraw.New(nil)

	imd.Color = pixel.RGB(1, 0, 0)
	imd.Push(pixel.V(200, 100))
	imd.Color = pixel.RGB(0, 1, 0)
	imd.Push(pixel.V(800, 100))
	imd.Color = pixel.RGB(0, 0, 1)
	imd.Push(pixel.V(500, 700))
	imd.Polygon(0)
And here we draw the result to the screen.
	for !win.Closed() {
		win.Clear(colornames.Aliceblue)
		imd.Draw(win)
		win.Update()
	}
And here we go!
Ok, it works but we don't really know what's going on.
IMDraw is basically a pretty convenient state machine. There are three kinds things we can do with it.
Fields such as imd.Color, imd.EndShape or imd.Precision are properties. They are easily settable using = assignment. All of these properties affect points before they are pushed.
The second kind is the imd.Push method, which takes variable number of arguments: vectors representing the positions of points. This method pushes points to the IMDraw. The points take all of the currently set properties with themselves (remembers them). Changing the properties later does not affect any previously pushed points.
The last kind of methods is shape finalizers. These methods include imd.Line, imd.Polygon, imd.Rectangle or imd.Circle. Each of these methods collects all of the pushed points and draws a shape according to them. For example, the imd.Line method draws a line between the pushed points and imd.Circle draws a circle around each of the pushed points. These methods take additional arguments further describing the specific shape.
The drawn shapes are then remembered inside the IMDraw, so when we call imd.Draw(win), the IMDraw draws all of the drawn shapes to the window.
So, looking back at the triangle code, it's quite easy. We set a color and push a point for each of the three points in the triangle. Finally, we draw a polygon with the 0 thickness, which means a filled polygon.
The only part we don't really understand about the triangle code yet is the pixel.RGB function. As you probably already know, the standard "image/color" package defines the color.Color interface. It's possible to create our own color formats just by implementing this interface.
Pixel does that and implements it's own color format (which you may or might not use, it's up to you): pixel.RGBA. It's an alpha-premultiplied RGBA color with float64 components in range [0, 1] and additional useful methods (e.g. multiplying two colors).
There are two constructors. One is pixel.RGB, which creates a fully opaque RGB color. The other one is pixel.Alpha constructor which creates a transparent white color. Creating a transparent RGBA color is achieved by creating a opaque RGB color and multiplying it by a transparent white.
Now that we know most of the theory behind IMDraw, let's take a look at what it can really do! First of all, let's delete all of the code related to the red-green-blue triangle.
	// delete all this
	imd.Color = pixel.RGB(1, 0, 0)
	imd.Push(pixel.V(200, 100))
	imd.Color = pixel.RGB(0, 1, 0)
	imd.Push(pixel.V(800, 100))
	imd.Color = pixel.RGB(0, 0, 1)
	imd.Push(pixel.V(500, 700))
	imd.Polygon(0)
Now, we'll take a quick tour here. Each code fragment shows how to draw a certain type of shapes.
Here's how we draw lines. Particularly notice the EndShape property.
	imd.Color = colornames.Blueviolet
	imd.EndShape = imdraw.RoundEndShape
	imd.Push(pixel.V(100, 100), pixel.V(700, 100))
	imd.EndShape = imdraw.SharpEndShape
	imd.Push(pixel.V(100, 500), pixel.V(700, 500))
	imd.Line(30)
Another shape is circles and ellipses.
	imd.Color = colornames.Limegreen
	imd.Push(pixel.V(500, 500))
	imd.Circle(300, 50)
	imd.Color = colornames.Navy
	imd.Push(pixel.V(200, 500), pixel.V(800, 500))
	imd.Ellipse(pixel.V(120, 80), 0)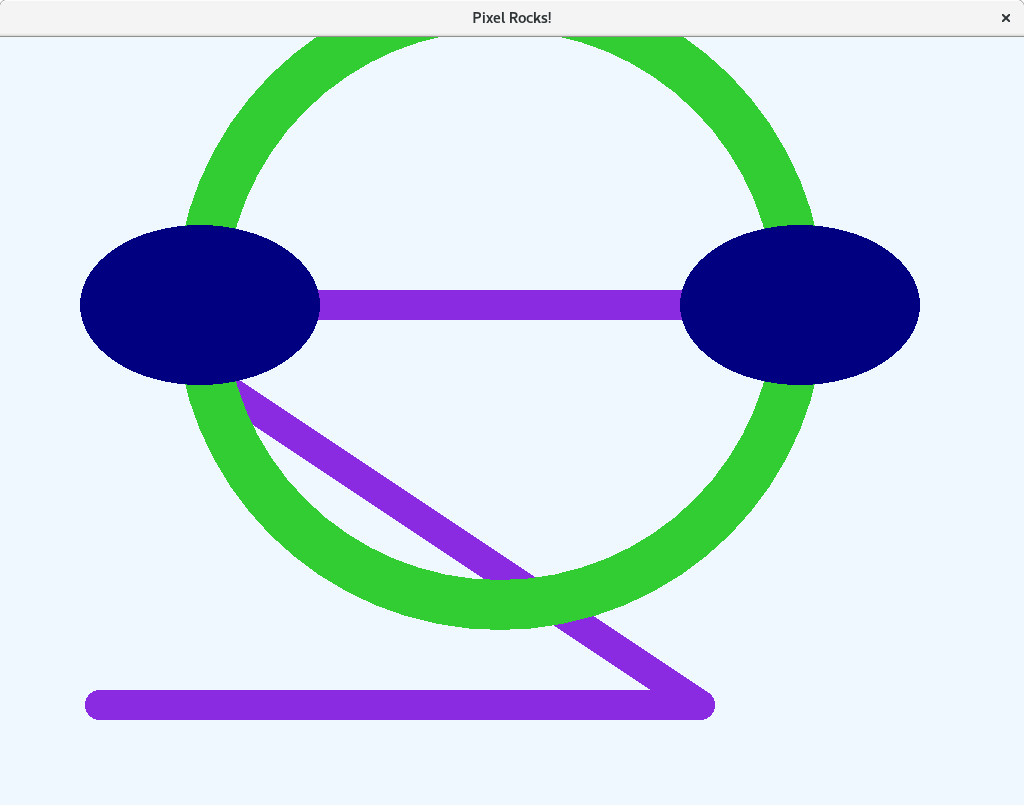
And a circle arc (ellipse arc is possible too).
	imd.Color = colornames.Red
	imd.EndShape = imdraw.RoundEndShape
	imd.Push(pixel.V(500, 350))
	imd.CircleArc(150, -math.Pi, 0, 30)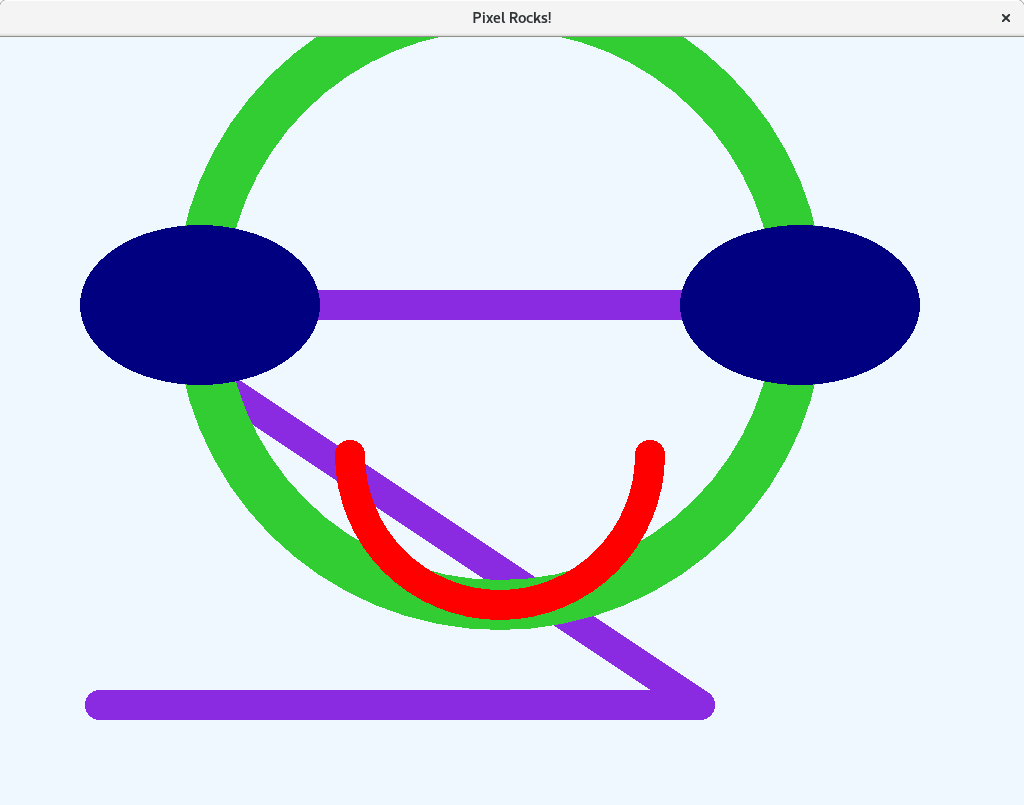
There are two major ways to use IMDraw. One resembles the immediate mode, the other one resembles the retained mode.
Let's take a look at the first one. When using IMDraw this way, we usually have one global IMDraw. We clear it upon every frame, draw our scene, draw the result to the window, and loop. Schematically, it looks something like this.
imd := imdraw.New(nil)

for !win.Closed() {
	imd.Clear()
	// ... draw the scene using imd

	win.Clear(colornames.White)
	imd.Draw(win)
	win.Update()
}
The second one exploits the fact, that IMDraw is an object. We can create one, draw a shape to it and retain it for later drawing. Again, it looks something like this.
// initialization
circle := imdraw.New(nil)
circle.Color = colornames.Red
circle.Push(0)
circle.Circle(64, 0)

// ... later in the code
for !win.Closed() {
	// ...
	circle.Draw(win)
	// ...
}
As you can see, IMDraw is very flexible and usable in many ways. It gives you the convenience of the immediate mode, yet it allows for the performance of the retained mode.
Here's the whole code from this part.
package main

import (
	"math"

	"github.com/faiface/pixel"
	"github.com/faiface/pixel/imdraw"
	"github.com/faiface/pixel/pixelgl"
	"golang.org/x/image/colornames"
)

func run() {
	cfg := pixelgl.WindowConfig{
		Title:  "Pixel Rocks!",
		Bounds: pixel.R(0, 0, 1024, 768),
		VSync:  true,
	}
	win, err := pixelgl.NewWindow(cfg)
	if err != nil {
		panic(err)
	}

	imd := imdraw.New(nil)

	imd.Color = colornames.Blueviolet
	imd.EndShape = imdraw.RoundEndShape
	imd.Push(pixel.V(100, 100), pixel.V(700, 100))
	imd.EndShape = imdraw.SharpEndShape
	imd.Push(pixel.V(100, 500), pixel.V(700, 500))
	imd.Line(30)

	imd.Color = colornames.Limegreen
	imd.Push(pixel.V(500, 500))
	imd.Circle(300, 50)
	imd.Color = colornames.Navy
	imd.Push(pixel.V(200, 500), pixel.V(800, 500))
	imd.Ellipse(pixel.V(120, 80), 0)

	imd.Color = colornames.Red
	imd.EndShape = imdraw.RoundEndShape
	imd.Push(pixel.V(500, 350))
	imd.CircleArc(150, -math.Pi, 0, 30)

	for !win.Closed() {
		win.Clear(colornames.Aliceblue)
		imd.Draw(win)
		win.Update()
	}
}

func main() {
	pixelgl.Run(run)
}