Including images on Overleaf
When editing documents on Overleaf, it's straightforward to include images. This article explains how to upload images to your projects from your computer or from a URL, and how to include them in your typeset documents.
Simple image upload
|
To upload an image, in the editor go to the upper left corner and click the upload icon |
 |
|
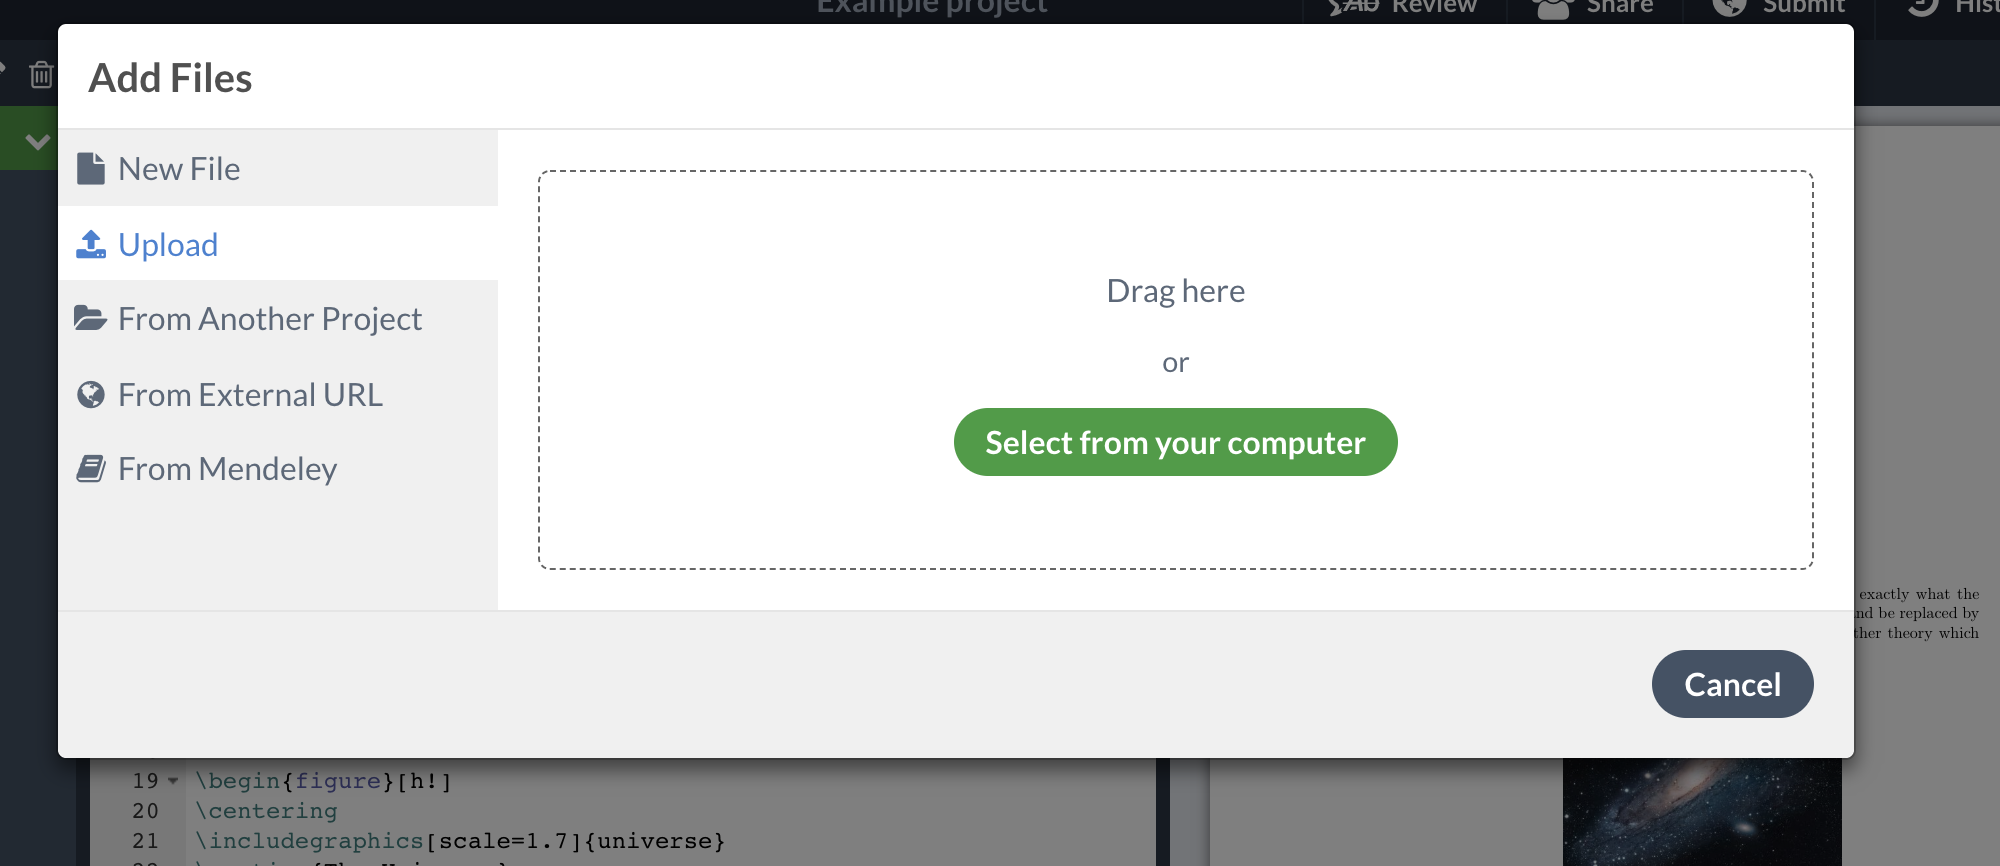
a dialogue box will pop up for you to upload your files |
 |
|
there you can either drag and drop your files or click Select files(s) to open a file browser |
 |
|
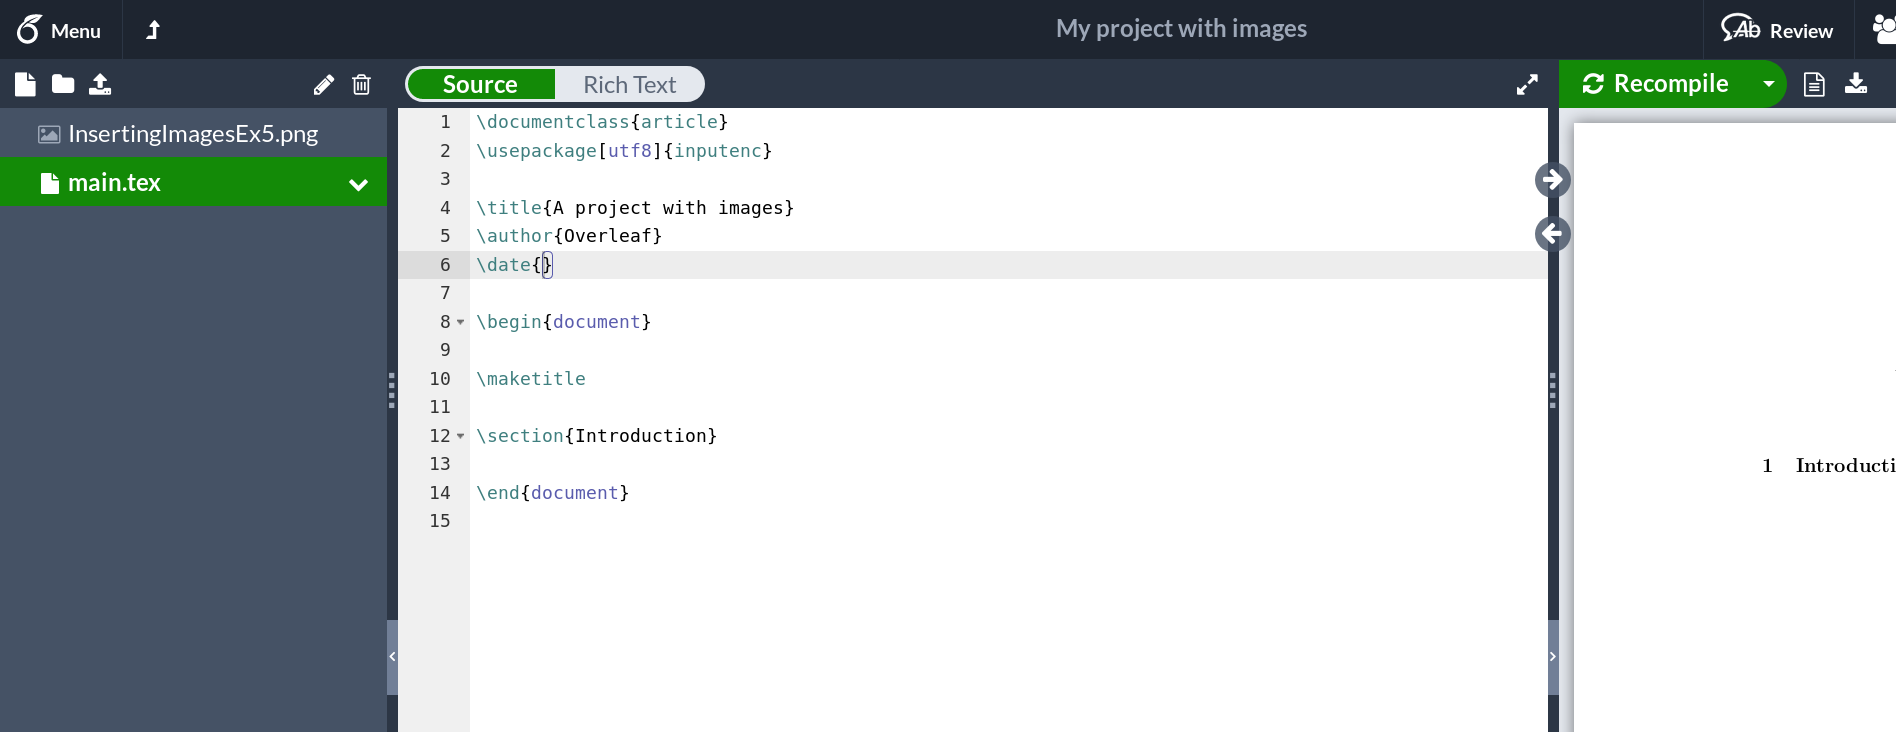
navigate to the right folder and select the images to upload. You can upload several files at once. After the upload process is complete you will see the files in the left panel. |
 |
Now you can use your images within your LaTeX file, see the example below
\documentclass{article}
\usepackage[utf8]{inputenc}
\usepackage{graphicx}

\title{A project with images}
\author{Overleaf}
\date{}

\begin{document}

\maketitle

\section{Introduction}
\begin{figure}[htp]
    \centering
    \includegraphics[width=4cm]{InsertingImagesEx5}
    \caption{An image of a galaxy}
    \label{fig:galaxy}
\end{figure}

\end{document}

notice that only the file name of the image is passed as parameter in \includegraphics[width=4cm]{lion-logo}
For more information about picture manipulation in LaTeX see the further reading for links to other documentation pages.
Uploading images to a folder
If your project includes several images you might need to put them in a separate folder to keep everything organized.
|
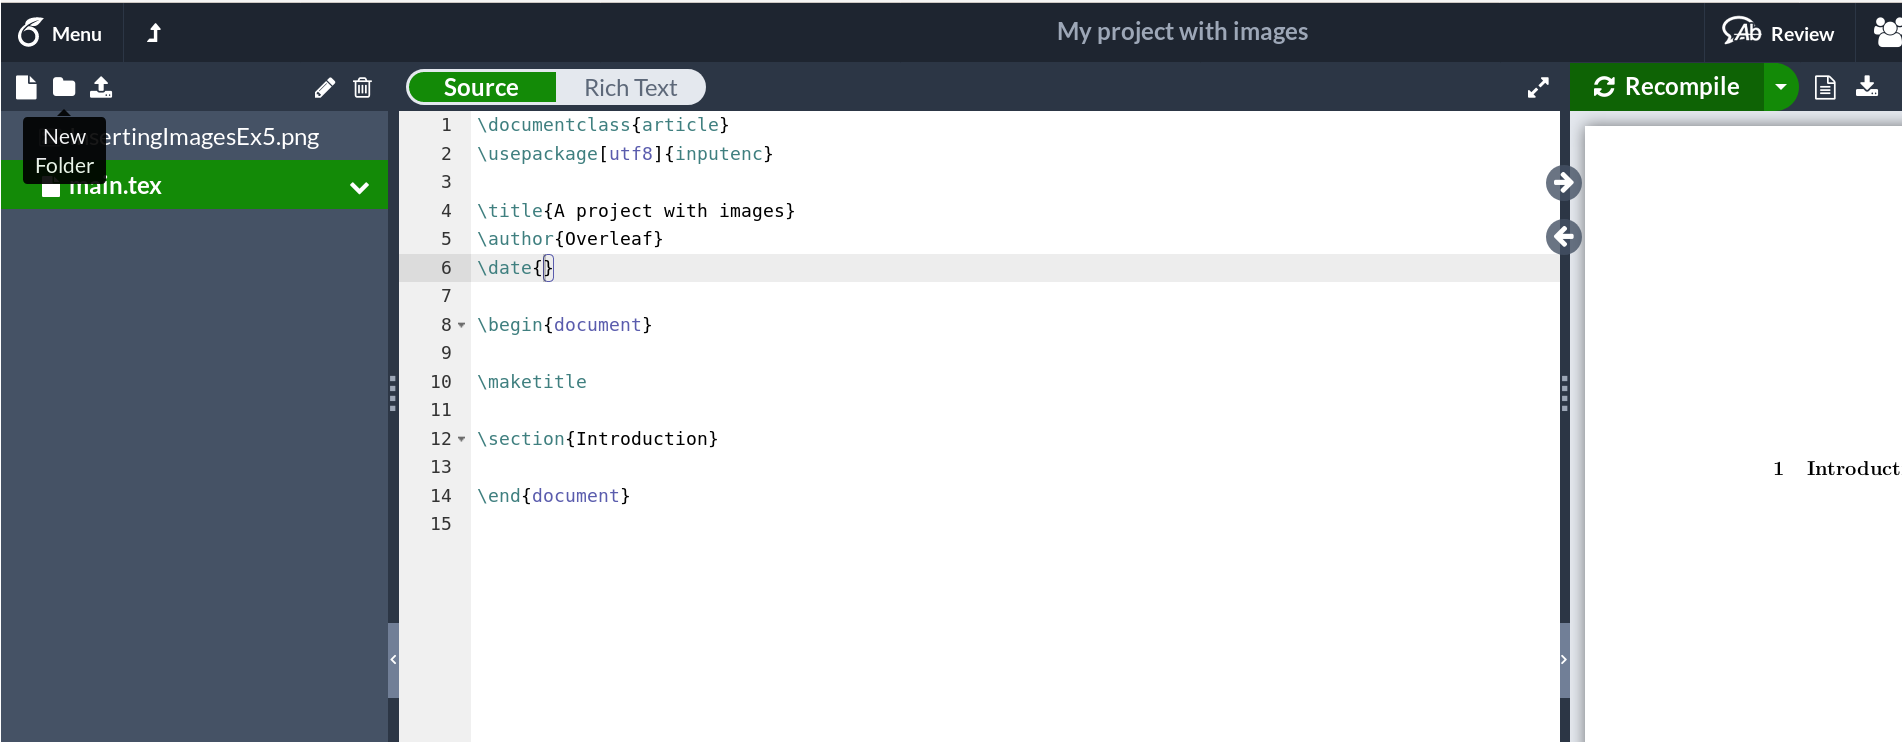
To create folders in Overleaf, go to the upper left corner of your editor and click the folder icon |
 |
|
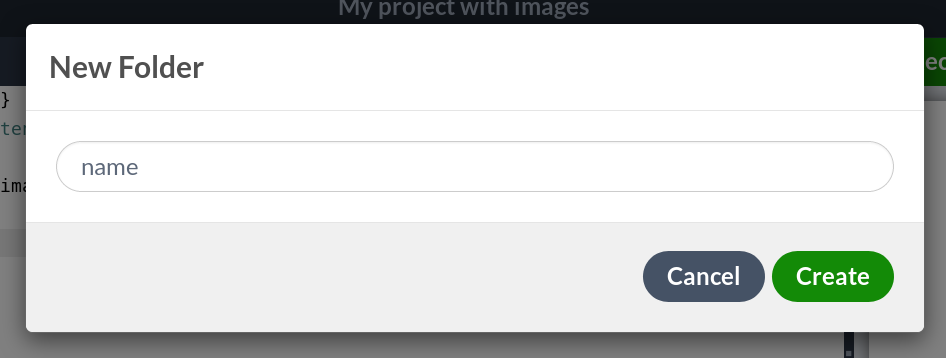
an input box will appear, set a name for your folder and click Create |
 |
|
Now you can see the folder in your left panel. You can drag and drop already uploaded files, even between folders in your left panel. |
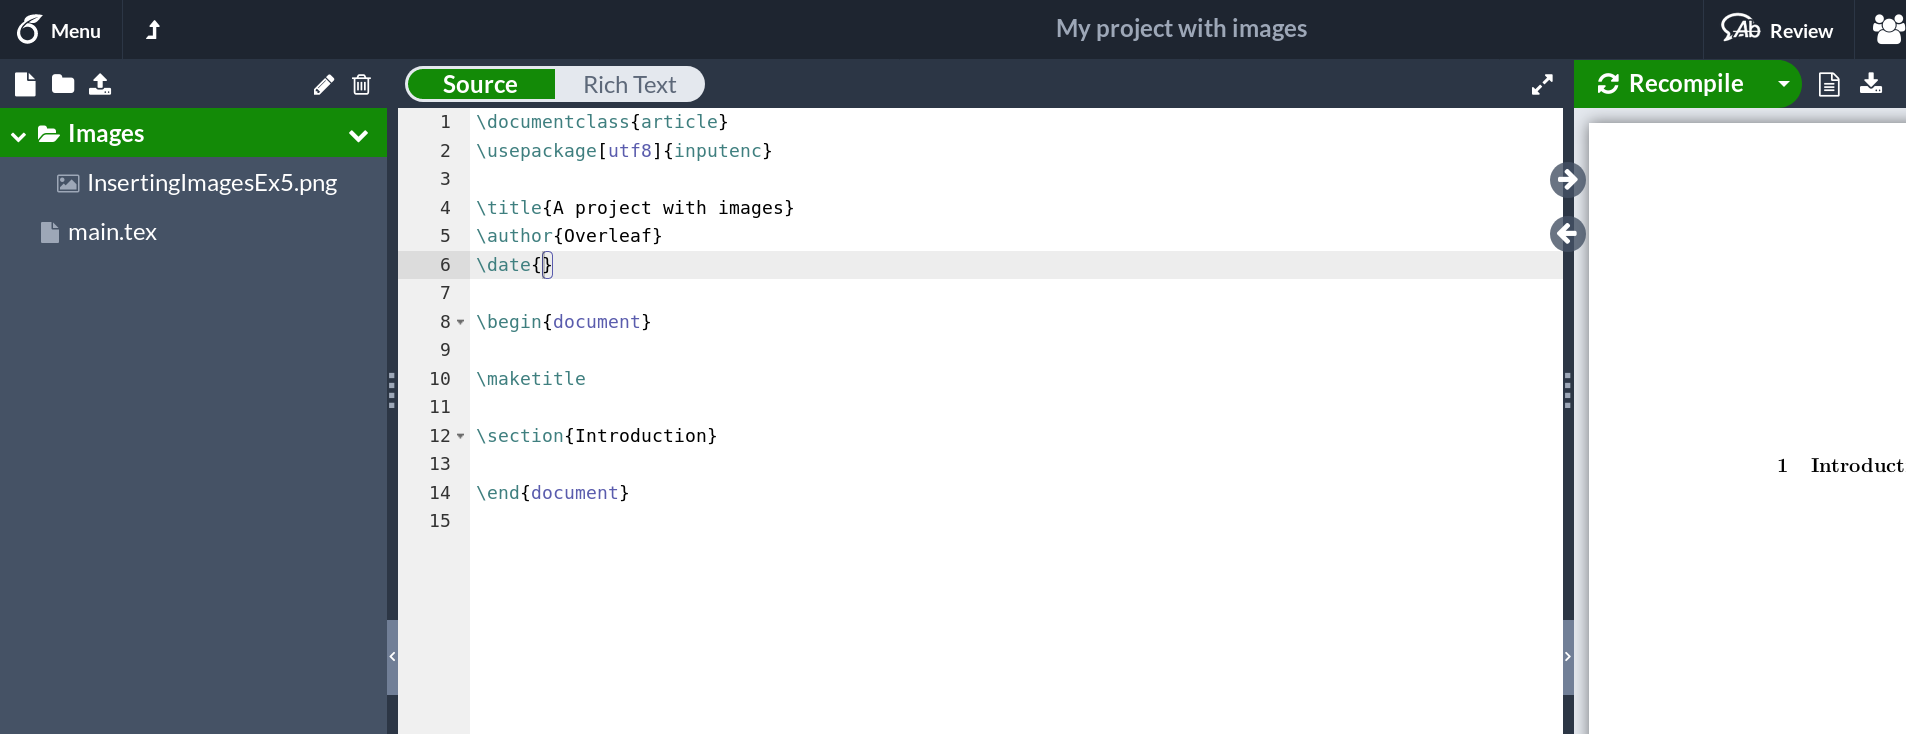 |
To upload files directly into a folder, click that folder then click on New and follow the instructions in the previous section.
Once you have some files in your folder you can use them within your document, see the example below.
\documentclass{article}
\usepackage[utf8]{inputenc}
\usepackage{graphicx}

\title{A project with images}
\author{Overleaf}
\date{}

\graphicspath{{Images/}}

\begin{document}

\maketitle

\section{Introduction}
\begin{figure}[htp]
    \centering
    \includegraphics[width=4cm]{InsertingImagesEx5}
    \caption{An image of a galaxy}
    \label{fig:galaxy}
\end{figure}

\end{document}

The command \graphicspath{ {Images/} } tells LaTeX that the images are stored in Images, now you only have to use the file name instead of the full path in \includegraphics
For more information on image management in LaTeX look in further reading for links.
Quick guide
- Quick guide to uploading one or more images into your Overleaf project:
- In the top left corner of the editor click on the upload icon, then you can either drag and drop the files or click Select files(s) to browse in your local directories. After the uploading process is complete, you can use these images in your document.
- Quick guide to uploading images into a folder:
- To create a new folder in the editor click the folder icon, set a name for your folder and click create. Now click your newly created folder and follow the process described in the previous paragraph to upload images, or drag and drop already uploaded images into your folder.
Further reading
To learn more about image manipulation in LaTeX see.
Overleaf guides
- Creating a document in Overleaf
- Uploading a project
- Copying a project
- Creating a project from a template
- Using the Overleaf project menu
- Including images in Overleaf
- Exporting your work from Overleaf
- Working offline in Overleaf
- Using Track Changes in Overleaf
- Using bibliographies in Overleaf
- Sharing your work with others
- Using the History feature
- Debugging Compilation timeout errors
- How-to guides
- Guide to Overleaf’s premium features
LaTeX Basics
- Creating your first LaTeX document
- Choosing a LaTeX Compiler
- Paragraphs and new lines
- Bold, italics and underlining
- Lists
- Errors
Mathematics
- Mathematical expressions
- Subscripts and superscripts
- Brackets and Parentheses
- Matrices
- Fractions and Binomials
- Aligning equations
- Operators
- Spacing in math mode
- Integrals, sums and limits
- Display style in math mode
- List of Greek letters and math symbols
- Mathematical fonts
- Using the Symbol Palette in Overleaf
Figures and tables
- Inserting Images
- Tables
- Positioning Images and Tables
- Lists of Tables and Figures
- Drawing Diagrams Directly in LaTeX
- TikZ package
References and Citations
- Bibliography management with bibtex
- Bibliography management with natbib
- Bibliography management with biblatex
- Bibtex bibliography styles
- Natbib bibliography styles
- Natbib citation styles
- Biblatex bibliography styles
- Biblatex citation styles
Languages
- Multilingual typesetting on Overleaf using polyglossia and fontspec
- Multilingual typesetting on Overleaf using babel and fontspec
- International language support
- Quotations and quotation marks
- Arabic
- Chinese
- French
- German
- Greek
- Italian
- Japanese
- Korean
- Portuguese
- Russian
- Spanish
Document structure
- Sections and chapters
- Table of contents
- Cross referencing sections, equations and floats
- Indices
- Glossaries
- Nomenclatures
- Management in a large project
- Multi-file LaTeX projects
- Hyperlinks
Formatting
- Lengths in LaTeX
- Headers and footers
- Page numbering
- Paragraph formatting
- Line breaks and blank spaces
- Text alignment
- Page size and margins
- Single sided and double sided documents
- Multiple columns
- Counters
- Code listing
- Code Highlighting with minted
- Using colours in LaTeX
- Footnotes
- Margin notes
Fonts
Presentations
Commands
Field specific
- Theorems and proofs
- Chemistry formulae
- Feynman diagrams
- Molecular orbital diagrams
- Chess notation
- Knitting patterns
- CircuiTikz package
- Pgfplots package
- Typesetting exams in LaTeX
- Knitr
- Attribute Value Matrices
Class files
- Understanding packages and class files
- List of packages and class files
- Writing your own package
- Writing your own class