5. ROS2
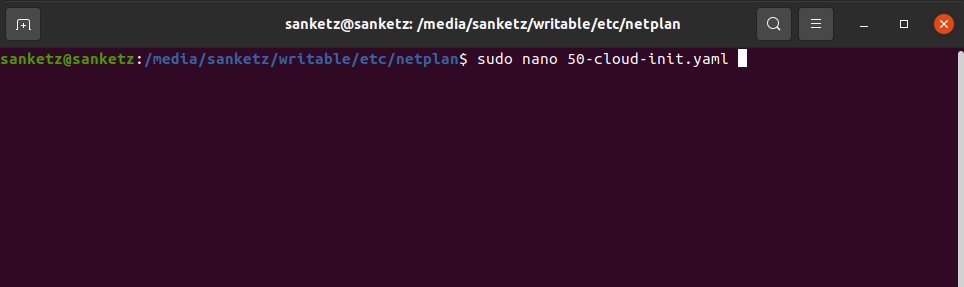
- Insert the SD card into your computer using a card reader.
- Navigate to the "writable" folder and then to "/etc/netplan/".
- Open the "50-cloud-init.yaml" file in a text editor.
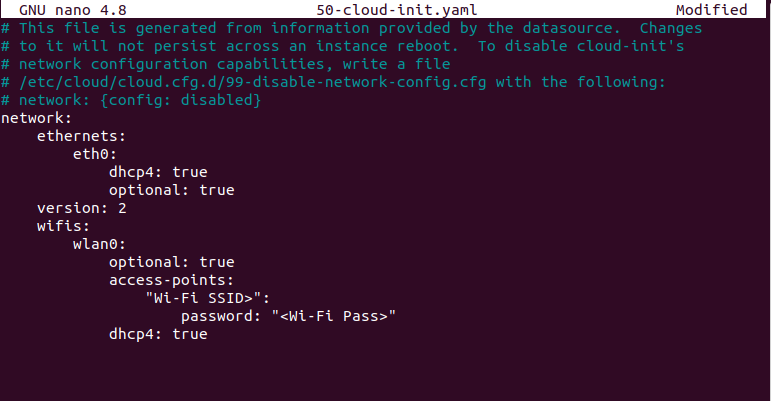
- Look for the "wifis" section in the file.
- Add the following code under the "wifis" section, replacing "ssid_name" with your WiFi name and "psd" with your WiFi password:
wlan0:
  optional: true
  access-points:
    "ssid_name":
      password: "psd"
  dhcp4: true
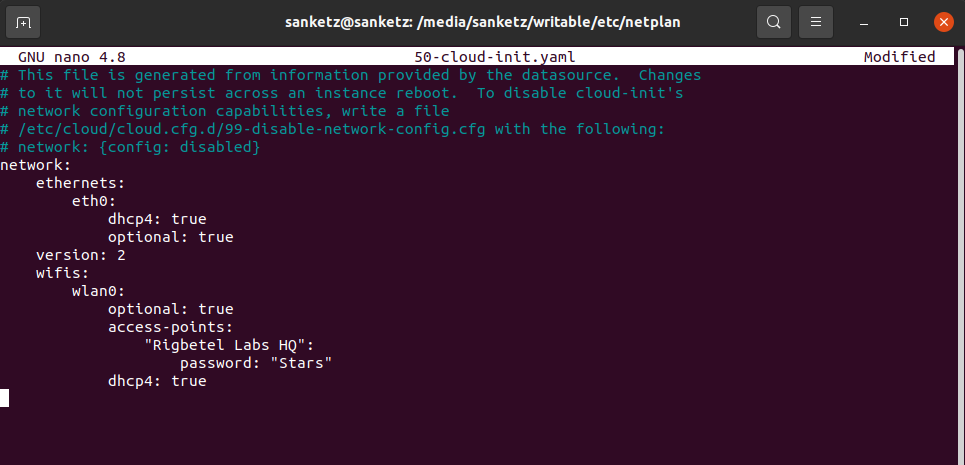
- Save the file and exit the text editor.
- Safely eject the SD card from your computer and insert it into the robot.
source /opt/ros/galactic/setup.bash
mkdir -p ~/ros2_ws/src
cd ~/ros2_ws/
colcon build
~/ros2_ws/install/setup.bash
sudo apt install ros-galactic-joint-state-publisher ros-galactic-robot-state-publisher ros-galactic-cartographer ros-galactic-cartographer-ros ros-galactic-gazebo-plugins ros-galactic-teleop-twist-keyboard ros-galactic-teleop-twist-joy ros-galactic-xacro ros-galactic-nav2* ros-galactic-urdf
cd ~/ros2_ws/src
git clone -b ros2-galactic https://github.com/rigbetellabs/tortoisebot.git
cd ~/ros2_ws/
colcon build
source /opt/ros/galactic/setup.bash
source ~/ros2_ws/install/setup.bash
Type the following command to enter the ROS2:
source /opt/ros/galactic/setup.bash
source <your workspace directory>/install/local_setup.bash
Type this command in another terminal:
ros2 launch tortoisebot_bringup bringup.launch.py use_sim_time:=True

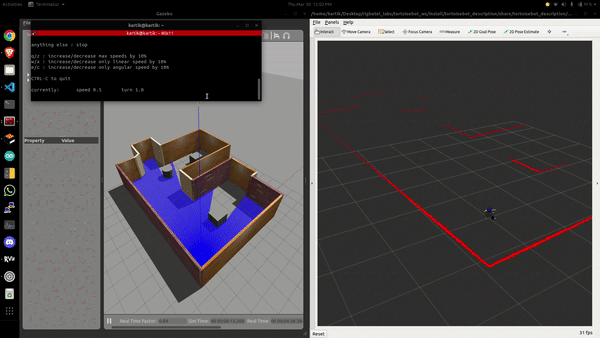
3. Look at that! You have a Tortoisebot running in Gazebo and Rviz! You can visualize its sensor data too! Now, let's get ready for teleoperation.
Type this command in another terminal:
ros2 run teleop_twist_keyboard teleop_twist_keyboard
Type this command in another terminal:
ros2 launch tortoisebot_bringup autobringup.launch.py use_sim_time:=True exploration:=True
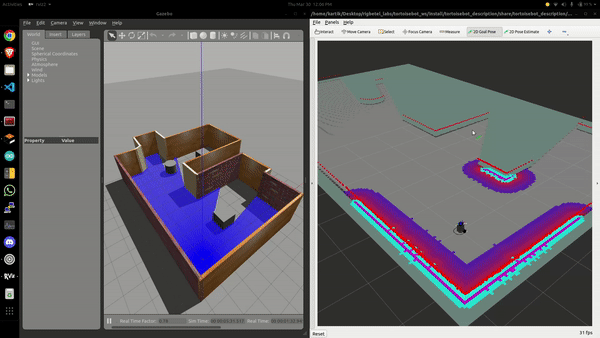
6. Woohoo! The Tortoisebot is exploring the simulated environment autonomously! You can give it a goal to navigate to as well! Check out the following image:
1. Let's now move on to simulation and SLAM! First, enter the ROS2 world by typing the following command in a new terminal:
source /opt/ros/galactic/setup.bash
source <your workspace directory>/install/local_setup.bash
Type this command in another terminal:
ros2 launch tortoisebot_bringup autobringup.launch.py use_sim_time:=True exploration:=True
3. Whoa! The Tortoisebot is now mapping the environment! You can teleoperate it to map the environment even better!
ros2 run nav2_map_server map_saver_cli -f /path_to_map/name_of_map_file.yaml
You'll be able to see something similar to this on your terminal:
kartik@kartik:~/Desktop/rigbetel_labs/tortoisebot_ws$ ros2 run nav2_map_server map_saver_cli -f /home/kartik/Desktop/rigbetel_labs/tortoisebot_ws/src/tortoisebot/tortoisebot_bringup/maps/room2.yaml
[INFO] [1680187250.898838998] [map_saver]:
  map_saver lifecycle node launched.
  Waiting on external lifecycle transitions to activate
  See https://design.ros2.org/articles/node_lifecycle.html for more information.
[INFO] [1680187250.898933015] [map_saver]: Creating
[INFO] [1680187250.899004279] [map_saver]: Saving map from 'map' topic to '/home/kartik/Desktop/rigbetel_labs/tortoisebot_ws/src/tortoisebot/tortoisebot_bringup/maps/room2.yaml' file
Every time you open a new terminal, enter the ROS2 world and workspace again by typing:
source /opt/ros/galactic/setup.bash
source <your workspace directory>/install/local_setup.bash
That's it! Have fun exploring and mapping with the Tortoisebot!
Here's a guide to help you connect with your real robot and have some fun exploring its capabilities.
The first step is to obtain the IP address of your robot. Don't worry, it's not as complicated as it sounds. Check out the picture below for a step-by-step guide on how to obtain the IP address.

Once you have the IP address, use the command below to connect with your real robot on your PC terminal:
- Password: raspberry
galactic
ros2 launch tortoisebot_bringup bringup.launch.py use_sim_time:=False
And voila! Your tortoisebot is up and running! Now let's command the robot to move using our PC!
source /opt/ros/galactic/setup.bash
source <your workspace directory>/install/local_setup.bash
Enter the following command on the PC terminal:
ros2 run teleop_twist_keyboard teleop_twist_keyboard
ros2 run tortoisebot_control teleop_twist_keyboard
And now you can see your tortoisebot move as you wish!
ros2 launch tortoisebot_description rviz.launch.py
galactic
ros2 launch tortoisebot_bringup autobringup.launch.py use_sim_time:=False exploration:=True
The tortoisebot has now started mapping the environment! You can visualize it and follow this:
source /opt/ros/galactic/setup.bash
source <your workspace directory>/install/local_setup.bash
ros2 launch tortoisebot_description rviz.launch.py

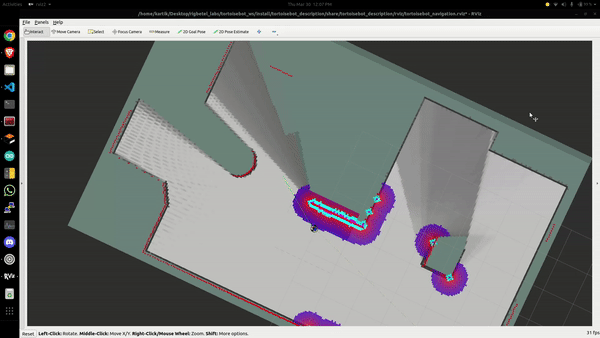
Whoa! The Tortoisebot is now mapping the environment! You can now teleoperate it to map the environment, or something even cooler! Try providing a goal to your Tortoisebot using the 'Nav2 Goal' button on the Rviz screen to see your robot move autonomously!
galactic
ros2 run nav2_map_server map_saver_cli -f /path_to_map/name_of_map_file.yaml
ros2 launch tortoisebot_bringup autobringup.launch.py use_sim_time:=False exploration:=False map:=/home/../map_file_name.yaml
- Note: Make sure the tortoisebot is placed at approximately the same position as when it was while starting the mapping
source /opt/ros/galactic/setup.bash
source <your workspace directory>/install/local_setup.bash
ros2 launch tortoisebot_description rviz.launch.py
*** If using multiple robots set separate Domain Id for each robot using the below command for separate control ***
export ROS_DOMAIN_ID=0