3. ROS Melodic
If using a Virtual Machine image:
- Download this specific pre-setup Virtual machine Image which is zipped and then unzip into a folder on your PC.
- Download and open VMware Workstation Player
- Choose 'Open a Virtual Machine'
- Select the downloaded 'TortoiseBot by RigBetel Labs.ovf' file, making sure all the downloaded files are in the same directory from where you open the '.ovf' file.
- username: rigbetellabs
- password: tortoisebot
If you are already using the SD card provided in the TortoiseBot package, you can skip this step. But if you're building your own TortoiseBot, or have managed to screw up the inbuilt OS provided in the TortoiseBot package then you can use this step to load up the Raspberry Pi Image on your SD card.
Step 1: - Download the Raspberry Pi Image
Step 2: Open the Imager software and you will see a window pop up like below.
Step 3: Click on the choose OS drop-down and navigate to the bottom to find the use custom image from your computer option.
Step 4: Navigate to the location where the image file is downloaded and click open.
Step 5: Now go to the storage option and click on your SD card as shown.
Step 6: Now click on write, wait for a few moments before the OS is loaded to the SD card properly, and then you're good to go.
This step is important so that your TortoiseBot will know your Wi-Fi Name and Password and will connect to it automatically whenever you start it in order to operate. By connecting to Wi-Fi, you can either use SSH communication from your PC's terminal to access the robot and give it commands or directly use VNC Viewer to have a complete Desktop Experience of TortoiseBot on your PC.
For this step you will need:
- SD Card
- Card Reader
- A PC with Windows/Mac/Ubuntu OS
Follow along the following steps:
-
Remove the SD Card you got in your Raspberry Pi and put it into the appropriate slot in the USB Card Reader that came with your kit.
-
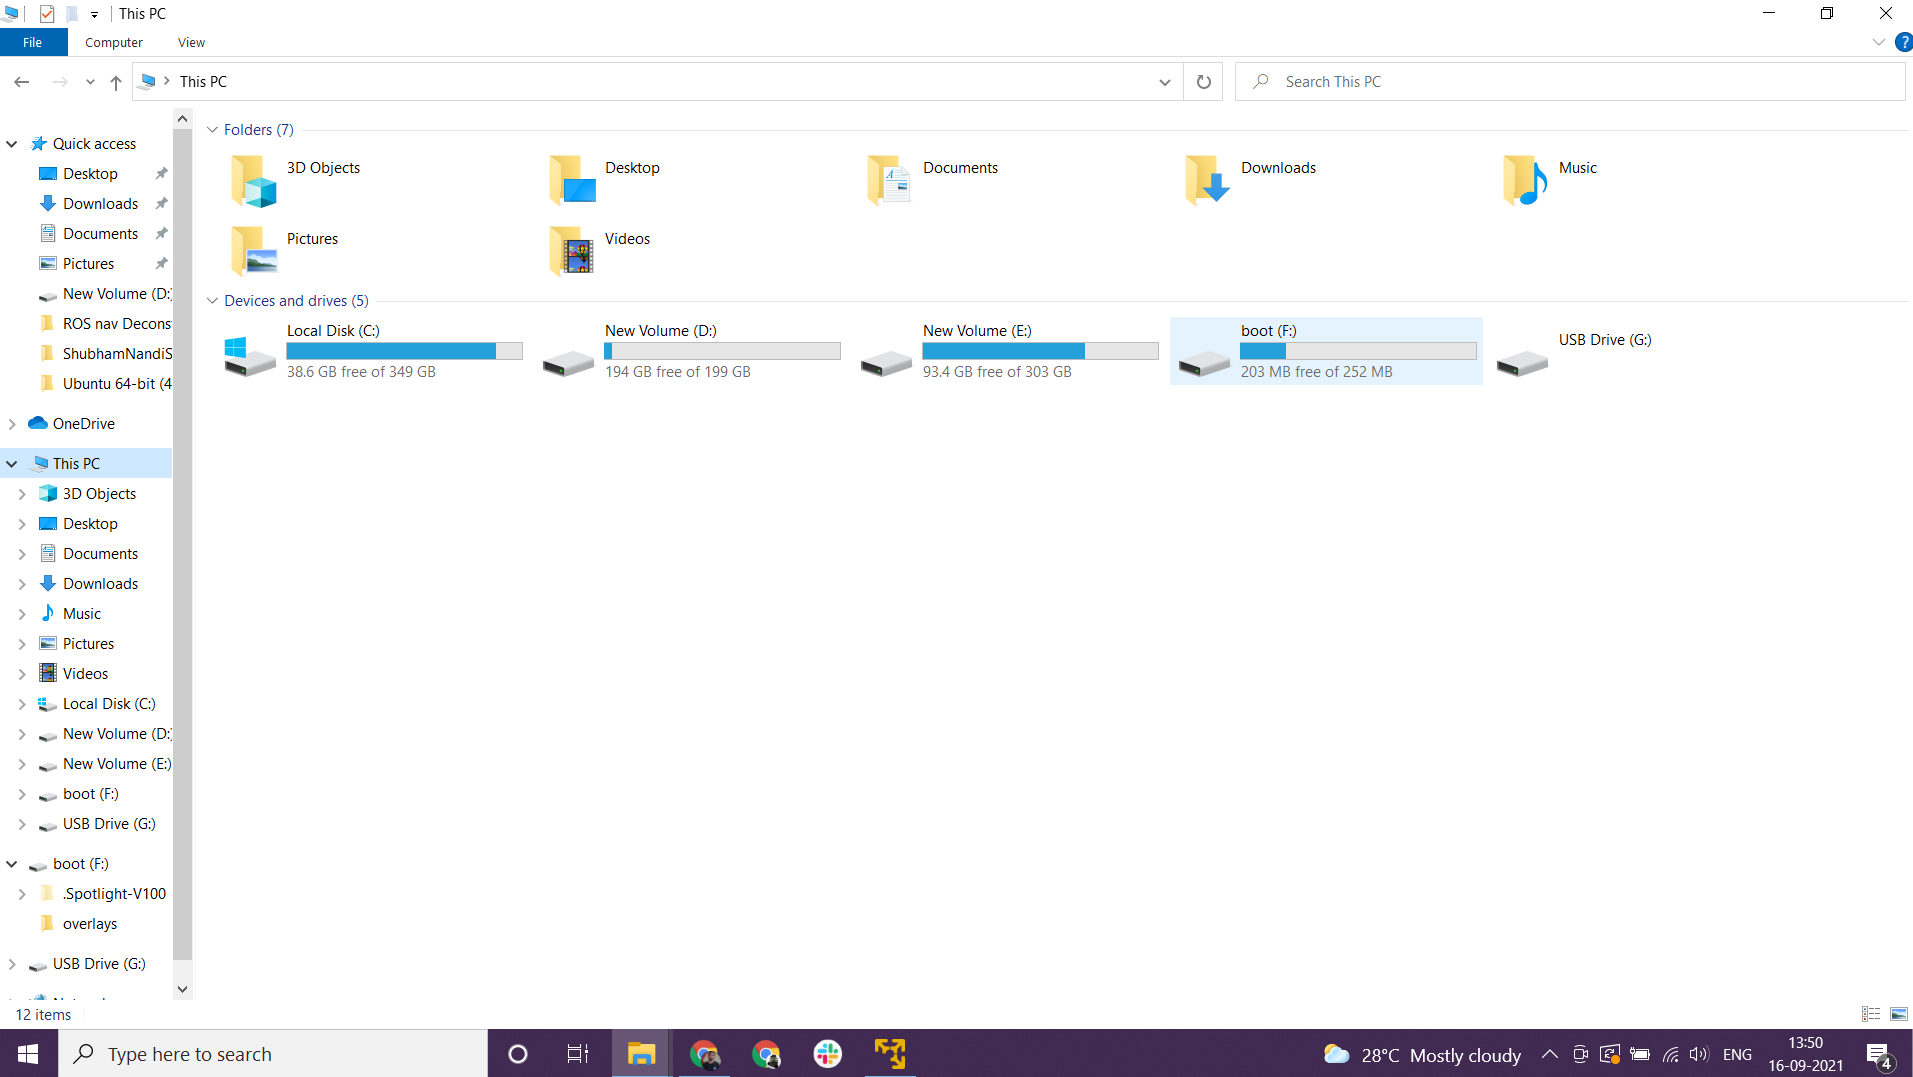
Plug the USB Card Reader into your PC. You will see a drive named 'boot'
-
Navigate Into Boot from your Pi SD Card
-
Then, make sure you check the 'View Extensions' as shown in the image

-
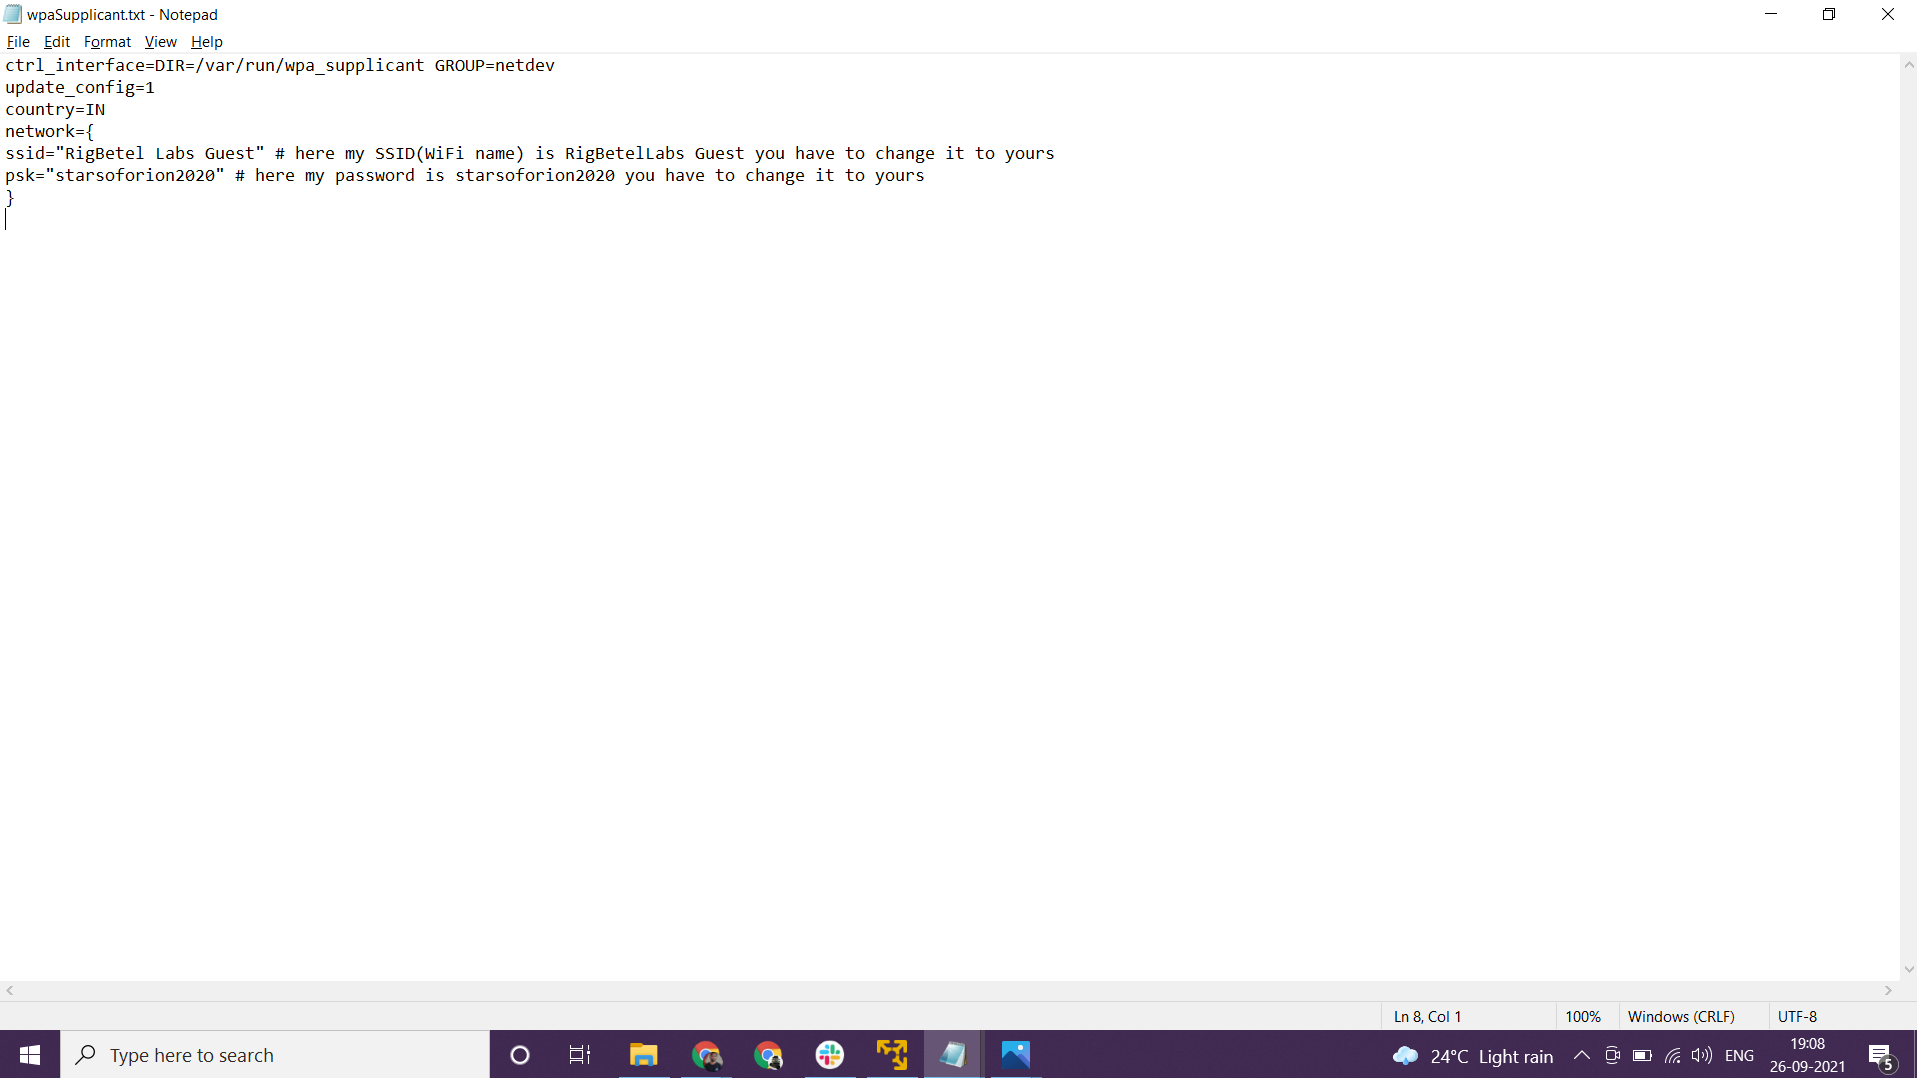
Create a new Text file and name it 'ssh'


- Create another new text file and name it 'wpa_supplicant.conf'

- In this wpa_supplicant.conf text file copy paste the below code and change the WIFI name and Password respectively
ctrl_interface=DIR=/var/run/wpa_supplicant GROUP=netdev
update_config=1
country=IN
network={
    ssid="RigBetel Labs Guest" # here my SSID(WiFi name) is RigBetelLabs Guest you have to change it to yours
    psk="starsoforion2020" # here my password is starsoforion2020 you have to change it to yours
}
- Now place the SD Card back in Raspberry Pi and power up your ROBOT!
- Use the Android App to Find IP Open the app and Scan the network; the app will capture all the registered devices with your Network

Look for the Raspberry IP address and use it to log into the VNC

- Use the WIFI default gateway Open the Network Section and look for the Raspberry IP Address

- Use it to log into the VNC, by first entering the IP of raspberry pi
- Then enter the username as pi and password as raspberry

source /opt/ros/noetic/setup.bash
mkdir -p ~/catkin_ws/src
cd ~/catkin_ws/
catkin_make
~/catkin_ws/devel/setup.bash
sudo apt-get install ros-melodic-joy ros-melodic-teleop-twist-joy ros-melodic-teleop-twist-keyboard ros-melodic-amcl ros-melodic-map-server ros-melodic-move-base ros-melodic-urdf ros-melodic-xacro ros-melodic-rqt-image-view ros-melodic-gmapping ros-melodic-navigation ros-melodic-joint-state-publisher ros-melodic-robot-state-publisher ros-melodic-slam-gmapping ros-melodic-dwa-local-planner ros-melodic-joint-state-publisher-gui ros-melodic-cartographer-ros ros-melodic-cartographer-rviz
cd ~/catkin_ws/src
git clone https://github.com/rigbetellabs/tortoisebot.git
cd ~/catkin_ws/
catkin_make
source /opt/ros/noetic/setup.bash
source ~/catkin_ws/devel/setup.bash
Pre-requisites: Must have ROS installed!!
For communication with the TortoiseBot we need to establish a Master-Slave Communication. This can be done in either of the two ways:
- Opening the .bashrc file manually
- Open the home directory of your Raspberry Pi.
- Press Ctrl + H to unhide the files as .bashrc is a hidden file
- Add the below commands at the end of .bashrc
export ROS_MASTER_URI=http:https://{ip of TortoiseBot}:11311
export ROS_HOSTNAME={ip of TortoiseBot}
- Please change the {ip of TortoiseBot} section with the IP address of your TortoiseBot found earlier.
- Save and exit the file
- Or by using a Terminal
- Open a new terminal on your Raspberry Pi.
- Copy the following commands and paste them into the terminal.
- Change the IP address section with your robot's IP and hit enter to execute them.
echo "export ROS_MASTER_URI=http:https://{ip of TortoiseBot}":11311 >> ~/.bashrcecho "export ROS_HOSTNAME={ip of TortoiseBot}" >> ~/.bashrcOnce done restart your existing terminals
Pre-requisites: Must have ROS installed!!
For communication with the TortoiseBot we need to establish a Master-Slave Communication between TortoiseBot and our system.
This can be done in either of the two ways:
- Opening the .bashrc file manually
- Open the home directory of your system (Laptop / PC / VM).
- Press Ctrl + H to unhide the files as .bashrc is a hidden file
- Add the below commands at the end of .bashrc
export ROS_MASTER_URI=http:https://{ip of TortoiseBot}:11311
export ROS_HOSTNAME={ip of System}
- Please change the {ip of TortoiseBot} section with the IP address of your TortoiseBot found earlier.
- And please change the {ip of system} section with the IP address of your Laptop/PC.
- Save and exit the file
- Or by using a Terminal
- Open a new terminal on your system (Laptop / PC / VM).
- Copy the following commands and paste them into the terminal.
- Change the IP address section with your robot and system's IP appropriately and hit enter to execute them.
echo "export ROS_MASTER_URI=http:https://{ip of TortoiseBot}":11311 >> ~/.bashrcecho "export ROS_HOSTNAME={ip of System}" >> ~/.bashrcOnce done restart your existing terminals
Let us explore some applications of TortoiseBot and understand how to perform Mapping, SLAM, etc on it.
Let's first start with setting up the Simulation and getting a gist of the surrounding. This is not a necessary step, but we recommend it so that you get a complete 3D View of the surroundings and understand it.
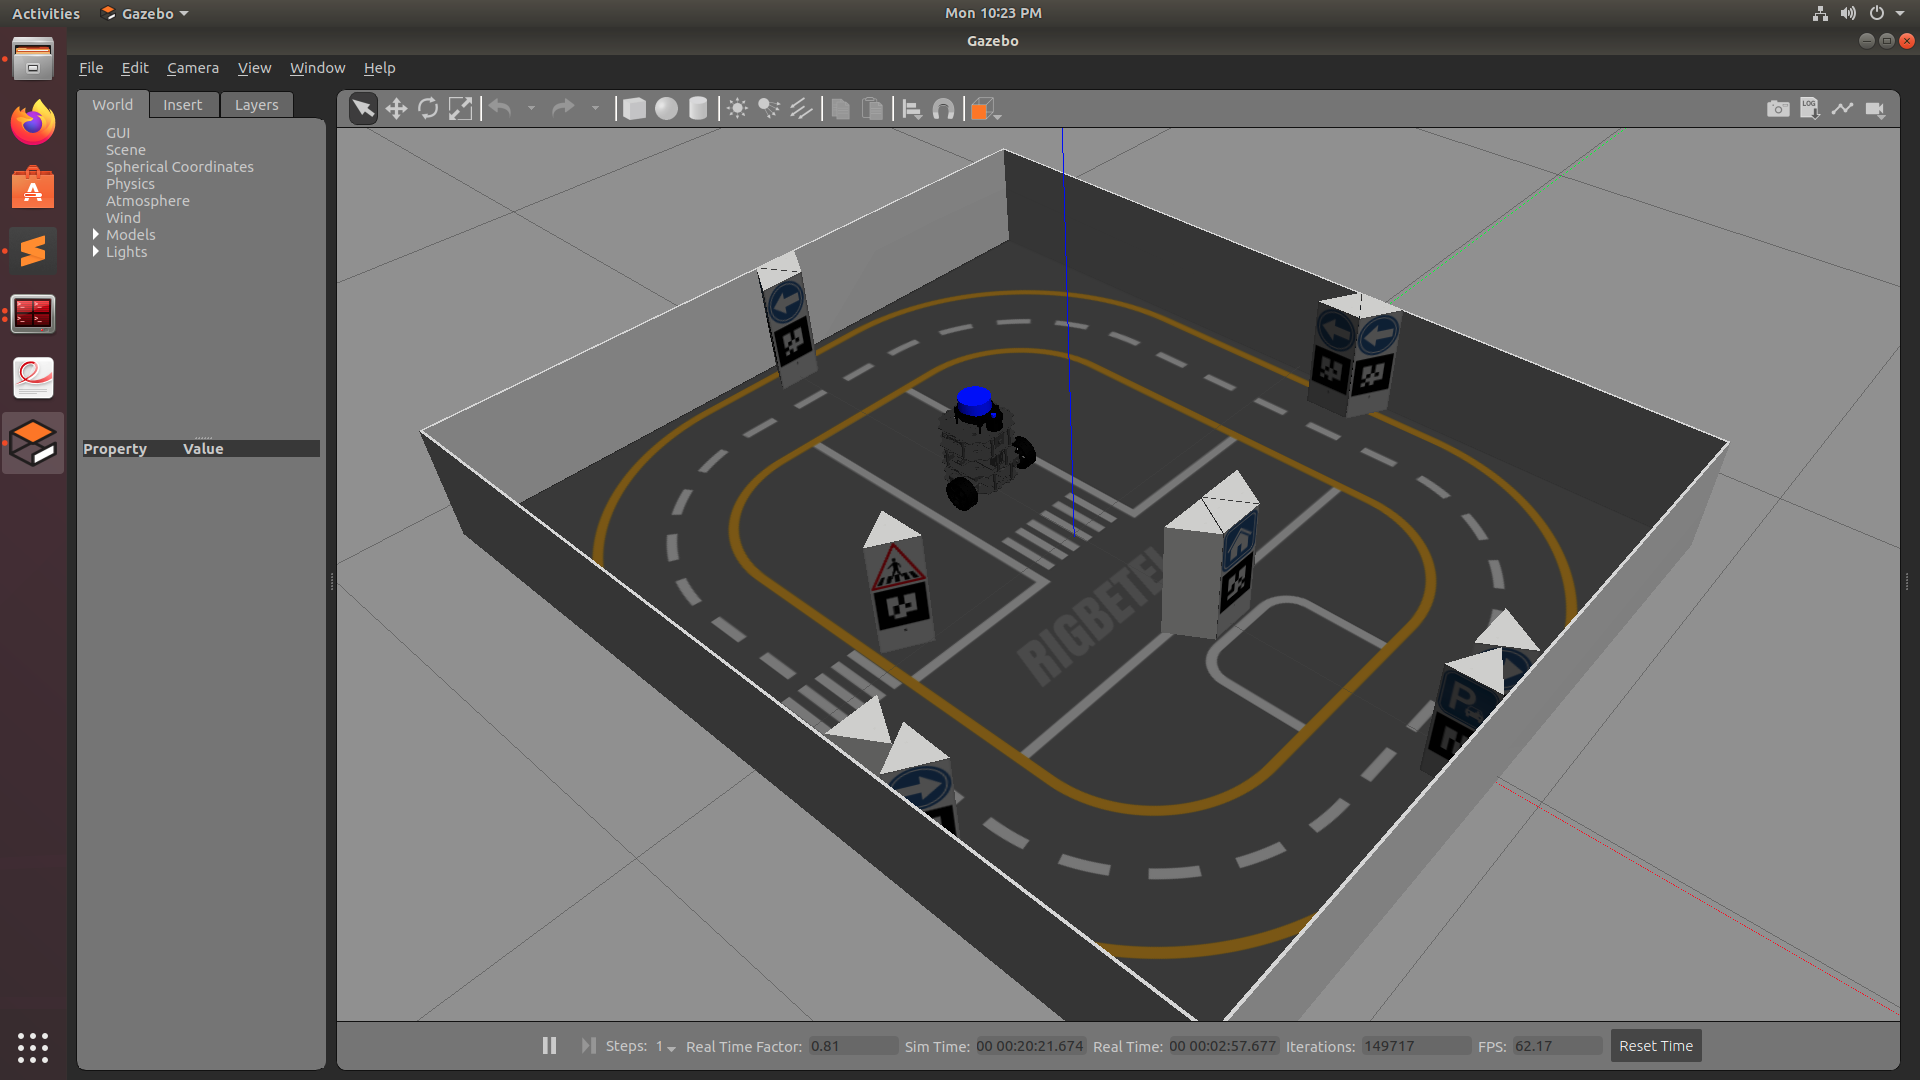
First, **run roscore in the first terminal
roscoreThen, open up second terminal and type the following command:
roslaunch tortoisebot_gazebo tortoisebot_playground.launchThis will launch up the simulation in Gazebo and you can view it from all sides. To pan, the simulation world left-click and move the mouse around. And to orbit, either press the scroll button or else press Shift+LeftMouseButton and move around.
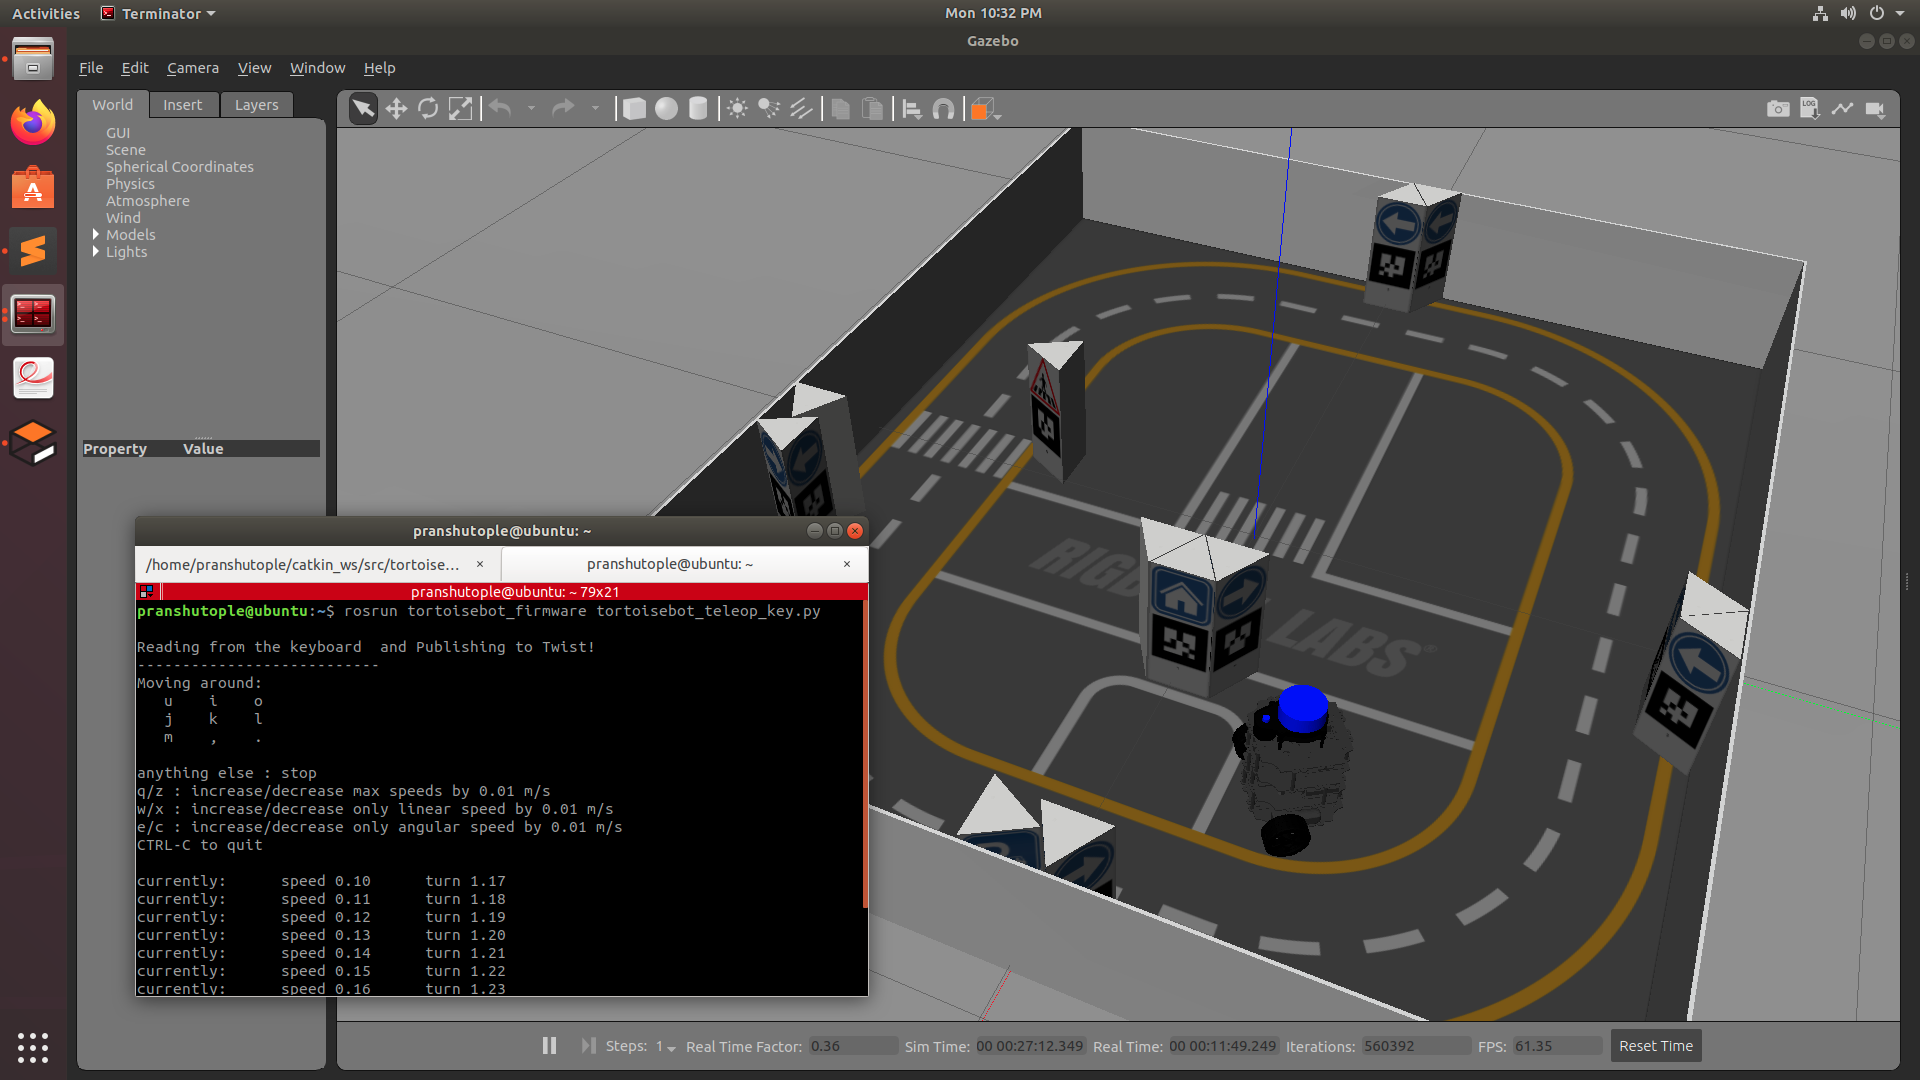
If you now wish to move the robot around in the Simulation, you can open up a new terminal and type in:
rosrun tortoisebot_control tortoisebot_teleop_key.pyand then control the robot using the keys printed on the terminal to move the robot around.
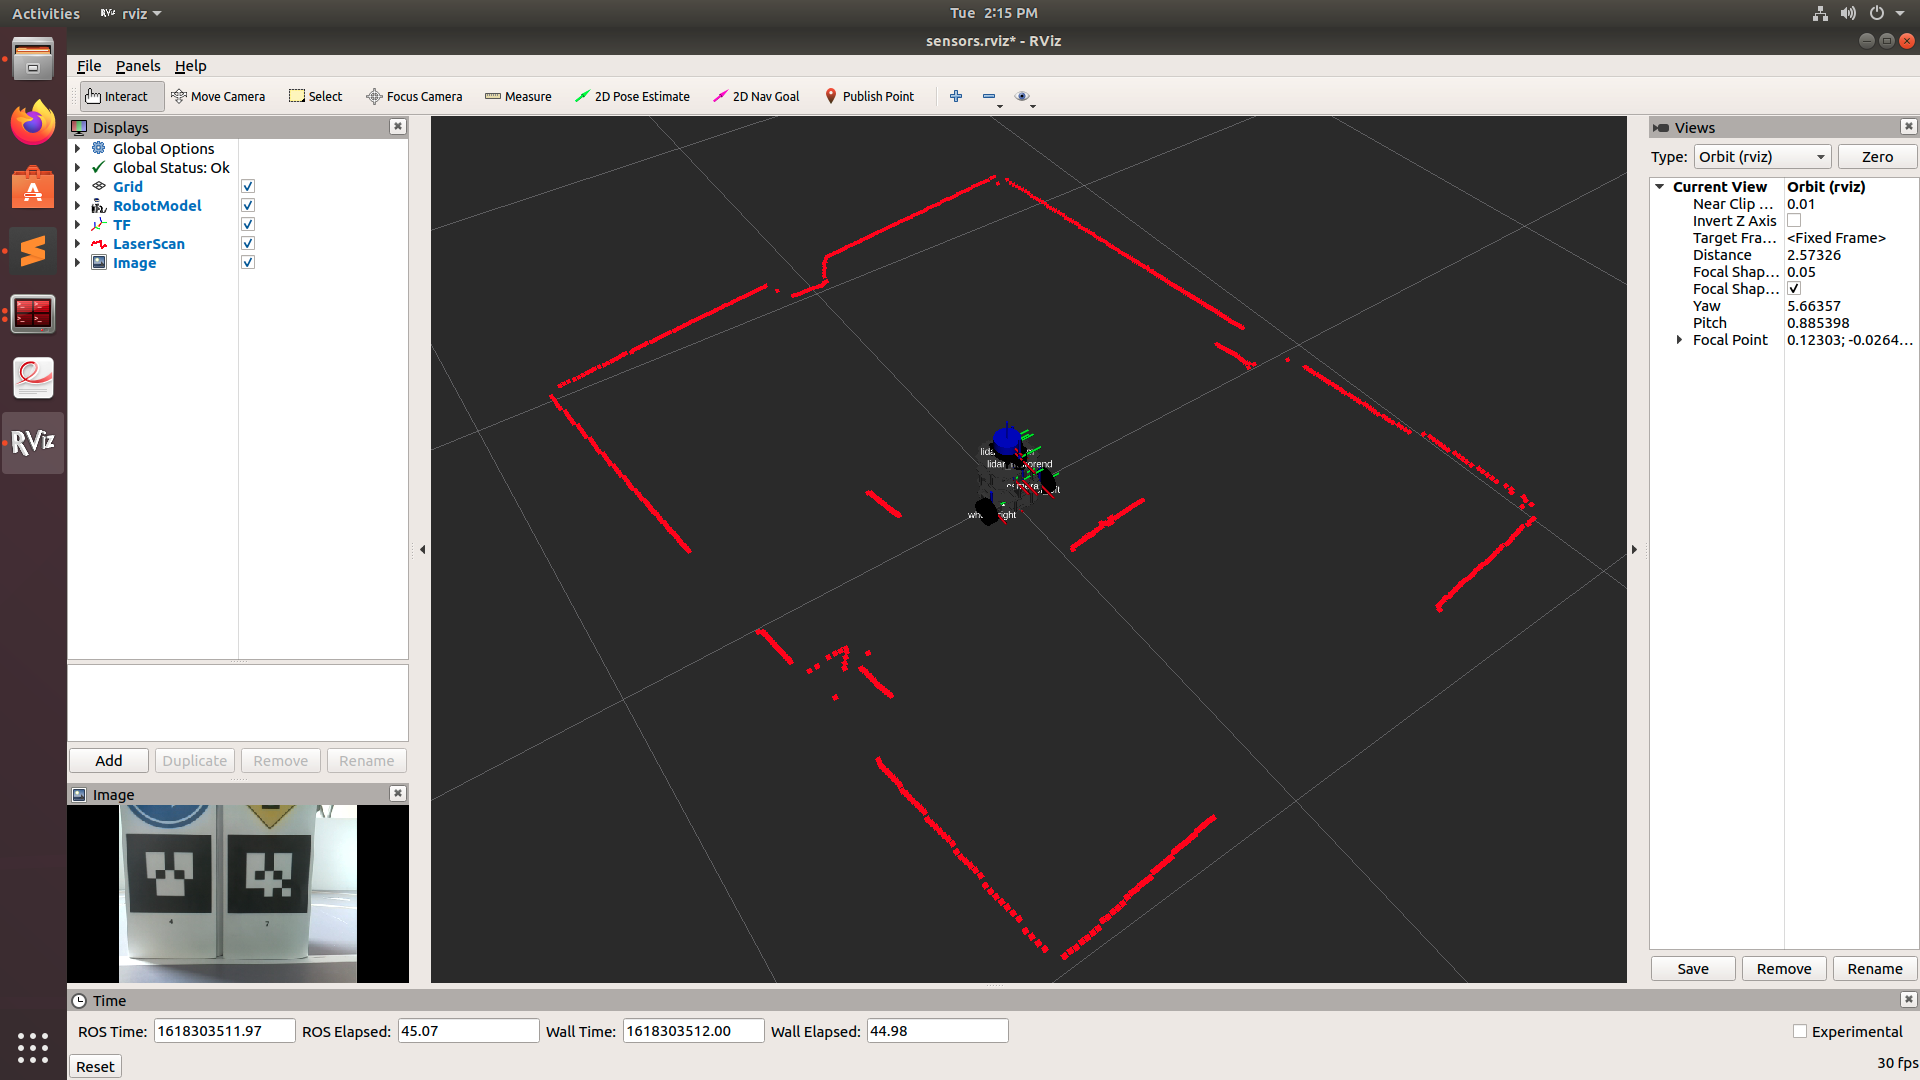
Now that everything is set up, you can visualize data from various sensors on your robot like LiDAR and Camera. To visualize the data, we will be using RViz. To open up RViz, run the following command on your PC's terminal
roslaunch tortoisebot_slam view_sensors.launchThis will open up RViz with all the robot models, tf tree, laser scan data, and image view from the camera. If you wish, you can uncheck certain boxes to remove the visualization of certain sensors.
WARNING: Do not change the size of the image view in RViz.
Suggestion: Unchecking the image view will put less load on your Robot
If you wish to always see the camera view and be able to change the position and size of the window, then you can view it using Image View. To run that, open up a new terminal on your pc and type:
rosrun image_view image_view image:=/raspicam_node/image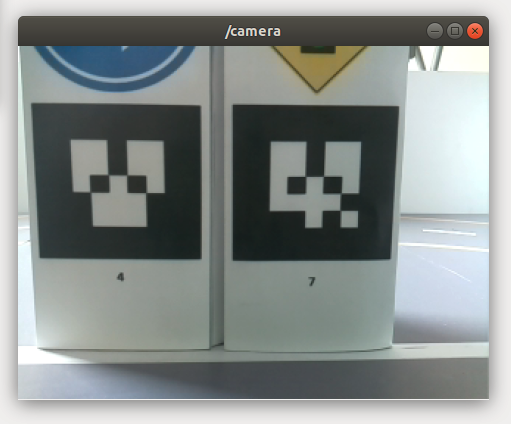
This will open up a new camera window that shows a live feed from Robot's camera. You can make it to always view it on top by right-clicking on the Menu bar and then selecting the always on top option. You can now move your robot in real-world and explore through its camera view using the same teleoperation command as given above:
rosrun tortoisebot_control tortoisebot_teleop_key.py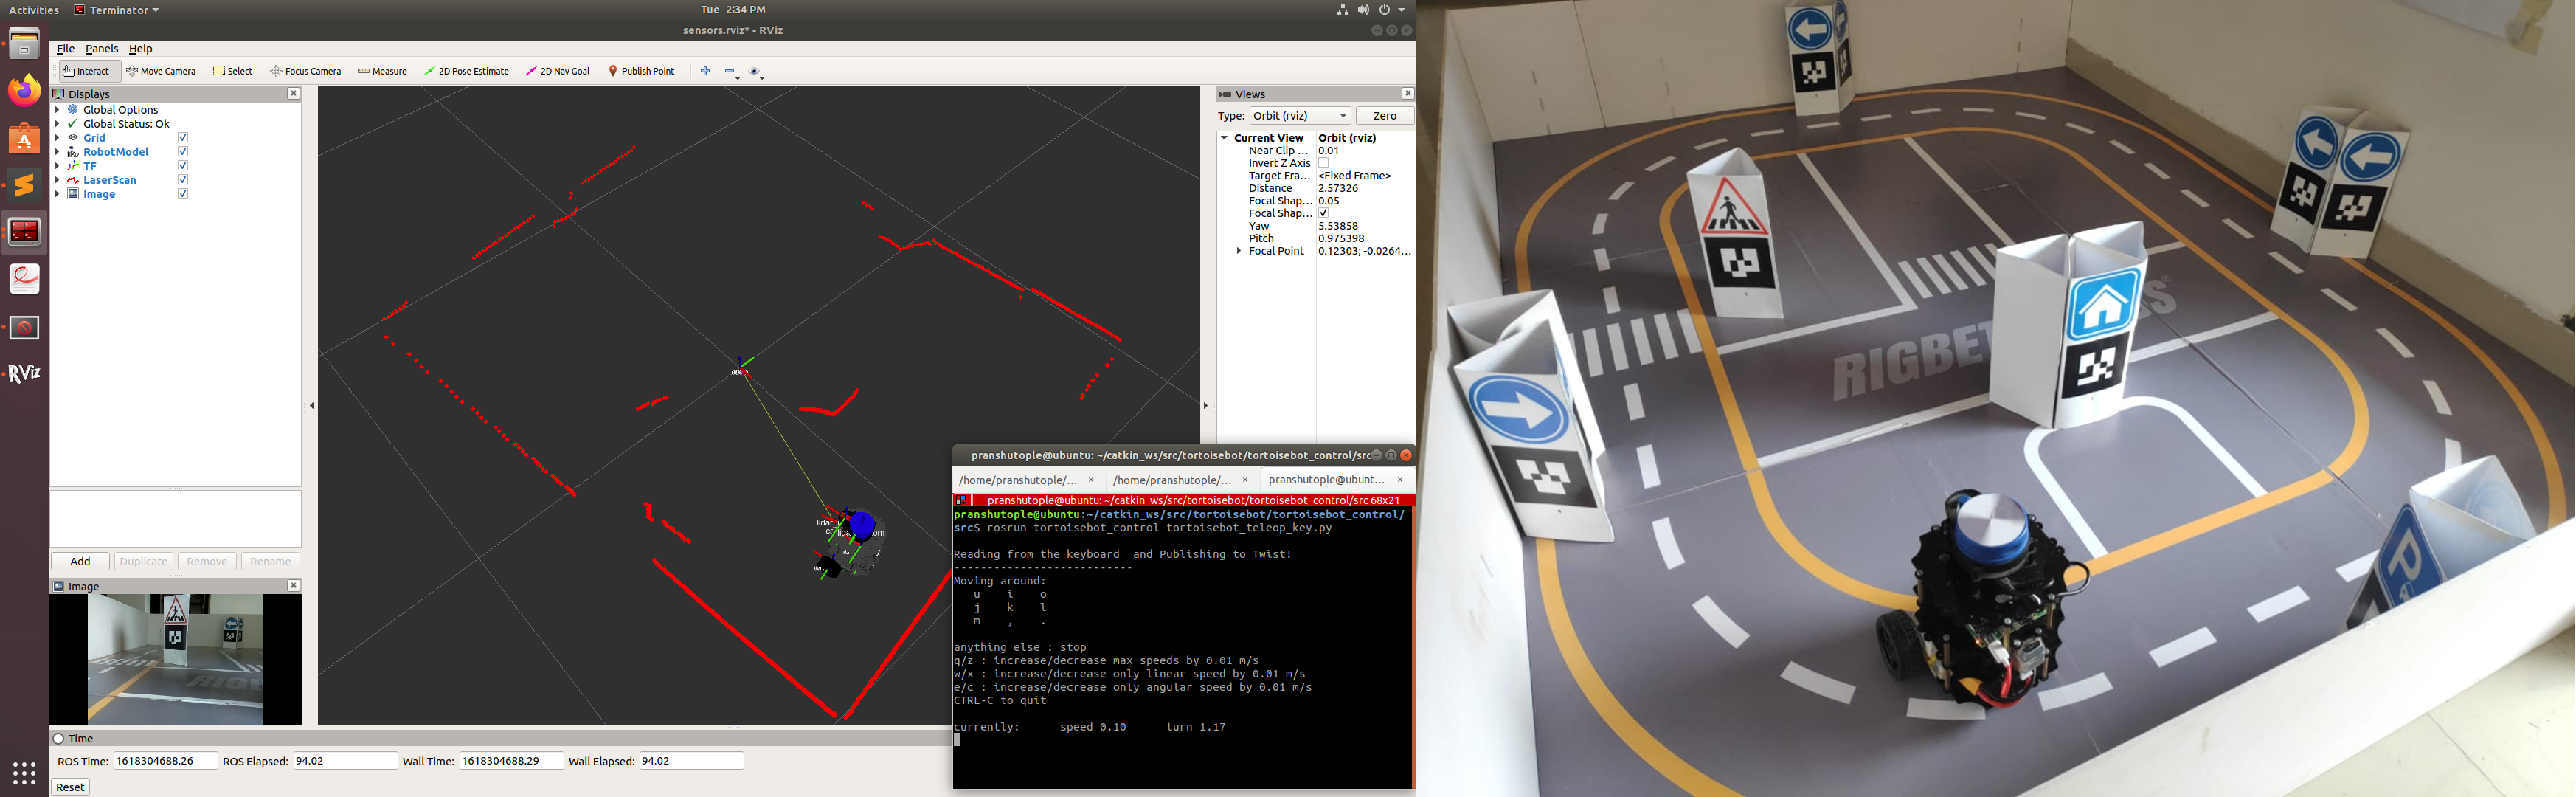
To generate a map of the surrounding, first, run the bringup.launch on Robot's terminal
First, **run roscore in the first terminal
roscoreThen, open up second terminal and type the following command:
roslaunch tortoisebot_gazebo tortoisebot_playground.launchThen run server_bringup.launch on the second terminal
roslaunch tortoisebot_firmware server_bringup.launchThen in another terminal launch tortoisebot_slam.launch using:
roslaunch tortoisebot_slam tortoisebot_slam.launchThis will launch RViz which will be generating Map on the basis of the LiDAR scan that is been received.

Now you can start the TortoiseBot teleoperation node in another terminal and move the robot around to make the complete map of the surrounding.
rosrun tortoisebot_control tortoisebot_teleop_key.py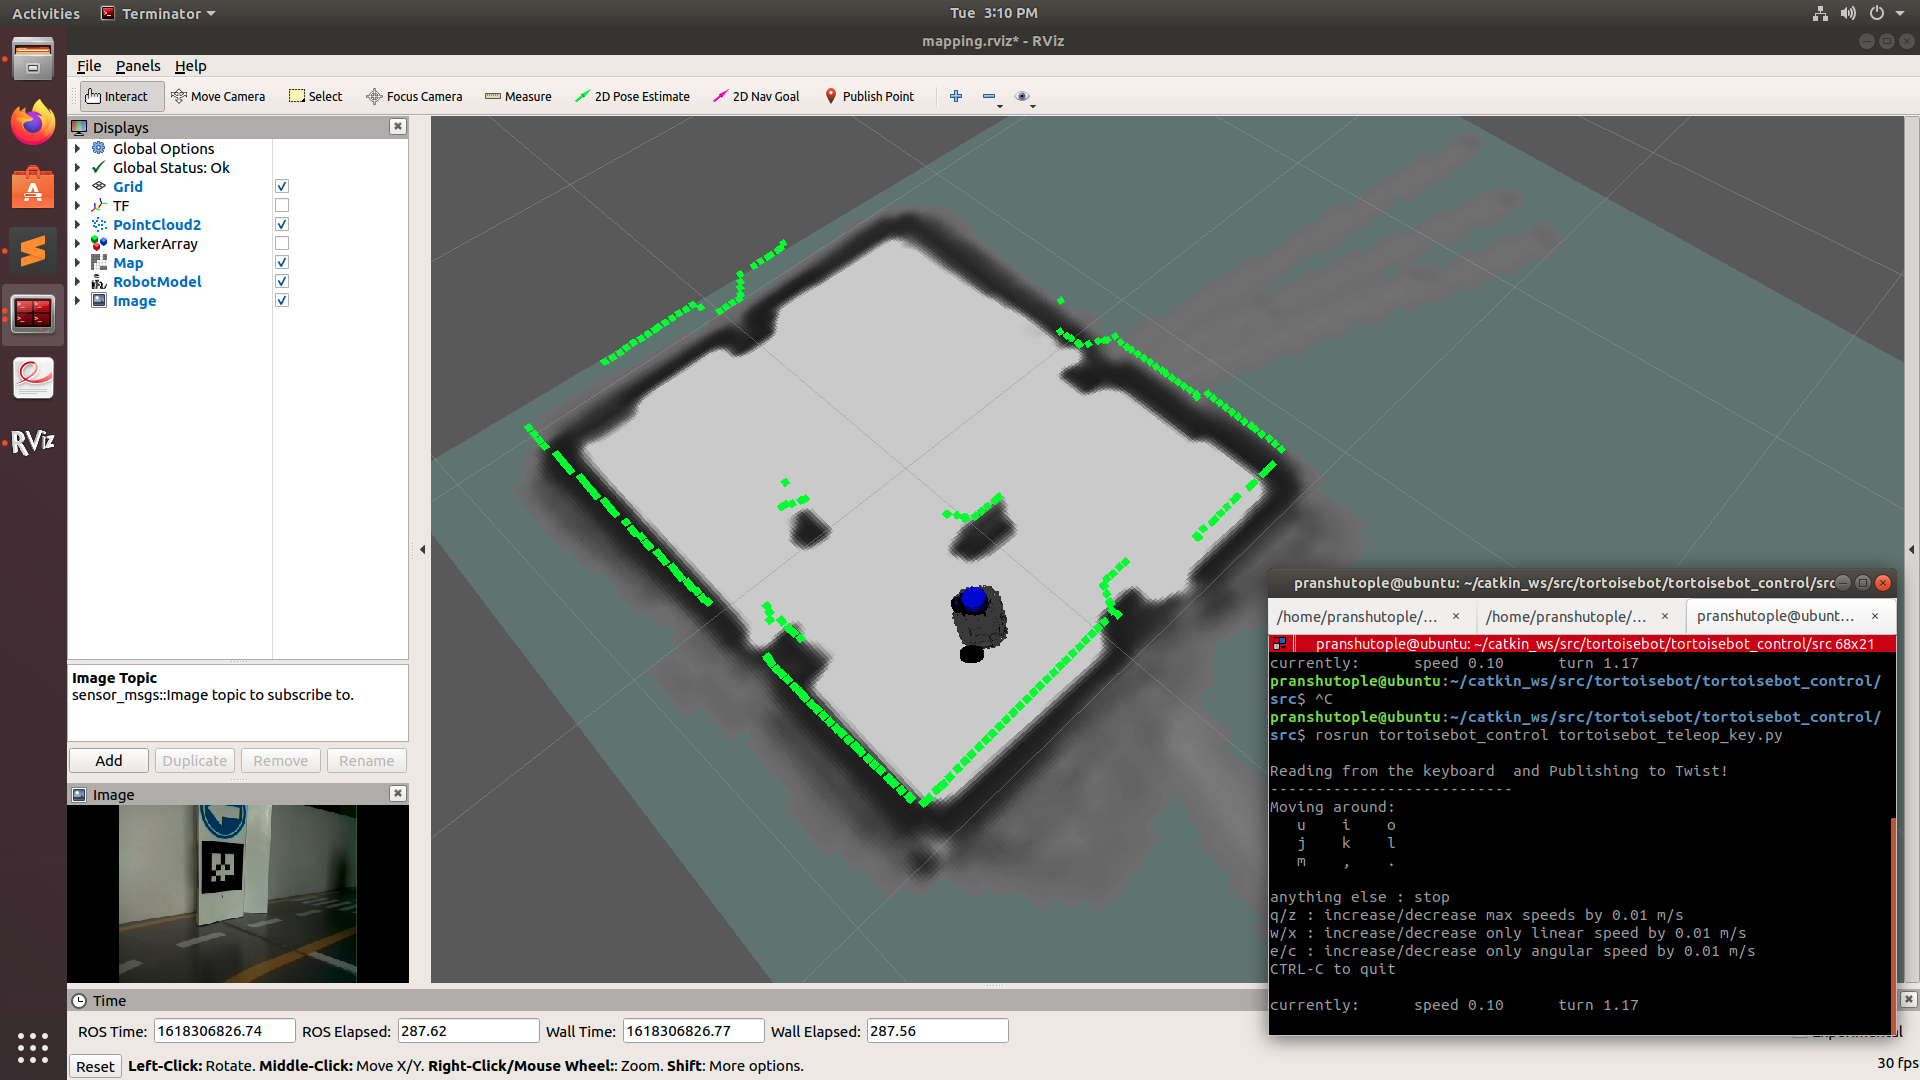
Navigate to the tortoisebot_navigation package and open up the maps folder. Right-click and select an option to open a terminal in a specific location. Make sure you are inside the maps directory on your terminal. You can run the following command in that terminal to save the generated map inside the maps folder. You can replace the "my_map" with whatever name you want.
rosrun map_server map_saver -f my_mapNow a pgm and yml file of your map will be created in the maps folder
Once we have generated our map, we are all set to automatically navigate our robot in the surrounding without any human intervention. To run the autonomous navigation script, first, make sure your robot is placed just on the central zebra crossing and then run the following command on the robot's terminal to start the robot.
First, **run roscore in the first terminal
roscoreThen, open up second terminal and type the following command:
roslaunch tortoisebot_gazebo tortoisebot_playground.launchThen run server_bringup.launch on the PC
roslaunch tortoisebot_firmware server_bringup.launchThen in another terminal launch the autonomous navigation launch file using:
roslaunch tortoisebot_navigation tortoisebot_navigation.launchIf you wish to start navigation in a map file that you created, run the same launch file with a parameter giving the name of your map. For example, if the name of my map is "my_map" then I will run:
roslaunch tortoisebot_navigation tortoisebot_navigation.launch map_file:=my_map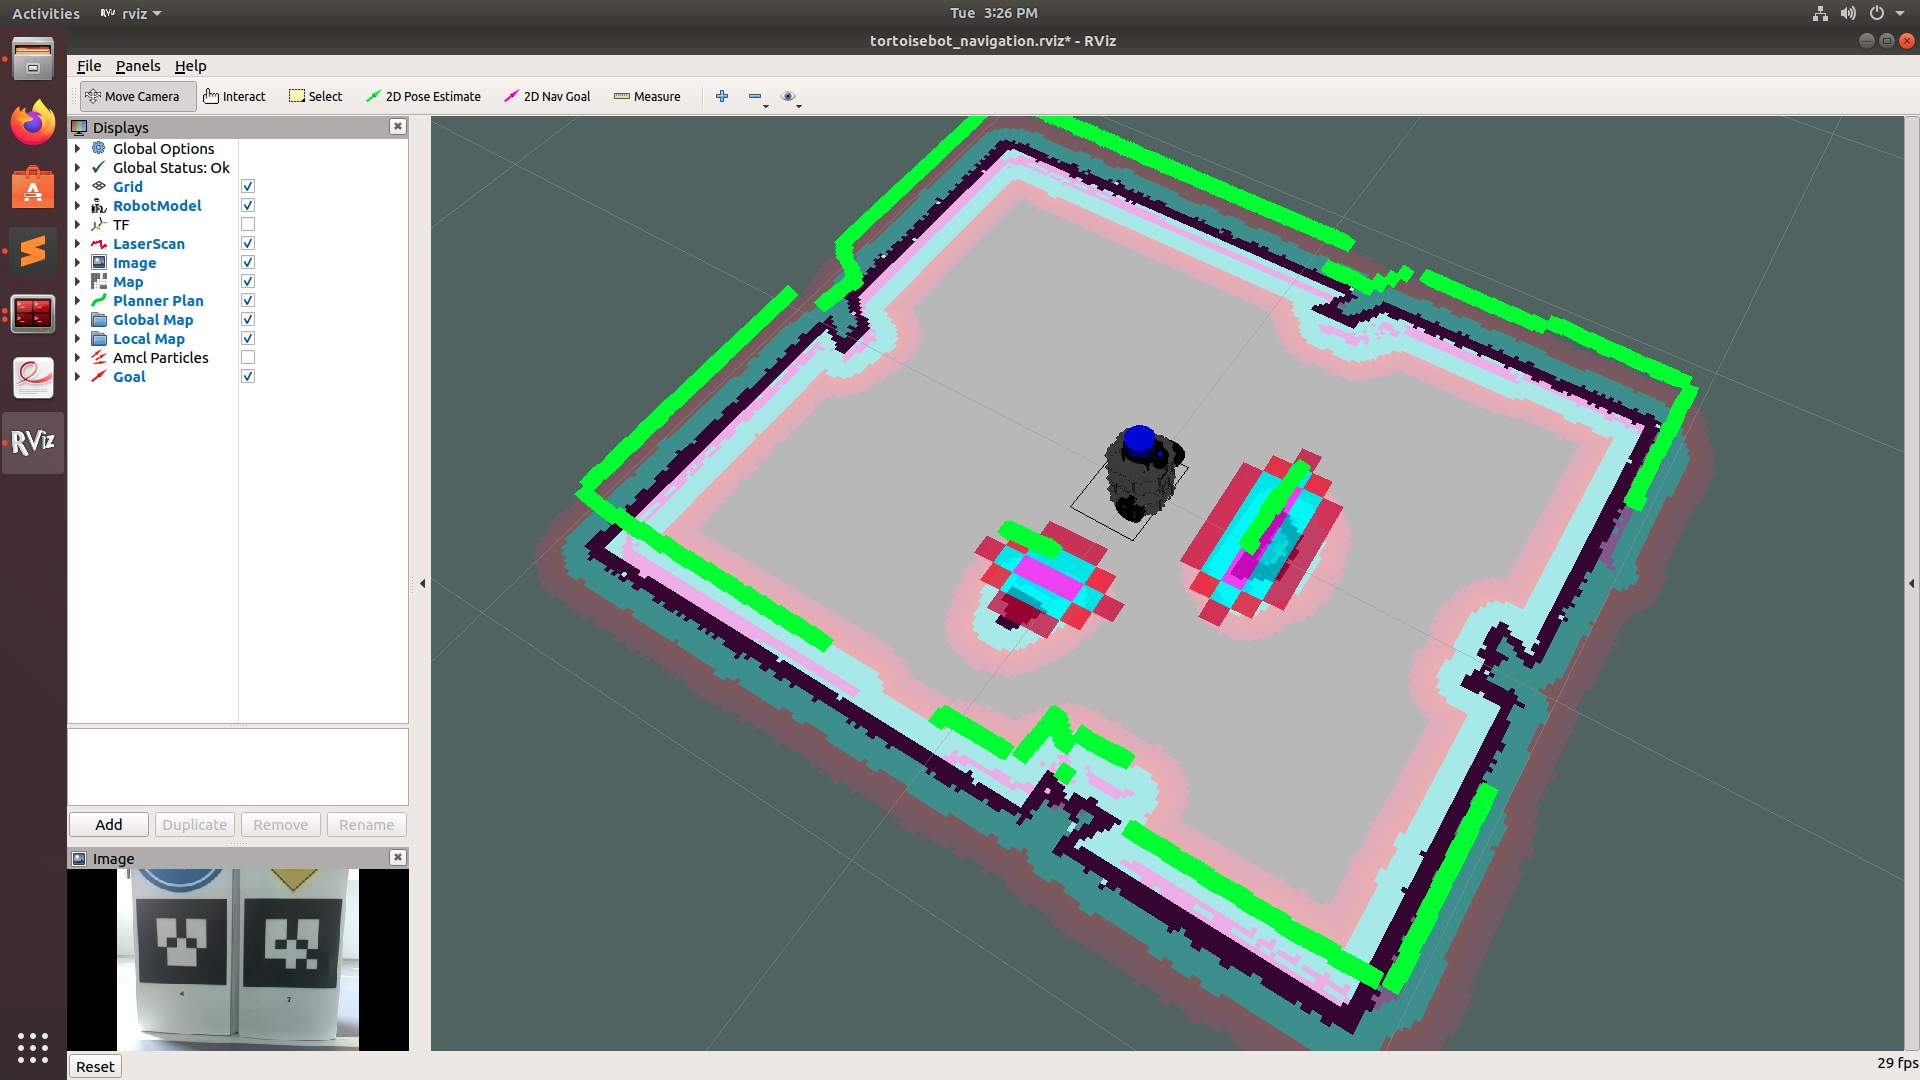
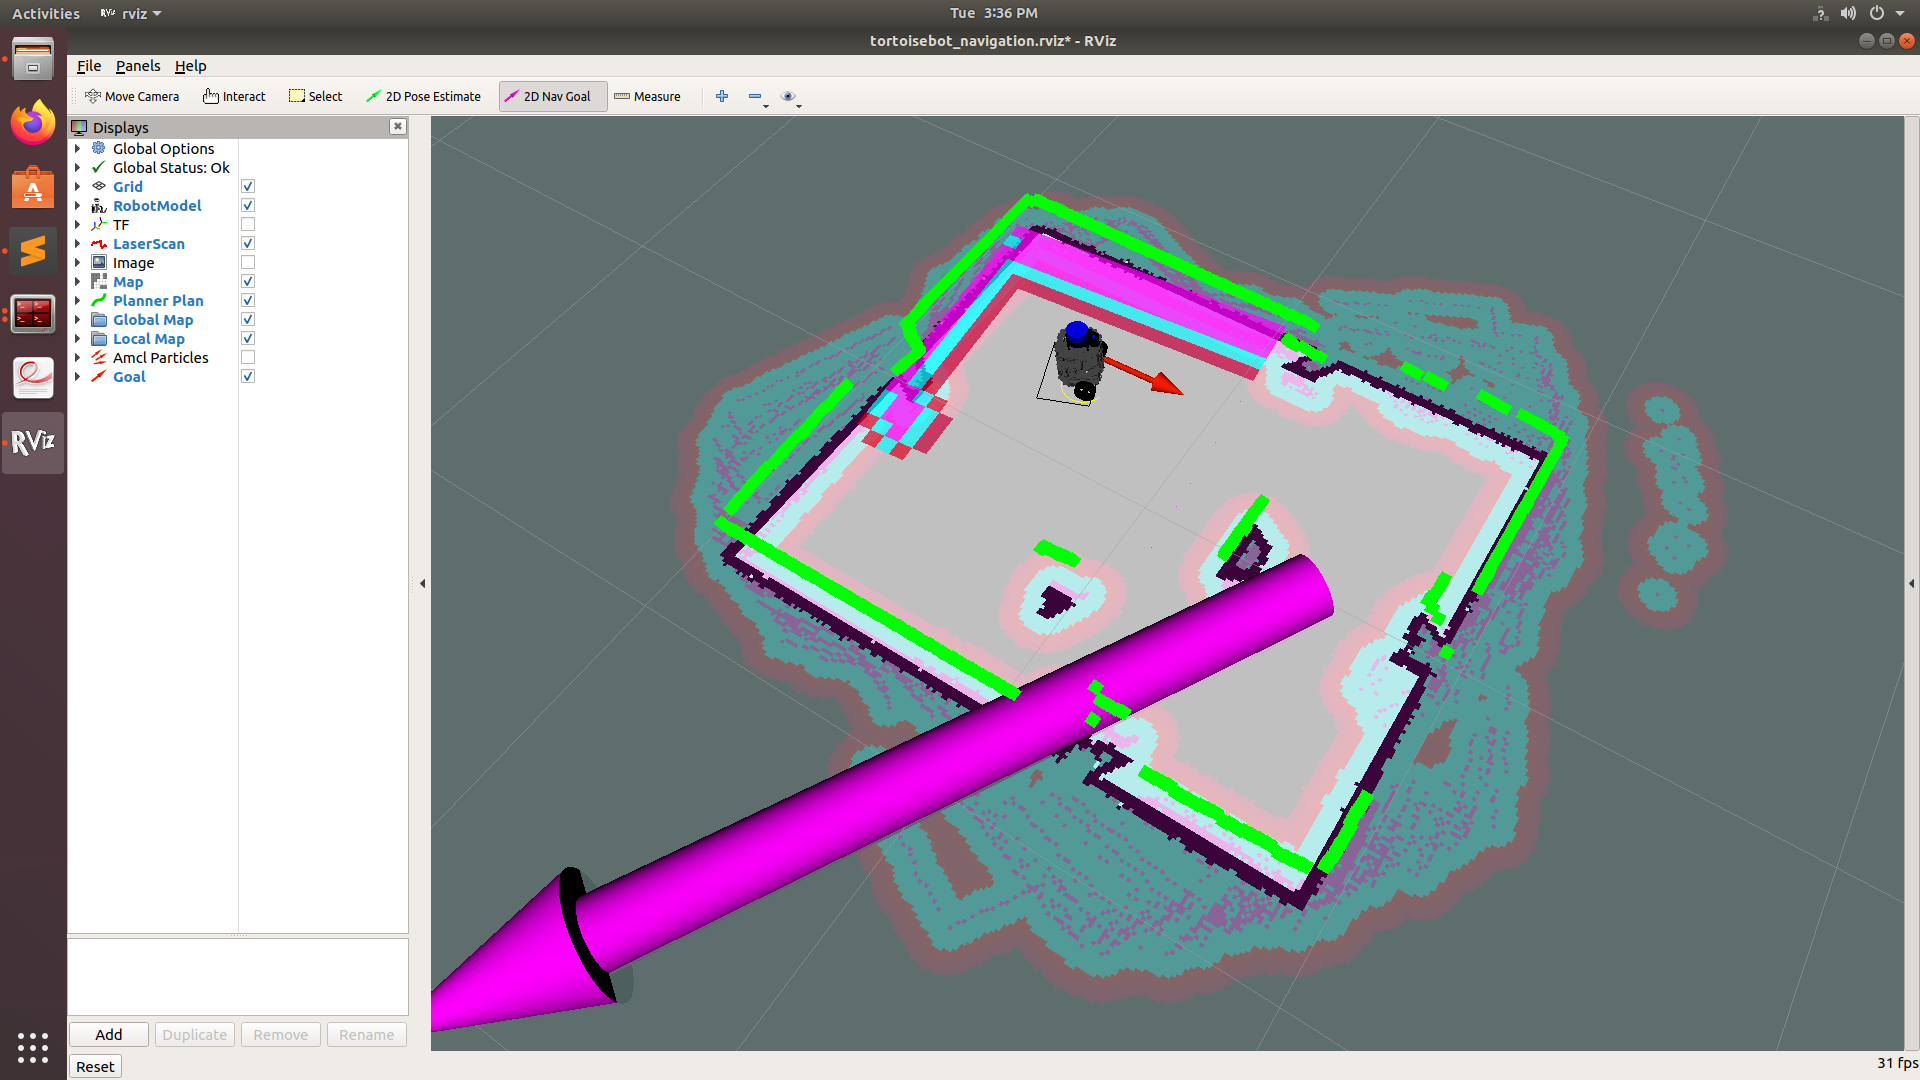
Once the RViz is launched successfully, you can give navigation goals anywhere on the map using the 2D Nav Goal option that is displayed on the top.
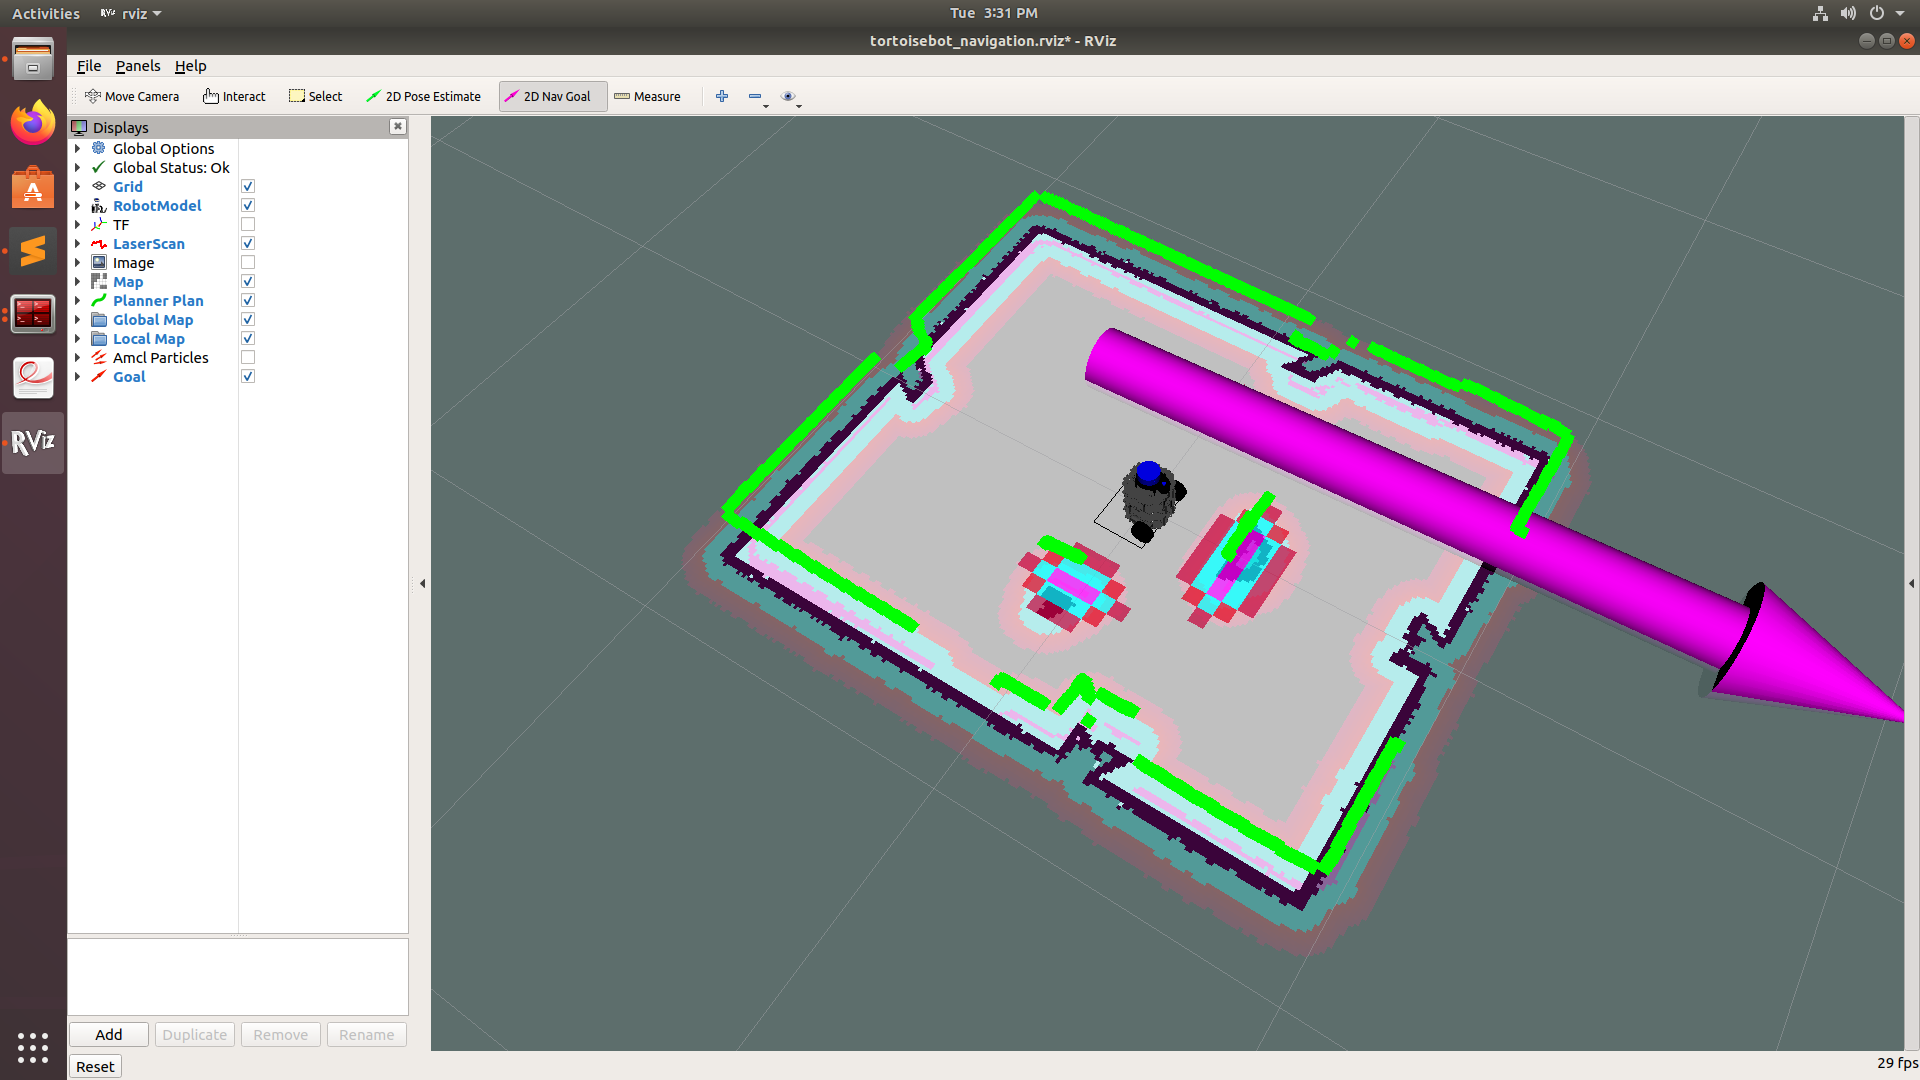
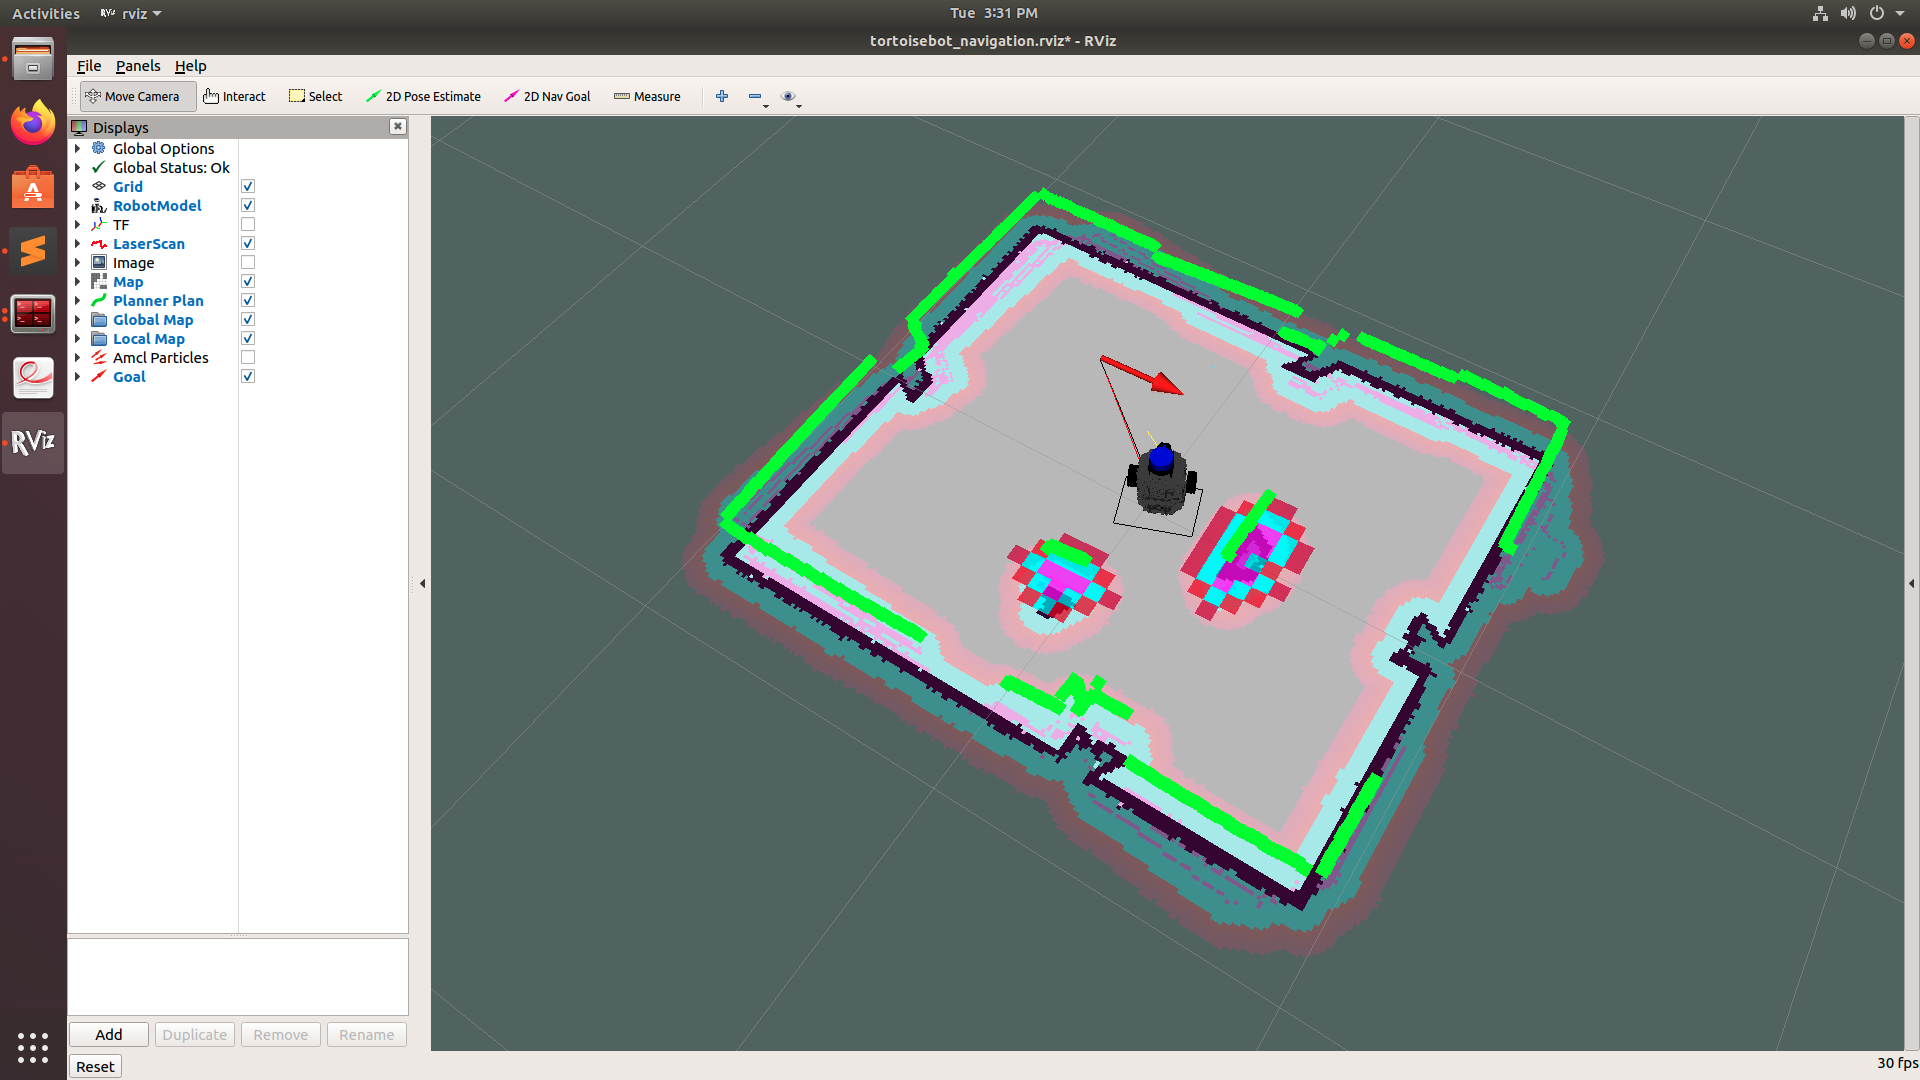
Once you give the goal, the robot automatically calculates the best route and starts navigating to the goal location autonomously. You can see the same in RViz as well as through the webcam.
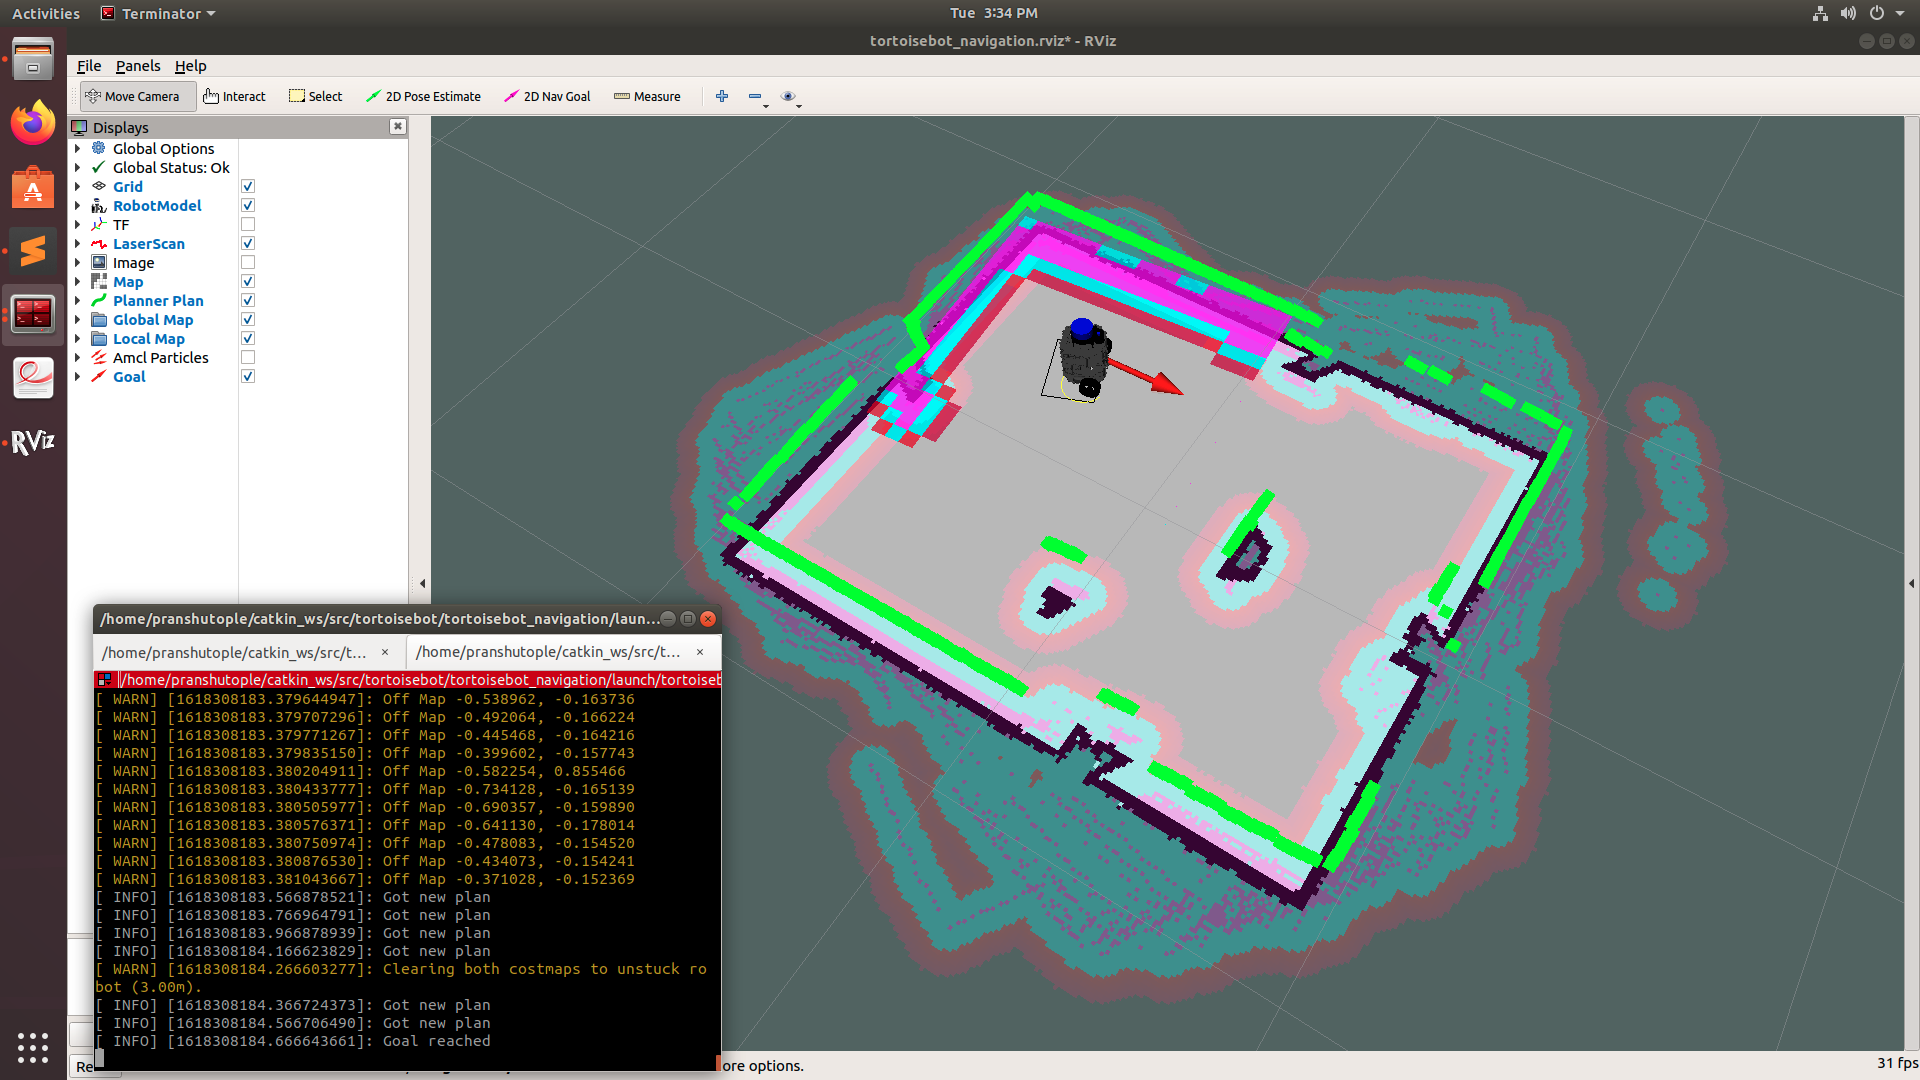
And once the goal is reached, the robot prints the message on the Terminal that the goal is reached.
Similarly, you can give the navigation goal somewhere behind any obstacle and the robot will try to avoid all the obstacles and navigate to the goal location.
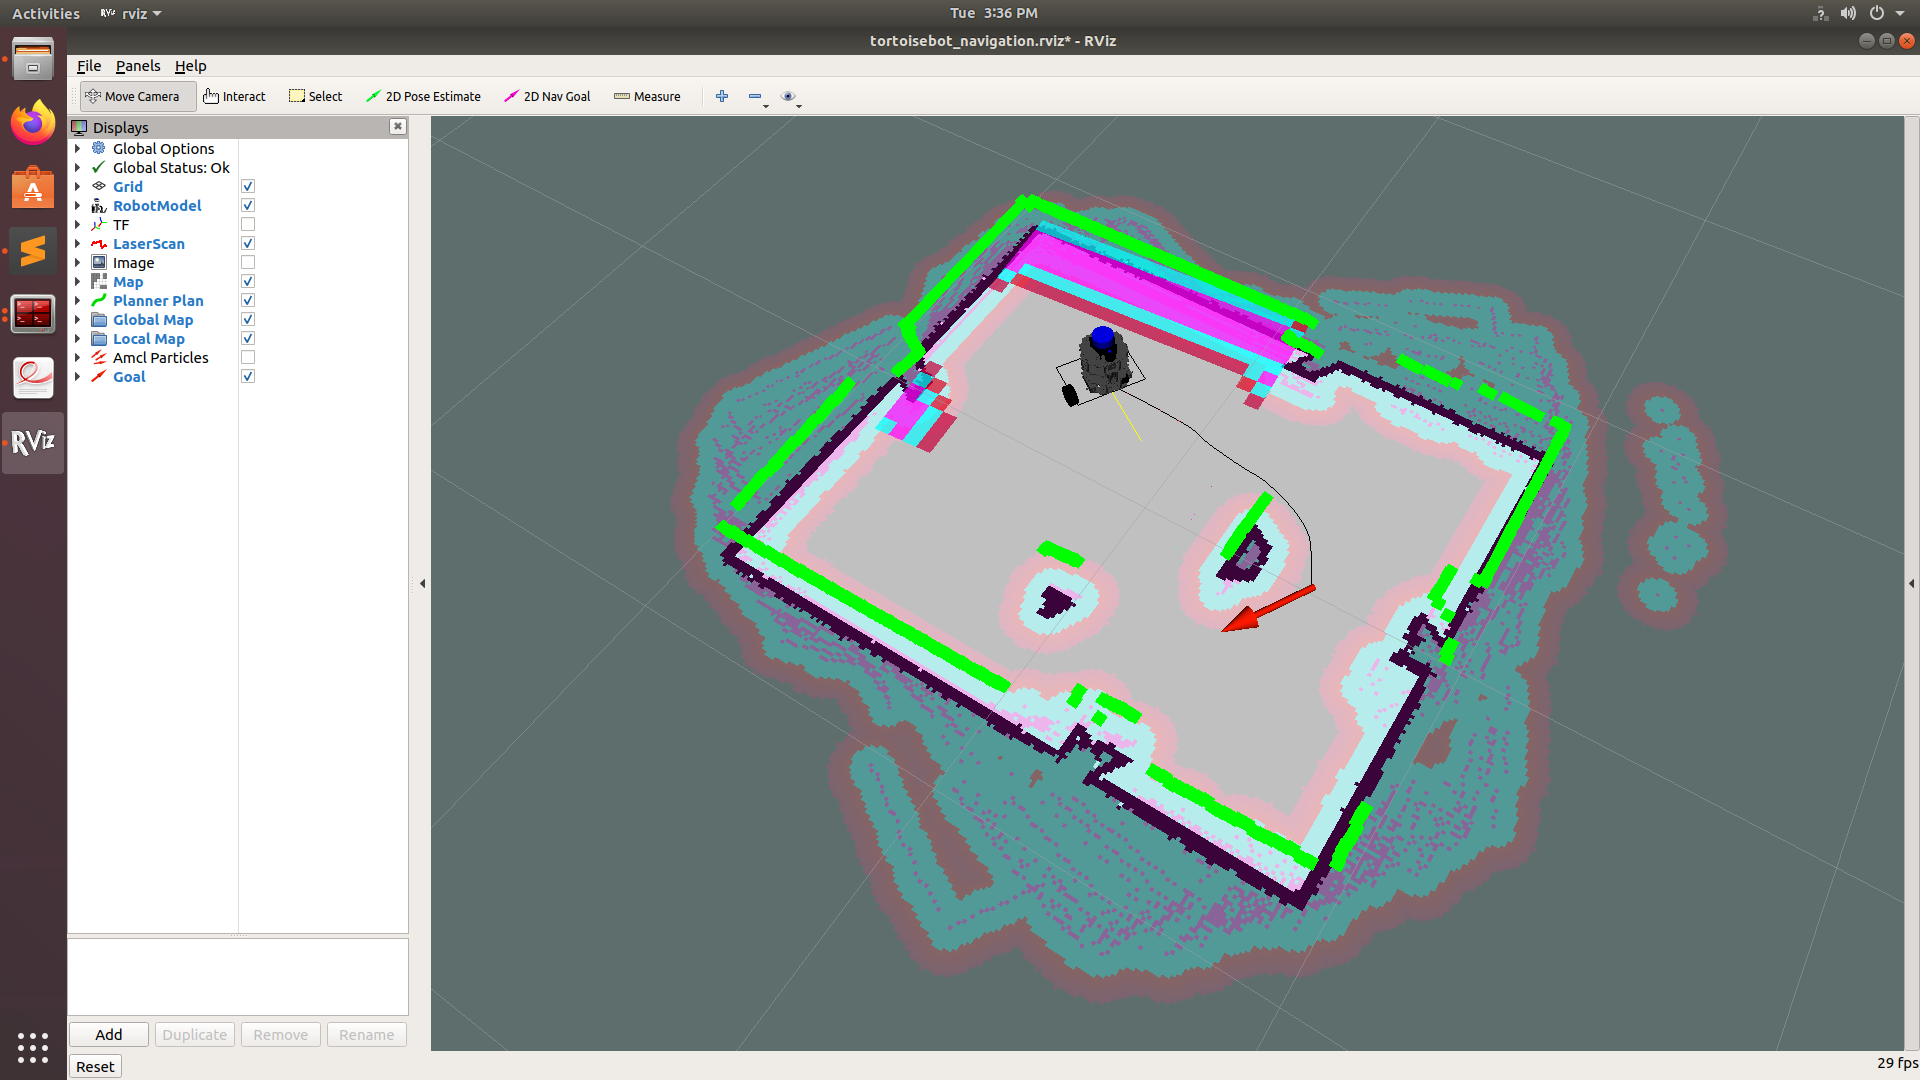
Similarly, you can give the navigation goal somewhere behind any obstacle and the robot will try to avoid all the obstacles and navigate to the goal location.
The first thing you need to do is to access your robot through SSH.
This connects a specific terminal on your PC to the robot so that you can run commands in the robot's terminal.
To do that, open up a terminal on your PC, type the following command and replace the IP address section with your Raspberry Pi's IP.
And then when it prompts for the password, type -" raspberry " (if you have changed the password then type the respective password) and hit enter.
There you are inside the brain of the robot. You can check it with the name on the terminal as
tortoisebot@ubuntu
Now, in this case, our Robot is our master. So you need to make sure that roscore or a roslaunch file is running on your pi before you run anything on the PC's terminal or else it won't work!
Firstly, you should initialize the robot and all its sensors. To do so, enter the following in the raspberry pi terminal.
roslaunch tortoisebot_firmware bringup.launchOnce the robot and all the sensors are brought online through bringup, you can see that the LiDAR at top start rotating. Then you need to bring the server online from your PC to control and send commands to the robot. For that, run the following command from your PC's terminal
roslaunch tortoisebot_firmware server_bringup.launchThere you have your Robot ready to go!!!
For using the Camera Node and its Visualisation in RQT Image View run the following command and then subscribe to /camera topic ****
Now that everything is set up, you can visualize data from various sensors on your robot like LiDAR and Camera. To visualize the data, we will be using RViz. To open up RViz, run the following command on your PC's terminal
roslaunch tortoisebot_slam view_sensors.launchThis will open up RViz with all the robot models, tf tree, laser scan data, and image view from the camera. If you wish, you can uncheck certain boxes to remove the visualization of certain sensors.
WARNING: Do not change the size of the image view in RViz.
Suggestion: Unchecking the image view will put less load on your Robot
If you wish to always see the camera view and be able to change the position and size of the window, then you can view it using Image View. To run that, open up a new terminal on your pc and type:
rosrun image_view image_view image:=/raspicam_node/image
This will open up a new camera window that shows a live feed from Robot's camera. You can make it to always view it on top by right-clicking on the Menu bar and then selecting the always on top option. You can now move your robot in real-world and explore through its camera view using the same teleoperation command as given above:
rosrun tortoisebot_control tortoisebot_teleop_key.py
To generate a map of the surrounding, first, run the bringup.launch on Robot's terminal
roslaunch tortoisebot_firmware bringup.launchThen run server_bringup.launch on the PC
roslaunch tortoisebot_firmware server_bringup.launchThen in another terminal launch tortoisebot_slam.launch using:
roslaunch tortoisebot_slam tortoisebot_slam.launchThis will launch RViz which will be generating Map on the basis of the LiDAR scan that is been received.
Now you can start the TortoiseBot teleoperation node in another terminal and move the robot around to make the complete map of the surrounding.
rosrun tortoisebot_control tortoisebot_teleop_key.py
Navigate to the tortoisebot_navigation package and open up the maps folder. Right-click and select an option to open a terminal in a specific location. Make sure you are inside the maps directory on your terminal. You can run the following command in that terminal to save the generated map inside the maps folder. You can replace the "my_map" with whatever name you want.
rosrun map_server map_saver -f my_mapNow a pgm and yml file of your map will be created in the maps folder
Once we have generated our map, we are all set to automatically navigate our robot in the surrounding without any human intervention. To run the autonomous navigation script, first, make sure your robot is placed just on the central zebra crossing and then run the following command on the robot's terminal to start the robot.
roslaunch tortoisebot_firmware bringup.launchThen run server_bringup.launch on the PC
roslaunch tortoisebot_firmware server_bringup.launchThen in another terminal launch the autonomous navigation launch file using:
roslaunch tortoisebot_navigation tortoisebot_navigation.launchIf you wish to start navigation in a map file that you created, run the same launch file with a parameter giving the name of your map. For example, if the name of my map is "my_map" then I will run:
roslaunch tortoisebot_navigation tortoisebot_navigation.launch map_file:=my_map
Once the RViz is launched successfully, you can give navigation goals anywhere on the map using the 2D Nav Goal option that is displayed on the top.
Once you give the goal, the robot automatically calculates the best route and starts navigating to the goal location autonomously. You can see the same in RViz as well as through the webcam.
And once the goal is reached, the robot prints the message on the Terminal that the goal is reached.
Similarly, you can give the navigation goal somewhere behind any obstacle and the robot will try to avoid all the obstacles and navigate to the goal location.
Similarly, you can give the navigation goal somewhere behind any obstacle and the robot will try to avoid all the obstacles and navigate to the goal location.