My experiments, snippets and documents about some Microchip Curiosity Nano boards I use for my projects or for learning.
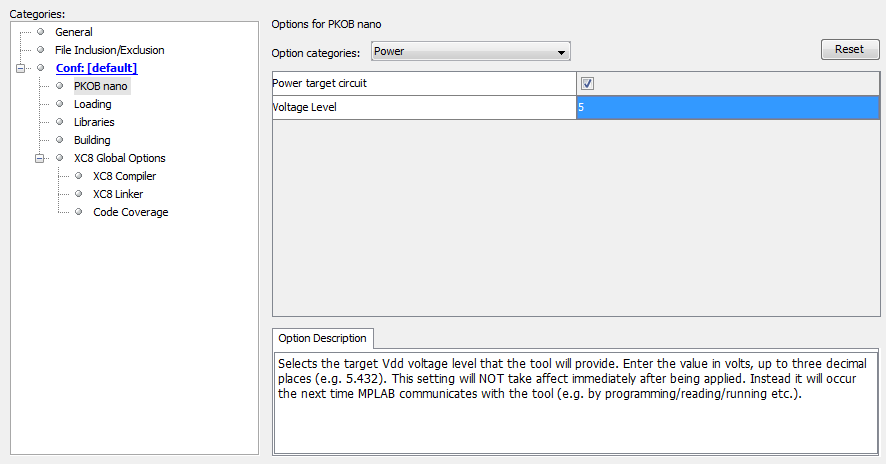
By default Curiosity nano runs at 3.3V when powered from USB: there is a software controlled variable regulator on board that generates the VTG (V Target). If you want to run the board @5V when you power it from USB you must change a parameter in the project configuration:
- Right click on project in Projects tree and select Properties
- in Categories box on the left, select PKOB Nano
- in Option Categories dropdown box, on the right, select Power
- check the Power target circuit checkbox
- write 5 in the blank field Voltage level
- press OK
The project property will be changed and will be active the next time you'll program the board. Voltage change is permanent, so there is no need to keep this setting every-time for every project: be careful. This setting, obviously, only affect the V Target when you power the board from USB. Following picture illustrates where this setting is located:
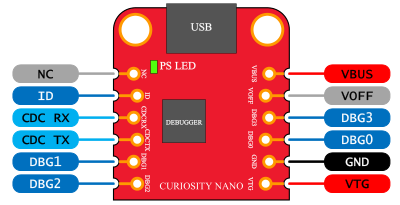
If you want to power the board from the external instead of USB, you must tie to GND the pin VOFF: it's the second pin on the right, starting from top, having the USB connector on top: this will disable the on board regulator. After you've tied VOFF to GND you can power the board on the pin VTG: it's the sixth pin on the right, starting from top, having the USB connector on top. The voltage you apply will not be affected by the modification explained above. 5V is the maximum allowed.
WARNING: if you use the old PIC16F18446 revision (Called MPLAB Xpress PIC16F18446) there is no VOFF pin (notice that the debug header has fewer pins) and you must cut some traces below the board for powering from external, please refer to old documents in the assets folder
Following infos are for the PIC16F15376 Curiosity Nano.
RCOandRC1: Normally, those pins are not routed from edge connector to PIC MCU, so if you would to use them, put a solder blob on pads on the bottom of the board marked asRC0-RC1. They're not connected since you can choose to use them for the Secondary Oscillator (SOSC) soldering a 32768Hz Crystal on top.RB6andRB7: Those pins are not shown on the silkscreen. They are used by the debugger (DBG1/ICSPCLKandDBG0/ICSPDAT respectively), maybe is safe to use if you disconnect them first than programmingRD0andRD1: are shared with USB CDC and used by debugger, they appears on the silkscreen.EUSART2can use those pins, so if you want to redirect serial communication over USB configure the EUSART2 for usingUART TXonRD0andUART RXonRD1.RE0: is connected toLEDanode (pin low = led ON).RE2: is connected toDGB2Debugger pin and shared withSW0.RE2marking does not appear on silkscreenRE3: this pin is shared withMCLRand is connected withDBG3debugger pin.RE3marking does not appear on silkscreen


