Your shopping cart is empty!

I2C Communication between micro:bit and Arduino
PREREQUISITES: This tutorial assumes that you are familiar with Arduino Boards, Arduino IDE Software, Serial Monitor, micro:bit and how to download program into micro:bit.
Introduction
Inter-Integrated Circuit (IIC) or also known as I2C is one of the popular communication protocols used in electronics and robotics. The popular, beginner-friendly board like micro:bit also capable of using this communication protocol. In this tutorial we will see how to communicate between micro:bit and Arduino boards using I2C protocol.
This will be useful as you might want to use an IoT Arduino compatible board like ESP8266, ESP32, Nano 33 IoT, etc. You want to use these board to integrate an IoT platform, while at the same time you wanted to use a simple and compact board like micro:bit. As most of IoT platform does not recognize micro:bit boards yet, we can use I2C communication for micro:bit to send data to Arduino boards, and then the Arduino boards will send the data to the IoT platform. Hopefully this tutorial will help you understand the basic concept on how to program I2C communication on micro:bit.
Hardware

- Maker Uno (or any Arduino compatible boards)
- micro:bit
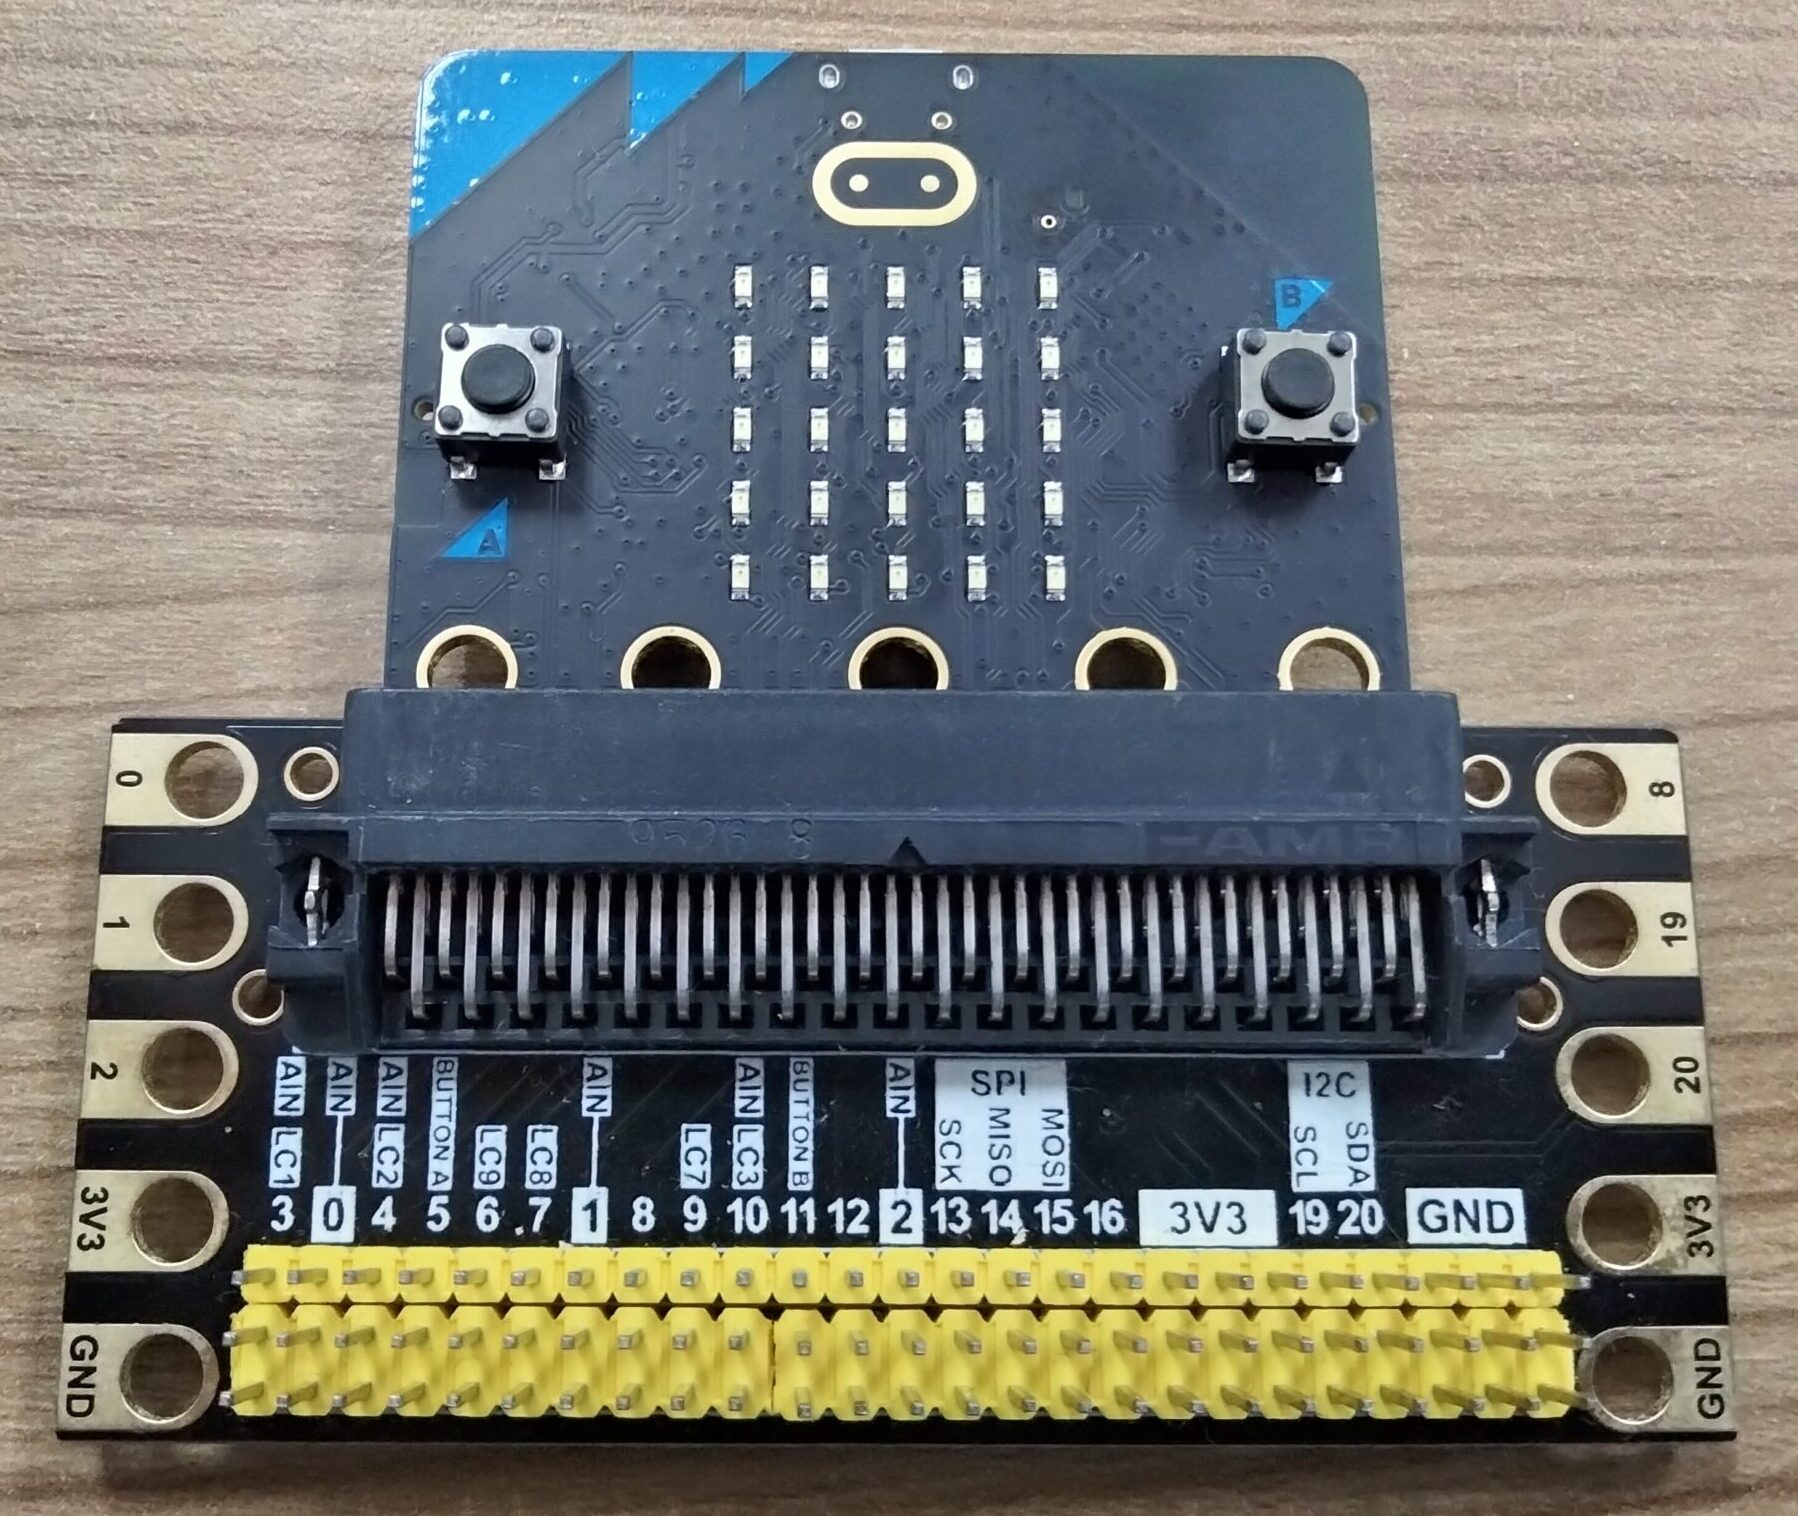
- micro:bit Expansion Board
- USB Micro B Cable (Its better if you have two cables. But if you just have one, we could work on it)
- Male to Female Jumper Wires
micro:bit Setup

1. Plug in your micro:bit onto the expansion board properly. Make sure the micro:bit side that have buttons is facing up.

2. Plug in your USB Cable to your micro:bit, and connect it to your laptop / PC USB port.

3. Now lets do the program for micro:bit. Open your web browser and go to Microsoft MakeCode browser editor.
4. Proceed to create a new project.

5. Click on the Input tab, and drag the on button A pressed block into the editor.

6. Click on the Advanced tab, click Pins, and click more. Drag the i2c write number block into the editor, and snap it into the on button A pressed block.

7. Insert the address number. You can use 0 to 127 for the address number. For the value, you can use any number from 0 to 255.
Note: If you have a sensor that reads value more than 255, you need to split the value and send 2 seperate value to the arduino. For example, the value is 500. You need to split into 2 value. The first value is 255, and the second value is 245. You need to add back this value together in the Arduino to get the exact value back.
You have finished on the micro:bit setup. Proceed to download your program into your micro:bit board. You need to pair your micro:bit board with your MakeCode Editor.
If you don't know how, continue reading how to pair your micro:bit board.
If you already paired your board, you can click Download button on the bottom left, and the word will change to Downloaded!. You can proceed to Arduino Programming section.

Pair micro:bit Board with MakeCode Editor

1. First we need to pair your micro:bit board to the MakeCode editor. Make sure you already plug in your USB cable properly onto your micro:bit and USB port. On the bottom left corner, click on the three dots beside the Download button. Then, click Connect Device.


2. Press Next to all the prompts that appear.

3. A small window should appear at top left corner of your browser. Choose your micro:bit board and click Connect. If no board appears here to choose, please check your USB cable connection and repeat from step 1.

4. Click Done, and click the Download button on the bottom left corner. The word will change to Downloaded! and you can proceed to Arduino Programming section.

Arduino Programming
Open your Arduino IDE Software. If you don't have it, feel free to download and install it from the Official Arduino Website.


1. On the top left corner, click on File. And then click Examples > Wire > slave_receiver. A new program will popup. You will need to modify the program according to your need.

2. Look inside void setup(). Change the number inside the Wire.begin() matching your address that you use for micro:bit.


3. Next, delete these 4 lines.

4. Your final program should look like this:
					// Wire Slave Receiver
// by Nicholas Zambetti
// Demonstrates use of the Wire library
// Receives data as an I2C/TWI slave device
// Refer to the "Wire Master Writer" example for use with this
// Created 29 March 2006
// This example code is in the public domain.
#include
void setup() {
  Wire.begin(13);                // join I2C bus with address #8
  Wire.onReceive(receiveEvent); // register event
  Serial.begin(9600);           // start serial for output
}
void loop() {
  delay(100);
}
// function that executes whenever data is received from master
// this function is registered as an event, see setup()
void receiveEvent(int howMany) {
  int x = Wire.read();    // receive byte as an integer
  Serial.println(x);         // print the integer
}
5. Check your board and port selection, and proceed to upload your program to your Arduino board.


I2C Communication
Once you already downloaded your micro:bit program, and uploaded Arduino program, we are ready to connect the I2C Pins.

On the Maker Uno (or any Arduino boards), there are two pins named SCL and SDA. In our case of Maker Uno or Arduino Uno, its located at the top of digital pins, above AREF pin.
On the micro:bit Expansion Board, you can see pin 19 and 20 are labelled as SCL and SDA.
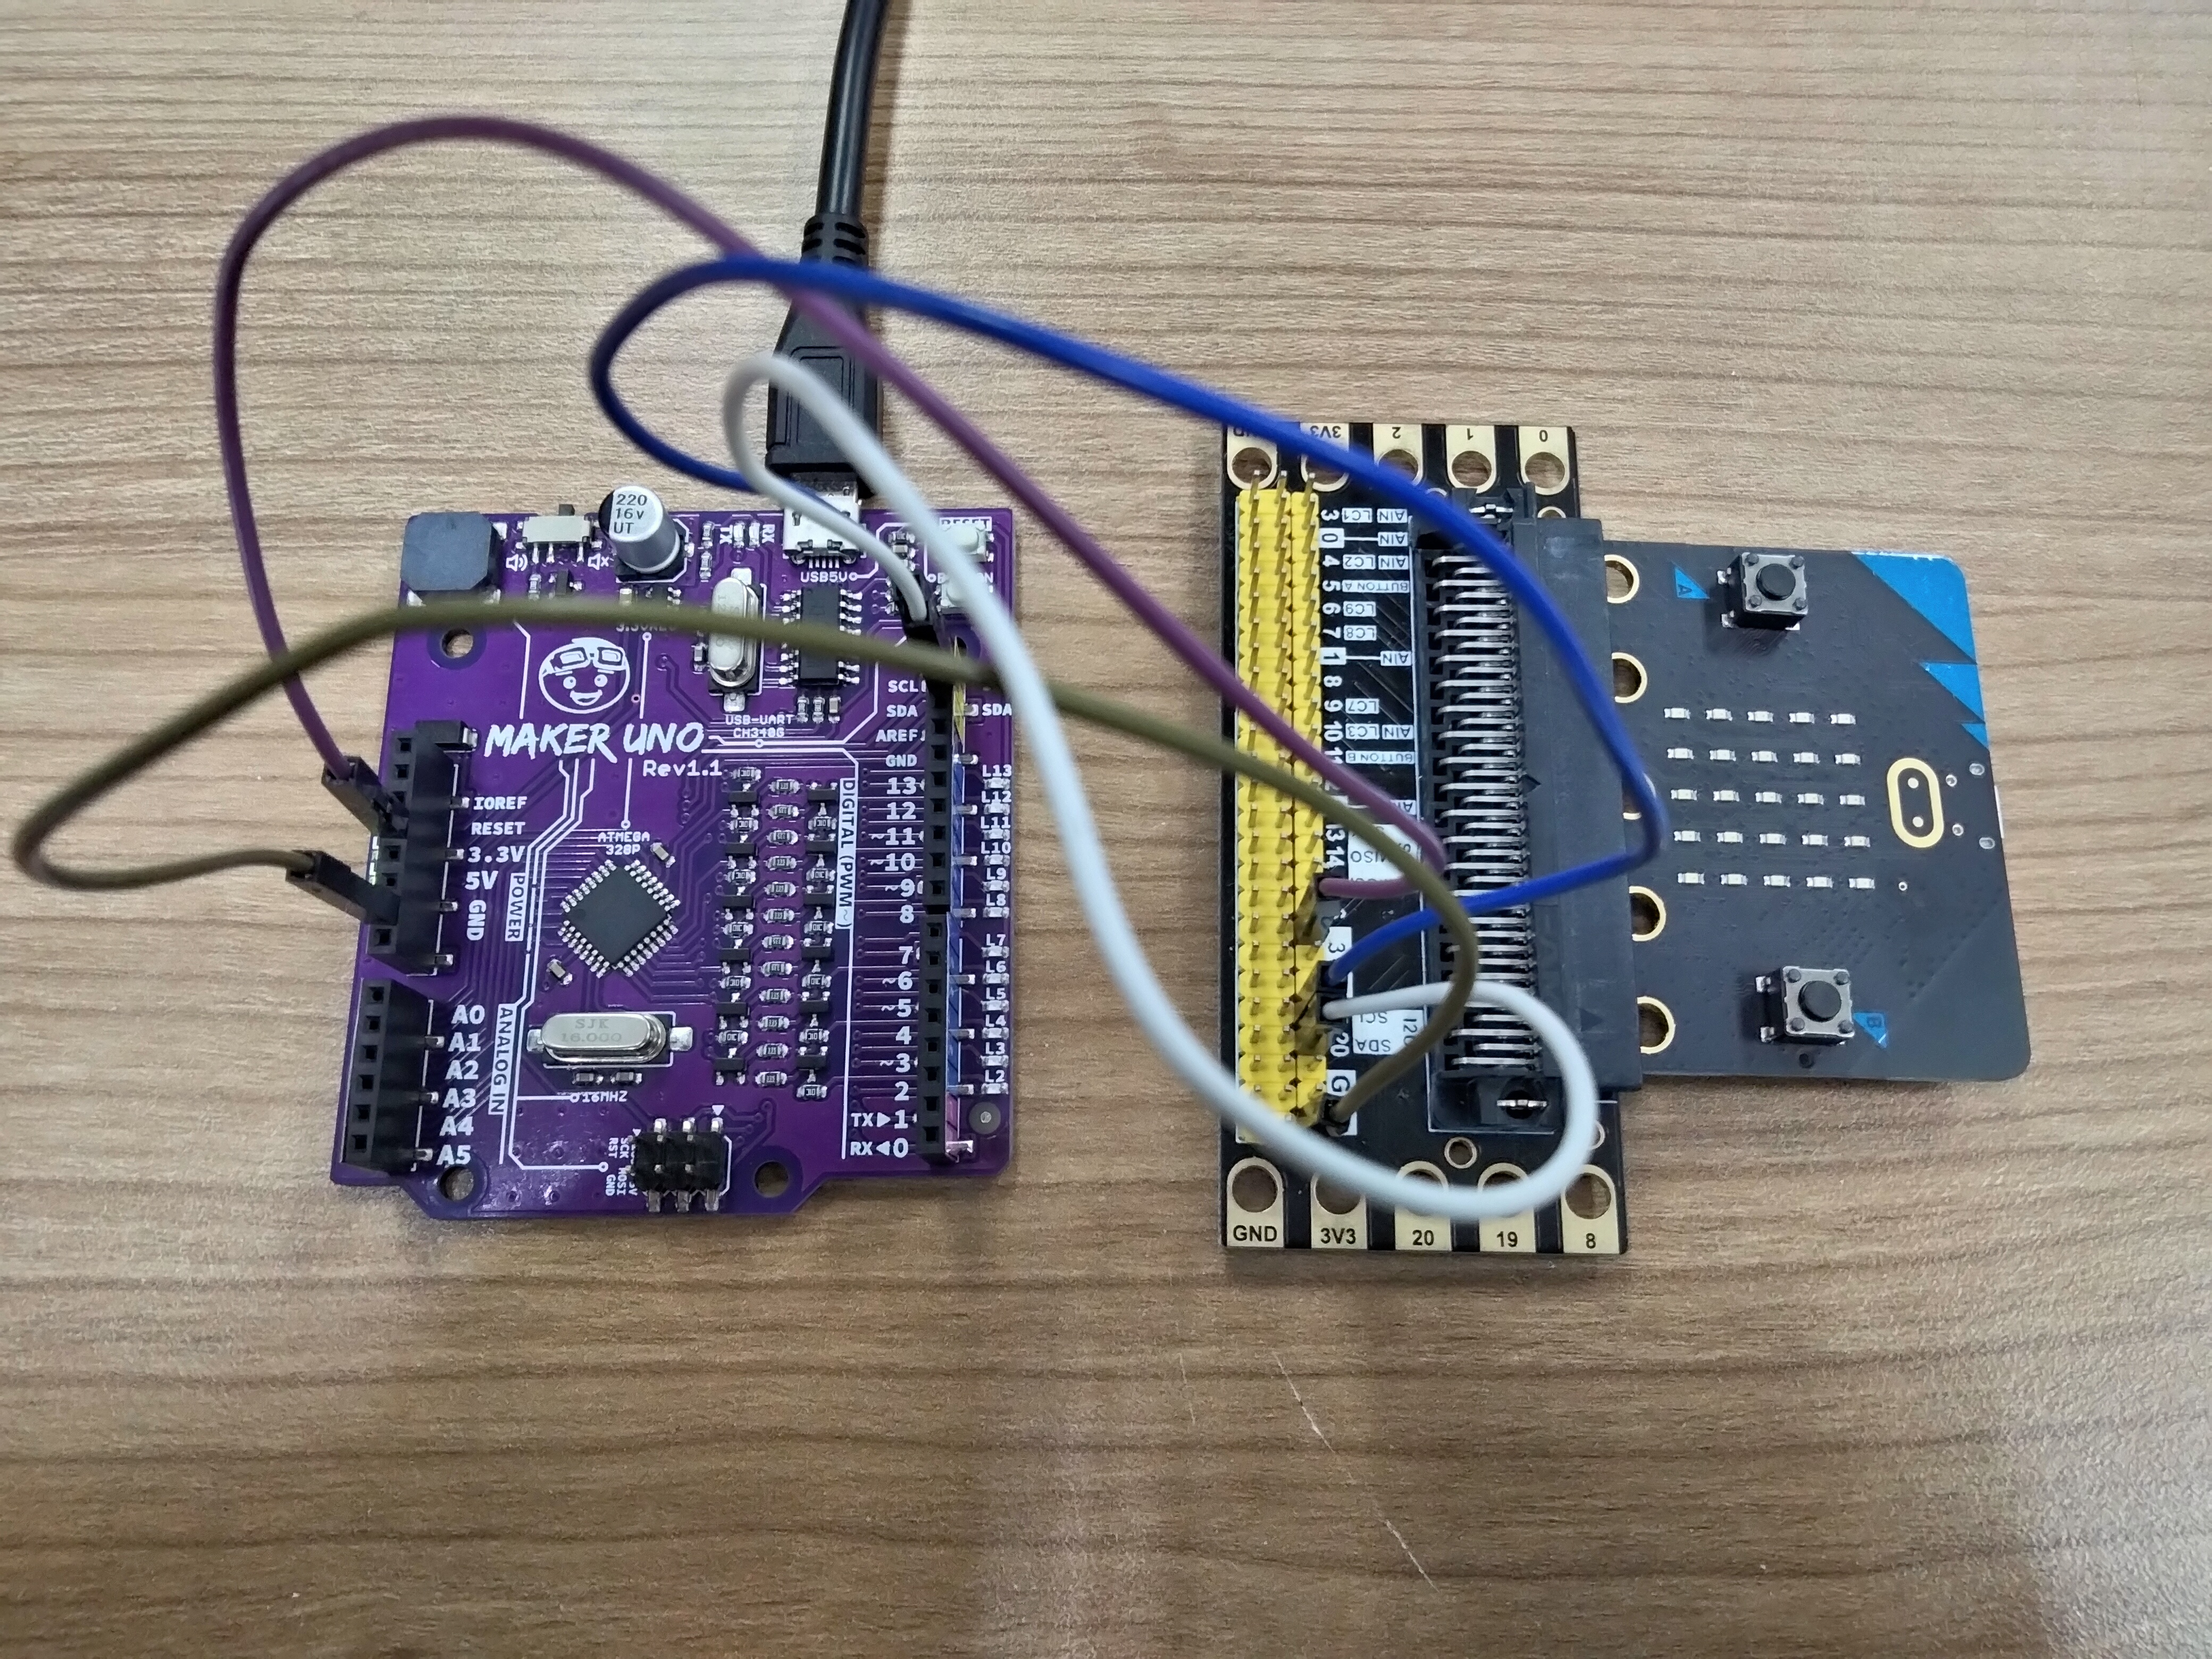
These two pins are used for I2C Communication. Connect the pins with its correct name, between the Maker Uno and micro:bit.
- SCL from Maker Uno connected to SCL micro:bit Expansion Board.
- SDA from Maker Uno connected to SDA micro:bit Expansion Board.

In you Arduino IDE, open Serial Monitor at the top right corner. And then start pressing the A button on your micro:bit. The number that we program it to send, which is 52, will appear on the Serial Monitor.


Use only One USB Cable to Power both Boards
In case you only have one USB Micro B Cable, or you want to simplify your project, you can easily connect 3.3V and GND Pin from Maker Uno to the micro:bit Expansion Board.


You are done! Now you know how to communicate between micro:bit and Arduino using I2C Protocol. Be creative with your project. There are so much project you can do with micro:bit, micro:bit Expansion Board and Maker Uno. Have Fun! ?
 International
 Singapore
 Malaysia
 Thailand
 Vietnam