Level Specification
Each level in the game is defined in a separate JSON file in the Levels directory.
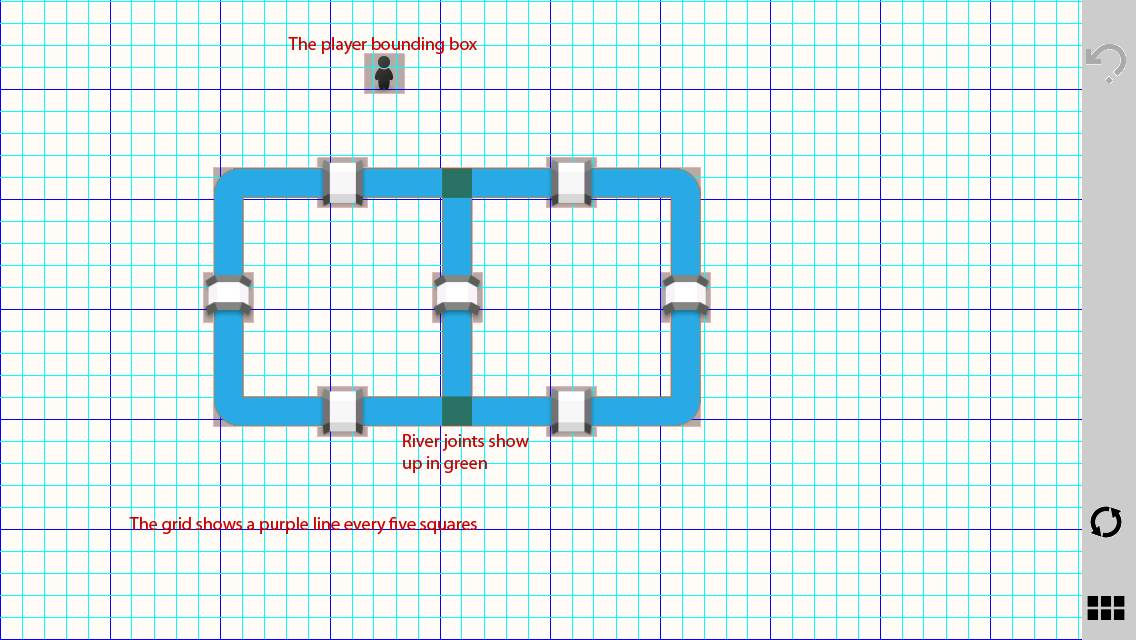
Before you start working on a level it's very useful to turn on debug drawing so you can see the background grid, the sprite bounding boxes, and highlight the river joints.
To enable debug drawing you must edit the DEBUG_DRAW variable in the BridgeColors.h file. This value is false by default and you just need to change it to true. The result should look like this:
static bool const DEBUG_DRAW = true;
Each level has a format like this:
{
    "level": {
        "name": "Tile test",
        "rivers": [
	        {
	            "x": "17-23",
	            "y": "18",
	            "orient": "h"
	        },
	        {
	            "x": "17-23",
	            "y": "12",
	            "orient": "h"
	        },
	        {
	            "x": "17",
	            "y": "12-18",
	            "orient": "v",
	            "side": "left"
	        },
	        {
	            "x": "23",
	            "y": "12-18",
	            "orient": "v",
	            "side": "right"
	        }
        ],
        "bridges": [

        ],
        "houses": [
        ]
    }
}
This level definition creates four rivers which connect to form a square in the middle of the screen like this:

Every level must be a valid JSON file in the Levels directory within the project. You probably want to verify your levels with JSONLint to make sure they're valid.
Each level starts with a top node of level which contains the following fields:
-
nameThe display name of this level. -
coinsAn optional field to specify the number of coins the player starts the level with. If this value is blank the user starts the level with zero coins. -
tilesAn optional field to specify an alternate tile count for this level.
In addition to those fields each level has the following objects:
The optional player element specifies the starting location of the player in this level. It specifies the tile coordinates as an x and y like this:
"player": {
    "x": "6",
    "y": "20"
}
If the starting position of the player isn't included then the player can choose where to start.
The optional hint element specifies the hint for where the player should start on this level. It specifies the tile coordinates as an x and y like this:
"hint": {
    "x": "5",
    "y": "15"
}
If the hint isn't included then the hint button isn't visible for the level.
Each level may optionally specify a set of labels to explain details of the level. The labels are an array child of the level like this:
"labels": [
    {
        "x": "22",
        "y": "27",
        "w": "16",
        "h": "10",
        "text": "Make sure to visit every house"
    }
]
Each label will grow vertically to support the text in the label.
The rivers array specifies the location of each river in the level. Each river has an x and y coordinate and an orient to specify if the bridge is vertical or horizontal.
{
    "x": "5",
    "y": "5",
    "orient": "h"
}
The valid values for orient are h for horizontal and v for vertical.
Vertical rivers also support an additional optional property called side. This value allows the river to add an extra sprite to the top and bottom to make a nice connection with a rounded border. The valid values are left and right.
Rivers can also specify a border property. This property specifies the borders of the river sprite and valid values are top, left, bottom, right, and none. Specifying the border is useful when creating seamless river intersections.
The bridges array specifies places where the player can cross rivers. Each bridge has an x and y coordinate in addition to the following fields:
-
dirThe direction of the bridge. This optional value restricts the player to only cross the bridge in one direction. Valid values areup,left,down, andright. -
orientThe orientation of the bridge. Eitherhfor horizontal orvfor vertical. -
colorThe optional color of the bridge. Valid colors arered,green,blue, andorange -
coinsThe optional number of coins required to completely cross this bridge.
{
    "x": "8",
    "y": "15",
    "orient": "h",
    "color": "green"
}
The houses array specifies houses the player can visit in the level. Each house has an x and y coordinate in addition to the following optional fields:
-
colorThe optional color of the bridge. Valid colors arered,green,blue, andorange -
coinsThe optional number of coins available at this house
The subways array specifies all of the subways in the level. A player can enter the subway at one end and exit at the other end as many times as they want, but each ride costs one coin. Each subways has an x1 and y1 field for the first subway station and an x2 and y2 for the second one.
Subways also have an optional color field. Valid values are red, green, blue, and orange.
{
    "x1": "4",
    "y1": "10",
    "x2": "24",
    "y2": "10",
    "color": "red"
}
Objects in each level are placed at an X,Y coordinate based on a tile system that is 42 tiles wide and 28 tiles tall. Placing an item at 0,0 puts it in the lower left corner and placing it at 42,28 places it in the top right corner.
In addition to specifying a specific number for coordinates levels also support the following constants:
-
lThe left side of the screen -
bThe bottom of the screen -
rThe right side of the screen -
tThe top of the screen -
mThe vertical middle of the screen -
cThe horizontal center of the screen
Rivers can also specify their X,Y coordinates as ranges. Each range must start with the small value and end with the larger value.
A river across the middle of the screen horizontally
{
    "x": "l-r",
    "y": "m",
    "orient": "h"
}
A river across the middle of the screen vertically
{
    "x": "c",
    "y": "b-t",
    "orient": "v"
}
Once you've created a level you must add it to the levels.json file before it shows up in the game. Levels.json is organized into sets of levels like this:
{
    "set1": {
        "name": "Bridges",
        "index": "1",
        "image": "bridge.png",
        "levels": [
            "hello_bridges.json",
            "two_bridges.json",
            "start_anywhere.json",
            "one_way.json",
			...
Each set must have a name, index, and image property. These point to the display name of the set, the index of the set, and the image for the set respectively.
The set must also contain an array of levels. This lists all of the levels in this set in the order they will appear. Right now each set has 16 levels, but that might change.