QQ群: 624214498
- 背景
- 简介
- 优点
- 扩展
- 准备 (必须步骤)
- 配置websocket (必须步骤)
- 启动 (必须步骤)
- 配置数据库 (非必须步骤)
- 管理后台 (非必须步骤)
- 企微通知 (非必须步骤)
- OSS云存储 (非必须步骤)
- Chat-GPT (非必须步骤)
- 配置turnserver (局域网非必须步骤,公网必须步骤)
- Docker
- 其他形式部署
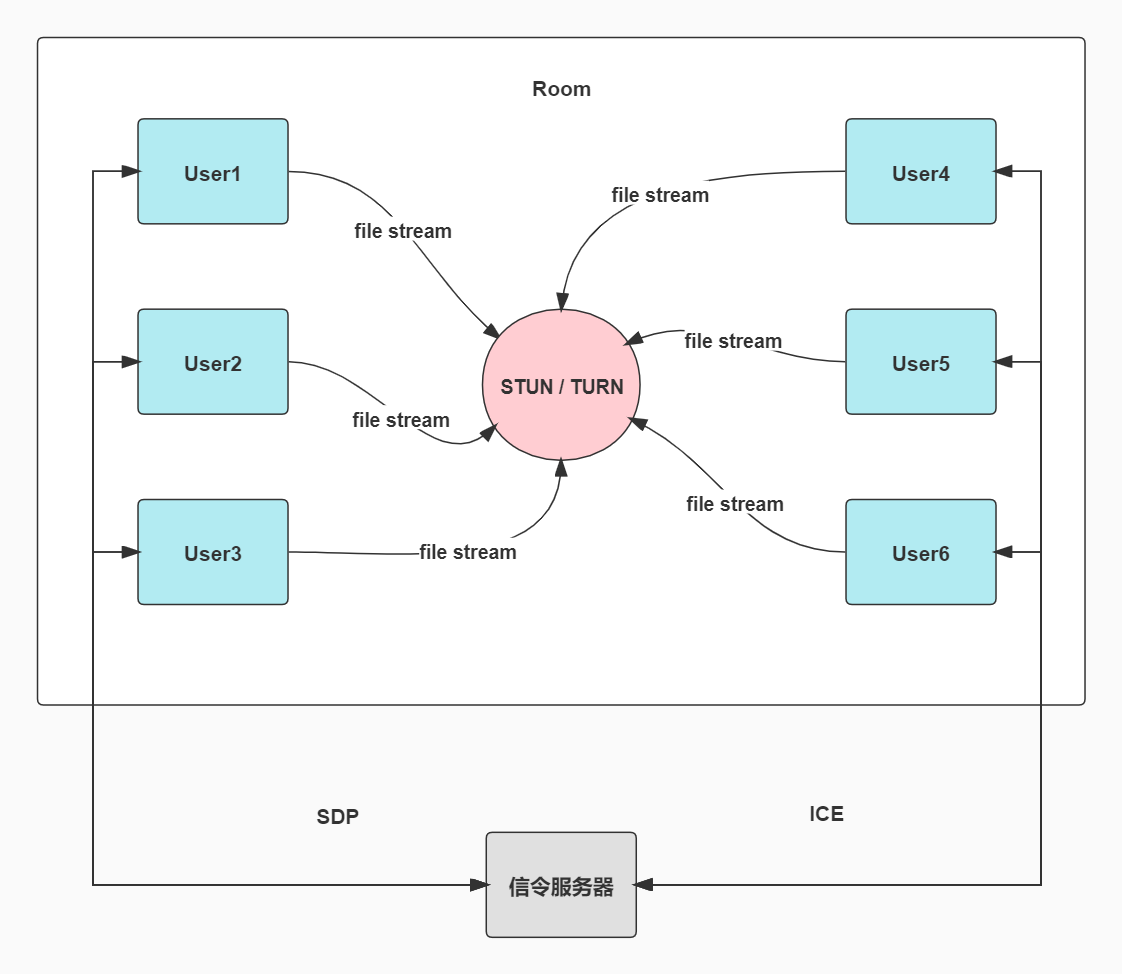
- 概述图
- License
- 免责声明
扩展 : 扩展了许多丰富的小功能,如本地屏幕录制,远程屏幕共享(无延迟),远程音视频通话(无延迟),直播(无延迟),密码房间,oss云存储,中继服务设置,webrtc检测,webrtc统计,文字传输(群聊,私聊),公共聊天,远程画板,AI聊天框,丰富的后台管理,实时执行日志展示,机器人告警通知等功能... 等等
1.安装node-14.21.x或14.21.x以上,npm后,进入项目目录运行下面命令
cd svr/
npm install
2.首次运行/自行开发页面,用下面两个命令之一即可
npm run build:dev (如果你需要自己开发/修改前端页面,用这个命令)
npm run build:pro (不需要开发/修改前端页面,用这个命令)
3.修改 tlrtcfile.env 配置文件
修改 tlrtcfile.env 中相应websocket配置
## websocket服务端口
tl_rtc_file_socket_port=8444

## websocket服务地址
## "ws:https://域名 或者 ws:https://ip:端口 或者 ws:https://域名:端口"
tl_rtc_file_socket_host=ws:https://127.0.0.1:8444
启动以下两个服务, 选一种模式启动即可,两者的区别就是,https环境启动才可以使用音视频,直播,屏幕共享功能,其他功能不影响
http模式启动后,访问 https://你的机器ip:9092 即可
- api服务:
npm run http-api - socket服务 :
npm run http-socket
https模式启动后,访问 https://你的机器ip:9092 即可
- api服务:
npm run https-api - socket服务 :
npm run https-socket
修改 tlrtcfile.env 中的数据库相关配置即可
## 是否开启数据库
tl_rtc_file_db_open=false
## 数据库地址
tl_rtc_file_db_mysql_host=mysql
## 数据库端口
tl_rtc_file_db_mysql_port=3306
## 数据库名称
tl_rtc_file_db_mysql_dbName=webchat
## 数据库用户名
tl_rtc_file_db_mysql_user=tlrtcfile
## 数据库密码
tl_rtc_file_db_mysql_password=tlrtcfile
前提 : 需要开启数据库配置
修改 tlrtcfile.env 中的管理后台相关配置即可, 启动后,输入配置的房间号,输入密码,即可进入管理后台
## 管理后台房间号
tl_rtc_file_manage_room=tlrtcfile
## 管理后台密码
tl_rtc_file_manage_password=tlrtcfile
修改 tlrtcfile.env 中的企业微信通知相关配置即可
# ## 企业微信通知开关
tl_rtc_file_notify_open=false
## 企业微信通知机器人KEY,正常通知,如果有多个key,逗号分隔
tl_rtc_file_notify_qiwei_normal=
## 企业微信通知机器人KEY,错误通知,如果有多个key,逗号分隔
tl_rtc_file_notify_qiwei_error=
修改 tlrtcfile.env 中的OSS存储相关配置即可
## oss-seafile存储库ID
tl_rtc_file_oss_seafile_repoid=
## oss-seafile地址
tl_rtc_file_oss_seafile_host=
## oss-seafile用户名
tl_rtc_file_oss_seafile_username=
## oss-seafile密码
tl_rtc_file_oss_seafile_password=

## oss-alyun存储accessKey
tl_rtc_file_oss_alyun_AccessKey=
## oss-aly存储SecretKey
tl_rtc_file_oss_alyun_Secretkey=
## oss-aly存储bucket
tl_rtc_file_oss_alyun_bucket=

## oss-txyun存储accessKey
tl_rtc_file_oss_txyun_AccessKey=
## oss-txyunt存储SecretKey
tl_rtc_file_oss_txyun_Secretkey=
## oss-txyun存储bucket
tl_rtc_file_oss_txyun_bucket=

## oss-qiniuyun存储accessKey
tl_rtc_file_oss_qiniuyun_AccessKey=
## oss-qiniuyunt存储SecretKey
tl_rtc_file_oss_qiniuyun_Secretkey==
## oss-qiniuyun存储bucket
tl_rtc_file_oss_qiniuyun_bucket=
修改 tlrtcfile.env 中的openai相关配置即可
## openai-key,如果有多个key,逗号分隔
tl_rtc_file_openai_keys=
目前有两种形式去生成使用turn服务的帐号密码,一种是固定帐号密码 (优先推荐),一种是有效期帐号密码。选一种方式即可
ubuntu示例:
- 安装coturn
sudo apt-get install coturn
有效帐号密码 : docker/coturn/turnserver-with-secret-user.conf
- 修改
listening-device,listening-ip,external-ip,static-auth-secret,realm几个字段即可 - 启动turnserver
turnserver -c /这个地方路径填完整/conf/turn/turnserver-with-secret-user.conf
固定帐号密码 : docker/coturn/turnserver-with-fixed-user.conf
- 修改
listening-device,listening-ip,external-ip,user,realm几个字段即可 - 生成用户
turnadmin -a -u 帐号 -p 密码 -r 这个地方填配置文件中的relam - 启动turnserver
turnserver -c /这个地方路径填完整/docker/coturn/turnserver-with-secret-user.conf
部署好coturn后,在对应的 tlrtcfile.env 配置中设置好webrtc相关信息即可
## webrtc-stun中继服务地址
tl_rtc_file_webrtc_stun_host=
## webrtc-turn中继服务地址
tl_rtc_file_webrtc_turn_host=
## webrtc中继服务用户名
tl_rtc_file_webrtc_turn_username=tlrtcfile
## webrtc中继服务密码
tl_rtc_file_webrtc_turn_credential=tlrtcfile
## webrtc中继服务Secret
tl_rtc_file_webrtc_turn_secret=tlrtcfile
## webrtc中继服务帐号过期时间 (毫秒)
tl_rtc_file_webrtc_turn_expire=86400000
目前支持 官方镜像 和 自行打包镜像,使用官方镜像目前支持两种操作方式 docker脚本启动,docker-compose启动
和自行在 服务器/电脑部署 不同的是,docke环境默认开启数据库,coturn服务,无须过多额外操作,启动即可用。
按需修改好 tlrtcfile.env 配置 (或使用默认配置也可) 后,进入 bin/ 目录执行脚本 auto-pull-and-start-docker.sh
chmod +x ./auto-pull-and-start-docker.sh
./auto-pull-and-start-docker.sh
按需修改好 tlrtcfile.env 配置 (或使用默认配置也可) 后,根据你的Docker Compose版本在主目录执行如下对应的命令
- 对于
Docker Compose V1
docker-compose --profile=http up -d
- 对于
Docker Compose V2
docker compose --profile=http up -d
确认修改好 tlrtcfile.env 配置文件 (或使用默认配置也可) 后, 进入 docker/ 目录后根据你的Docker Compose版本在主目录执行如下对应的命令
- 对于
Docker Compose V1
docker-compose -f docker-compose-build-code.yml up -d
- 对于
Docker Compose V2
docker compose -f docker-compose-build-code.yml up -d
除了上面的手动安装,docker官方镜像,docker自己打包镜像之外,还支持自动脚本,托管平台一键部署等
下载项目后,可以进入 bin/ 目录,选择对应的系统脚本,直接执行即可,会自动检测安装环境,自动安装依赖,自动启动服务
注意 : 执行之前可以先修改好配置,如使用默认配置,后续修改需要重启两个服务才能生效,重启可以先执行 停止服务脚本,然后再次执行 自动脚本 即可
chmod +x ./ubuntu16/*.sh

cd ubuntu16/

./auto-check-install-http.sh
使用https方式则是执行这个脚本
./auto-check-install-https.sh
停止服务脚本 :
./auto-stop.sh
windows/auto-check-install-http.bat
或者使用https方式则是执行这个脚本
windows/auto-check-install-https.bat
