nanoDAP-wl is a cmsis-dap based wireless debugger made by the laboratory. It is plug and play, fast, and supports virtual serial ports. The wireless debugger includes a transmitter/receiver. Based on 2.4G wireless communication, it can program and debug the target within 10m. In some scenarios where the wired debugger is inconvenient to debug, such as the target is always in a moving state (aircraft, Cars, robots, etc.), the target has been assembled into a product form and installed on a wall or high place. At this time, the use of a wireless debugger can better solve the debugging problems in these scenarios and effectively improve the research and development efficiency.
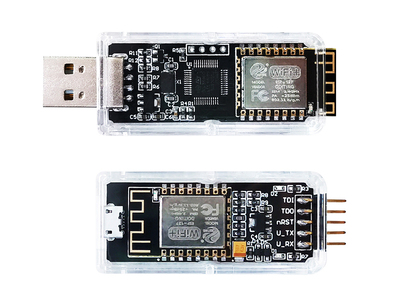
- Simple to use, no need to install additional driver on the PC, just power on the transmitter and receiver separately, wait for the wireless connection to succeed, and then start debugging immediately
- SWD interface
- JTAG interface
- USB CDC serial port
- The receiver supports power supply (5V/3.3V) to the target board and power supply (5V/3.3V) from the target board to work
- Support MDK/IAR/OpenOCD, support debugging and development under Windows/Linux/Mac
- The software is implemented based on CMSIS-DAP, using the USB HID protocol, you can download and debug without installing any driver
- used to debug aircraft, cars, and robots. Since the debugging target is usually in a moving state, if you use a traditional debugger, it is not only troublesome to download, but also impossible to perform single-step debugging.
- The target board has been assembled with a shell and becomes a product form. At this time, the traditional wired method is inconvenient for debugging.
- The product is installed in a high place, such as a street lamp, a high tower, etc., and it is inconvenient to debug using a wired debugger.
nanoDAL-wl supports JTAG and SWD interfaces. If your debugging target is based on Cortex-M series chips, it is recommended to use SWD interface to connect and debug. The SWD protocol requires only two signal lines CLK and IO to achieve debugging. It may be marked as SWCLK and SWDIO on your target board, or it may be marked as TCK and TMS (in fact, this is because the SWD interface multiplexes the JTAG interface. you only need to connect GND, CLK, IO, 3.3V to realize debugging.
The wireless connection configuration does not need to install additional software to configure. power on the transmitter and receiver and observe that the blue light on the wireless module changes from flashing to steady on, which means that the wireless connection has been established. After the wireless connection is established, you can use it as a wired debugger.
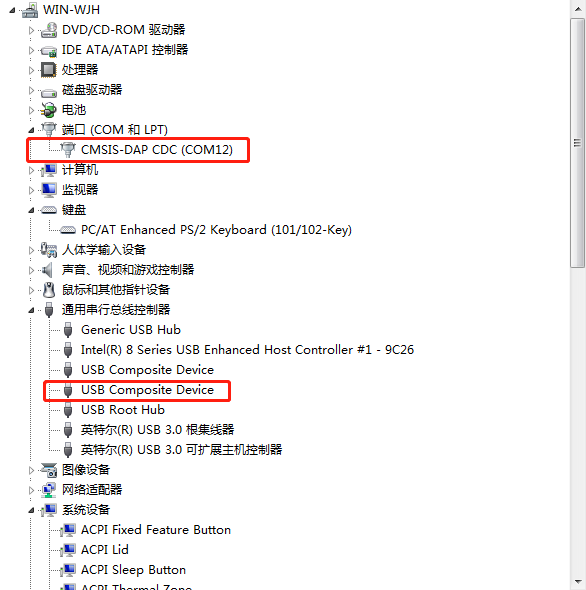
power on the transmitter and receiver, plug the transmitter into PC USB, if everything is ok, there will appear a CDC port and a USB HID device
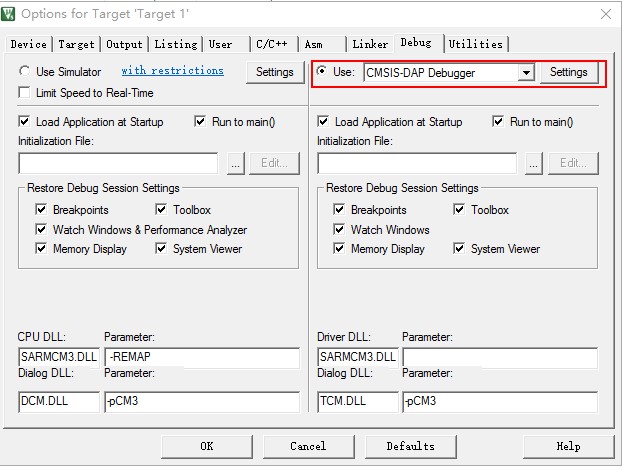
select CMSIS-DAP Debugger in Option -> Debug
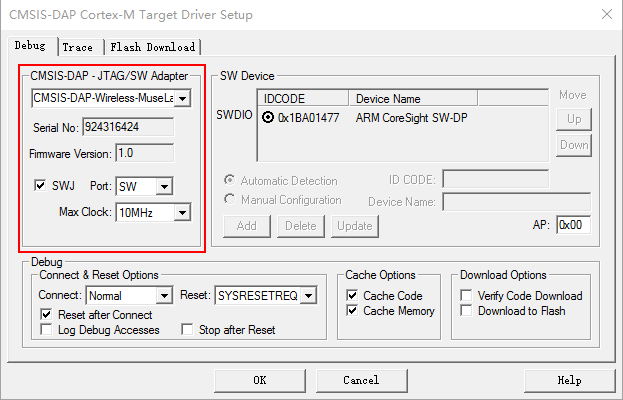
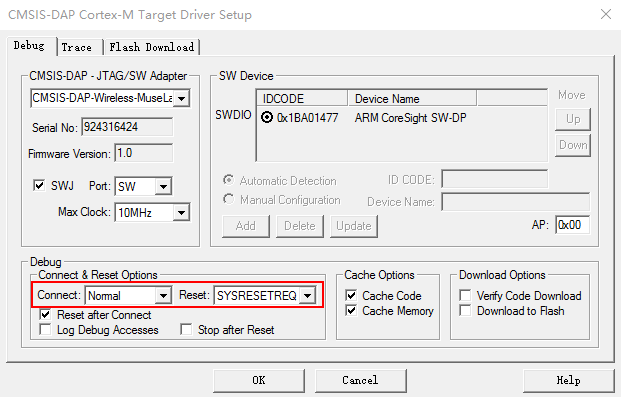
click Settings in Option -> Debug, recommend to select the swd port, and config the frequence to 10MHz
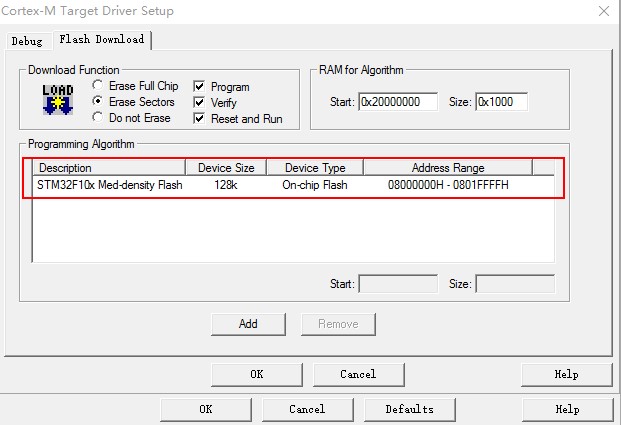
you need to config the flash algorithm for your target mcu, here is a example with stm32f1x
Note: select the Reset and Run for target auto reset after program done.
Generally, you may need to start the mcu when program done, config the Reset type to SYSRESETREQ here and select Reset and Run in the Flash Download Page above.
| LED | Description |
|---|---|
| transmitter blue light flashes slowly | Waiting to connect with receiver |
| transmitter Blue light is always on | Has successfully established a connection with receiver |
| transmitter Blue light flashes quickly | Exchanging data with receiver |
| receiver blue light flashes slowly | Waiting to connect with transmitter |
| receiver Blue light is always on | Has successfully established a connection with transmitter |
| receiver Blue light flashes quickly | Exchanging data with transmitter |
Since the wireless debugger works in the ISM 2.4G public frequency band, and Bluetooth, wifi, and some remote controls all work in this frequency band, the electromagnetic interference in this frequency band is relatively large, which may cause communication failure. And if you are debugging indoors, indoor obstructions, antenna positions, and communication multipath effects may cause the connection to be disconnected. After detecting that the connection is disconnected, the transmitter and receiver will automatically re-establish the connection. Please observe the connection status indicator to restart debugging. If the communication is frequently disconnected, please check whether the power supply of the receiver is stable, and adjust the position and distance appropriately, which may affect the stability of the communication.
In an open field, wireless debugging within 10m can be achieved.
Each pair of nanoDAP-wl has been paired one by one when they leave the factory, and they will not interfere or cross-connect with each other. In theory, it can support 256 pairs of nanoDAP-wl to work at the same time.
The firmware of the wireless emulator has been carefully designed to support one transmitter and multiple receivers for pairing (of course, only one pair of transmitters and receivers can be in operation at the same moment). In some usage scenarios, you may only need to purchase one transmitter and multiple receivers. There is still no need to install additional software for pairing. You only need to power on the transmitter, short-circuit the nRST pin of the receiver to GND, and then power on. At this time, the receiver will search for the transmitter in the current wireless frequency band again after it is started. Pair, wait for the red light on the receiver to change to green, that means the pairing is successful.
The typical use scenario is to program and debug the microcontroller. Theoretically, the cores of the Cortex-M series can be programmed and debugged using nanoDAP-wl. Typical chips are the full range of STM32 chips, the full series of GD32, and the nRF51/52 series. nanoDAP-wl support JTAG protocol, theoretically it can support more chip debugging, such as ARM Cortex-A series, MIPS, DSP, FPGA, etc.
You can use openocd with nanoDAP-wl for debugging under linux (openocd can also be used under windows). Openocd is the most popular and powerful open source debugger software in the world. Since openocd is cross-platform, you can also use windows Use openocd to debug and burn the chip by writing appropriate configuration scripts. Due to the content involved, please search for more instructions or leave a message for consultation.
any questions or suggestions, please raise them on the Issues page