A tutorial about Java Annotation Processing Tool.
- Introduction
- Overview
- APT Code Generator Project
- APT Example Project
- Integration with Eclipse
- Conclusion
- License
- References
“The apt tool is a command-line utility for annotation processing. It includes a set of reflective APIs and supporting infrastructure to process program annotations (JSR 175). These reflective APIs provide a build-time, source-based, read-only view of program structure. They are designed to cleanly model the Java programming language's type system after the addition of generics (JSR 14).
The apt tool first runs annotation processors that can produce new source code and other files. Next, apt can cause compilation of both original and generated source files, thus easing the development cycle.” (Oracle APT)
In the last times I have used APT to auto generate Java code in order to improve developers’ productivity and to minimize errors. Since the APT is integrated in the Java compiler, it is activated by default at compile time so no extra effort is required to adopt it in the projects. Moreover modern IDEs, such as Eclipse, have built-in features to support it at development time. Since the APT works at compile time, all the code (annotations, processors, etc.) needed to activate the APT has to be included in the classpath. Moreover the code used by the APT cannot have direct reference to the source code. At least the source code cannot be modified: only new classes can be created.
In this tutorial I’ll show a simple example about how to use it. In order to generate Java code I’ll use Code Model.
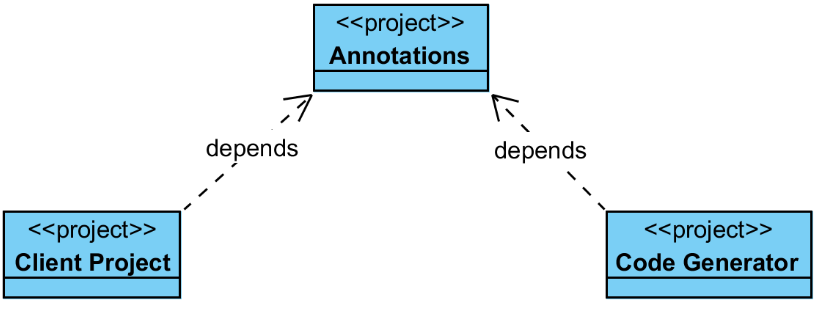
In this tutorial there are two projects, one containing the code needed to activate the APT, called code-generator, and one representing a hypothetical client project, called example.
Typically the annotations used to activate the APT are included in a third project referred by both the code generator and the client project in order to prevent the client project from having a dependency from the code generator project.
The hypothetical client project requires that every entity of the model can be uniquely identified on the basis of one or more of its fields. Moreover when a field is modified a Journal Monitor has to be notified.
The first solution is that every entity class overrides the equals and hashCode methods and that every set method invokes the Journal Monitor to notify it about the update. This approach is error prone and it is expensive to make changes.
The second solution is to automate the process using APT to generate the boiler plate code. As the source code cannot be modified during the APT execution, it is necessary to design the model architecture in order to support this constraint.
The following class diagram describes the model architecture adopted to allow the usage of the APT for code generation.
The equals and hashCode methods are placed in an external class called Key that extends AbstractModelKey and that is auto generated by the APT. The equals and hashCode methods of the AbstractModel delegate the operations to the related Key class: the instance of the Key class is created using the Reflections. For each entity, an abstract class is created and it is annotated in order to activate APT during the compilation. These abstract classes extend AbstractModel and they contain only the attributes as the set and get methods will be included in the auto generated classes that will extend the abstract entity class. Every set method will invoke the notifyUpdate method of AbstractModel.
Two annotations will be created: Model and ModelId. The first is used to annotate the abstract entity class and will activate the APT, the second is used to annotate the attributes representing the key.
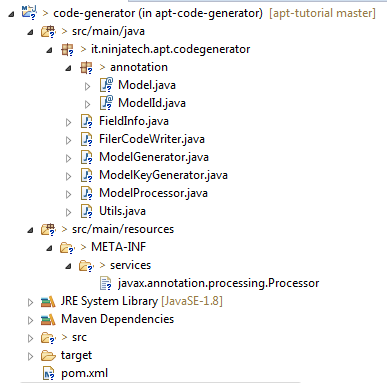
The Code Generator project contains the annotations used to activate the APT, the Processor and all the support classes needed to generate the code.
There are only two annotations, Model and ModelId.
The Model annotation is used to activate the APT.
@Retention(RetentionPolicy.SOURCE)
@Target(ElementType.TYPE)
public @interface Model {}
The @Retention annotation specifies the scope of the Model annotation. We want the compiler to discard it after the compilation phase so we set it to SOURCE. The @Target annotation specifies that this annotation can be applied only to TYPE elements. In fact we want to apply the Model annotation only to classes.
The ModelId annotation is used to generate the Key class. It is not used to activate the APT but it is used during the processing of the Model annotation.
@Retention(RetentionPolicy.SOURCE)
@Target(ElementType.FIELD)
public @interface ModelId {}
As well as for the Model annotation we don’t want to retain the ModelId annotation after the compilation phase so the @Retention is set to SOURCE. The @Target is set to FIELD as we want to apply the annotation only to the fields of the models.
The APT needs the Annotation Processors to operate. Each Processor can process more than one annotation. All the annotations a Processor can process are specified by the @SupportedAnnotationTypes annotation. Each Processor inherits from AbstractProcessor and have to override the process method.
The ModelProcessor is the Processor used to process the Model annotation.
@SupportedAnnotationTypes({
"it.ninjatech.apt.codegenerator.annotation.Model"
})
@SupportedSourceVersion(SourceVersion.RELEASE_8)
public class ModelProcessor extends AbstractProcessor {}
I have overridden the init method too, that is invoked by the APT to initialize the Processor. In this method I set some helper objects I will use after:
- Filer used to create new files.
- Messager used to report error messages, warnings and other notices.
- Element Utils containing utility methods for operating on program elements.
@Override
public synchronized void init(ProcessingEnvironment processingEnvironment) {
    super.init(processingEnvironment);

    this.filer = processingEnvironment.getFiler();
    this.messager = processingEnvironment.getMessager();
    this.elementUtils = processingEnvironment.getElementUtils();
}
As said, the Processor has to override the process method
@Override
public boolean process(Set<? extends TypeElement> annotations, RoundEnvironment roundEnvironment) {
    try {
        Set<? extends Element> elements = roundEnvironment.getElementsAnnotatedWith(Model.class);
        if (!elements.isEmpty()) {
            JCodeModel codeModel = new JCodeModel();
            ModelGenerator modelGenerator = new ModelGenerator(codeModel);
            ModelKeyGenerator modelKeyGenerator = new ModelKeyGenerator(codeModel);

            for (Element element : elements) {
                if (element.getKind() == ElementKind.CLASS) {
                    TypeElement modelType = (TypeElement) element;
                    generate(modelType, modelGenerator, modelKeyGenerator);
                    this.messager.printMessage(Kind.NOTE, String.format("[Model] Generated class %s", modelType.getQualifiedName().toString()));
                }
            }

            codeModel.build(new FilerCodeWriter(this.filer));
        }
    }
    catch (Exception e) {
        this.messager.printMessage(Kind.ERROR, e.getMessage());
    }

    return true;
}
In the process method I retrieve all the elements annotated by the Model annotation and for each element I call the generate method to generate the Model and the ModelKey classes. I use the Code Model library to generate the code.
The classes used by the APT belong to the
javax.lang.modelpackage and subpackages.
To notify APT about Processors it can be used the Annotation Processing Factories or the Service Provider Interface (SPI).
In this tutorial I use SPI. I create a file called javax.annotation.processing.Processor located in the META-INF/services in which I put the fully qualified name of the processor:
it.ninjatech.apt.codegenerator.ModelProcessor
The project uses Apache Maven and in order to create a JAR containing all the third party libraries I add the assembly plugin.
<plugin>
	<groupId>org.apache.maven.plugins</groupId>
	<artifactId>maven-assembly-plugin</artifactId>
	<version>${assembly-plugin.version}</version>
	<executions>
		<execution>
			<phase>package</phase>
			<goals>
				<goal>single</goal>
			</goals>
		</execution>
	</executions>
	<configuration>
		<descriptorRefs>
			<descriptorRef>jar-with-dependencies</descriptorRef>
		</descriptorRefs>
		<appendAssemblyId>false</appendAssemblyId>
	</configuration>
</plugin>
The need to create a single JAR with all the dependencies is to avoid adding several JARs to the classpath.
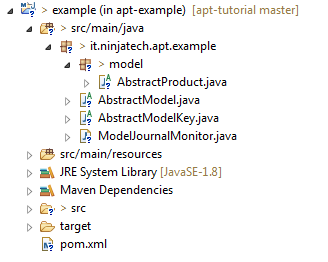
The Example project represents the hypothetical client project.
In this project there are the ModelJournalMonitor, AbstractModel and AbstractModelKey classes. Moreover there is the AbstractProduct class that is the first entity of the project.
The ModelJournalMonitor is the journal monitor that has to be notified when an update to an entity takes place. It’s a Singleton and exposes two methods
public static ModelJournalMonitor getInstance()that returns the instance of the journal monitor and
public void notifyUpdate(AbstractModel model)invoked when an entity is updated.
AbstractModel is the abstract class of the entities.
It exposes only one abstract method
protected abstract String keyQualifiedName();that returns the fully qualified name of the related Key class and it is invoked by the getKey method to create a new instance of the Key
public final <Model extends AbstractModel> AbstractModelKey<Model> getKey() {
    AbstractModelKey<Model> result = null;

    try {
        result = (AbstractModelKey<Model>)Class.forName(keyQualifiedName()).getConstructor(this.getClass()).newInstance(this);
    }
    catch (Exception e) {
        throw new RuntimeException(String.format("Key construction failed: %s", keyQualifiedName()), e);
    }

    return result;
}
It implements the hashCode and equals methods delegating the execution to the Key class
@Override
public int hashCode() {
    AbstractModelKey<?> key = getKey();
    return key.hashCode();
}

@Override
public boolean equals(Object obj) {
    if (this == obj) {
        return true;
    }
    if (obj == null) {
       return false;
    }
    if (getClass() != obj.getClass() || !(obj instanceof AbstractModel)) {
        return false;
    }
    AbstractModelKey<?> myKey = getKey();
    AbstractModelKey<?> otherKey = ((AbstractModel)obj).getKey();

    return myKey.equals(otherKey);
}
Moreover it contains the notifyUpdate method used by the children classes to notify the journal monitor about the update of the entity
protected final void notifyUpdate() {
    ModelJournalMonitor.getInstance().notifyUpdate(this);
}
AbstractModelKey is the abstract class of the Keys. It exposes only two abstract methods
@Override
public abstract int hashCode();

@Override
public abstract boolean equals(Object other);
AbstractProduct is the first entity class. It is annotated with the Model annotation in order to activate APT and it contains only two attributes, id and name. The id attribute is annotated with ModelId as it is the key of the entity.
@Model
public abstract class AbstractProduct extends AbstractModel {

    @ModelId
    protected Integer id;
    protected String name;

}
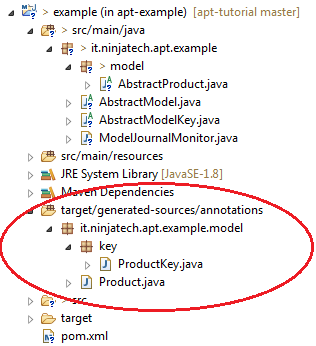
When the APT is executed it produces two classes Product and ProductKey. The generated classes are saved in the target/generated-sources/annotations directory.
Note: Since the generated classes are placed under the
targetdirectory they are not versioned by a code versioning tool.
Following is the generated code of the Product class
@Generated(value = "it.ninjatech.apt.example.model.Product", date = "2016-08-29T15:55:35+0200")
public class Product
    extends AbstractProduct
{


    @Override
    public String keyQualifiedName() {
        return "it.ninjatech.apt.example.model.key.ProductKey";
    }

    public Integer getId() {
        return this.id;
    }

    public void setId(Integer id) {
        this.id = id;
        notifyUpdate();
    }

    public String getName() {
        return this.name;
    }

    public void setName(String name) {
        this.name = name;
        notifyUpdate();
    }

}
The class overrides the keyQualifiedName returning the name of the ProductKey class and it contains the set and get methods of the two attributes, id and name. The set methods invoke the notifyUpdate method as expected.
Following is the generated code of the ProductKey class
@Generated(value = "it.ninjatech.apt.example.model.key.ProductKey", date = "2016-08-29T15:55:35+0200")
public class ProductKey
    extends AbstractModelKey<Product>
{

    private final Integer id;

    public ProductKey(Product model) {
        this.id = model.getId();
    }

    public ProductKey(Integer id) {
        this.id = id;
    }

    @Override
    public int hashCode() {
        final int prime = 31;
        int result = 1;
        result = ((prime*result)+((id == null)? 0 :id.hashCode()));
        return result;
    }

    @Override
    public boolean equals(Object obj) {
        if (this == obj) {
            return true;
        }
        if (obj == null) {
            return false;
        }
        if (getClass()!= obj.getClass()) {
            return false;
        }
        ProductKey other = ((ProductKey) obj);
        if (this.id == null) {
            if (other.id!= null) {
                return false;
            }
        } else {
            if (!this.id.equals(other.id)) {
                return false;
            }
        }
        return true;
    }

    public Integer getId() {
        return this.id;
    }

}
It overrides the hashCode and equals methods evaluating the result on the base of the Product id attribute, as expected.
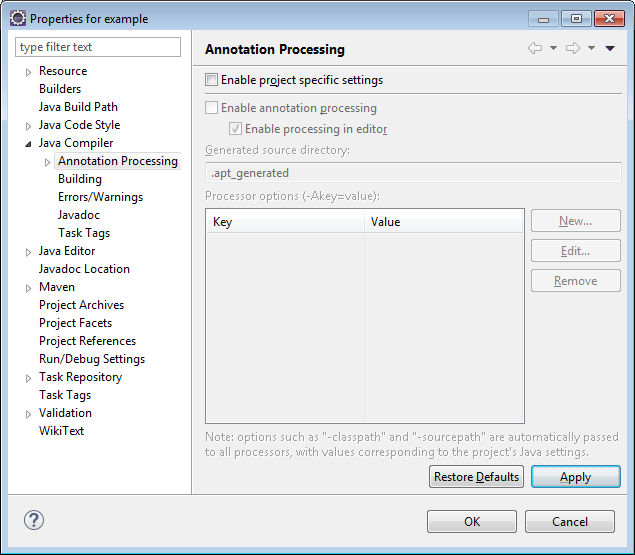
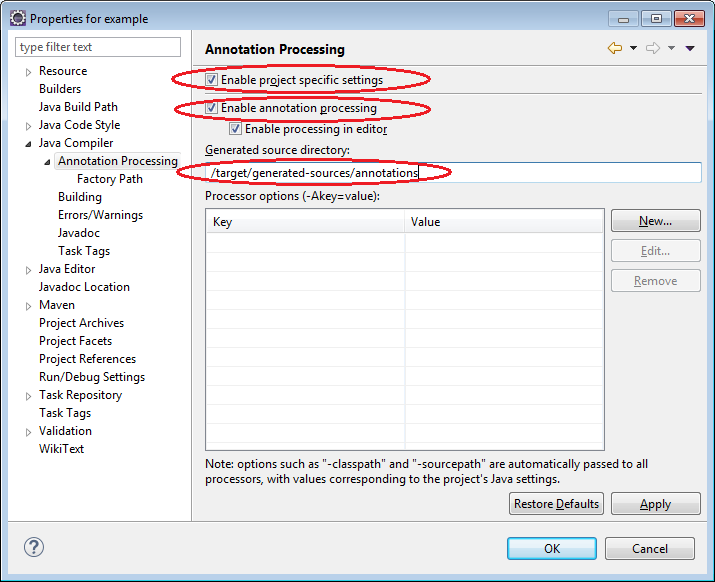
Since the APT is integrated into the Java compiler it can be used by Eclipse too. In fact, Eclipse, has an option to enable annotation processing. In the project properties, under Java Compiler, there is the Annotation Processing settings pane.
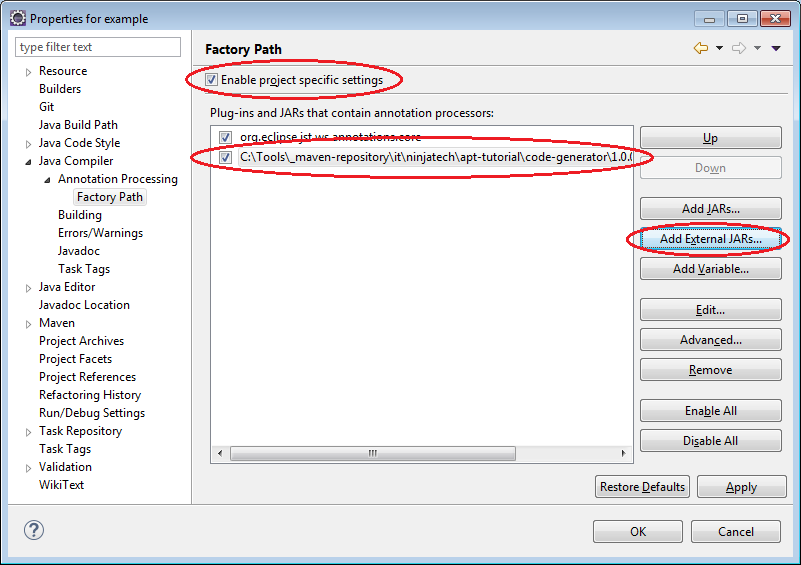
To add our code generator we have to enable the project specific settings in the Factory Path pane and add the code generator JAR to the Plug-ins and JARs that contain annotation processors list
Now we can enable the project specific settings in the Annotation Processing pane, enable annotation processing and set the generated source directory to /target/generated-sources/annotations.
Applying the new settings the project structure changes and now Eclipse shows the generated classes.
It is possible to access to the messages published by the Messager class opening the Error Log
At this point every time the AbstractProduct class is saved the generated code is produced.
The APT is a powerful tool to automate some development tasks. It is integrated into the Java compiler so it requires no extra effort to adopt it. There are many situations in which APT can be used, especially when there are much boiler plate code. Moreover the main IDEs are ready to take advantage of it.
Released and distributed under the Apache License Version 2.0.
