Scratch is a visual programming tool which allows the user to create animations and games with a drag-and-drop interface. It allows you to create your own computer games, interactive stories, and animations using some programming techniques without actually having to write code. In this workshop you'll learn how to control the raspberry pi's sense hat (a real astronauts's tool) using scratch.
By following the steps in this tutorial, you will learn:
- How to set up the sense hat with scratch
- Using the LEDs on the sense hat
- Using the joystick on the sense hat
You'll find Scratch GPIO 7 on the desktop of Raspbian. Once opened you will see a window like this:

Yours may look different, thats not a problem. We won't be using any of the right hand side, with the exception of the flag button and the stop button to test our code.
Will start of by testing our sense hat to make sure it's been connected alright and it's working fine. By doing this we will also learn how to setup the sense hat on scratch.
- Click on the Block Palette and select Control
- Next drag a When green flag clicked block and place it on the scripts area in the middle of the screen.
- Click on the the Block Palette and select Vriables

- Click on Make a variable
- Name your variable AddOn and press Ok

- Than add a orange set block from the variables blocks and connect it to the When green flag clicked block
- Since the only variable we have so far is the AddOn one it should automatically be selected, if it isn't click the little black arrow pointing down on the set block and select AddOn
- Click on the little white box at the end of the set block, the one with the number 0 in it. Everything should now be highlighted blue, now type in SenseHat.


Congrats You've just set up the sense hat on scratch. You should have something like this on your screen

Lets explain variables real quick. Think of variables as boxes that you put things inside. You can Put in a number or a word so you can use it later. In this case we told Scratch that we where using the Sense Hat by giving a variable the word SenseHat. Whats inside a variable can be changed at any time with the set block
Now lets test the sense hat.
- Click on the Block Palette and select Control again
- This time we are selecting the broadcast block and connecting it to the set block
- Now click on the little black arrow at the end of the broadcast block and click on new...

- Now name the message Sweep, now it's really important that you spell sweep just as i did including the capital letter. Now press Ok to finish it off.

- We've done it. All we need to do now is press the green flag button to see the results. You should see your sense hat start to light up row by row.


But now you see we have a problem. The LEDs are not turning off. This is a problem if we want to do anything with the sense hat's LEDs.
To fix this all we need to do is create a new broadcast with the message AllOff. Look at the previous steps that we used to create the first broadcast. Use those steps to create a new broadcast, but this time give the message the name AllOff instead of Sweep. You should have something looking like this:

Now run the program and see how it turns off all the LEDs after they all turn on.
For this bit we can re-use some of the most of the last peace of work. All we are going to do is light up one of the LEDs. Lets get right into it than.
- Drag the last broadcast block from the last example so that it's not connected anymore, place it anywhere.
- Right click the broadcast block we just disconnected and than click delete
- Now click the broadcast that still there and make it a AllOff message. You should have something like this:

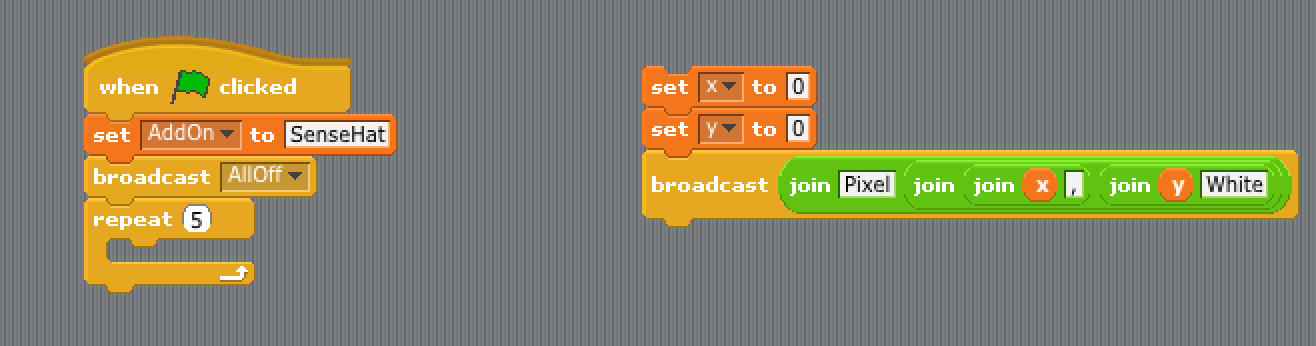
- Now we're going to set up 2 new variables. One named x and the other named y, remember we've done this before already. If you're not sure how to do it go back and check on previous steps
- Now we are going to set the value of x and y to 0. You should have something looking like this:

- Now we're going to add a new broadcast to the end of it.
- Instead of changing the message of the broadcast were going to add a couple of joins to the mix. Click on operator on the Block Pallett. Drag the join inside of the broadcast.
- Name the first block of the join Pixel
- Drag another join block to the end of the previous join block

- Now add two more join blocks inside that new join block. You should have something like this now:

- Now You should have 4 boxes inside the join blocks, two with the word 'hello' written in them and two with the word 'world' written in them. We are going to change that now, the first box with the word 'hello' in should have the variable x we created earlier. To do that go into the Variables block in the block Pallett and drag the little circle with an x inside of it
 to that first 'hello'
 - The white box infront of the last one, the first one with the word 'world' in, should have a comma instead of the word 'world'
- The next white box should have the variable y inside it
- And the last box inside all of those joins should have White written inside it. It should all look something like this:


The join block joins words and variable together into one thing. So what we just broadcasted was Pixel 0,0 White. We could have just created a new message saying just that and used that instead. But than if we wanted to change anything we would have to create new messages for each one. By using variables we can change parts of the messages with out having to create new messages all the time Now to explain what we just did. The variable x is used to tell scratch how many LED's to left we want to go, the y variable is used to tell scratch how many LEDs down we want to go up by. We just told Scratch that we did not want to go up and that we did not want to go to left which made it turn on the very first LED.
Now we are going to learn how to create a galaxy using random numbers.
- First click and hold on the first set block after the first broadcast from the last example. Drag it so it disconnects from the broadcast. DO NOT DELETE we are going to re use it, just put it to the side for now. It should look something like this (your disconnected bit doesn't have to be in the same place as mine)

- Now click on the Control block in the Block Pallett. Drag the repeat block and connect it to the broadcast connected to the green flag. Give it the number 5. You should have something like this:
- Now drag the blocks we disconnected earlier into the repeat block
- Click the Operator block in the Block Pallett drag the pick random block into both of the set block inside the repeat. Give the boxes the value of 1 and 5 for each of the pick random bloc. Give the boxes the value of 1 and 5 for each of the pick random block. It should look something like this:


There we have it, we've created a galaxy.
The pick random block picks a random number in between the two numbers we told it. The repeat block repeats whatever is inside it however many times we tell it.
Now we're going to learn how to use the joystick to create new galaxies. Before we start I need to tell you that the joystick on the sense hat is the same as the arrow keys on your keyboard Now lets get right to it than.
- Disconnect the repeat block. Do not delete it we are going to re-use it later.
- Click the control block in the Block Pallett, drag the forever block and connect it to our program. You should have something like this:

- While we are in the Control block select the if block and place it in the forver block
- The if block has a slot (not the empty space inside it). This is where we put the the condition for running the code inside the if block. We can find the condition we want in the block Sensing inside the Block Pallett. Drag and drop the key pressed block into the if block slot space. It should look something like this:

- Make sure the key we are waiting to be pressed is one of the arrow keys, I chose the right arrow key for my example
- Now drag the block we preveusly disconnected into the if block. It should look something like this:

- Now for the final stage click the Control block in the Block Pallett. Select the wait block, drag and drop it at the end of the forever block (but still inside it). It usually defaults to 1, if it isn't one please put 1 inside it. We are now done. You Should have something looking like this:


