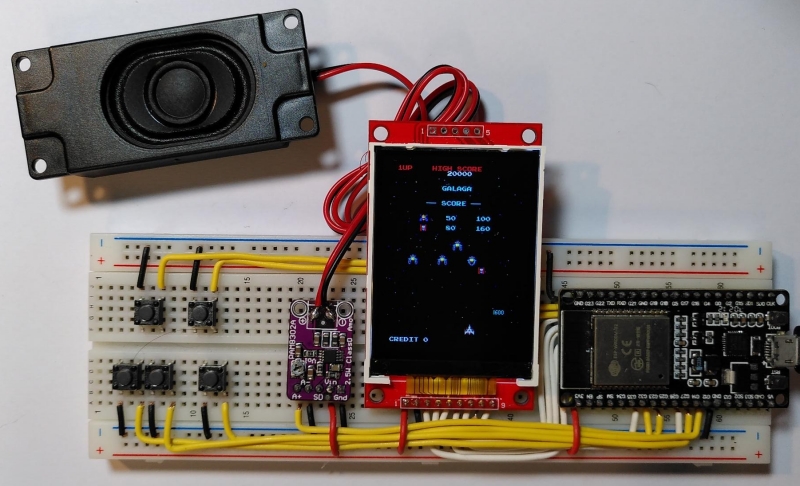
Galaga is one of the most iconic arcade machines of all times. It has been remade and emulated many times. So far the cheapest and smallest system able to do a faithful emulation of the original arcade machine was the raspberry pi. But even the much cheaper ESP32 should be able to easily emulate a machine from the early 80's, shouldn't it?
Well, things are not that easy. The galaga arcade was driven by three Z80 CPUs, each running at 3Mhz. Additionally the arcade machine included two more CPUs for button and coin handling and for audio support. And finally the hardware itself had dedicated support for simple wavetable audio, tilemap graphics and up to 64 sprites. The video resultion was 224 by 288 pixels. The ESP32 on the other hand comes with two cores running at 240MHz. But it lacks dedicated video hardware. Emulating the various CPUs as well as the handling of audio and graphics turned out to be challenging for the ESP32.
Cheap TFT screens with a resolution of 320 by 240 pixels are avaialable in various sizes from 2.0 inch to 3.2 inch allowing for a very small and cheap galagino setup.
These small displays usually allow for SPI clock rates of up to 40MHz allowing for a max screen refresh rate of ~30Hz. This is exactly half the refresh rate of the original arcade machine. 30Hz is sufficient for a very fluid gameplay.
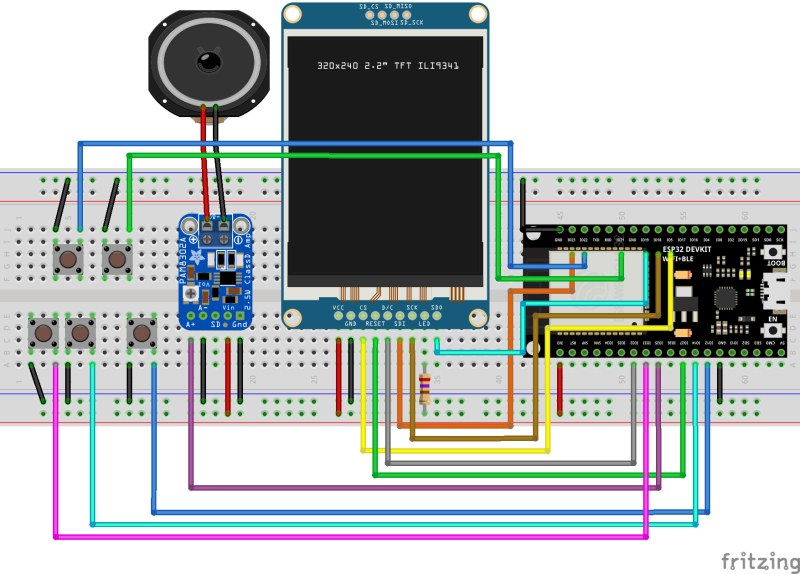
The hardware is built around one of those cheap ESP32 development boards like the ESP32 Devkit V4 depicted in the images below. The components needed are:
- ESP32 development board (e.g. Devkit V4)
- A 320x240 SPI TFT screen (no touch needed)
- Either a ILI9341 based screen as depicted, or
- a ST7789 based screen with 320x240 pixels
- An audio amplifier and speaker
- e.g. a PAM8302A and a 3W speaker (as seen in the photos), or
- a Keyestudio SC8002B, or similar
- five push buttons
- breadboard and wires
The entire setup should be connected as depiced below. The Devkit is too wide for the breadboard leaving no space above it to connect wires. Thus the wires going to the top pin row of the Devkit are placed underneath the DevKit with the connections done as shown in the image below.
The software consists of three parts:
- The Galagino specific code contained in this repository
- The original Galaga Namco Rev. B ROM files
- A Z80 software emulation
The ROM files have to be placed in the roms directory, together with the ZIP file containing the Z80 emulator. A set of python scripts is then being used to convert and patch the ROM data and emulator code and to include the resulting code into the galagino sketch directory. These scripts need to be run like so (this has yet only been tested under Linux, feedback for Windows is welcome):
$ cd romconv
$ ./audioconv.py > ../galagino/wavetables.h
$ ./cmapconv.py > ../galagino/colormaps.h
$ ./romconv.py > ../galagino/rom.h
$ ./spriteconv.py > ../galagino/spritemap.h
$ ./tileconv.py > ../galagino/tilemap.h
$ ./tileaddr.py > ../galagino/tileaddr.h
$ ./starsets.py > ../galagino/starseed.h
$ ./z80patch.py
Copying CodesCB.h
Copying Codes.h
Copying CodesXX.h
Copying CodesED.h
Copying CodesXCB.h
Copying Tables.h
Patching Z80.h
Patching Z80.c
$
Afterwards the galagino directory should contain the following files:
CodesCB.h    Codes.h      CodesXX.h    config.h     emulation.h
rom.h        starseed.h   tileaddr.h   video.cpp    wavetables.h
Z80.h        CodesED.h    CodesXCB.h   colormaps.h  emulation.c
galagino.ino spritemap.h  Tables.h     tilemap.h    video.h
Z80.c
With all these files in place, the galagino.ino sketch can be loaded into the Arduino IDE. The Arduino IDE must have the ESP32 board support installed and the appropriate board like e.g. the ESP32 Dev Module should be selected. Finally the default core used by Arduino should be 1 (this is the default) as Galagino will use core 0 for audio and video emulation.
The Galagino code can be configured through the galagino/config.h file. This is also the place where it's possible to choose between the ILI9143 controller (default) and the ST7789.
Also the pin assigmnent can be adjusted or the TFT SPI clock.
Galagino runs fluid and plays perfectly. Still a few things could be optimized.
- Displays allowing for 80MHz SPI clock could run the video at full 60Hz
- The SPI display update could be done using DMA which would significantly reduce the load on ESP32 core 0
- VGA output could be used to drive a VGA screen
- The ESP32's bluetooth could be used to connect to a wireless gamepad
- Galagino could be ported to the Raspberry Pi Pico and the DVI sock


