본 패키지는 협동 로봇 RB1_500e의 교육용 Gazebo Simulation 입니다. 이 문서는 패키지의 설명 문서이며, 구성은 다음과 같습니다.
-
What to do before simulation
-
Simulation Manual
- Download and Setting RobotControl2023
- Libraries used in RobotControl2023 Package
- How to run RobotControl2023 package, Please read section 2 before proceeding.
- Install ubuntu 20.04 and ROK-Noetic.
- ROS-Noetic install, link : https://wiki.ros.org/noetic/Installation/Ubuntu
- Normally, when you install the ROS-noetic, Gazebo, which version is 11, is installed.
However, If you want to find the extra information for Gazebo simulator, click the links below.
- Gazeobo-11 install, link : https://classic.gazebosim.org/tutorials?tut=install_ubuntu
- Install IDE (Intergrated Development Environment)
- Netbeans-IDE install, link : https://netbeans.apache.org/download/index.html
Java install before Netbeans install
- terminal
sudo apt update
sudo apt install openjdk-8-jdk
java -version
Netbeans-IDE install
- terminal
cd /usr/local/netbeans-x.x
//기존 netbeans의 uninstall.sh가 있는 폴더로 이동. (x.x는 현재버전)
//경로가 다를 수 있으니 확인할 것

sudo sh uninstall.sh
//uninstall 실행
-
NetBeans 16 setting의 다운로드 및 github 연동 문제가 있어 Netbeans 16 버전을 셋팅합니다.
-
Java install (11이상 버전 필요)
- terminal
sudo apt update
sudo apt install openjdk-11-jdk
java -version
- NetBeans download page 접속(해당 링크: https://netbeans.apache.org/download/nb16/index.html).
- 해당 링크에서 apache-betbeans_16-1_all.deb 파일을 다운로드 폴더에 다운 받습니다.
- deb 파일 설치 방법
*examplesudo dpkg -i packge_file_name.debsudo dpkg -i apache-netbeans_16-1_all.deb
- GitHub에 미리 가입한 상태면, 해당 패키지를 공동 작업하는데 있어 도움이됩니다.
따라서, 가입을 희망합니다. 또한,Token password를 발급받기 바랍니다.
토큰 발급 방법 을 참고하시기 바랍니다.
토큰은 생성 이후에 다시 확인할 수 없으니, 따로 저장해두어야 합니다.
1.Download and Setting RobotControl2023
-
RobotControl2023 Repository에 접속, link : https://github.com/swan0421/RobotControl2023
-
해당 Repository에 접속 후, 우측 상단의 Fork를 클릭하여, 본인의 Github Repository에 복제되었는지 확인합니다.
(swan0421/Robotcontrol2023->User_id/Robotcontrol2023)
Fork란?

다른 사람의 Github Repository 에서 내가 수정하거나 기능을 추가하고자 할 때,
해당 Repository를 내 Github Repository로 그대로 복제하는 기능이다.

Fork한 Repository는 원본 Repository와 연결되어 있어,
원본 Repository에 변화가 생기면, Fork한 Repository에 반영할 수 있다.
-
복제된 본인의 Repository에 접속 후에,
Code ▼라는 초록색 버튼이 있는데 클릭하여 URL 주소 (https:/~)을 복사하거나,Download ZIP을 통해 해당 패키지를 다운 받습니다. -
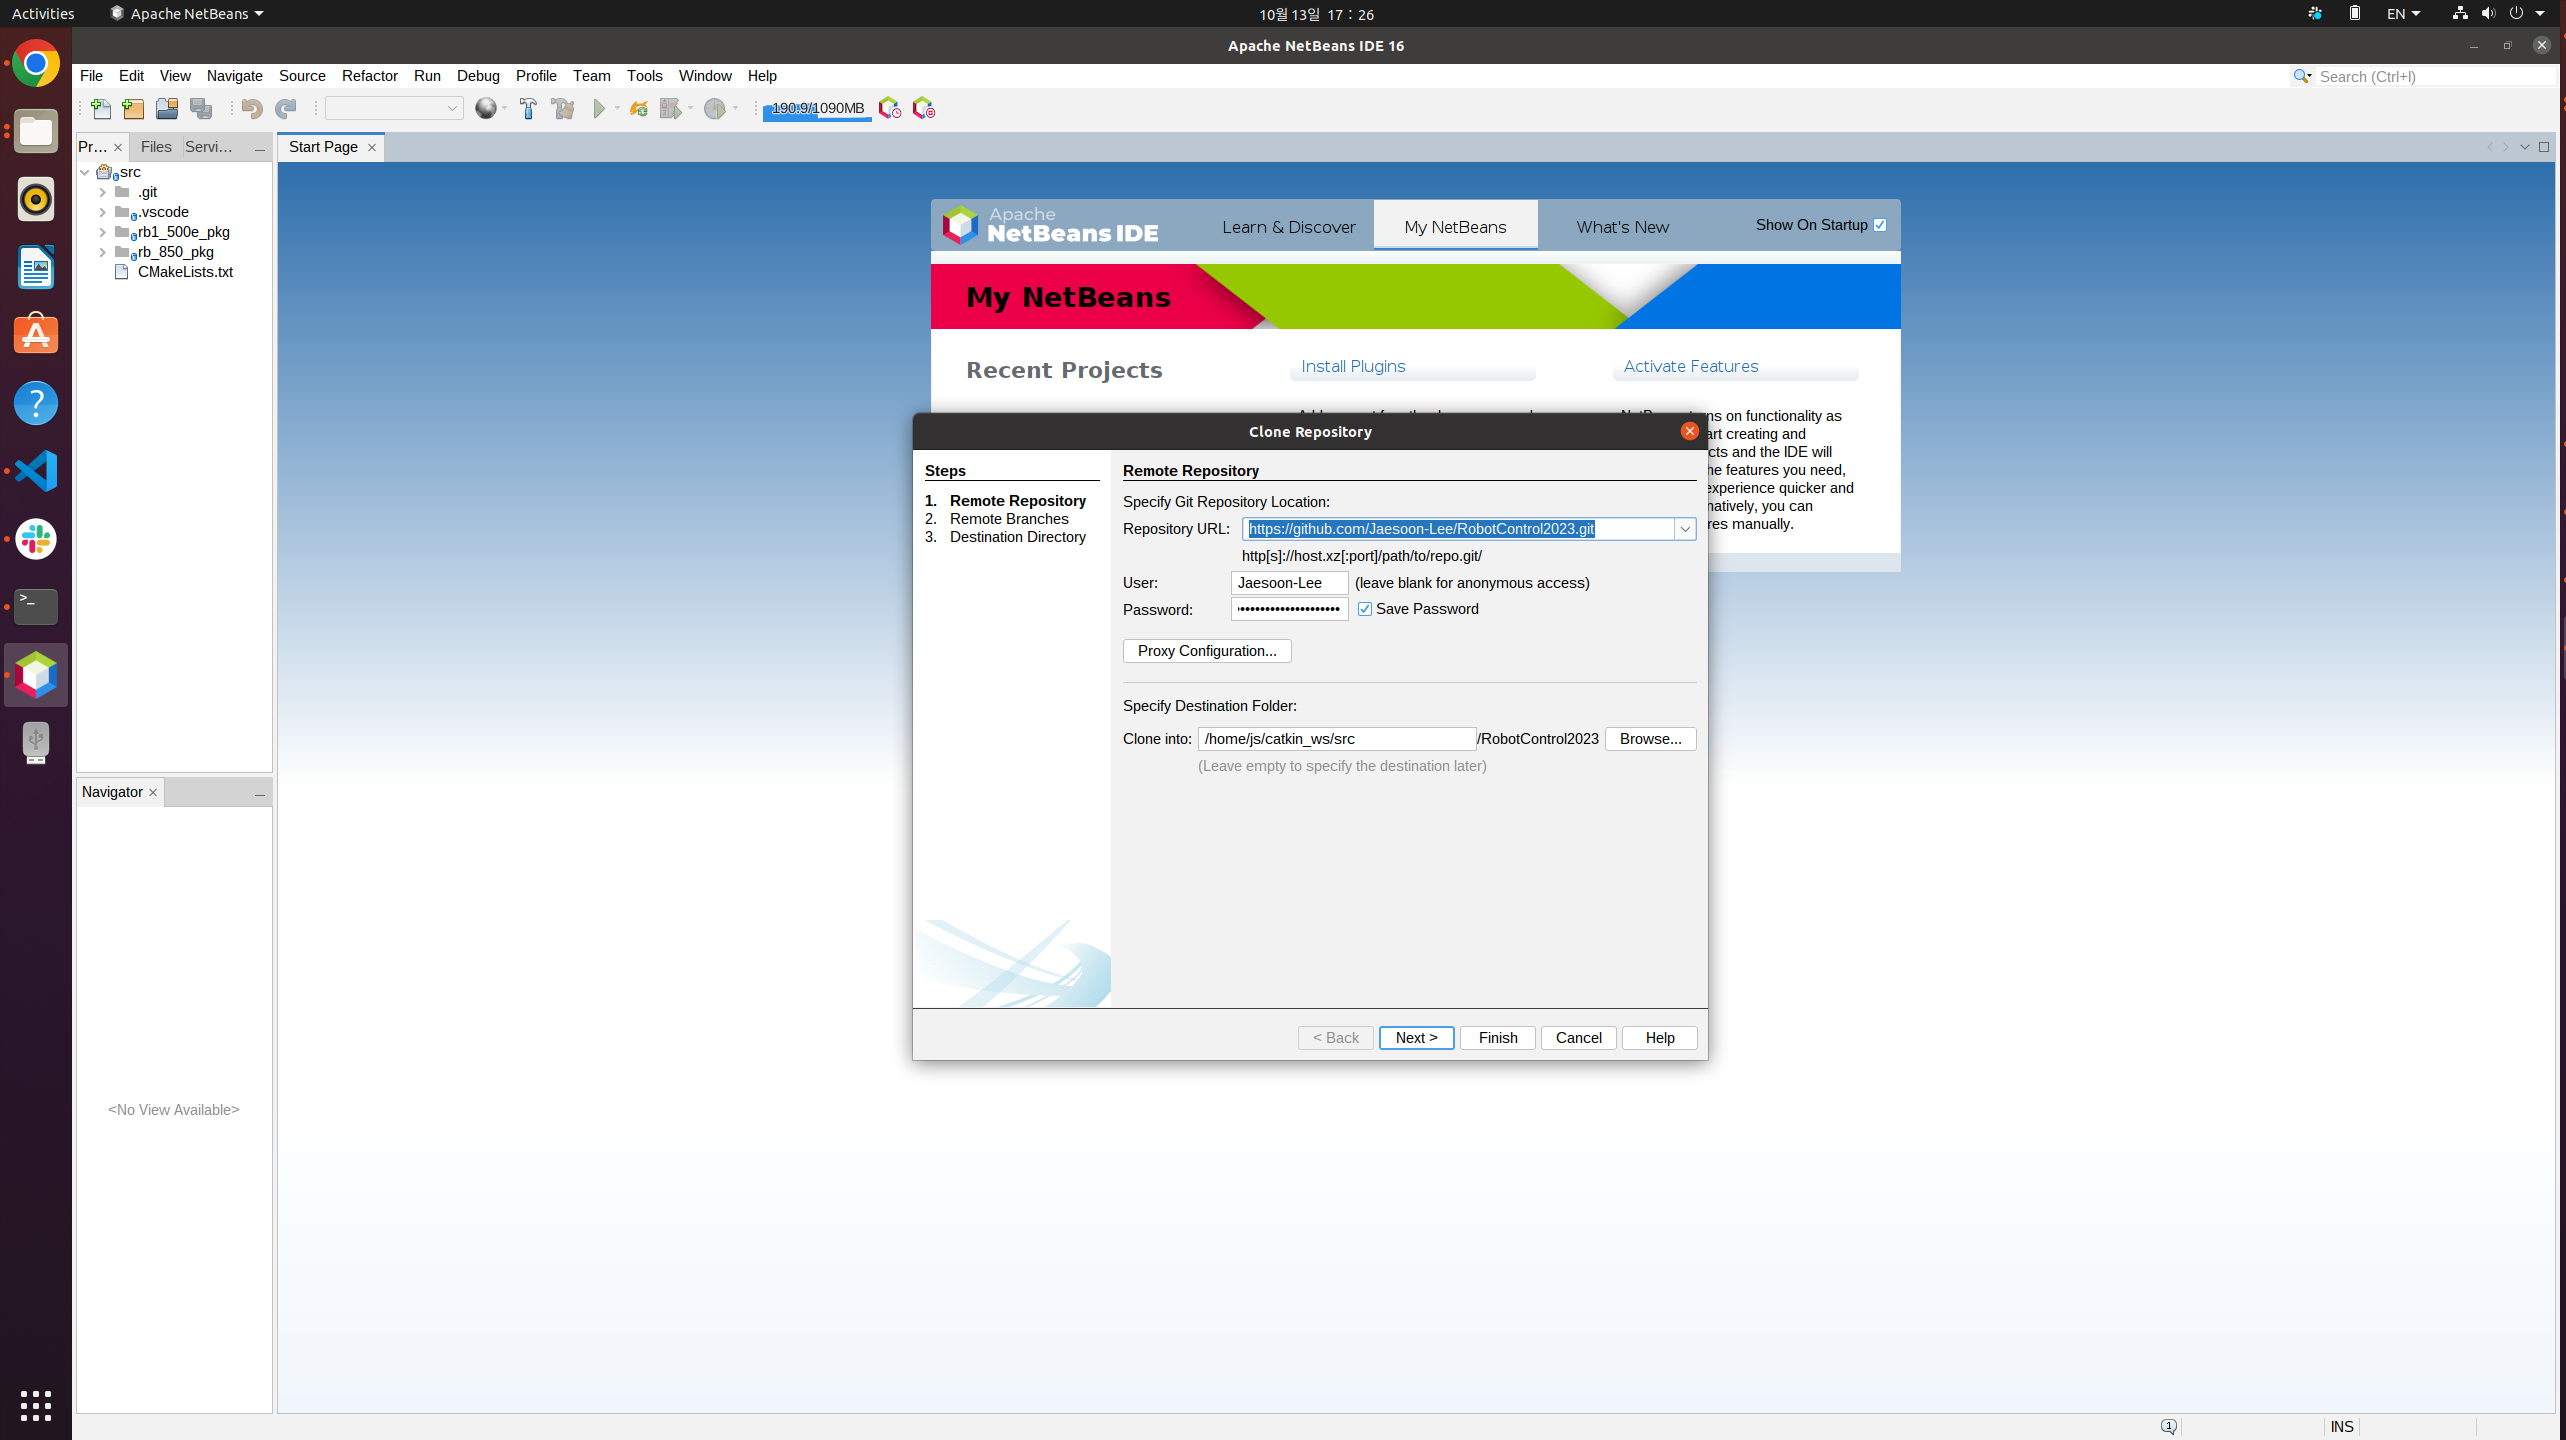
NetBeans의
Team>Git>clone을 누른후,Repository URL을 https://github.com/User_id/RobotControl2023.git 으로 설정합니다.
(본인의 Repository 경로)
(만약, NetBeans에서Team>Git>clone경로가 보이지 않는 경우, NetBeans 화면 좌측에 있는 Projects 패널에서 catkin_ws 를 클릭하면 보이며, 위의 경로는 git에 연동되었을 때 활성화되는 경로이므로 처음 연동하는 것이라면, Team > git > clone으로 해도 됨)
User에는 GitHUB의 user_name을 쓰고, Password에는 GitHUB의Token password를 입력한 후 NEXT를 누릅니다.
여기서 Clone into에 있는 주소를 정확하게 위치를 잡아줘야 합니다.
꼭 catkin_ws내에 src폴더로 경로를 잡도록 합니다.
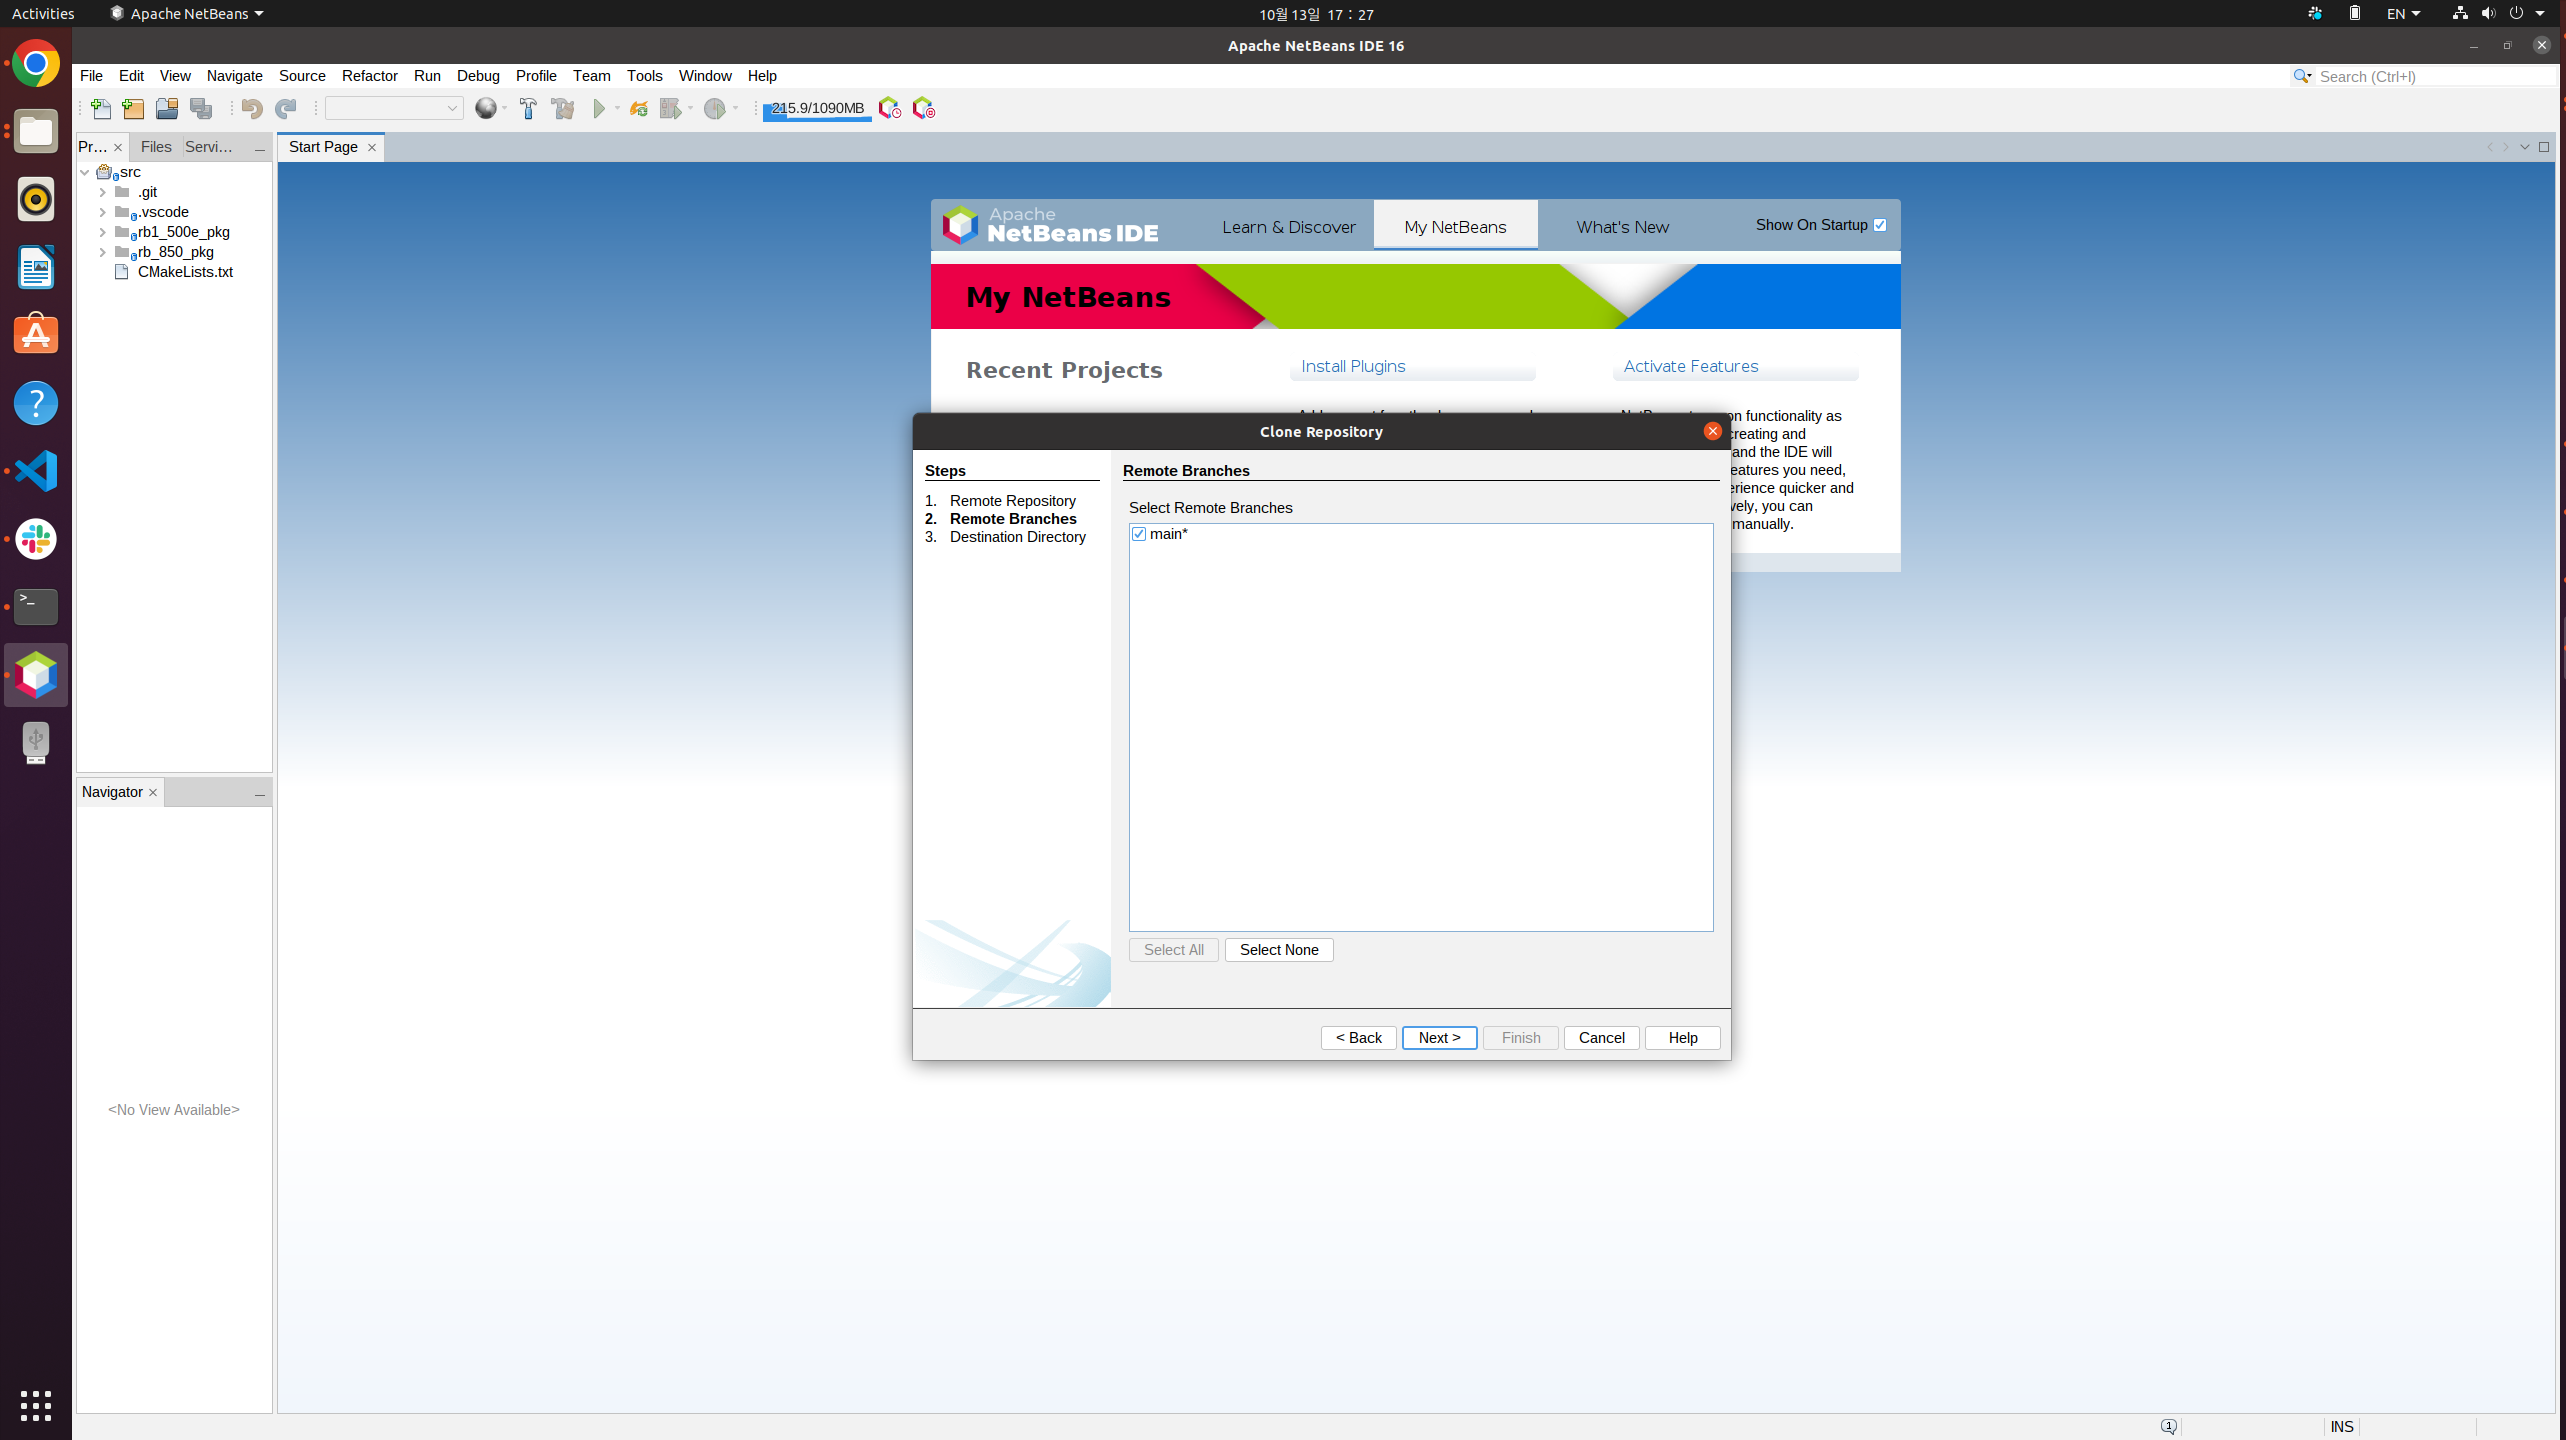
- Select Remote Branches를
main*로 선택하고 Next를 누릅니다.
-
Parent Directory를 사용자의
home/user_name/catkin_ws/src경로로 설정하고, Clone name을 사용자가 원하는 이름으로 설정하고, (참고 : Clone Name은 패키지에 관련된 이름으로 써서 다른 폴더들과 구별 지을 것, example: RobotControl2023) Checkout Branch는main*로 설정하고, Remote Name은 origin으로 설정한 후 Finish를 누릅니다. -
정확하게 셋팅이 되었다면 다음과 같은 화면이 활성화 됩니다.
1. 여기서 Create Project를 눌러줍니다.
2. New Project라는 창으로 활성화가 될것이고, Project Path를 설정하는 창이 열립니다. 경로는 앞서 설정한것과 같이 해줍니다 (= `/home/user_name/catkin_ws/src`).
3. 다음으로 넘어가면 Complie command 창이 나오는데 이 부분은 일단 넘어갑니다.
4. 그리고 난뒤에 finish를 눌러주면 됩니다.
-
사용자의 catkin_ws/src 위치에 Step5에서 설정한 Clone Name 을 갖는 폴더가 있는지 확인하고, 폴더 내부에 패키지 구성 파일들(world 폴더, src 폴더, launch 폴더 등)과 model 압축파일 (=
[Model]RB1_500e.tar.xz)이 있는지 확인합니다. -
[Model]RB1_500e.tar.xz파일을 압축 푼뒤에[Model]RB1_500e폴더 안에 있는RB1_500e를HOME/.gazebo/models/폴더로 가져와서 시뮬레이션을 위한 파일 셋팅을 마무리합니다.
(.gazebo폴더가 보이지 않으면, Home 폴더에서,Ctrl+H를 눌러서 폴더 숨김 해제를 할 것)
(Gazebo를 실행한 적이 없는 경우, 숨김해제를 하여도 폴더가 보이지 않을 수 있음. Terminal 에서gazebo를 입력하여 한번 실행해준 후 다시 확인할 것) -
패키지를 컴파일하기 위해 Netbeans에서 터미널 창을 열거나 기본 터미널 창에서
cd ~/catkin_ws && catkin_make을 입력하여 컴파일을 진행합니다. (터미널 창이 안보인다면, Netbeans의 상단Winodow > IDE Tools > Termianl을 클릭) -
만약,
catkin_make가 안될 경우, section 2를 해보시기 바랍니다.
| Library | Description |
|---|---|
| Eigen | Eigen is a C++ template library for linear algebra: matrices, vectors, numerical solvers, and related algorithms. |
| RBDL | RBDL library contains highly efficient code for both forward and inverse dynamics for kinematic chains and branched models. |
Recommended to re-install RBDL
RBDL의 재설치를 권장합니다. 사용자마다 root 계정 혹은 user 계정으로 하기 때문에, Build 하는 과정에서 문제가 발생할 수 있습니다. 따라서, 다음과 같이 재설치를 해주시기 바랍니다. 본 패키지를 root 계정에서 사용할 경우, 재설치가 필요없을 수 있습니다.
RBDL Build
RobotControl2023/src/RBDL/addons/urdfreader폴더 내에 있는CMakeList.txt파일에include_directories를 다음과 같이 추가해줍니다.
- Before :
IF (DEFINED ENV{ROS_ROOT})
	MESSAGE (STATUS "ROS found: $ENV{ROS_ROOT}")
find_package(catkin REQUIRED COMPONENTS urdf)- After :
IF (DEFINED ENV{ROS_ROOT})
	MESSAGE (STATUS "ROS found: $ENV{ROS_ROOT}")
	find_package(catkin REQUIRED COMPONENTS urdf)
include_directories(include ${catkin_INCLUDE_DIRS})- RBDL make & install (build 폴더가 존재할 경우, 삭제) RBDL 폴더에서 터미널 창을 켜고 아래의 명령어를 입력함으로써, RBDL 재설치를 끝냅니다.
RBDL 폴더 -> 오른쪽 마우스 클릭 -> Open in Terminal
또는
cd catkin_ws/src/RobotControl2023/src/RBDL

mkdir build
cd build/
cmake -D CMAKE_BUILD_TYPE=Release ../
cmake -D RBDL_BUILD_ADDON_URDFREADER=true ../
make
sudo make install- 그리고 다시 패키지를 컴파일하기 위해 Netbeans에서 터미널 창을 열거나 기본 터미널 창에서
cd ~/catkin_ws && catkin_make을 입력하여 컴파일을 진행합니다.
Setting Floating Dynamics in rb1_500e.world
<?xml version="1.0" ?>
<sdf version="1.6">
  <world name="rb1_500e">
.
.
.
    <include>
      <uri>model:https://RB1_500e</uri>
      <pose frame=''>0 0 0 0 0 0</pose>
      <plugin name="main" filename="librb1_500e_study.so"/>
    </include>
  </world>
</sdf>main.cpp는 Gazebo main code 이며,/catkin_ws/src/RobotControl2023/src에 있습니다.- 그리고,
main.cpp에서 사용자는 반드시Load(physics::ModelPtr _model, sdf::ElementPtr /*_sdf*/)함수에서, 아래 코드 예시와 같이Addons::URDFReadFromFile()함수 안에 적용되어 있는RB1_500e.urdf의 경로를 확인해주시고, 틀린다면 바로잡아주시기 바랍니다. RB1_500e.urdf는/home/user_name/catkin_ws/src/RobotControl2023/urdf폴더에 있으며, 파일 속성 확인을 통해 정확한 경로 확인하시기 바랍니다.
In main.cpp
void gazebo::RB1_500E::Load(physics::ModelPtr _model, sdf::ElementPtr /*_sdf*/)
{
    /*
     * Loading model data and initializing the system before simulation
     */

    //* model.sdf file based model data input to [physics::ModelPtr model] for gazebo simulation

    int argc = 0;
    char** argv = NULL;
    ros::init(argc, argv, "RB1_500E");
    ROS_INFO("PLUGIN_LOADED");

    printf("\n Loading Complete \n");

    this->model = _model;

    #if GazeboVersion < 8
        this->BASE_LINK = this->model->GetLink("BASE_LINK");
        this->LINK1 = this->model->GetLink("LINK1");
        this->LINK2 = this->model->GetLink("LINK2");
        this->LINK3 = this->model->GetLink("LINK3");
        this->LINK4 = this->model->GetLink("LINK4");
        this->LINK5 = this->model->GetLink("LINK5");
        this->LINK6 = this->model->GetLink("LINK6");

        this->JT0 = this->model->GetJoint("JT0");
        this->JT1 = this->model->GetJoint("JT1");
        this->JT2 = this->model->GetJoint("JT2");
        this->JT3 = this->model->GetJoint("JT3");
        this->JT4 = this->model->GetJoint("JT4");
        this->JT5 = this->model->GetJoint("JT5");
        this->last_update_time = this->model->GetWorld()->GetSimTime();
    #else
        BASE_LINK = this->model->GetLink("BASE_LINK");
        LINK1 = this->model->GetLink("LINK1");
        LINK2 = this->model->GetLink("LINK2");
        LINK3 = this->model->GetLink("LINK3");
        LINK4 = this->model->GetLink("LINK4");
        LINK5 = this->model->GetLink("LINK5");
        LINK6 = this->model->GetLink("LINK6");

        JT0 = this->model->GetJoint("JT0");
        JT1 = this->model->GetJoint("JT1");
        JT2 = this->model->GetJoint("JT2");
        JT3 = this->model->GetJoint("JT3");
        JT4 = this->model->GetJoint("JT4");
        JT5 = this->model->GetJoint("JT5");

        last_update_time = model->GetWorld()->SimTime();
    #endif

    //* RBDL setting
    printf("\n RBDL load start \n");
    Addons::URDFReadFromFile(RB1_500e_MODEL_DIR, _rb.rb1_500e_model, false, false);
    _rb.rb1_500e_model->gravity = Vector3d(0., 0., -9.81);

    printf("\n RBDL load Complete \n");

    //* setting for getting dt
    this->update_connection_ = event::Events::ConnectWorldUpdateBegin(boost::bind(&RB1_500E::UpdateAlgorithm, this));

}
// #define RB1_500e_MODEL_DIR "/home/js/catkin_ws/src/RobotControl2023/urdf/RB1_500e.urdf"모든 준비 과정이 끝나면, catkin_make을 입력하여 컴파일을 진행합니다.
cd ~/catkin_ws && catkin_make
위의 catkin_make 방식은 번거롭기 때문에 bashrc 파일에 단축키 설정을 하여 간편하게 빌드합니다.
- 새로운 terminal 창에서 다음과 같은 명령을 합니다.
gedit ~/.bashrc
- 적절한 위치에 다음과 같은 alias 코드를 넣어줍니다.
alias cm='cd ~/catkin_ws && catkin_make'
아래 코드는 예시 코드이며, 사용자들마다 적절한 위치에 넣어주시면 됩니다. 예시 코드에서는 bashrc의 처음 부분에 단축키 설정을 하였습니다.
In bashrc
# ~/.bashrc: executed by bash(1) for non-login shells.
# see /usr/share/doc/bash/examples/startup-files (in the package bash-doc)
# for examples

alias eb='gedit ~/.bashrc'
alias sb='source ~/.bashrc'
alias cc='cd ~/catkin_ws && catkin_make clean'
alias cw='cd ~/catkin_ws'
alias cs='cd ~/catkin_ws/src'
alias cm='cd ~/catkin_ws && catkin_make'
alias ljscm='cd ~/ljs/catkin_ws && catkin_make'
alias cds='source ~/catkin_ws/devel/setup.bash'
alias vip='cd ~/catkin_ws/src/gui'
alias sim='cd ~/Downloads && ./omniverse-launcher-linux.AppImage'
alias matlab='cd /usr/local/MATLAB/R2023a/bin && ./matlab'
alias PYTHON_PATH=~/.local/share/ov/pkg/isaac_sim-2022.2.1/python.sh
# source /opt/ros/noetic/setup.bash
# source ~/catkin_ws/devel/setup.bash

#own
export ISAAC_SIM="$HOME/.local/share/ov/pkg/isaac_sim-2022.2.1"

export ROS_MASTER_URI=http://localhost:11311
export ROS_HOSTNAME=localhost

# local address
PATH=$PATH:/usr/local/bin/

# If not running interactively, don't do anything
case $- in
    *i*) ;;
      *) return;;
esac

# don't put duplicate lines or lines starting with space in the history.
# See bash(1) for more options
HISTCONTROL=ignoreboth

# append to the history file, don't overwrite it
shopt -s histappend

# for setting history length see HISTSIZE and HISTFILESIZE in bash(1)
HISTSIZE=1000
HISTFILESIZE=2000

# check the window size after each command and, if necessary,
# update the values of LINES and COLUMNS.
shopt -s checkwinsize

# If set, the pattern "**" used in a pathname expansion context will
# match all files and zero or more directories and subdirectories.
#shopt -s globstar

# make less more friendly for non-text input files, see lesspipe(1)
[ -x /usr/bin/lesspipe ] && eval "$(SHELL=/bin/sh lesspipe)"

# set variable identifying the chroot you work in (used in the prompt below)
if [ -z "${debian_chroot:-}" ] && [ -r /etc/debian_chroot ]; then
    debian_chroot=$(cat /etc/debian_chroot)
fi

# set a fancy prompt (non-color, unless we know we "want" color)
case "$TERM" in
    xterm-color|*-256color) color_prompt=yes;;
esac

# uncomment for a colored prompt, if the terminal has the capability; turned
# off by default to not distract the user: the focus in a terminal window
# should be on the output of commands, not on the prompt
#force_color_prompt=yes

if [ -n "$force_color_prompt" ]; then
    if [ -x /usr/bin/tput ] && tput setaf 1 >&/dev/null; then
	# We have color support; assume it's compliant with Ecma-48
	# (ISO/IEC-6429). (Lack of such support is extremely rare, and such
	# a case would tend to support setf rather than setaf.)
	color_prompt=yes
    else
	color_prompt=
    fi
fi

if [ "$color_prompt" = yes ]; then
    PS1='${debian_chroot:+($debian_chroot)}\[\033[01;32m\]\u@\h\[\033[00m\]:\[\033[01;34m\]\w\[\033[00m\]\$ '
else
    PS1='${debian_chroot:+($debian_chroot)}\u@\h:\w\$ '
fi
unset color_prompt force_color_prompt

# If this is an xterm set the title to user@host:dir
case "$TERM" in
xterm*|rxvt*)
    PS1="\[\e]0;${debian_chroot:+($debian_chroot)}\u@\h: \w\a\]$PS1"
    ;;
*)
    ;;
esac

# enable color support of ls and also add handy aliases
if [ -x /usr/bin/dircolors ]; then
    test -r ~/.dircolors && eval "$(dircolors -b ~/.dircolors)" || eval "$(dircolors -b)"
    alias ls='ls --color=auto'
    #alias dir='dir --color=auto'
    #alias vdir='vdir --color=auto'

    alias grep='grep --color=auto'
    alias fgrep='fgrep --color=auto'
    alias egrep='egrep --color=auto'
fi

# colored GCC warnings and errors
#export GCC_COLORS='error=01;31:warning=01;35:note=01;36:caret=01;32:locus=01:quote=01'

# some more ls aliases
alias ll='ls -alF'
alias la='ls -A'
alias l='ls -CF'

# Add an "alert" alias for long running commands.  Use like so:
#   sleep 10; alert
alias alert='notify-send --urgency=low -i "$([ $? = 0 ] && echo terminal || echo error)" "$(history|tail -n1|sed -e '\''s/^\s*[0-9]\+\s*//;s/[;&|]\s*alert$//'\'')"'

# Alias definitions.
# You may want to put all your additions into a separate file like
# ~/.bash_aliases, instead of adding them here directly.
# See /usr/share/doc/bash-doc/examples in the bash-doc package.

if [ -f ~/.bash_aliases ]; then
    . ~/.bash_aliases
fi

# enable programmable completion features (you don't need to enable
# this, if it's already enabled in /etc/bash.bashrc and /etc/profile
# sources /etc/bash.bashrc).
if ! shopt -oq posix; then
  if [ -f /usr/share/bash-completion/bash_completion ]; then
    . /usr/share/bash-completion/bash_completion
  elif [ -f /etc/bash_completion ]; then
    . /etc/bash_completion
  fi
fi
source /opt/ros/noetic/setup.bash
source ~/catkin_ws/devel/setup.bash
최종적으로, 다음과 같은 명령어를 통해 시뮬레이션 실행
roslaunch rb1_500e_study rb1_500e.launch
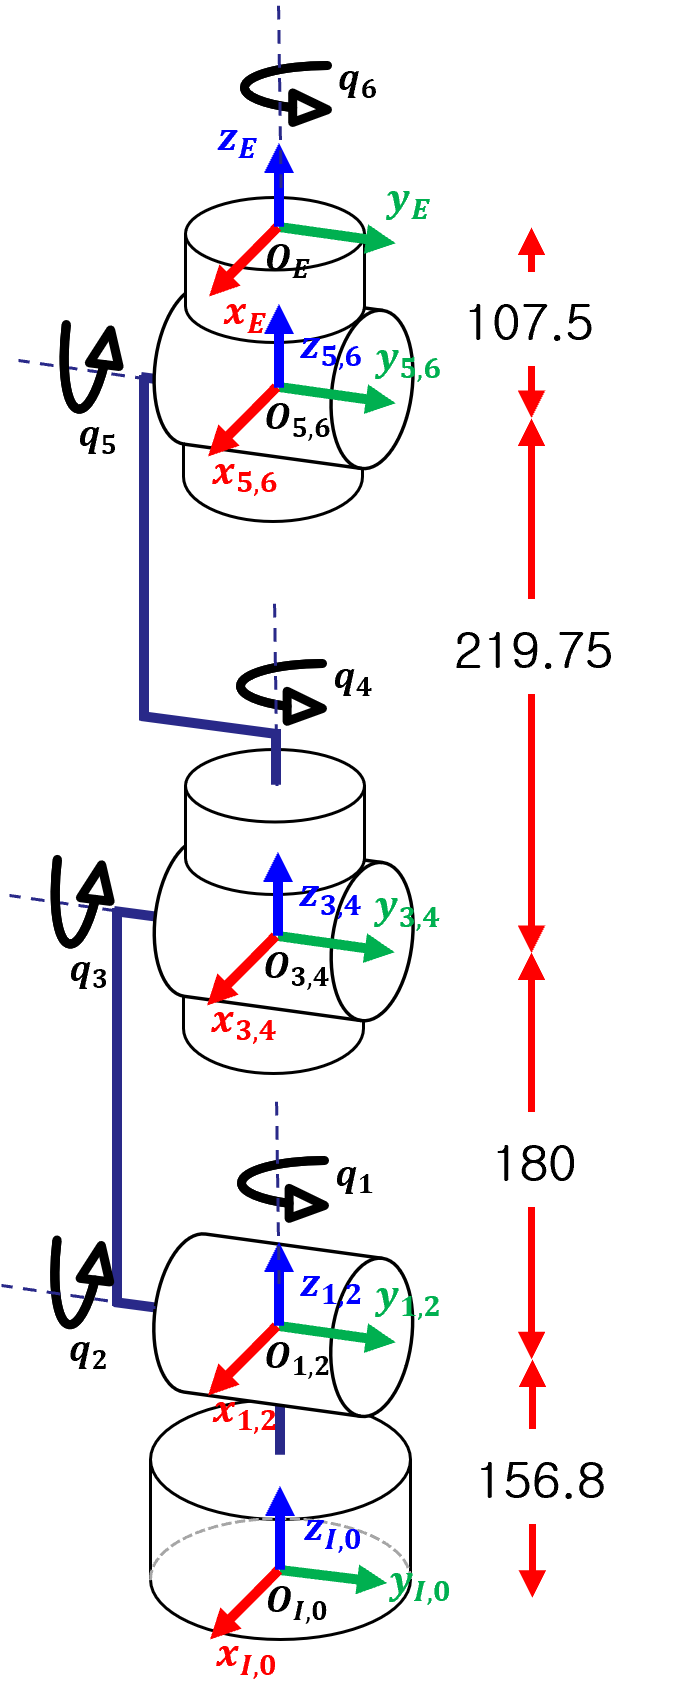
로봇을 정상적으로 불러오면 6자유의 로봇팔이 나타나며 로봇팔의 기구 정보는 다음과 같습니다.
- void Practice() 함수 만들기
void Practice()- Practice() 함수안에 matrix 생성 및 터미널창에 인쇄하기
- cout 사용
std::cout << "C_IE = " << C_IE << std::endl;- Load 함수 첫줄에 Practice() 함수 사용
- 3-link planar arm를 위한 Homogeneous Transformation Matrix 만들기
- 모든 링크의 길이는 1m로 가정
MatrixXd getTransformI0()
MatrixXd jointToTransform01(VectorXd q)
MatrixXd jointToTransform12(VectorXd q)
MatrixXd jointToTransform23(VectorXd q)
MatrixXd getTransform3E()- Forward Kinematics 만들기
VectorXd jointToPosition(VectorXd q)
MatrixXd jointToRotMat(VectorXd q)
VectorXd rotToEuler(MatrixXd rotMat) // EulerZYX- Homogeneous Transformation Matrix 만들기
MatrixXd getTransformI0()
MatrixXd jointToTransform01(VectorXd q)
MatrixXd jointToTransform12(VectorXd q)
MatrixXd jointToTransform23(VectorXd q)
MatrixXd jointToTransform34(VectorXd q)
MatrixXd jointToTransform45(VectorXd q)
MatrixXd jointToTransform56(VectorXd q)
MatrixXd getTransform6E()- Forward Kinematics 만들기
VectorXd jointToPosition(VectorXd q)
MatrixXd jointToRotMat(VectorXd q)
VectorXd rotToEuler(MatrixXd rotMat)- q=[10;20;30;40;50;60] 일때, End-effector의 position과 Rotation Matrix 구하기
- 이때, Euler Angle 구하기
- source 코드
- 출력된 결과물 capture 파일
- jointToPosJac 함수 만들기
MatrixXd jointToPosJac(VectorXd q)
{
    // Input: vector of generalized coordinates (joint angles)
    // Output: J_P, Jacobian of the end-effector translation which maps joint velocities to end-effector linear velocities in I frame.
    MatrixXd J_P = MatrixXd::Zero(3,6);
    MatrixXd T_I0(4,4), T_01(4,4), T_12(4,4), T_23(4,4), T_34(4,4), T_45(4,4), T_56(4,4), T_6E(4,4);
    MatrixXd T_I1(4,4), T_I2(4,4), T_I3(4,4), T_I4(4,4), T_I5(4,4), T_I6(4,4);
    MatrixXd R_I1(3,3), R_I2(3,3), R_I3(3,3), R_I4(3,3), R_I5(3,3), R_I6(3,3);
    Vector3d r_I_I1(3), r_I_I2(3), r_I_I3(3), r_I_I4(3), r_I_I5(3), r_I_I6(3);
    Vector3d n_1(3), n_2(3), n_3(3), n_4(3), n_5(3), n_6(3);
    Vector3d n_I_1(3),n_I_2(3),n_I_3(3),n_I_4(3),n_I_5(3),n_I_6(3);
    Vector3d r_I_IE(3);


    //* Compute the relative homogeneous transformation matrices.
    T_I0 =
    T_01 =
    T_12 =
    T_23 =
    T_34 =
    T_45 =
    T_56 =
    T_6E =

    //* Compute the homogeneous transformation matrices from frame k to the inertial frame I.
    T_I1 =
    T_I2 =
    T_I3 =
    T_I4 =
    T_I5 =
    T_I6 =

    //* Extract the rotation matrices from each homogeneous transformation matrix. Use sub-matrix of EIGEN. https://eigen.tuxfamily.org/dox/group__QuickRefPage.html
    R_I1 = T_I1.block(0,0,3,3);
    R_I2 =
    R_I3 =
    R_I4 =
    R_I5 =
    R_I6 =

    //* Extract the position vectors from each homogeneous transformation matrix. Use sub-matrix of EIGEN.
    r_I_I1 =
    r_I_I2 =
    r_I_I3 =
    r_I_I4 =
    r_I_I5 =
    r_I_I6 =

    //* Define the unit vectors around which each link rotate in the precedent coordinate frame.
    n_1 << 0,0,1;
    n_2 <<
    n_3 <<
    n_4 <<
    n_5 <<
    n_6 <<

    //* Compute the unit vectors for the inertial frame I.
    n_I_1 = R_I1*n_1;
    n_I_2 =
    n_I_3 =
    n_I_4 =
    n_I_5 =
    n_I_6 =

    //* Compute the end-effector position vector.
    r_I_IE =


    //* Compute the translational Jacobian. Use cross of EIGEN.
    J_P.col(0) << n_I_1.cross(r_I_IE-r_I_I1);
    J_P.col(1) <<
    J_P.col(2) <<
    J_P.col(3) <<
    J_P.col(4) <<
    J_P.col(5) <<

    //std::cout << "Test, JP:" << std::endl << J_P << std::endl;

    return J_P;
}- jointToRotJac 함수 만들기
MatrixXd jointToRotJac(VectorXd q)
{
   // Input: vector of generalized coordinates (joint angles)
    // Output: J_R, Jacobian of the end-effector orientation which maps joint velocities to end-effector angular velocities in I frame.
    MatrixXd J_R(3,6);
    MatrixXd T_I0(4,4), T_01(4,4), T_12(4,4), T_23(4,4), T_34(4,4), T_45(4,4), T_56(4,4), T_6E(4,4);
    MatrixXd T_I1(4,4), T_I2(4,4), T_I3(4,4), T_I4(4,4), T_I5(4,4), T_I6(4,4);
    MatrixXd R_I1(3,3), R_I2(3,3), R_I3(3,3), R_I4(3,3), R_I5(3,3), R_I6(3,3);
    Vector3d n_1(3), n_2(3), n_3(3), n_4(3), n_5(3), n_6(3);

    //* Compute the relative homogeneous transformation matrices.


    //* Compute the homogeneous transformation matrices from frame k to the inertial frame I.


    //* Extract the rotation matrices from each homogeneous transformation matrix.


    //* Define the unit vectors around which each link rotate in the precedent coordinate frame.


    //* Compute the translational Jacobian.


    //std::cout << "Test, J_R:" << std::endl << J_R << std::endl;

    return J_R;
}- q=[10;20;30;40;50;60] 일때, Geometric Jacobian 구하기
- source 코드
- 출력된 결과물 capture 파일
-
Matrix Pesudo-Inversion The Moore-Pensore pseudo-inverse is a generalization of the matrix inversion operation for non-square matrices. Let a non-square matrix A be defined in R^{mxn}.
-
pseudoInverseMat 함수 만들기
MatrixXd pseudoInverseMat(MatrixXd A, double lambda)
{
    // Input: Any m-by-n matrix
    // Output: An n-by-m pseudo-inverse of the input according to the Moore-Penrose formula
    MatrixXd pinvA;


    return pinvA;
}- rotMatToRotVec 함수 만들기 : rotation matrix를 입력으로 받아서 rotation vector를 내보내는 함수
VectorXd rotMatToRotVec(MatrixXd C)
{
    // Input: a rotation matrix C
    // Output: the rotational vector which describes the rotation C
    Vector3d phi,n;
    double th;


    if(fabs(th)<0.001){
         n << 0,0,0;
    }
    else{

    }

    phi = th*n;


    return phi;
}- q=[10;20;30;40;50;60] 일때, Jacobian의 pseudoInverse 구하기
pinvJ = pseudoInverseMat(J);- q_des=[10;20;30;40;50;60], q_init=0.5q_des 일때, C_err(dph)=C_des*C_init.transpose() 구하기
- rotMatToRotVec 함수로 dph구하기
dph = rotMatToRotVec(C_err);- source 코드
- 출력된 결과물 capture 파일 => dph = [0.00;1.14;-0.19]
- inverseKinematics 함수 만들기
VectorXd inverseKinematics(Vector3d r_des, MatrixXd C_des, VectorXd q0, double tol)
{
    // Input: desired end-effector position, desired end-effector orientation, initial guess for joint angles, threshold for the stopping-criterion
    // Output: joint angles which match desired end-effector position and orientation
    double num_it;
    MatrixXd J_P(6,6), J_R(6,6), J(6,6), pinvJ(6,6), C_err(3,3), C_IE(3,3);
    VectorXd q(6),dq(6),dXe(6);
    Vector3d dr(3), dph(3);
    double lambda;

    //* Set maximum number of iterations
    double max_it = 200;

    //* Initialize the solution with the initial guess
    q=q0;
    C_IE = ...;
    C_err = ...;

    //* Damping factor
    lambda = 0.001;

    //* Initialize error
    dr = ... ;
    dph = ... ;
    dXe << dr(0), dr(1), dr(2), dph(0), dph(1), dph(2);

    ////////////////////////////////////////////////
    //** Iterative inverse kinematics
    ////////////////////////////////////////////////

    //* Iterate until terminating condition
    while (num_it<max_it && dXe.norm()>tol)
    {

        //Compute Inverse Jacobian
        J_P = ...;
        J_R = ...;

        J.block(0,0,3,6) = J_P;
        J.block(3,0,3,6) = J_R; // Geometric Jacobian

        // Convert to Geometric Jacobian to Analytic Jacobian
        dq = pseudoInverseMat(J,lambda)*dXe;

        // Update law
        q += 0.5*dq;

        // Update error
        C_IE = ...;
        C_err = ...;

        dr = ...;
        dph = ...;
        dXe << dr(0), dr(1), dr(2), dph(0), dph(1), dph(2);

        num_it++;
    }
    std::cout << "iteration: " << num_it << ", value: " << q << std::endl;

    return q;
}- q=[10;20;30;40;50;60] 일때, 이 관절각도에 해당하는 end-effoctor의 값을 r_des와 C_des로 설정하고,
- r_des와 C_des에 대한 joint angle 구하기
void Practice()
{
        ...
        // q = [10;20;30;40;50;60]*pi/180;
        r_des = jointToPostion(q);
        C_des = jointToRotMat(q);

        q_cal = inverseKinematics(r_des, C_des, q*0.5, 0.001);
}- source 코드
- 출력된 결과물 capture 파일
- Desired Pos = [0.28;0;0.1] & Desired Orientation = Base에 대해 y방향으로 180도 회전 ([-1 0 0;0 1 0;0 0 -1])
- Result = [?;?;?;?;?;?]
- 1-cos 함수로 trajectory 생성하기
double func_1_cos(double t, double, init, double final, double T)
{
        double des;

        ...

        return des;
}- 5초동안, 초기자세에서 실습5-2의 자세로 움직이기 in Joint Coordinates
- 5초동안, z방향으로 0.1m 이동하기 in Cartesian Coordinates (0번 실행뒤, 1번 실행)
- 5초동안 0.1m 다리들기, 5초동안 0.1m 다리내리기 in Cartesian Coordinates (0번 실행뒤, 1번 실행)
- 5초동안 0.1m 다리들기, 5초동안, z축으로 90도 회전하기 in Cartesian Coordinates (0번 실행뒤, 1번 실행)


