npx react-native@latest init AwesomeProject
React Native is a JavaScript framework for writing real, natively rendering mobile applications for iOS and Android. It’s based on React, Facebook’s JavaScript library for building user interfaces, but instead of targeting the browser, it targets mobile platforms. In other words: web developers can now write mobile applications that look and feel truly “native,” all from the comfort of a JavaScript library that we already know and love. Plus, because most of the code you write can be shared between platforms, React Native makes it easy to simultaneously develop for both Android and iOS.
Similar to React for the Web, React Native applications are written using a mixture of JavaScript and XML-esque markup, known as JSX. Then, under the hood, the React Native “bridge” invokes the native rendering APIs in Objective-C (for iOS) or Java (for Android). Thus, your application will render using real mobile UI components, not webviews, and will look and feel like any other mobile application. React Native also exposes JavaScript interfaces for platform APIs, so your React Native apps can access platform features like the phone camera, or the user’s location.
To put it very simply, React Native is an improved version of React, even though it uses it. Both of them are a mix of JavaScript and JSX. The difference between React and React Native is the syntax used to render elements in JSX components. React makes use of HTML and CSS, while React Native allows the use of native mobile UI elements.
- View
- State
- Props
- ScrollView
- Flatlist
- Style
- Networking
- Navigators
- List View
- Flex Layout
The Flexible Box Layout Module, makes it easier to design flexible responsive layout structure without using float or positioning. COnsistent screensizes across different devices and view ports.
-
UI Thread - This is also known as the main thread. The UI thread is used for native android or iOS UI rendering. This is the main thread that executes synchronous operations. This is also called a UI thread because it is at the end of all of our component hierarchy. This thread carried out data from Shadow Thread. For example, in android, this thread is used for handles android measure/layout/draw events.
-
JS Thread - JavaScript thread executes React and JavaScript code logic in our app. This thread carried out all DOM hierarchy operations that are straight from the code written by the developers. Once the hierarchy of code is executed, it is sent to the Native module Thread for optimizations and further operations.
-
Render Thread - This thread is only used by Android L (5.0) to draw the UI with OpenGL. This is only used in specific situations, therefore it cannot be included in the main thread. It is fully optional.
Issues in React Native Threads: If you understand the life cycle of these three threads in React Native (JS Thread, UI Thread, and React Native Modules Thread), you have an idea about why you experience performance issues in React Native.
- Animations blocking in the JS Thread.
- Because of timeouts or animations, there are slow navigation transitions occur.
- A large amount of space is occupied by DOM.
- Stuttering during a components mounting logic.
The Worklet interface is a lightweight version of Web Workers and gives developers access to low-level parts of the rendering pipeline. With Worklets, you can run JavaScript and WebAssembly code to do graphics rendering or audio processing where high performance is required. Worklets are restricted to specific use cases; they cannot be used for arbitrary computations like Web Workers.
useImperativeHandle is a React Hook that lets you customize the handle exposed as a ref.
useImperativeHandle(ref, createHandle, dependencies?)
- Yes, a React Native app is going to be rendered using native views.
- No, JavaScript code is not being compiled to the platform's native language.
Why? This is pretty clear: How would your phone be able to translate a loosely typed language like JavaScript into strongly typed languages such as Java or Objective C?
You’ll have a component tree. The communication between these components will happen by means of properties and callbacks. You’ll pass down a callback to a child if a parent component needs something from it. In the same fashion, you’ll pass down a property to the child if it needs something from its parent. It uses Unidirectional data flow. The data from the parent is known as props. You can only transfer data from parent to child and not vice versa.
React Native project contains an ios directory and an android one. These directories act as the entry points for each platform.
As soon as you type in one of those commands (which are react-native run-android and react native run-ios, respectively) you start up the packager. One such packager is Metro. The packager takes all your JS code and puts it into a single file: main.bundle.js. When your app finally opens on your phone, the phone will look in the place that’s familiar to it: either the android or the ios directory. That’s the native entry point that I mentioned above. This native entry point will start the JavaScript virtual machine in a thread. The bundled code that is contained in main.bundle.js will then be run on this thread.
The code that’s now running within this JavaScript VM thread will communicate with the native thread using the React Native bridge.
Unlike a fully native application, a React Native app contains a Javascript bundle that needs to be loaded into memory. Then it is parsed and executed by the Javascript VM. The overall size of the Javascript code is an important factor. While that happens, the application remains in the loading state. We often describe this process as TTI - Time to Interactive. It is a time expressed in the milliseconds between when the icon gets selected from the application drawer and when it becomes fully interactive.
JavaScriptCore is a framework that allows JavaScript code to be run on mobile devices, for instance. On iOS devices, this framework is directly provided by the OS. Android devices don’t have the framework, so React Native bundles it along with the app itself. This increases the app size just a little bit, but it’ll barely matter in the end.
JavaScriptCore is used for running JS code when the app is run on a device. However, if you choose to debug your app, the JS code is going to run inside Chrome. Chrome uses the V8 engine and uses WebSockets for communicating with the native code, so you’ll be able to see important info such as properly formatted logs and what network requests are being made. Just remember that there are differences between the V8 engine and JavaScriptCore — they are different environments
Unfortunaltely, Metro - the default React Native bundler - currently doesn't support tree shaking. Tree shaking is a term commonly used within a JavaScript context to describe the removal of dead code. It relies on the import and export statements to detect if code modules are exported and imported for use between JavaScript files.
Hermes is an open-source JavaScript engine optimized for React Native. For many apps, using Hermes will result in improved start-up time, decreased memory usage, and smaller app size when compared to JavaScriptCore. React Native comes with a bundled version of Hermes. React Native applications running on 0.70 will have Hermes enabled by default.
The majority of modern browser engines use just-in-time (JIT) compilers. It means that the code is translated and executed line-by-line. However, the JIT compiler keeps track of warm code segments (the ones that appear a few times) and hot code segments (the ones that run many times). These frequently occuring code segments are then sent to compiler that, depending on how many times they appear in the program, compiles them to the machine code and optionlly, performs some optimizations.
Hermes unlike other engines, is an AOT (ahead-of-time) engine. It means that entire bundle is compiled to bytecode ahead of time. As a result, certain optimizations that JIT (just-in-time) compilers would perform on hot code segments are not present. On one hand it makes Hermes bundles underperform in benchmarks that are CPU-oriented. However, these benchmarks are not really comparable to a real-life mobile app experience, where TTI and application size takes priority.
The RN bridge is written in Java/C++ and it allows the communication between the main thread of your app and the JavaScript thread. It uses a custom message-passing protocol for allowing this communication to happen.
The JavaScript thread will decide what must be rendered on the screen. It will say to the main thread, “Hey, I need you to render a button and a text. Thanks.” It will use the bridge to say this. The message will be sent as a serialized JSON. But apart from what needs to be rendered on the screen, the message must also state where it will be rendered.
Here’s where the shadow thread comes into play. The shadow thread is launched along with the JavaScript thread, and it helps to compute the positions of the views. The results are passed along in the aforementioned message, sent by means of the bridge to the main thread.
Any action that the user does on the UI will happen on the main thread. Tapping on a button, toggling a switch — any action must be serialized and sent by means of the bridge to the JavaScript thread. There’s where all the logic of your app happens.
The user taps on a button. This action is understood by the main thread and passed as a message to the JavaScript thread. Here, some logic is handled, then the UI must change accordingly. The shadow thread decides where these changes happen, then the updates are sent as a message back to the native thread. Since the user won’t tap too rapidly on the screen, we won’t generally have any performance issues in normal usage scenarios — the bridge handles the communication pretty quickly.
What is cool about React Native (in comparison to other platforms such as Cordova) is that it doesn’t run its code inside of a WebView. It uses native views. This advantage means that we’ll be able to develop smooth and fast apps that can run at 60 FPS. If you modify the state of a component that is very high in the tree (and you didn’t dedicate too much time to prevent useless re-renders), then the whole component tree will be re-rendered. This won’t be visible to the user in most cases. However, if those descendants are computationally expensive, then you’ll notice your app stuttering for a little bit.
A StyleSheet is an abstraction similar to CSS StyleSheets. Making a stylesheet from a style object makes it possible to refer to it by ID instead of creating a new style object every time. It also allows to send the style only once through the bridge. All subsequent uses are going to refer an id.
Base implementation for the more convenient and components, which are also better documented. In general, this should only really be used if you need more flexibility than FlatList provides, e.g. for use with immutable data instead of plain arrays.
Virtualization massively improves memory consumption and performance of large lists by maintaining a finite render window of active items and replacing all items outside of the render window with appropriately sized blank space. The window adapts to scrolling behavior, and items are rendered incrementally with low-pri (after any running interactions) if they are far from the visible area, or with hi-pri otherwise to minimize the potential of seeing blank space.
The key difference between ScrollView vs FlatList is that ScrollView will load all those items as the page appears or the component is loaded. Hence, if you have thousands of items to load, it would make your app very slow and inefficient.
On the other side, FlatList, will load 10 by default and as the user scrolls the next ones will show up on the screen.
Scroll View will mount all the children at once while FlatList will calculate the items that are way off of distance based on the scroll and will unmount them. Hence the state is lost and re-created.
VirtualizedList: The component behind FlatList
-
Avoid arrow functions inline for renderItem. Using an arrow function inline re-creates the function on every re-render causing performance issues.
-
Don’t use 1080P HD images in the list. It is a known issue that android can’t handle 1080P HD images in the list. Even if iOS can handle HD images, it will still cause some performance issues.
-
Optimize maxToRenderPerBatch prop. maxToRenderPerBatch prop is used to set the number of items to render on every scroll. 10 is the default number
-
Optimize windowSize prop. windowSize prop is a measurement unit where 1 is equivalent to your viewport height. The default value is 21. Most cases you don’t need the number as big as 21. Again, it depends on the size of the items in your list. For example if each item in your list covers 50% of the device height (so 2 items in viewport) then you can set the windowSize to around 5.
-
Use getItemLayout to optimize flatlist react native. Using getItemLayout removes the need for FlatList to measure the list items layout. But you can use this method only if your list items have a fixed height.
-
Use fewer Views in your list item to optimize flatlist react native
-
Use PureComponent or memo carefully.
PureComponent re-renders a component by shallow comparing the props and re-renders only if the props have changed. PureComponent is used for class components. React memo is the alternative to PureComponent for functional components.
Using PureComponent or Memo for the list item can be helpful in optimizing the flatlist performance but it can also cause more performance issues sometimes. It depends on the props that are being passed to the list item. If too many props are being passed to the list item then it can only worsen the performance.
This is a high performance listview for React Native and Web with support for complex layouts. JS only with no native dependencies, inspired by both RecyclerView on Android and UICollectionView on iOS.
RecyclerListView uses "cell recycling" to reuse views that are no longer visible to render items instead of creating new view objects. Creation of objects is very expensive and comes with a memory overhead which means as you scroll through the list the memory footprint keeps going up. Releasing invisible items off memory is another technique but that leads to creation of even more objects and lot of garbage collections. Recycling is the best way to render infinite lists that does not compromise performance or memory efficiency.
RecyclerListView was built with performance in mind which means no blanks while quick scrolls or frame drops. RecyclerListView encourages you to have deterministic heights for items you need to render.
Primarily, the FlatList component renders list items lazily. To reduce memory usage and processing time, FlatList renders items just about to appear on the screen and removes those that have scrolled offscreen. It replaces views for offscreen list items with appropriately spaced blank spaces.
It also renders content asynchronously offscreen to constrain memory and enable smooth scrolling. This, however, has the downside of momentarily showing blank content if the scroll rate is faster than the fill rate.
Despite being feature-rich and more performant, FlatList has its shortcomings. Though creating and destroying views for onscreen and offscreen items helps to reduce memory usage, it is computationally expensive.
In the end, lots of objects have to be garbage collected. If the user scrolls through the whole list, FlatList creates as many views as items in the list — creating and destroying views as the user scrolls.
Flipper is a highly extensible mobile app debugger used to debug iOS, Android and React Native applications. It lets you inspect, control, and visualize your application from its desktop application.
It contains a long list of must-have debugging tools like log viewer, interactive layout inspector, and network inspector. It can be used as it is provided or you can extend it using the plugin API. It helps you debug apps running in an emulator/simulator or connected physical development devices.
Flipper for React Native is shipped with React DevTools, Hermes debugger and Metro bundler integration. You can use Flipper for tasks such as detecting memory leaks, previewing the content of Shared Preferences or inspecting loaded images.
Every bit of native code we use in our apps has a runtime cost associated with reading, loading and executing said code. The more native dependencies our apps have, the slower it is for apps to start.
npx depcheck
Proguard is a great tool for creating a production-ready application in Android. It assists us in reducing code and making apps faster. To make your app as small as possible, you should enable shrinking in your release build to remove unused code and resources. When enabling shrinking, you also benefit from obfuscation, which shortens the names of your app’s classes and members, and optimization, which applies more aggressive strategies to further reduce the size of your app.
As some of you know, in React Native, the JS side and Native side communication work with Bridge foundation. Because of JS side already has a well-isolated environment, it doesn’t have any mechanism to talk with the Native side. For example, you cannot access the device name, or you are unable to get the local IP address of a current device in a JavaScript environment without creating Native modules.
The bridge provides a tunnel, and with this tunnel, it performs message transmission between JS and Native.

JavaScript runtimes such as JSC, Hermes, and V8 are written in C and C++ because they need to work with high performance. Developers who want to take advantage of this situation have created C++ APIs that can talk to the native side. And they called it JSI (JavaScript Interface).
JSI provides an abstraction layer to a JavaScript Runtime. You can think of this layer as the concept of the interface in object-oriented languages. In these languages, you specify functions to be defined in the interface and the classes that implement it become obliged to override it. Similarly, by performing this operation on the JSI side, you can directly send a number value from the C++ side and obtain it by the JavaScript side without type conversion.
In Bridge, on the other hand, JS and the Native side communication happens asynchronously and messages are processed as batches, a simple operation like the addition of 2 numbers is required to use the await keyword.
Since everything works as synchronous by default in JSI, they can be used in top-level scope as well. Of course, asynchronous methods can be created for long-running operations and promises can be easily used.
As a disadvantage, it’s not possible to use remote debuggers like Google Chrome as JSI accesses JS runtime. Instead of this, we can use the Flipper Desktop app to debug our applications.
Because the JSI became an abstraction layer for native implementation, we don’t need to directly use the JSI and we don’t need to know C++ internals. We just call native functions from the JS side as we used to be.
Also, Turbo Modules API is almost the same as the Native Modules API. Thus, each existing Native Module in the RN ecosystem can be easily migrated to Turbo Modules without rewriting from scratch.
Now, take a closer look at the MMKV library to understand how JSI implementation works - https://github.com/mrousavy/react-native-mmkv
-
UI Thread — This is the main application thread on which your Android/iOS app is running. It has access to UI and your UI can be changed only by this thread.
-
Shadow Thread — This thread is the background thread used by React Native to calculate your layout created using React library.
-
JavaScript Thread — This thread is the place where your JavaScript code (your React code, essentially) lives and executes.
Suppose you want to draw a red box in the center of your screen. So what happens is that your JS thread contains code to create a layout, i.e. that red box on the screen.
<View style={{ flex: 1, justifyContent: "center", alignItems: "center" }}>
  <View style={{ width: 100, height: 100, backgroundColor: "red" }}></View>
</View>
The host operating system has its own layout implementation and does not follow the kind of flexbox code you just wrote. Therefore, RN first of all has to convert your flexbox coded layout into a layout system which your host operating system can understand.
Hold on! Before doing that, we need to offload this layout calculation part to another thread so we can keep executing our JavaScript thread. Hence, RN uses the Shadow Thread which essentially constructs a tree of your layout you coded in your JS thread. In this thread, RN uses a layout engine called Yoga which converts the flexbox-based layout into a layout system which your native host can understand.
React Native uses something called a React Native bridge to communicate this information from the JS thread to the Shadow thread. In a nutshell, this simply serializes the data in JSON format and transfers it as a string over the bridge.
At this point, we’re in the Shadow thread. The JS thread is executing and there’s nothing drawn on the screen.
Now, once we have the rendered markup from yoga, this information is again transferred to UI thread via the React Native bridge. Again, this does some serialization on the Shadow thread and deserialization on the main thread. Here, the main thread then renders the UI.
- it’s slow to transfer large chunks of data (say an image file converted into base64 string), and
- there’s unnecessary data copying if the same task can be implemented just by pointing to the data in memory (again, say an image)
Next, all communication is asynchronous, which in most cases is good. However, there is no way currently to update the UI thread from the JS thread synchronously. This creates a problem when you’re using, say, FlatList with a huge list of data. (You can think of FlatList as a weaker implementation of RecyclerView.
Fabric is React Native's new rendering system, a conceptual evolution of the legacy render system. The core principles are to unify more render logic in C++. RN Fabric allows the UI thread (where UI is drawn) to be in sync with the JS thread (where the UI is programmed).
Take a step back and think about your browser. If you take a deeper look, the input fields, the buttons, etc. are actually Operating System-specific. Therefore, it is your browser which asks your OS (Windows, Mac, Linux, or pretty much anything else) to draw, for example, an input field somewhere on a webpage.
Have you ever just written commands like document.getElementById and commands like setTimeout and setInterval in your console and seen the output? Oh! Their implementation is actually [native code] ! What does that mean?
You see, when you execute these functions, they do not call any JavaScript code. Instead, these functions are linked directly to native C++ code which is called. So the browser does not let JS communicate with the host Operating System using bridging, but instead, directly exposes JS to the OS using native code! In a nutshell, this is what React Native Fabric would do: eliminate the bridge and let the UI be controlled directly from the JS thread using native code.
The Facebook team decided to split this massive bridge into two separate actors: Fabric, which is the re-architecture of the UI manager, and the TurboModules, which is the “new gen” implementation of the interaction with native side.
If you've worked with React Native, you may be familiar with the concept of Native Modules, which allow JavaScript and platform-native code to communicate over the React Native "bridge", which handles cross-platform serialization via JSON.
TurboModules address the async and loading issues because they behave in a synchronous way in JavaScript and lazy load into memory allowing the app to start faster.
In the current implementation, the Native Modules used by JavaScript code (e.g. Bluetooth) need to be initialized when the app is opened—even when they’re not used—because of the “unawareness”. The new TurboModules approach allows the JavaScript code to load each module only when it’s really needed, and to hold direct reference to it, meaning no more need to communicate using batched JSON messages on the old bridge. This will significantly improve startup time for applications with lots of Native Modules, along with the direct communication
TurboModules cannot run when using Remote Debugging / Web Debugging. Use Flipper.
Turbo Native Modules are the next iteration on Native Modules that provide a few extra benefits:
- Strongly typed interfaces that are consistent across platforms
- The ability to write your code in C++, either exclusively or integrated with another native platform language, reducing the need to duplicate implementations across platforms
- Lazy loading of modules, allowing for faster app startup
- The use of JSI, a JavaScript interface for native code, allows for more efficient communication between native and JavaScript code than the bridge
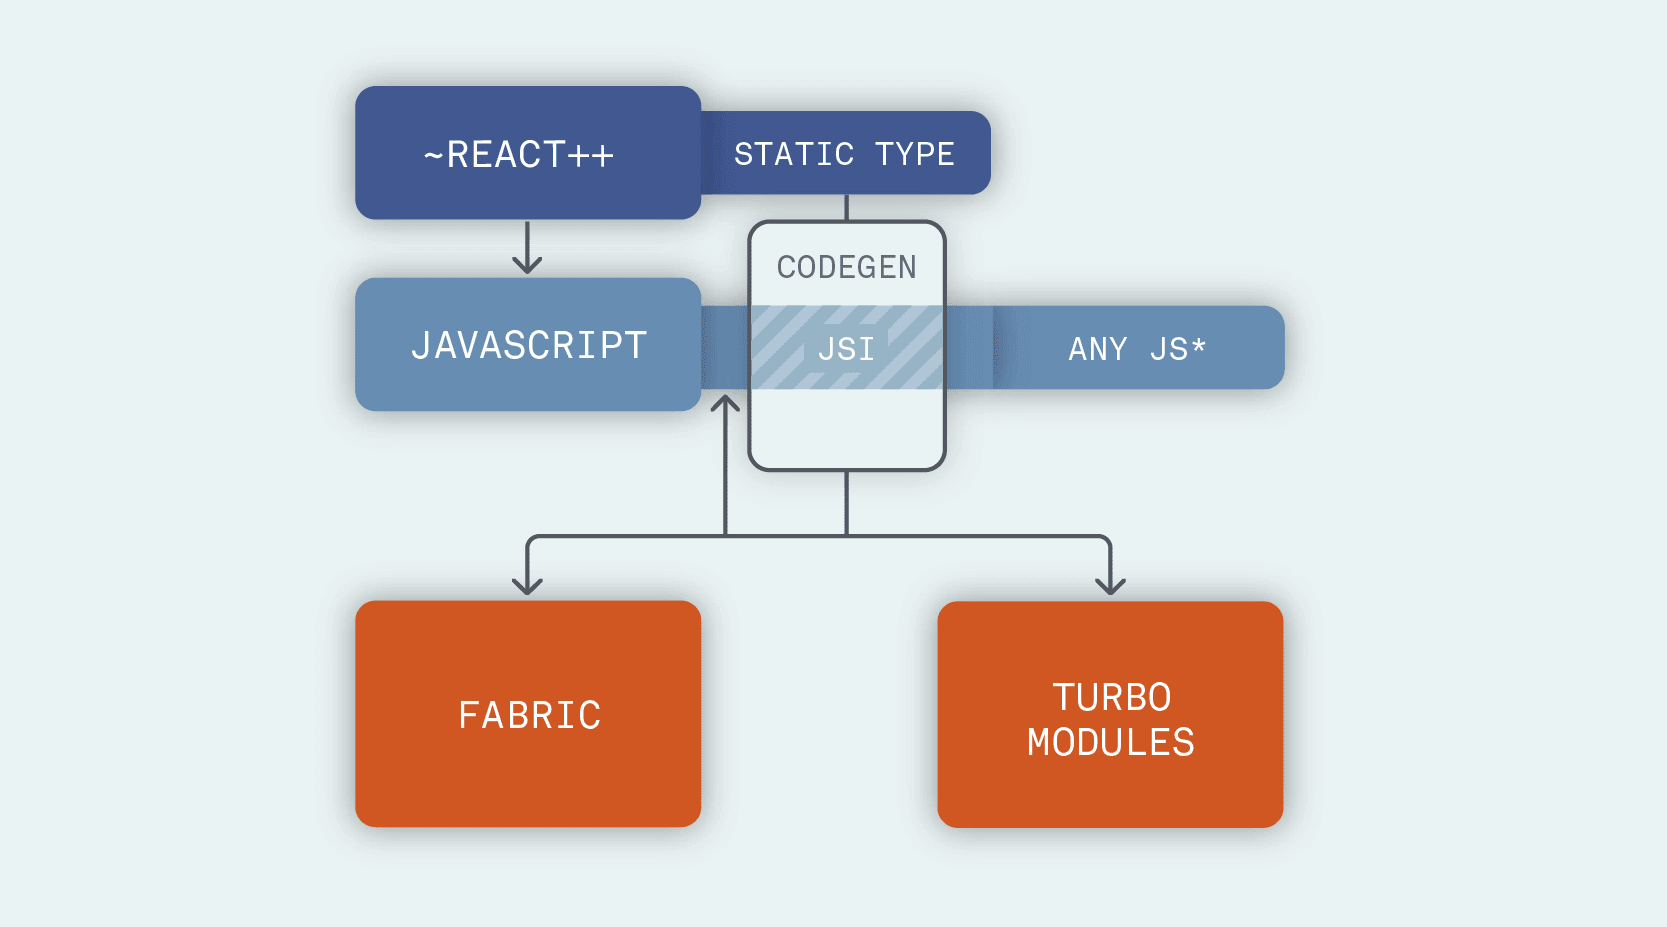
The React Native team is also doubling down on the presence of a static type checker (either Flow or TypeScript) in the code. In particular, they are working on a tool called CodeGen to "automate" the compatibility between JS and the native side. By using the typed JavaScript as the source of truth, this generator can define the interface files needed by Fabric and TurboModules to send messages across the realms with confidence. This automation will speed up the communication too, as it’s not necessary to validate the data every time.
The Codegen is not a proper pillar, but it is a tool that can be used to avoid writing a lot of repetitive code. Using Codegen is not mandatory: all the code that is generated by it can also be written manually. However, it generates scaffolding code that could save you a lot of time.
The Codegen is invoked automatically by React Native every time an iOS or Android app is built.
AsyncTask is an abstract class in Android that offers us the freedom to execute demanding tasks in the background while keeping the UI thread light and the application responsive.
JS driven animations occupy the bridge and slow down the application.
The Animated library is designed to make animations fluid, powerful, and painless to build and maintain. By using the native driver in Animated, we send everything about the animation to native before starting the animation, allowing native code to perform the animation on the UI thread without having to go through the bridge on every frame. Once the animation has started, the JS thread can be blocked without affecting the animation. Animatable components are as follows:
- Animated.Image
- Animated.ScrollView
- Animated.Text
- Animated.View
- Animated.FlatList
- Animated.SectionList
Enabling the usage of the native driver is the easiest way of quickly improving your animations performance. However, the subset of style props that can be used together with the native driver is limited. You can use it with non-layout properties like transforms and opacity. It will not work with colors, height and others.
For more complex use cases you can use the React Native Reanimated library. Its API is compatible with the basic Animated library and introduces a set of fine grained controls for your animations with a modern hook based interface. More importantly, it introduces the possibility to animate all possible style props with the native driver. So animating heigh or color will no longer be an issue. Reanimated supports syncronous JS execution on the UI thread using the concepts of worklets. The library runtime spawns a secondary JS context on the UI thread that is then able to run JS functions in the form of said worklets.
This library allows you to handler different gestures natively and interpolate those into animations. You can create swipable element by combing it with Animated. While it will still require JS callbacks, there's remedy for that! The most powerful pair of tools for gesture-driven animations is using gesture handler combined with renanimated. They were designed to work together and give the possibility to build complex gesture-driven animations that are fully calcualted on the native side.
It is not always possible to fully control the way animations are implemented. For example, React Navigation uses a combination of RN Gesture handler and Animated which still needs JavaScript to control the animation runtime. As a result, your animation may start flickering if the screen your are navigating to loads a heavy UI. Fortunately, you can postpone the execution of such actions using Interactionmanager.
Interaction Manager provides us the ability to schedule long-running work/tasks to run after the completion of any interactions/animations. The tasks can be scheduled with the help of the following command:
InteractionManager.runAfterInteractions(() => {
  someLongTask(); // or animations
});GIFs can quickly add a few megabytes to our app's bundle. So what other options do we have? Lottie A Lottie is a JSON-based animation file format that allows you to ship animations on any platform as easily as shipping static assets. They are small files that work on any device and can scale up or down without pixelation. LottieFiles lets you create, edit, test, collaborate on and ship a Lottie in the easiest way possible. It was created by AirBnb to leverage lottie files which is JSON based animations exported using the plugin BodyMoving from Adobe AfterEffects.
For example, if we tap on a button, the state of the animation changes for the next step. Let's say we want to change the size or do other customizations, we can't do it in the editor provided by LottieFiles. Instead, we will have to import that in Adobe AE and then do the adjustments.
Rive, on the other hand, is built from the ground up to make transitions and animations easy to build. Rive’s runtimes can take things a step further by allowing the designer/developer combo to take full control of the experience. With a runtime built purposefully for Rive, developers can fully control the animation and its hierarchy, optimizing for real-time modifications. Moreover, the runtimes and the exported Rive files are tiny, often smaller than Lottie. It runs on more FPS as compared to lottie because it uses less memory, cpu and graphics as compared to lottie.
Jest is a JavaScript testing framework built on top of Jasmine and maintained by Meta. It works with projects using: Babel, TypeScript, Node, React, Angular, Vue and more.
Snapshot tests are a very useful tool whenever you want to make sure your UI does not change unexpectedly. A typical snapshot test case renders a UI component, takes a snapshot, then compares it to a reference snapshot file stored alongside the test. The test will fail if the two snapshots do not match: either the change is unexpected, or the reference snapshot needs to be updated to the new version of the UI component.
The end-to-end testing and automation framework for React Native apps. The most popular E2E test runner within React Native community and a part of the React Native testing pipeline. With Detox, you will be able to ensure that your framework of choice is supported by the latest React Native versions.
CI/CD is a method to frequently deliver apps to customers by introducing automation into the stages of app development. The main concepts attributed to CI/CD are continuous integration, continuous delivery, and continuous deployment. Example: CircleCI or Github Actions (are based on Docker containers and the idea of composing different jobs into workflows)
The easiest way to build and release mobile apps. It Automates your development and release process.
Over The Air (OTA) updates are one of the advantages of React Native apps over native ones. In React Native apps, code is split into two parts:
- Native binaries – the part with native code that is compiled
- Javascript bundle – the bundle with Javascript code and assets that is not compiled
Normally when you want to update your app, you need first to build it and then send it to App Store or Google Play. A major drawback of this solution is the time needed for these stores to approve your update.
Imagine a situation where an app with a critical error was published to users by mistake. In these cases, every second count. And this is where Over The Air (OTA) may help us. In short, OTA allows us to send updated Javascript bundles directly to users without the need of accepting them by Apple or Google. We can fix errors or push small updates (more on those later) almost immediately. Example: Microsoft CodePush (AppCenter), EAS (Expo App Services), DUS by Flipkart
Use DMAIC (DEFINE MEASURE ANALYZE IMPROVE CONTROL) methodology to help you solve performance issues consistently
- Define the problem, improvement activity, opportunity for improvement, the project goals, and customer (internal and external) requirements.
- Measure process performance.
- Analyze the process to determine root causes of variation, poor performance (defects).
- Improve process performance by addressing and eliminating the root causes.
- Control the improved process and future process performance.
This is the standard pattern that most applications use to separate the model from the view. In this format, the controller identifies the data that matches the model.
With this pattern, the frontend and backend work as separate components, and the controller will be responsible for fetching the data, rendering the requests, and ensuring smooth communication.
Model-View-ViewModel (MVVM) is a software design pattern that is structured to separate program logic and user interface controls. MVVM is also known as model-view-binder and was created by Microsoft architects Ken Cooper and John Gossman.
- View
- ViewController
- ViewModel
- Model
- Provider (Extra)
The view is your Interface, which you build with React Native framework. This is the point where the user will interact with your application. Either they will input a command, use mouse movements or press a key to trigger the ViewController from the interface. The interface doesn’t do much except take in and give out the display data.
The ViewController will take up the command and pass it on to the ViewModel. It is important to note that one ViewController can pass commands to several ViewModels. You won't need to ramp up the controllers in this case.
This is the third and most important block of the MVVM architecture. At this point, the block is not communicating with the interface directly. So, it will not know whether the interface was built using React, Vue, or any other framework. It is a JS class that you can reuse to make any application.
This is your source for accessing the data; from here, the ViewModel and ViewController will gain the necessary output and send it to View. This part of the architecture will find databases, network layers, and services. Your logic should be restricted to helping the model send the necessary updates to the View.
When working with ViewModel, you will need to inject dependencies that can help quickly collect the data and send it to the View. That’s where the provider will help. This block doesn’t carry any logic. It is designed to connect the different blocks properly.
SSL (Secure socket layer) Certificate Pinning, or pinning for short, is the process of associating a host with its certificate or public key. Once you know a host’s certificate or public key, you pin it to that host.
In other words, you configure the app to reject all but one or a few predefined certificates or public keys. Whenever the app connects to a server, it compares the server certificate with the pinned certificate(s) or public key(s). If and only if they match, the app trusts the server and establishes the connection.
You usually add a service’s certificate or public key at development time. In other words, your mobile app should include the digital certificate or the public key within your app’s bundle. This is the preferred method since an attacker cannot taint the pin.
-
Pin the certificate: You can download the server’s certificate and bundle it into your app. At runtime, the app compares the server’s certificate to the one you’ve embedded.
-
Pin the public key: You can retrieve the certificate’s public key and include it in your code as a string. At runtime, the app compares the certificate’s public key to the one hard-coded in your code.
createSlice takes an object of reducer functions, a slice name, and an initial state value and lets us auto-generate action types and action creators, based on the names of the reducer functions that we supply. It also helps you organize all of your Redux-related logic for a given slice into a single file. More Details: https://redux-toolkit.js.org/api/createSlice
React 18, also known as the Concurrent React, released earlier this year and brought with it important changes. The most impactful one is the new concurrent rendering engine, which is what the new Concurrent Rendering feature “Suspense” is based on.
lets you display a fallback until its children have finished loading.
Suspense is a feature for managing asynchronous operations in a React app. It lets your components communicate to React that they’re waiting for some data.
React Freeze builds on the ideas presented in React Suspense, enabling you to pause component rendering for a good user experience. This library lets you freeze the renders of parts of the React component tree using Suspense mechanism introduced in React 17. The main use case of this library is to avoid unnecessary re-renders of parts of the app that are not visible to the user at a given moment.
Code Splitting is a technique that splits the code into multiple files, which can be loaded on demand and in parallel.
It can be used to:
- Optimize the initial size of the application and to improve the startup performance by deferring the parsing (only with JSC) and execution (JSC and Hermes) of the non-critical code.
- Dynamically deliver content and features to the users based on runtime factors: user's role, subscription plan, preferences etc.
- For developers and companies: split and isolate pieces of the product to improve scalability and reduce coupling.*
The main feature of Re.Pack is Webpack and its ecosystem of loaders, plugins and support for various features like symlinks, aliases etc. However, because Re.Pack is based on Webpack, it is targeted towards advanced users who already know how to use Webpack and want to leverage Webpack ecosystem.
Code Splitting is one of the most important features in Re.Pack, and it's based on Webpack's infrastructure as well as the native module that allows to execute the additional code on the same JavaScript context (same React Native instance).
Code Splitting with Re.Pack is not designed to add new features dynamically without doing the regular App Store or Play store release. It can be used to deliver fixes or tweaks to additional (split) code, similarly to Code Push, but you should not add new features with it.
URL - https://re-pack.netlify.app/docs/code-splitting/guide-async-chunks
A monorepo is a single repository that holds a multitude of projects with all their code and assets. While the projects can be related, they can be used independently by different teams.
Working with monorepos is very useful, especially when developing big and complex applications like super apps. Monorepos enable sharing the logic between a web app and a mobile app, for example.
Thanks to react-native-web we can share every component so there’s no need to duplicate the code many times. This means easier dependency management, shorter CI times, and better collaboration between teams since the code can be shared.
The main advantage though is the possibility of sharing packages between React and React Native. Most of the time we decide to share only business logic, but thanks to React Native Web, we can also share some of the UI components.
https://github.com/shubhamd99/react_native/tree/master/mono_repo_yarn
While setting up a monorepo, we have two options: we can either hoist the packages to the root level or prevent them from hoisting. Yarn workspaces have an option named nohoist which allows us to specify packages that aren’t hoisted. It depends on your use case but most of the time it’s better to hoist packages to the root level.
If you have a relatively small collection of key-values that you'd like to save, you can use the SharedPreferences APIs. A SharedPreferences object points to a file containing key-value pairs and provides simple methods to read and write them. Each SharedPreferences file is managed by the framework and can be private or shared.
- Package Name - react-native-shared-group-preferences
import SharedGroupPreferences from "react-native-shared-group-preferences";

const appGroupIdentifier = "group.com.mytest";
const userData = {
  name: "Vin Diesel",
  age: 34,
  friends: ["Lara Croft", "Mike Meyers"],
};
await SharedGroupPreferences.setItem("savedData", data, appGroupIdentifier);
const loadedData = await SharedGroupPreferences.getItem(
  "savedData",
  appGroupIdentifier
);- The file is saved to the user's storage in the following format: $storage/$appGroupIdentifier/data.json. So make sure your appGroupIdentifier is a valid folder name
// This Android only script lets you check if another app is installed based on package name. The example below is for Facebook.
const facebookPackageName = "com.facebook.android";
try {
  const installed = await SharedGroupPreferences.isAppInstalledAndroid(
    facebookPackageName
  );
  console.log("Facebook is installed on this device");
} catch (err) {
  console.log("Facebook is not installed");
}
DNS over HTTPS (DoH) is a protocol that encrypts DNS traffic by passing DNS queries through an HTTPS encrypted session. DoH can help improve online security and privacy and protect DNS queries from attacks. Introduced in 2018, DoH works similarly to DNS but uses HTTPS sessions to keep the requests secure and minimize the visibility of the information exchanged during queries.
https://dev.to/somadevtoo/difference-between-graphql-rest-and-grpc-58bl