Anggota:
- 05111940000006 Daffa Tristan Firdaus
- 05111940000086 Nabil Fikri Arief
- 05111940000158 Shahnaaz Anisa Firdaus
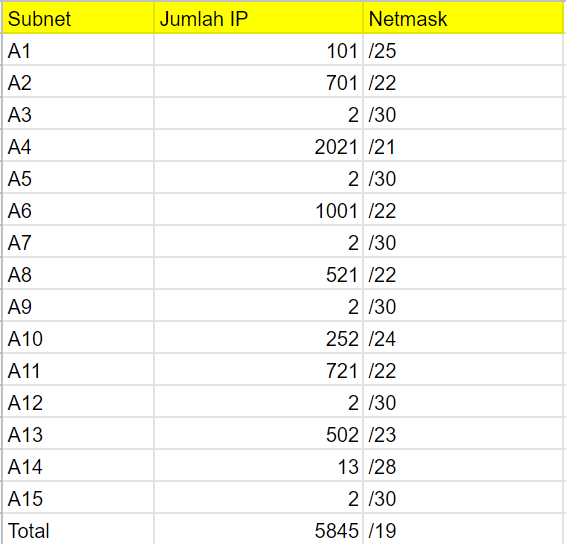
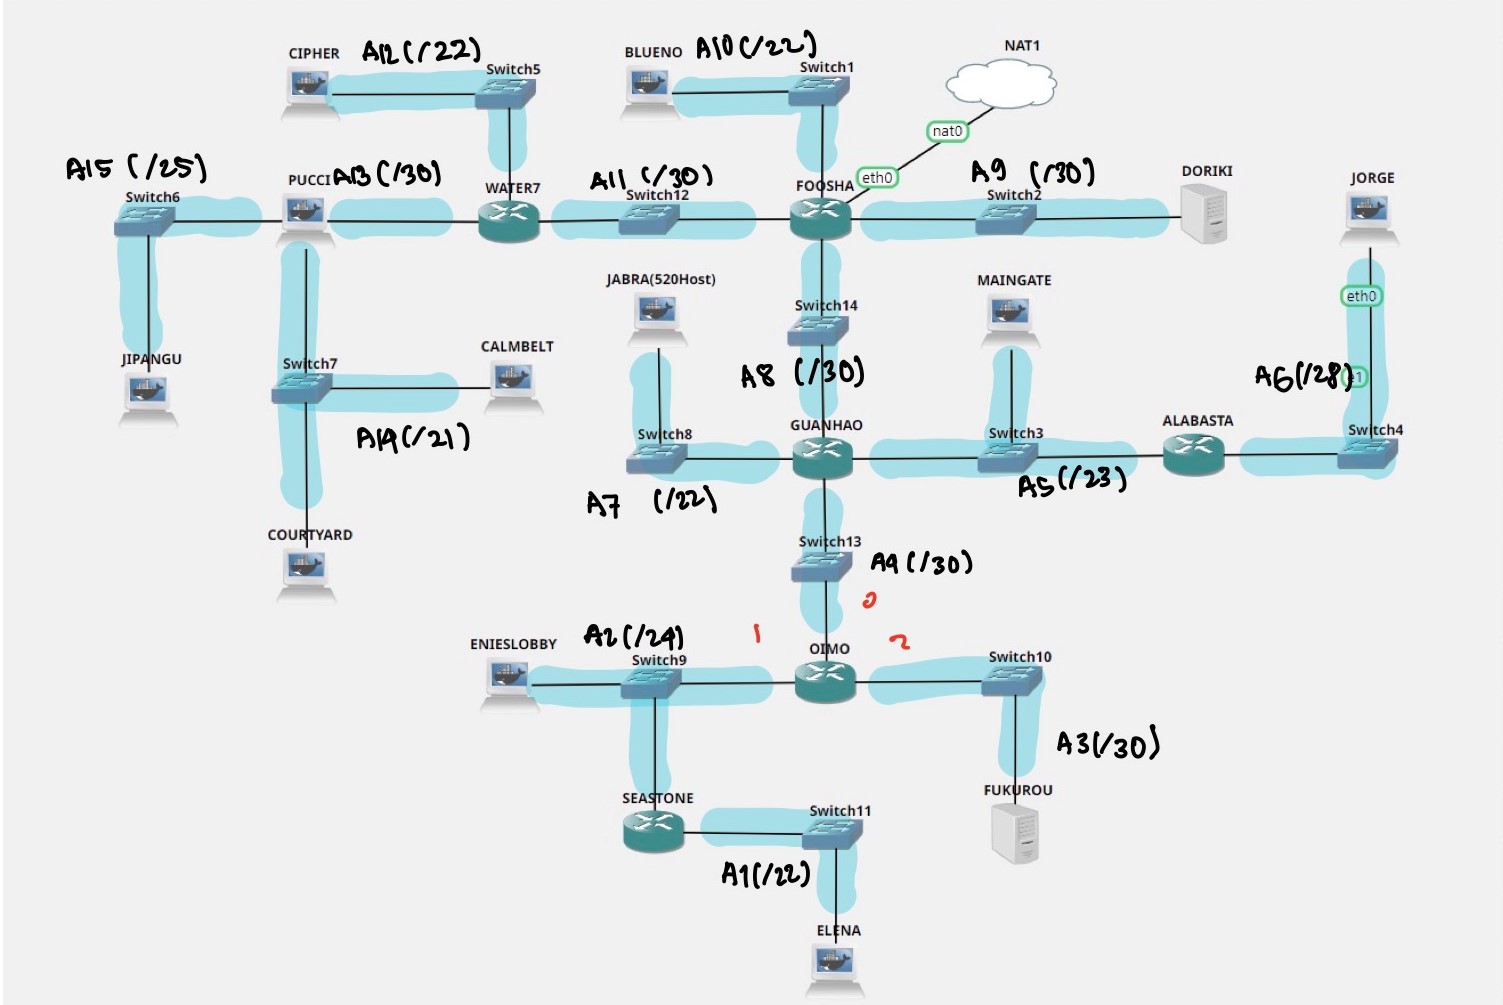
- Langkah 1 - Menentukan subnet yang ada pada topologi
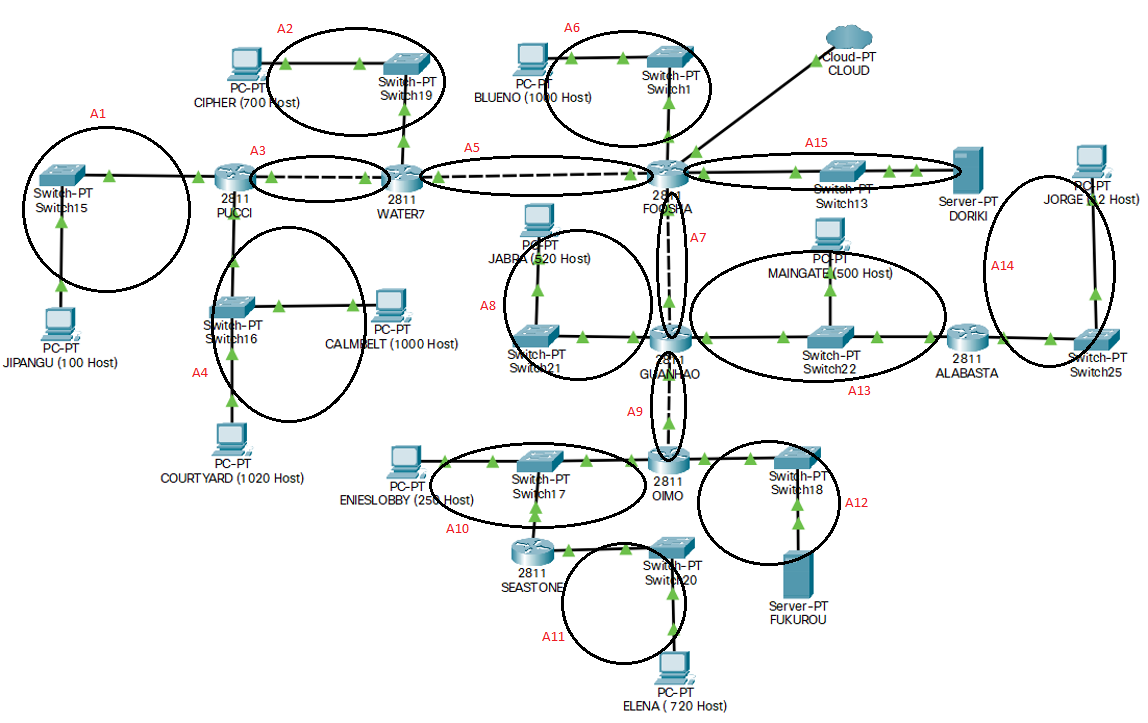 dan kemudian menentukan jumlah IP dan netmask pada tiap subnet
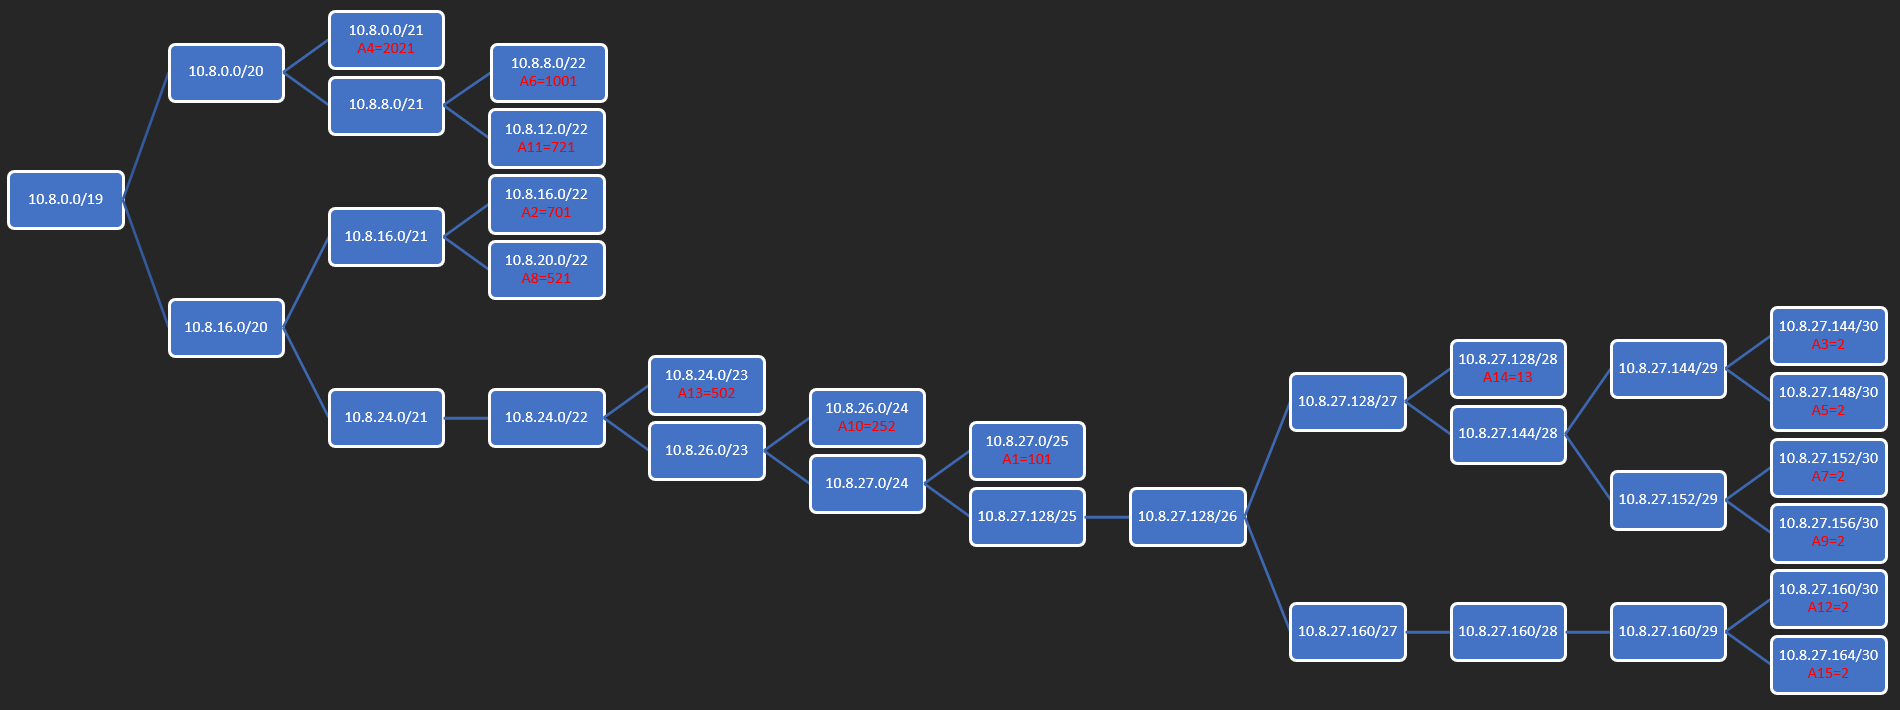
- Langkah 2 - Menghitung pembagian IP berdasarkan pohon berikut
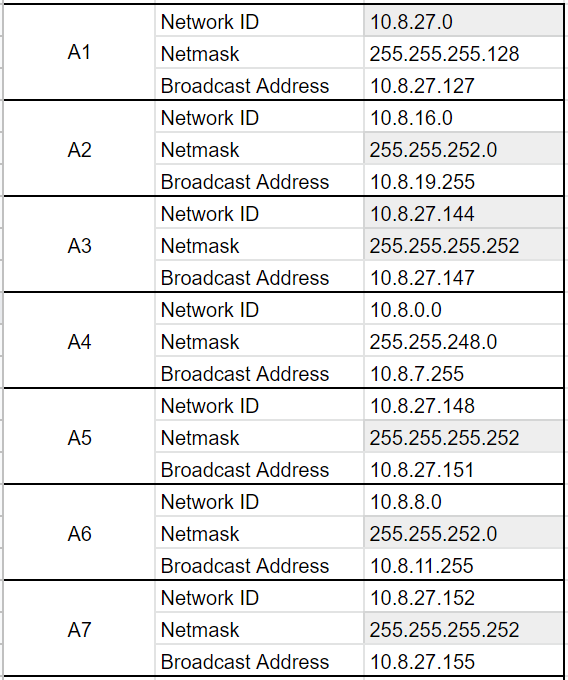
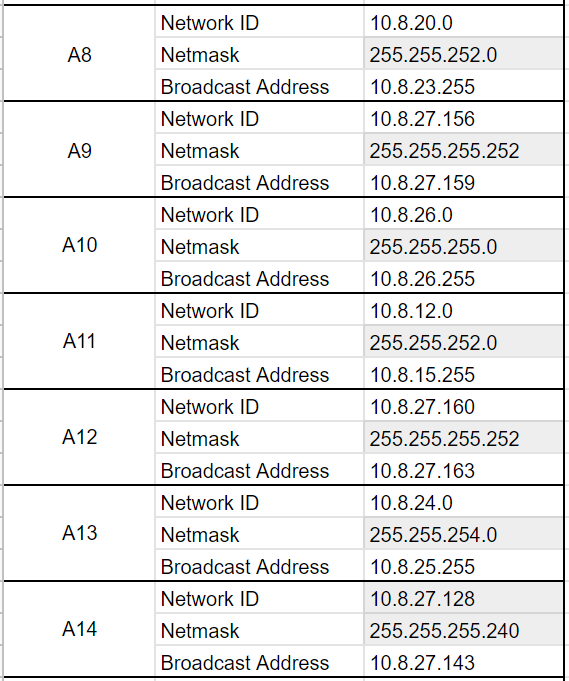
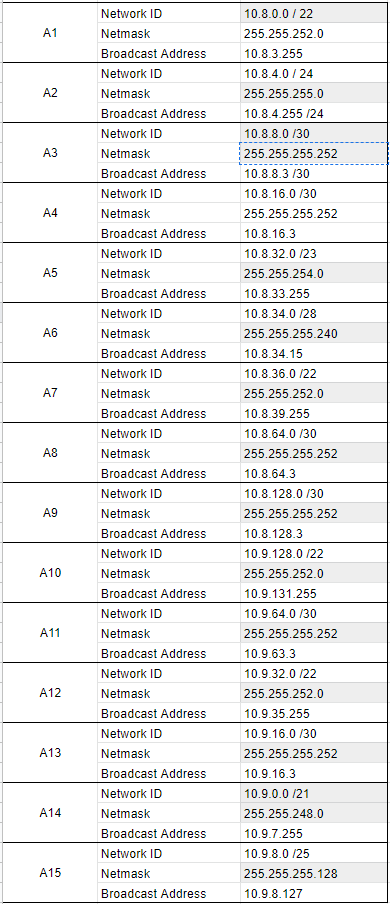
- Langkah 3 - Menentukan Network ID, Netmask, dan Broadcast Address

- Langkah 4 - Lalu, memasukkan konfigurasi IP ke router atau PC
Foosha melalui Fa1/0 terhubung dengan Water7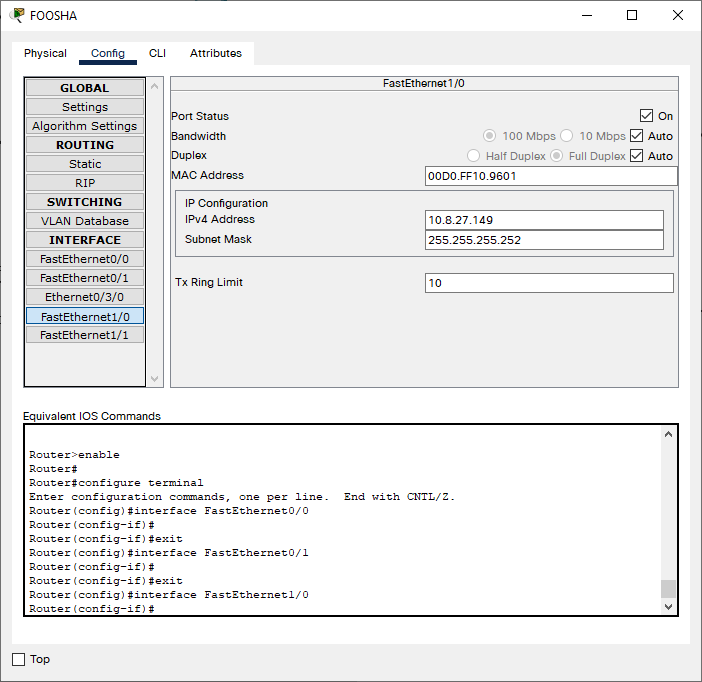
Foosha melalui Fa0/1 terhubung dengan BLUENO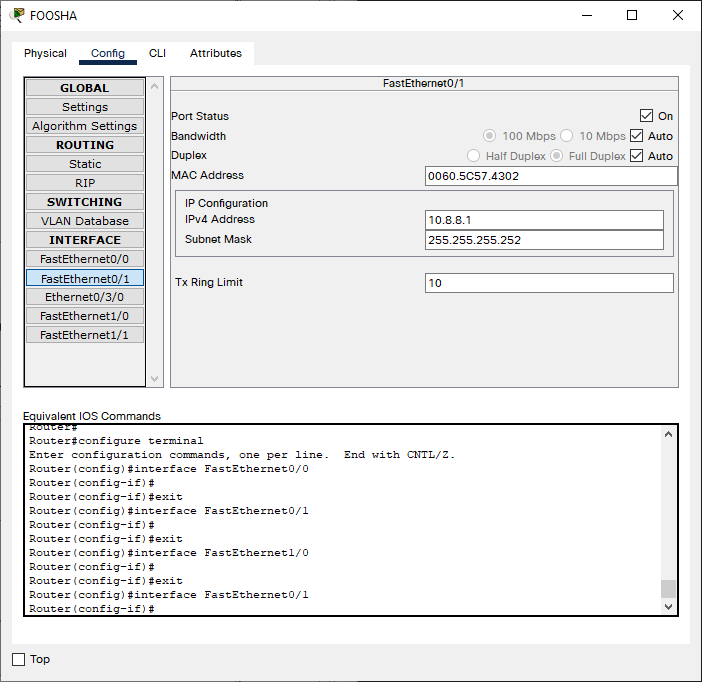
BLUENO terhubung dengan Foosha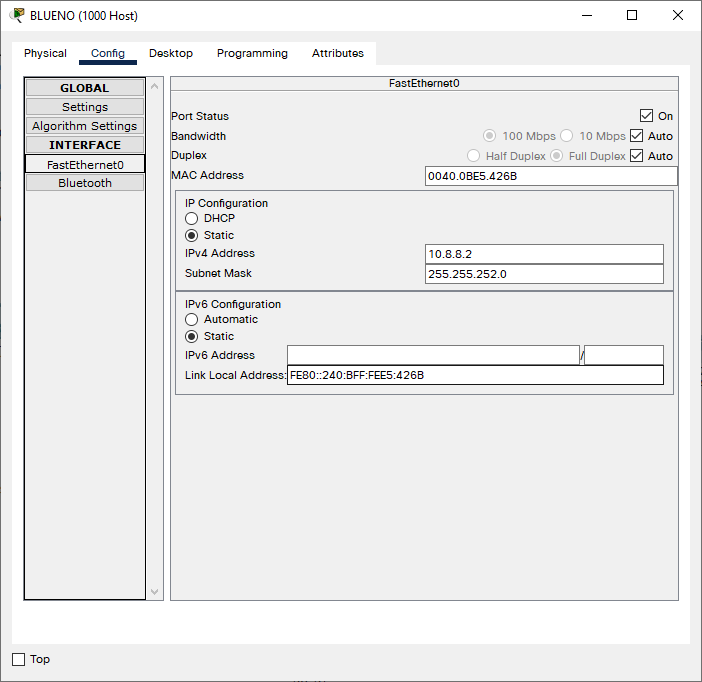
- Langkah 5 - Kemudian, menentukan routing untuk tiap router
- Foosha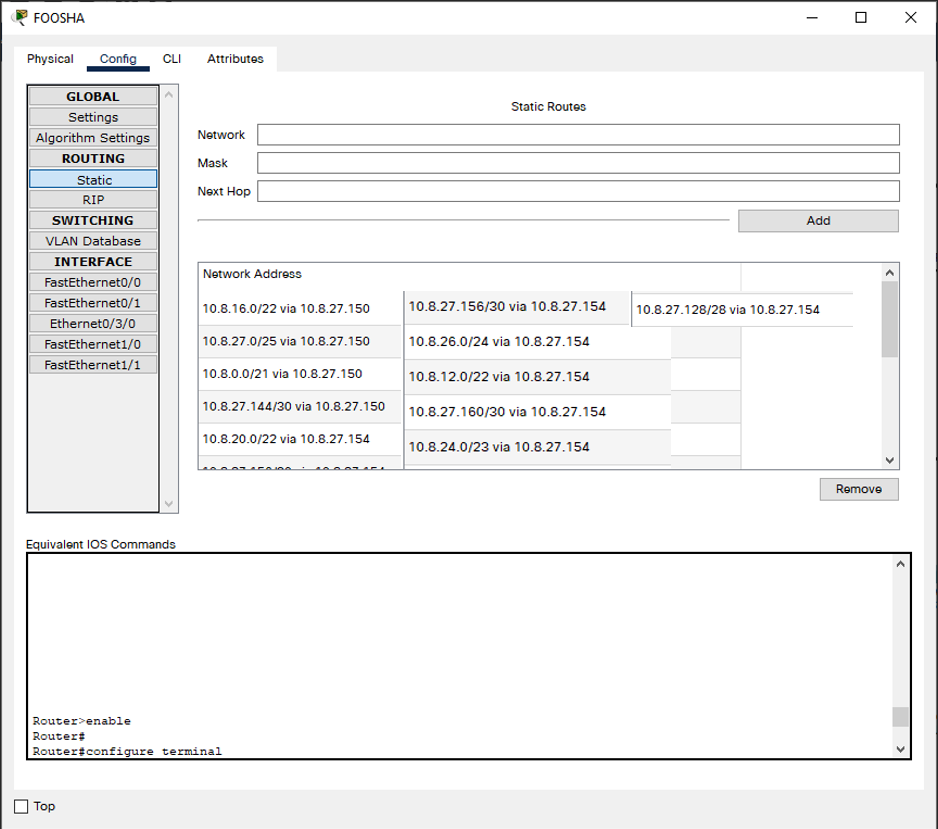
- Guanhao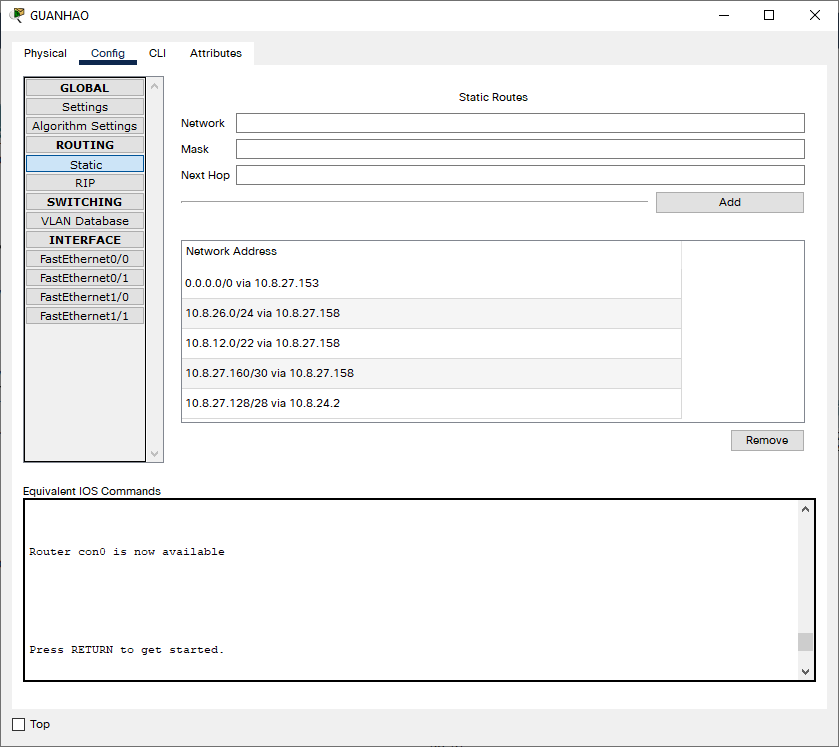
- Water7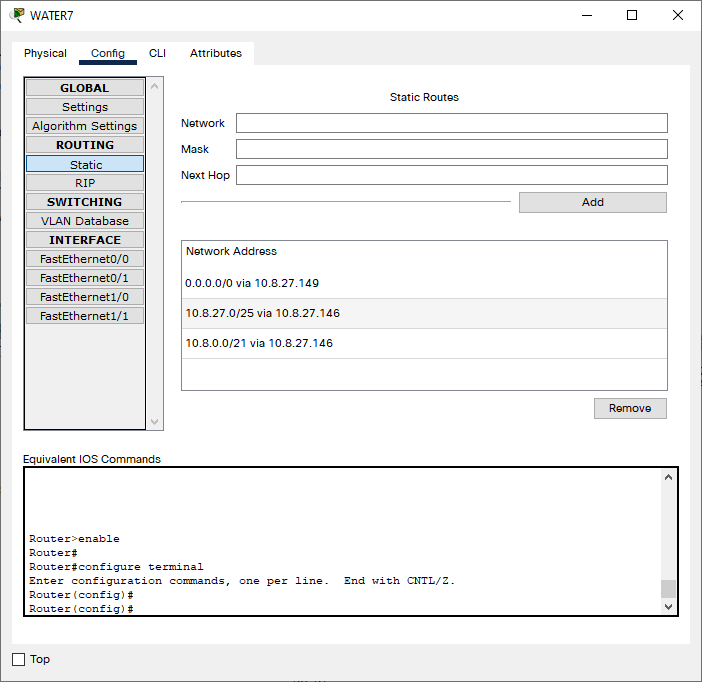
- Pucci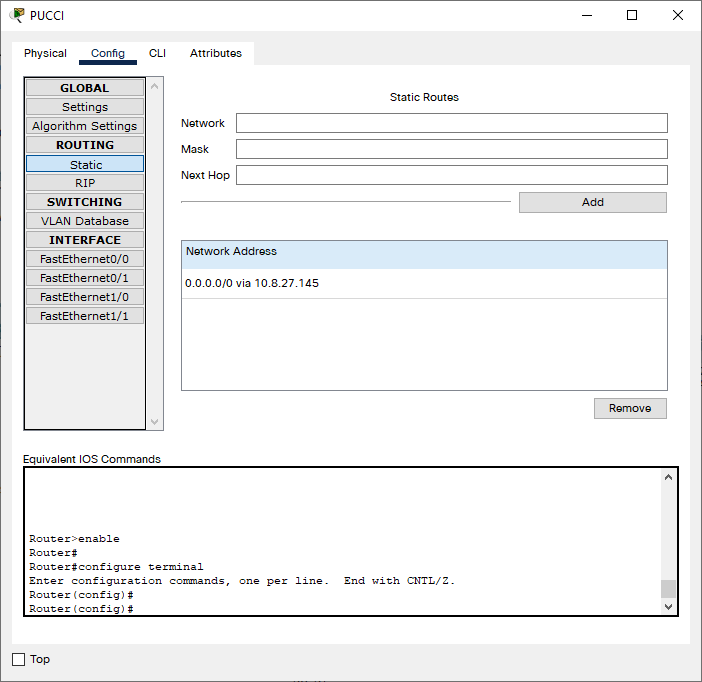
- Oimo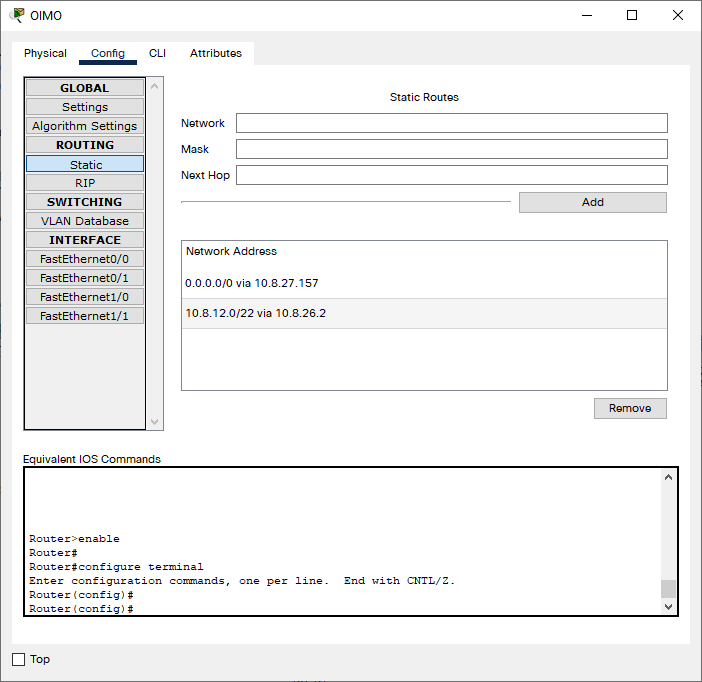
- Seastone
- Alabasta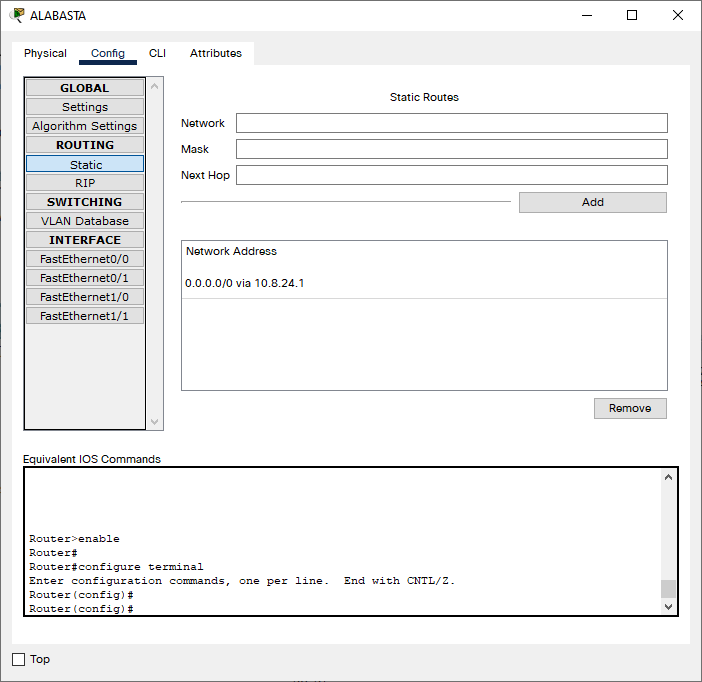
- Langkah 6 - Melakukan Ping antar Server, Router atau PC


-
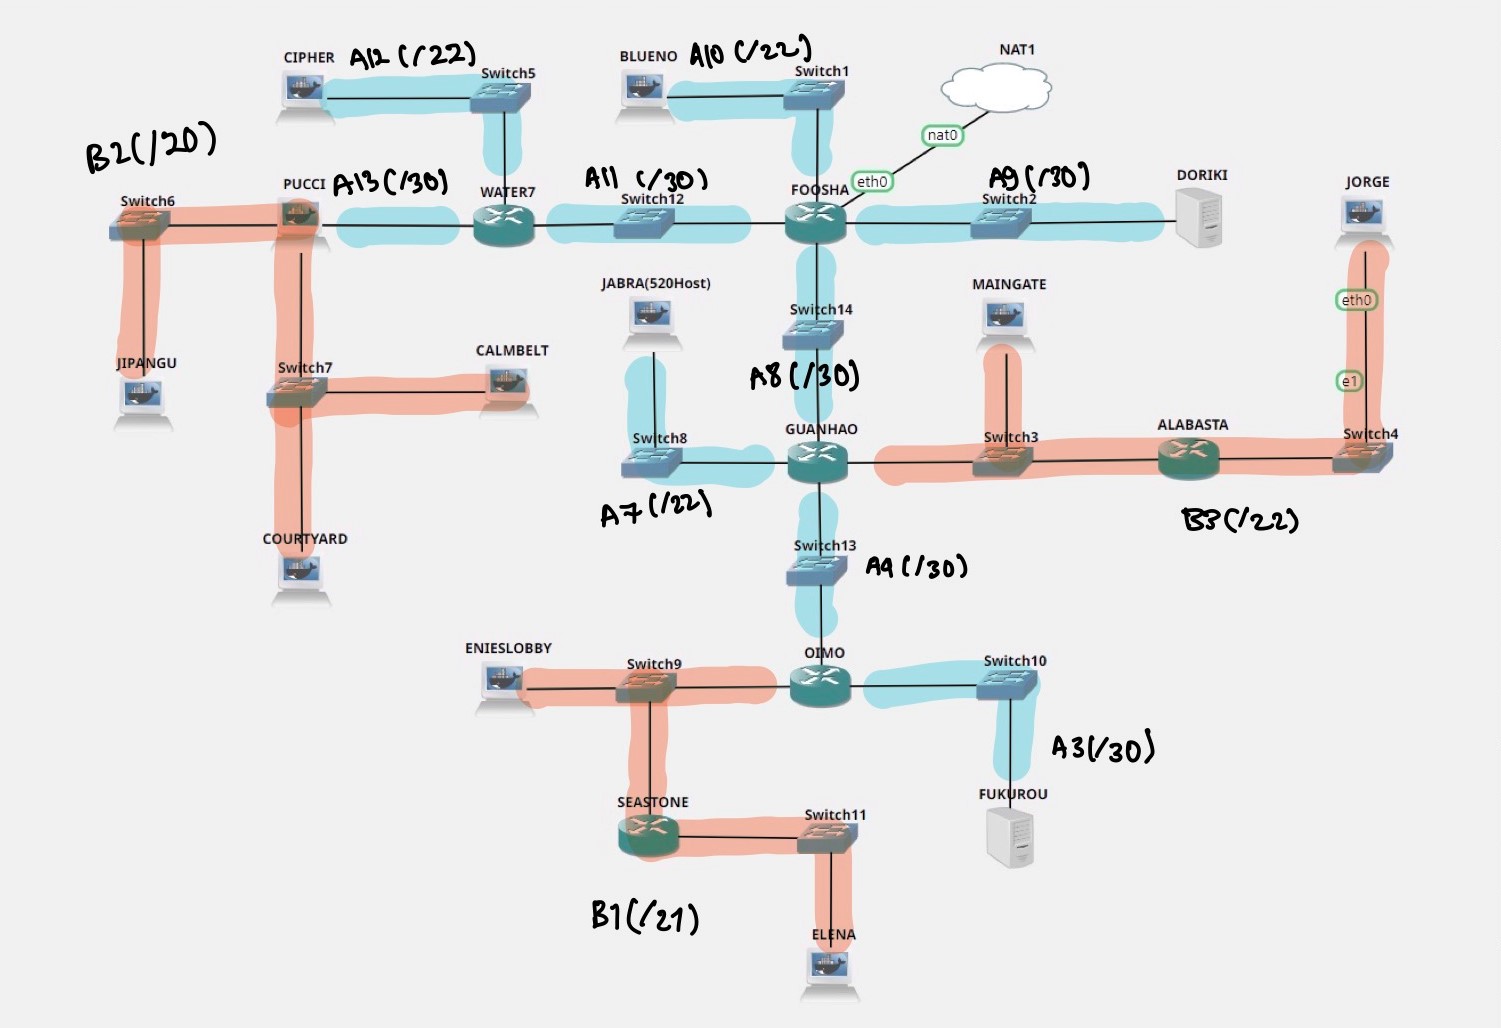
Langkah 1: Menentukan subnet yang ada dalam topologi dan melakukan labelling netmask terhadap masing-masing subnet. Penggabungan dilakukan hingga didapatkan satu subnet besar.
-
Langkah 2: Menggabungkan subnet paling bawah di dalam topologi (paling jauh dari NAT)
- iterasi 1
- iterasi 2
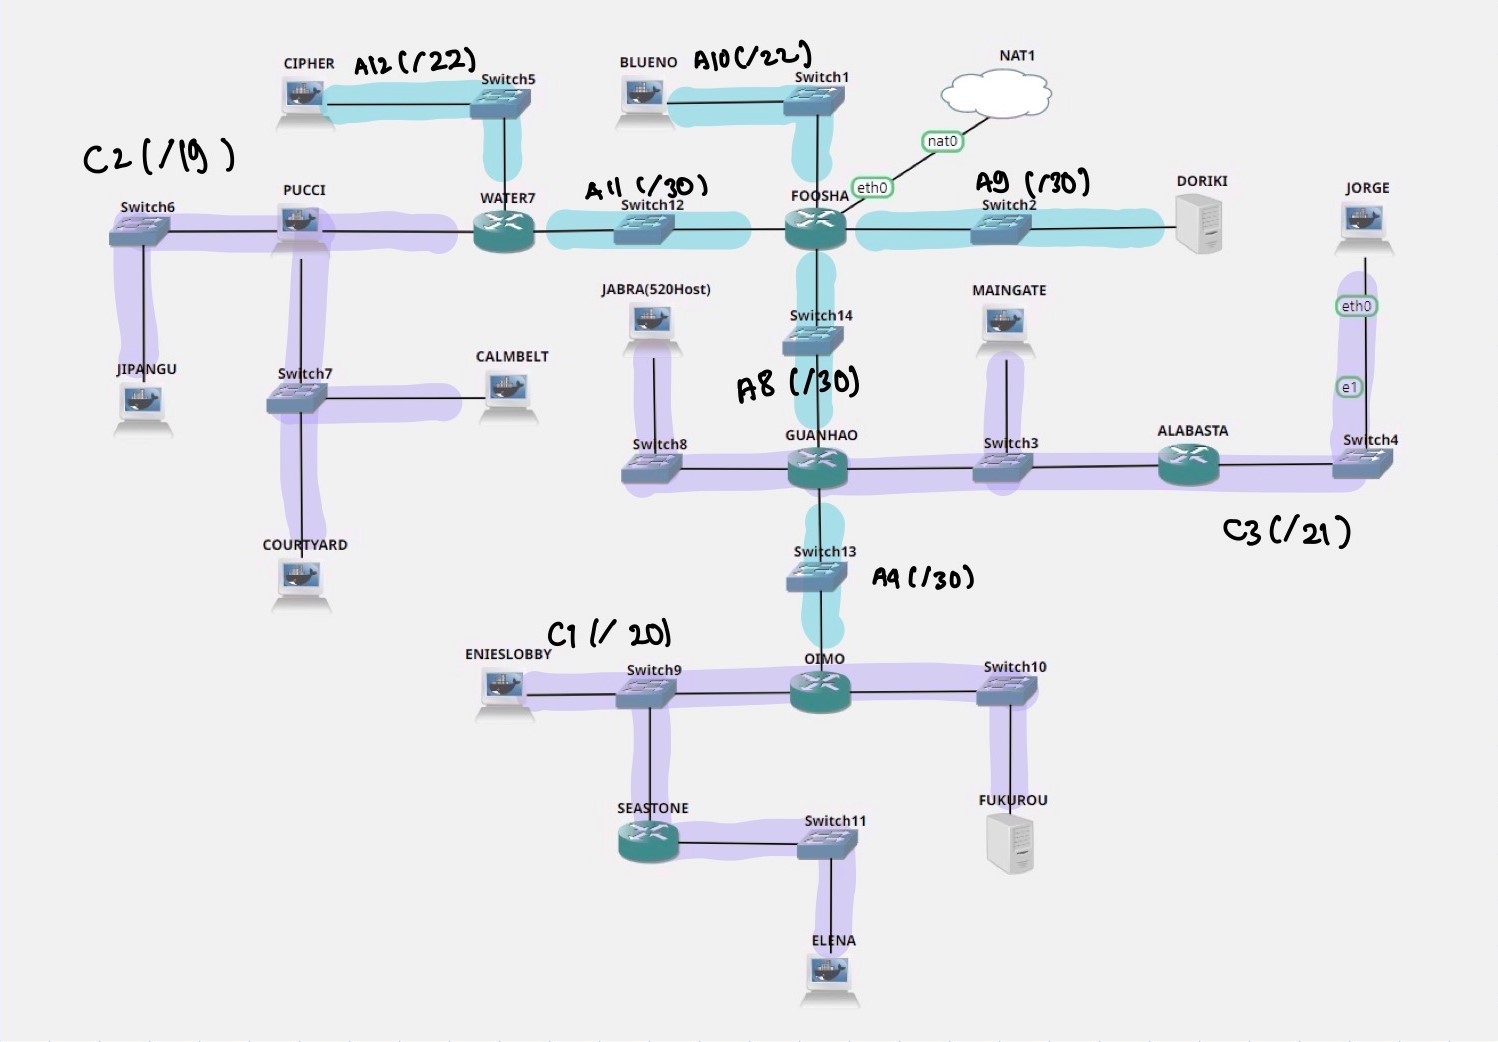
- iterasi 3
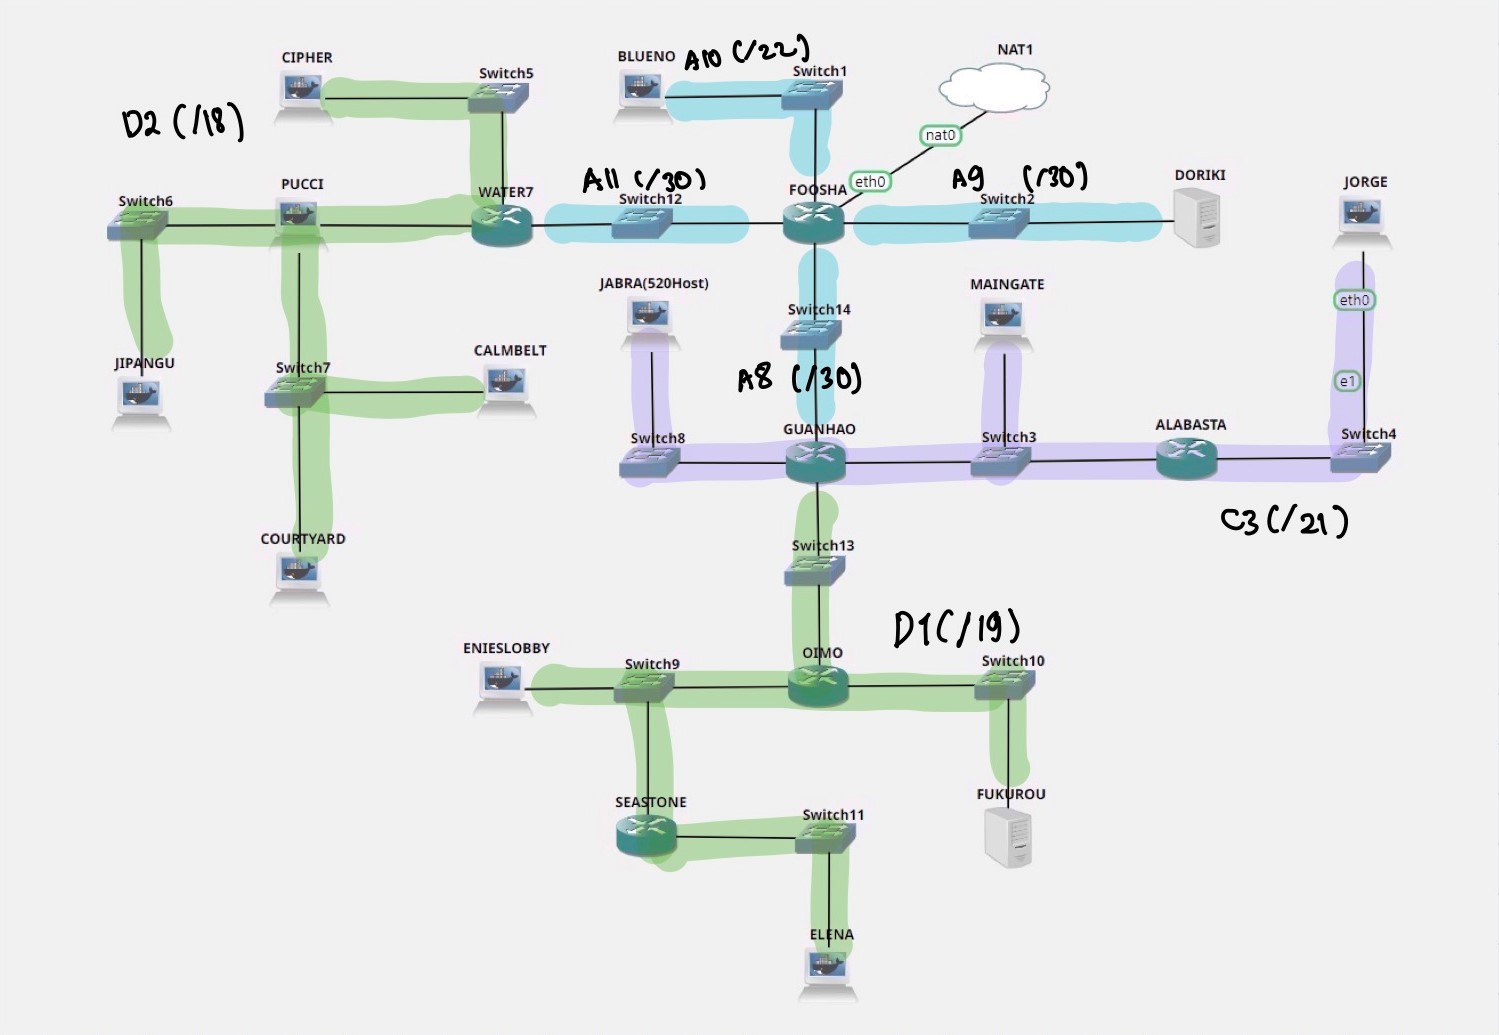
- iterasi 4
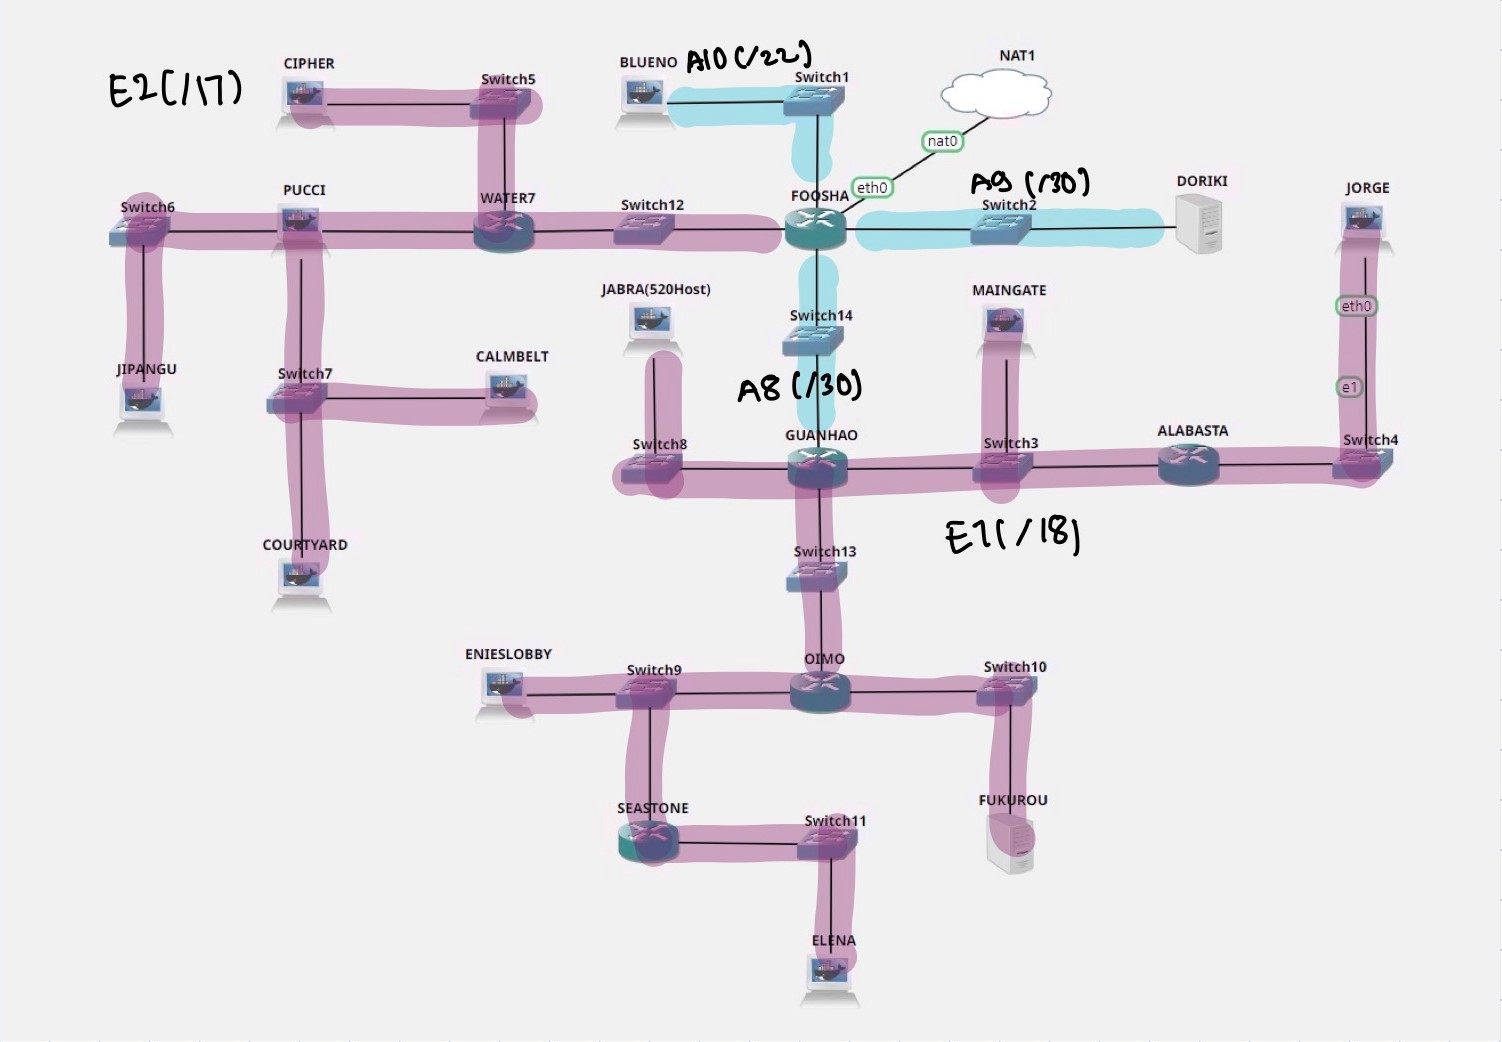
- iterasi 5
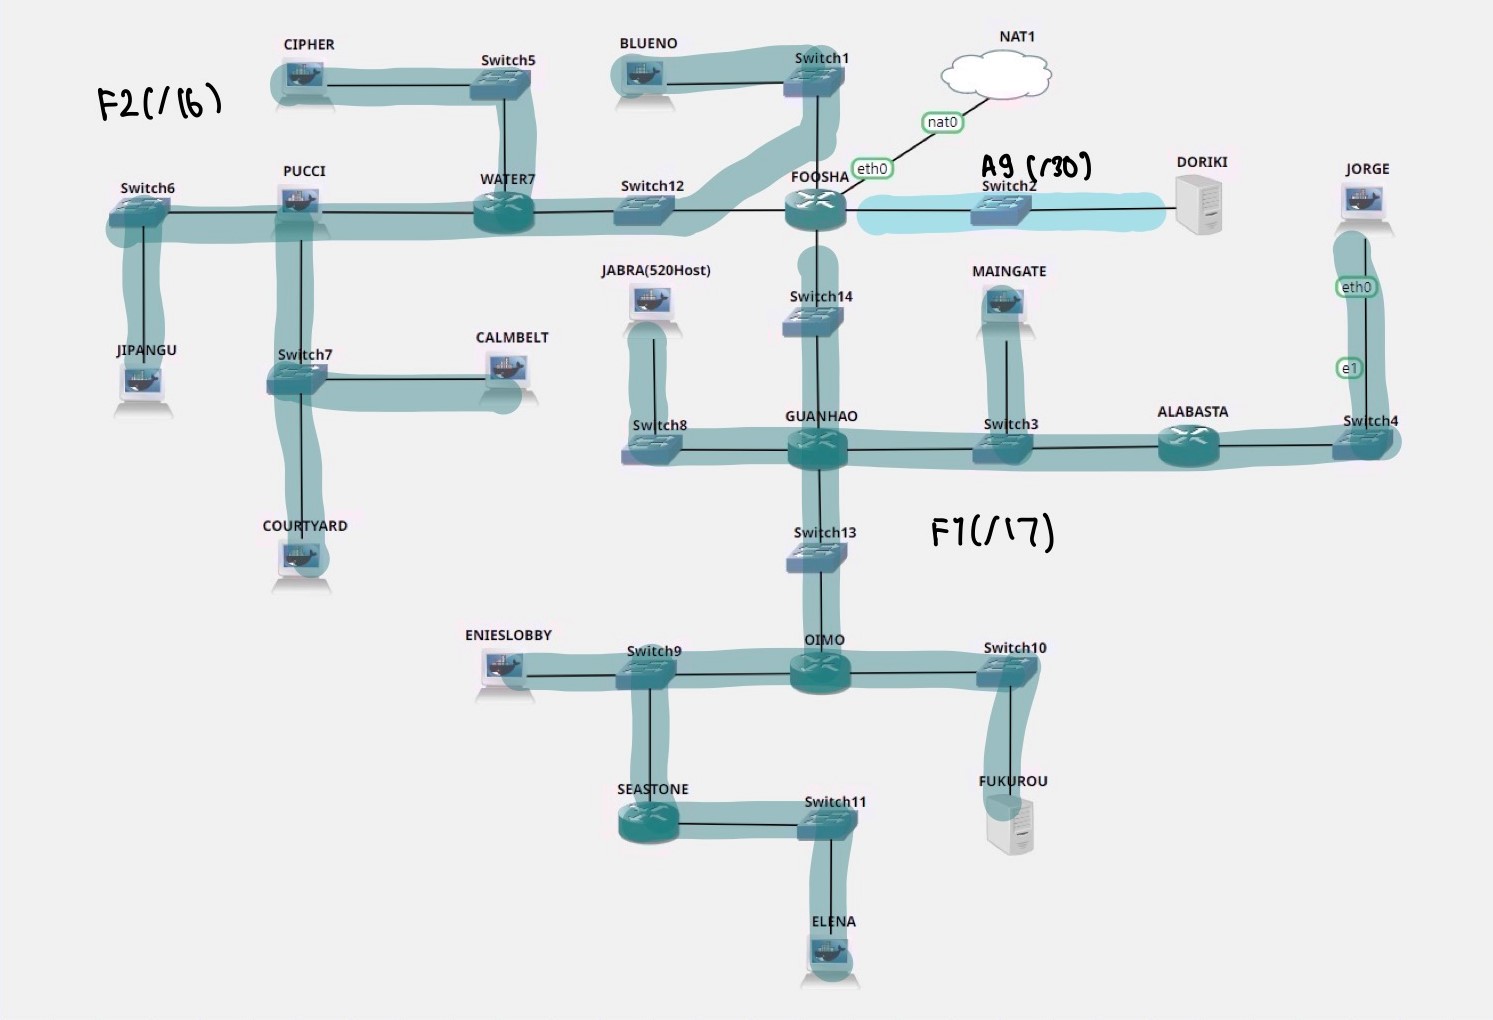
- iterasi 6
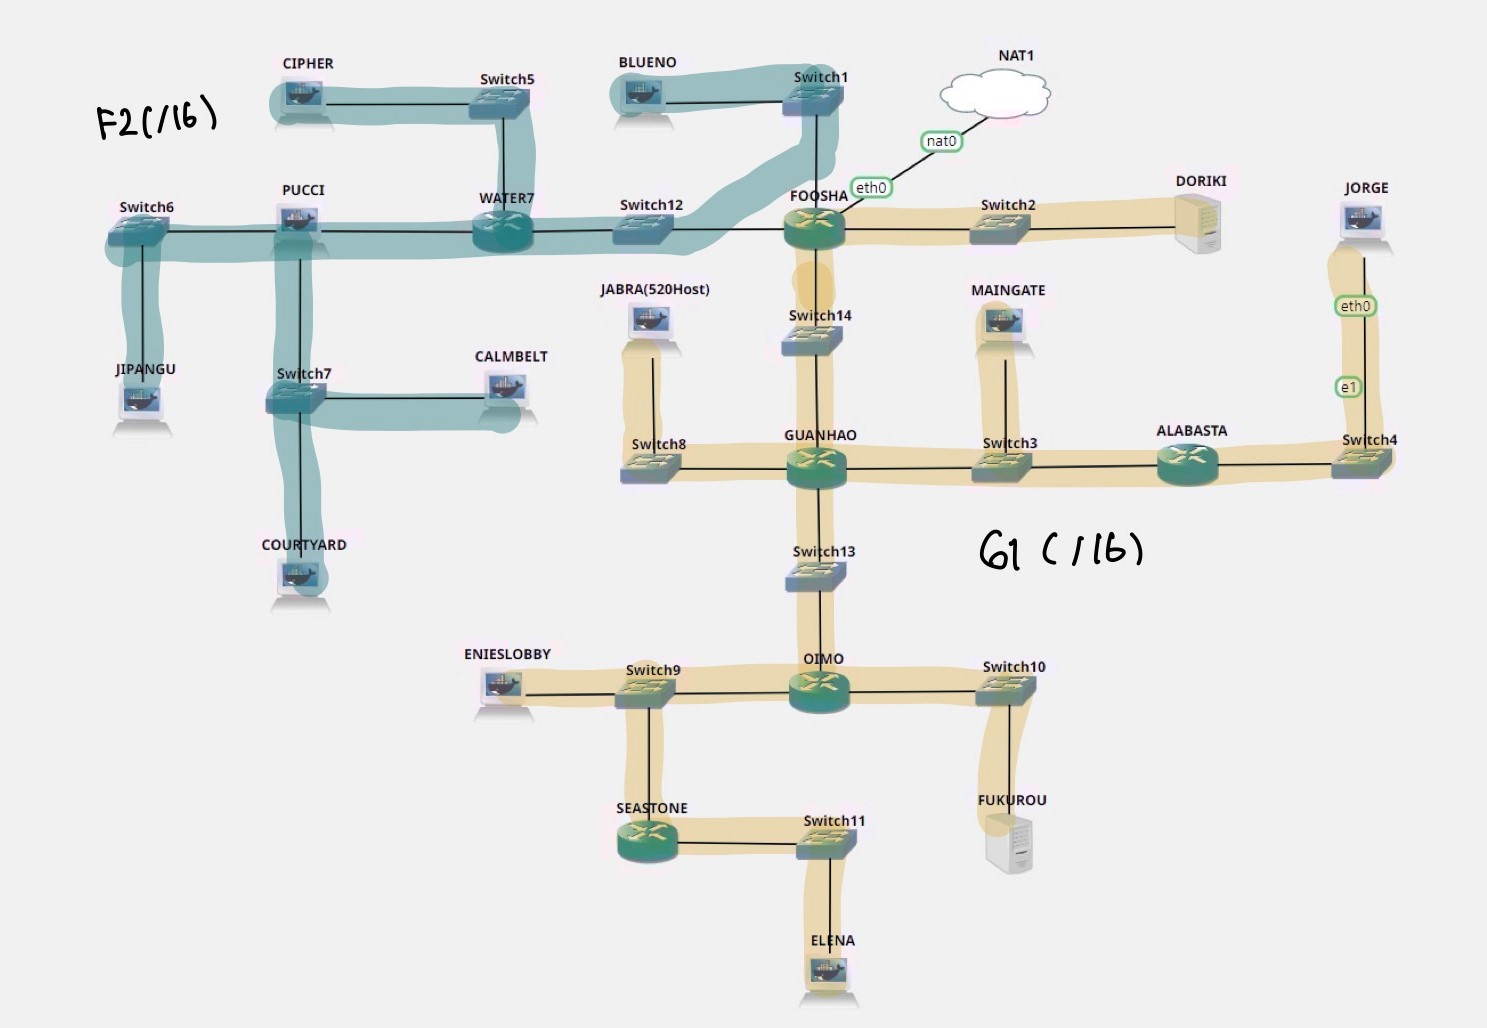
- iterasi 7
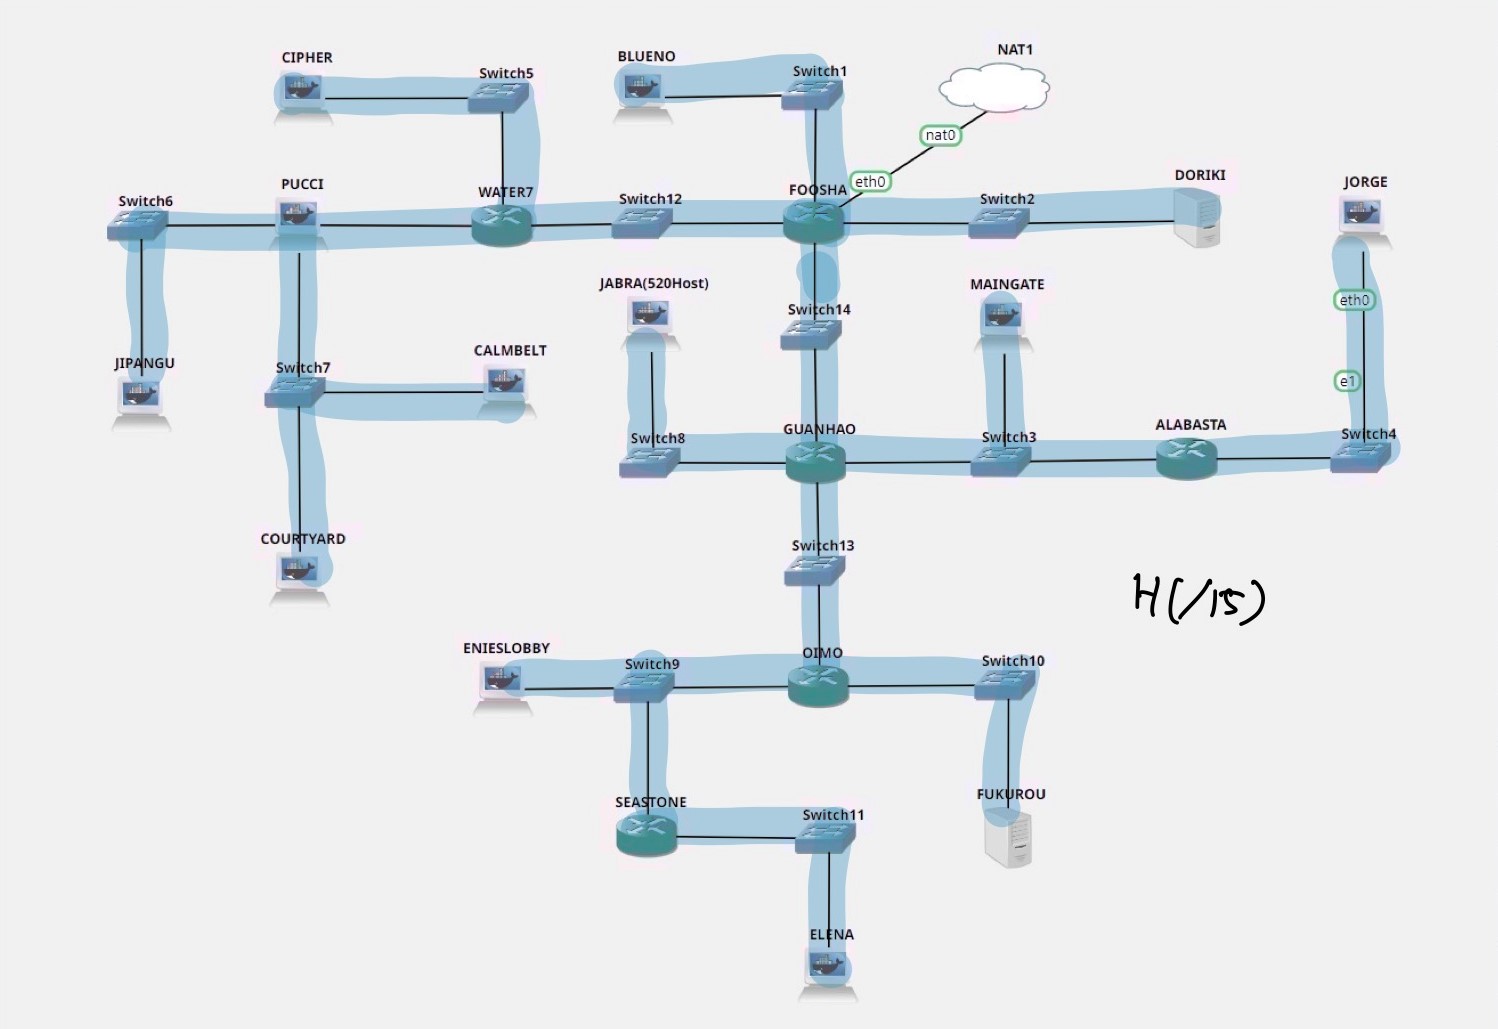
- iterasi 1
-
Langkah 3: Dari proses penggabungan yang telah dilakukan, dari gambar di atas bisa kita lihat didapatkan sebuah subnet dengan netmask /15.
-
Langkah 4: Selanjutnya dilakukan perhitungan pembagian IP menggunakan pohon ip
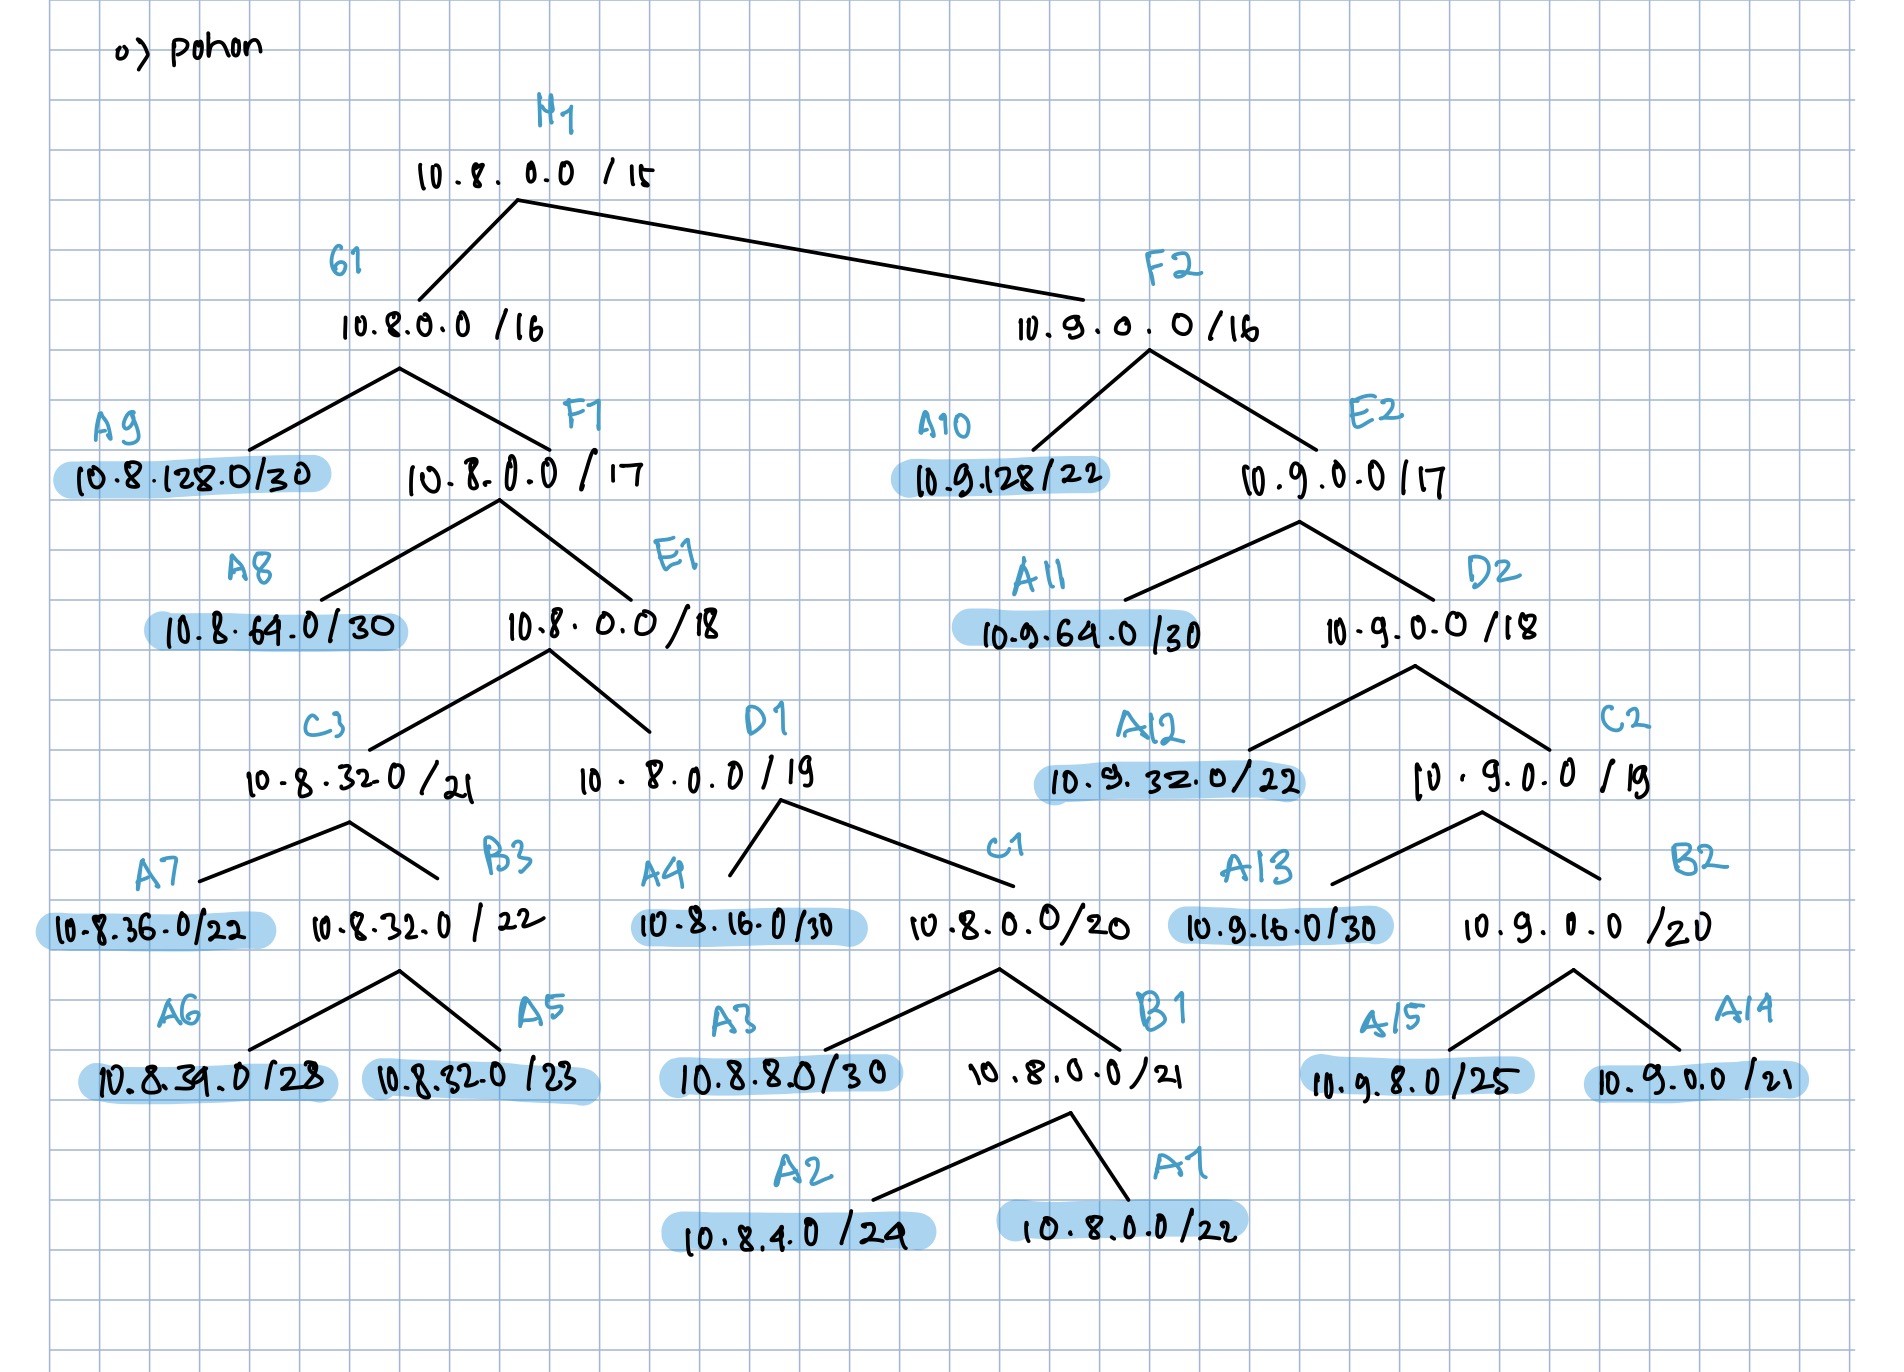
-
Langkah 5: berdasarkan perhitungan tersebut, maka didapatkan pembagian IP sebagai berikut.


Konfigurasi dilakukan menggunakan langkah yang pernah dilakukan pada modul GNS3
- FOOSHA
# Config for eth0 (NAT)
auto eth0
iface eth0 inet dhcp

# Static config for eth1
auto eth1
iface eth1 inet static
	address 10.9.128.1
	netmask 255.255.252.0

# Static config for eth2
auto eth2
iface eth2 inet static
	address 10.9.64.1
	netmask 255.255.255.252

# Static config for eth3
auto eth3
iface eth3 inet static
	address 10.8.64.1
	netmask 255.255.255.252

# Static config for eth4
auto eth4
iface eth4 inet static
	address 10.8.128.1
	netmask 255.255.255.128
- WATER7
# Static config for eth0
auto eth0
iface eth0 inet static
	address 10.9.64.2
	netmask 255.255.255.252
	gateway 10.9.64.1

# Static config for eth1
auto eth1
iface eth1 inet static
	address 10.9.16.1
	netmask 255.255.255.252

# Static config for eth2
auto eth2
iface eth2 inet static
	address 10.9.32.1
	netmask 255.255.252.0
- PUCCI
# Static config for eth0
auto eth0
iface eth0 inet static
	address 10.9.16.2
	netmask 255.255.255.252
	gateway 10.9.16.1

# Static config for eth1 (A15)
auto eth1
iface eth1 inet static
	address 10.9.8.1
	netmask 255.255.255.128

# Static config for eth2 (A14)
auto eth2
iface eth2 inet static
	address 10.9.0.1
	netmask 255.255.248.0
- GUANHAO
# Static config for eth0 (A8)
auto eth0
iface eth0 inet static
	address 10.8.64.2
	netmask 255.255.255.252
	gateway 10.8.64.1

# Static config for eth1 (A4)
auto eth1
iface eth1 inet static
	address 10.8.16.1
	netmask 255.255.255.252

# Static config for eth2 (A7)
auto eth2
iface eth2 inet static
	address 10.8.36.1
	netmask 255.255.252.0

# Static config for eth3 (A5)
auto eth3
iface eth3 inet static
	address 10.8.32.1
	netmask 255.255.254.0
- ALABASTA
# Static config for eth0 (A5)
auto eth0
iface eth0 inet static
	address 10.8.32.3
	netmask 255.255.254.0
	gateway 10.8.32.1

# Static config for eth1 (A6)
auto eth1
iface eth1 inet static
	address 10.8.34.1
	netmask 255.255.255.240
- OIMO
# Static config for eth0 (A4)
auto eth0
iface eth0 inet static
	address 10.8.16.2
	netmask 255.255.255.252
	gateway 10.8.16.1

# Static config for eth1 (A2)
auto eth1
iface eth1 inet static
	address 10.8.4.1
	netmask 255.255.255.0


# Static config for eth2 (A3)
auto eth2
iface eth2 inet static
	address 10.8.8.1
	netmask 255.255.255.252
- SEASTONE
# Static config for eth0 (A2)
auto eth0
iface eth0 inet static
	address 10.8.4.2
	netmask 255.255.255.0
	gateway 10.8.4.1

# Static config for eth1 (A1)
auto eth1
iface eth1 inet static
	address 10.8.0.1
	netmask 255.255.252.0
Lakukan routing pada router-router dengan menjalankan command pada console masing-masing router.
- FOOSHA
route add -net 10.8.0.0 netmask 255.255.128.0 gw 10.8.64.2
route add -net 10.9.0.0 netmask 255.255.128.0 gw 10.9.64.2
- WATER7
route add -net 0.0.0.0 netmask 0.0.0.0 gw 10.9.64.1
route add -net 10.9.0.0 netmask 255.255.224.0 gw 10.9.16.1
- PUCCI
route add -net 0.0.0.0 netmask 0.0.0.0 gw 10.9.16.1
- GUANHAO
route add -net 10.8.32.0 netmask 255.255.252.0 gw 10.8.32.3
route add -net 10.8.0.0 netmask 255.255.224.0 gw 10.8.16.2
route add -net 0.0.0.0 netmask 0.0.0.0 gw 10.8.64.1
- ALABASTA
route add -net 0.0.0.0 netmask 0.0.0.0 gw 10.8.32.1
- OIMO
route add -net 10.8.0.0 netmask 255.255.248.0 gw 10.8.4.2
route add -net 0.0.0.0 netmask 0.0.0.0 gw 10.8.16.1
- SEASTONE
route add -net 0.0.0.0 netmask 0.0.0.0 gw 10.8.4.1
Jalankan command di bawah pada FOOSHA:
iptables -t nat -A POSTROUTING -o eth0 -j MASQUERADE -s 10.8.0.0/15
Kemudian jalankan command di bawah pada semua node agar terhubung dengan internet
echo nameserver 192.168.122.1 > /etc/resolv.conf
Test ping google.com dari node ELENA

- Kesulitan dengan subnetting dan routing menggunakan CIDR dan konfigurasi pada GNS3-nya.