This Python library is an interface to Hang Si's TetGen C++ software. This module combines speed of C++ with the portability and ease of installation of Python along with integration to PyVista for 3D visualization and analysis. See the TetGen GitHub page for more details on the original creator.
This Python library uses the C++ source from TetGen (version 1.6.0, released on August 31, 2020) hosted at libigl/tetgen.
Brief description from Weierstrass Institute Software:
TetGen is a program to generate tetrahedral meshes of any 3D polyhedral domains. TetGen generates exact constrained Delaunay tetrahedralization, boundary conforming Delaunay meshes, and Voronoi partitions.
TetGen provides various features to generate good quality and adaptive tetrahedral meshes suitable for numerical methods, such as finite element or finite volume methods. For more information of TetGen, please take a look at a list of features.
The original TetGen software is under AGPL (see LICENSE) and thus this Python wrapper package must adopt that license as well.
Please look into the terms of this license before creating a dynamic link to this software in your downstream package and understand commercial use limitations. We are not lawyers and cannot provide any guidance on the terms of this license.
Please see https://www.gnu.org/licenses/agpl-3.0.en.html
From PyPI
pip install tetgenFrom source at GitHub
git clone https://github.com/pyvista/tetgen
cd tetgen
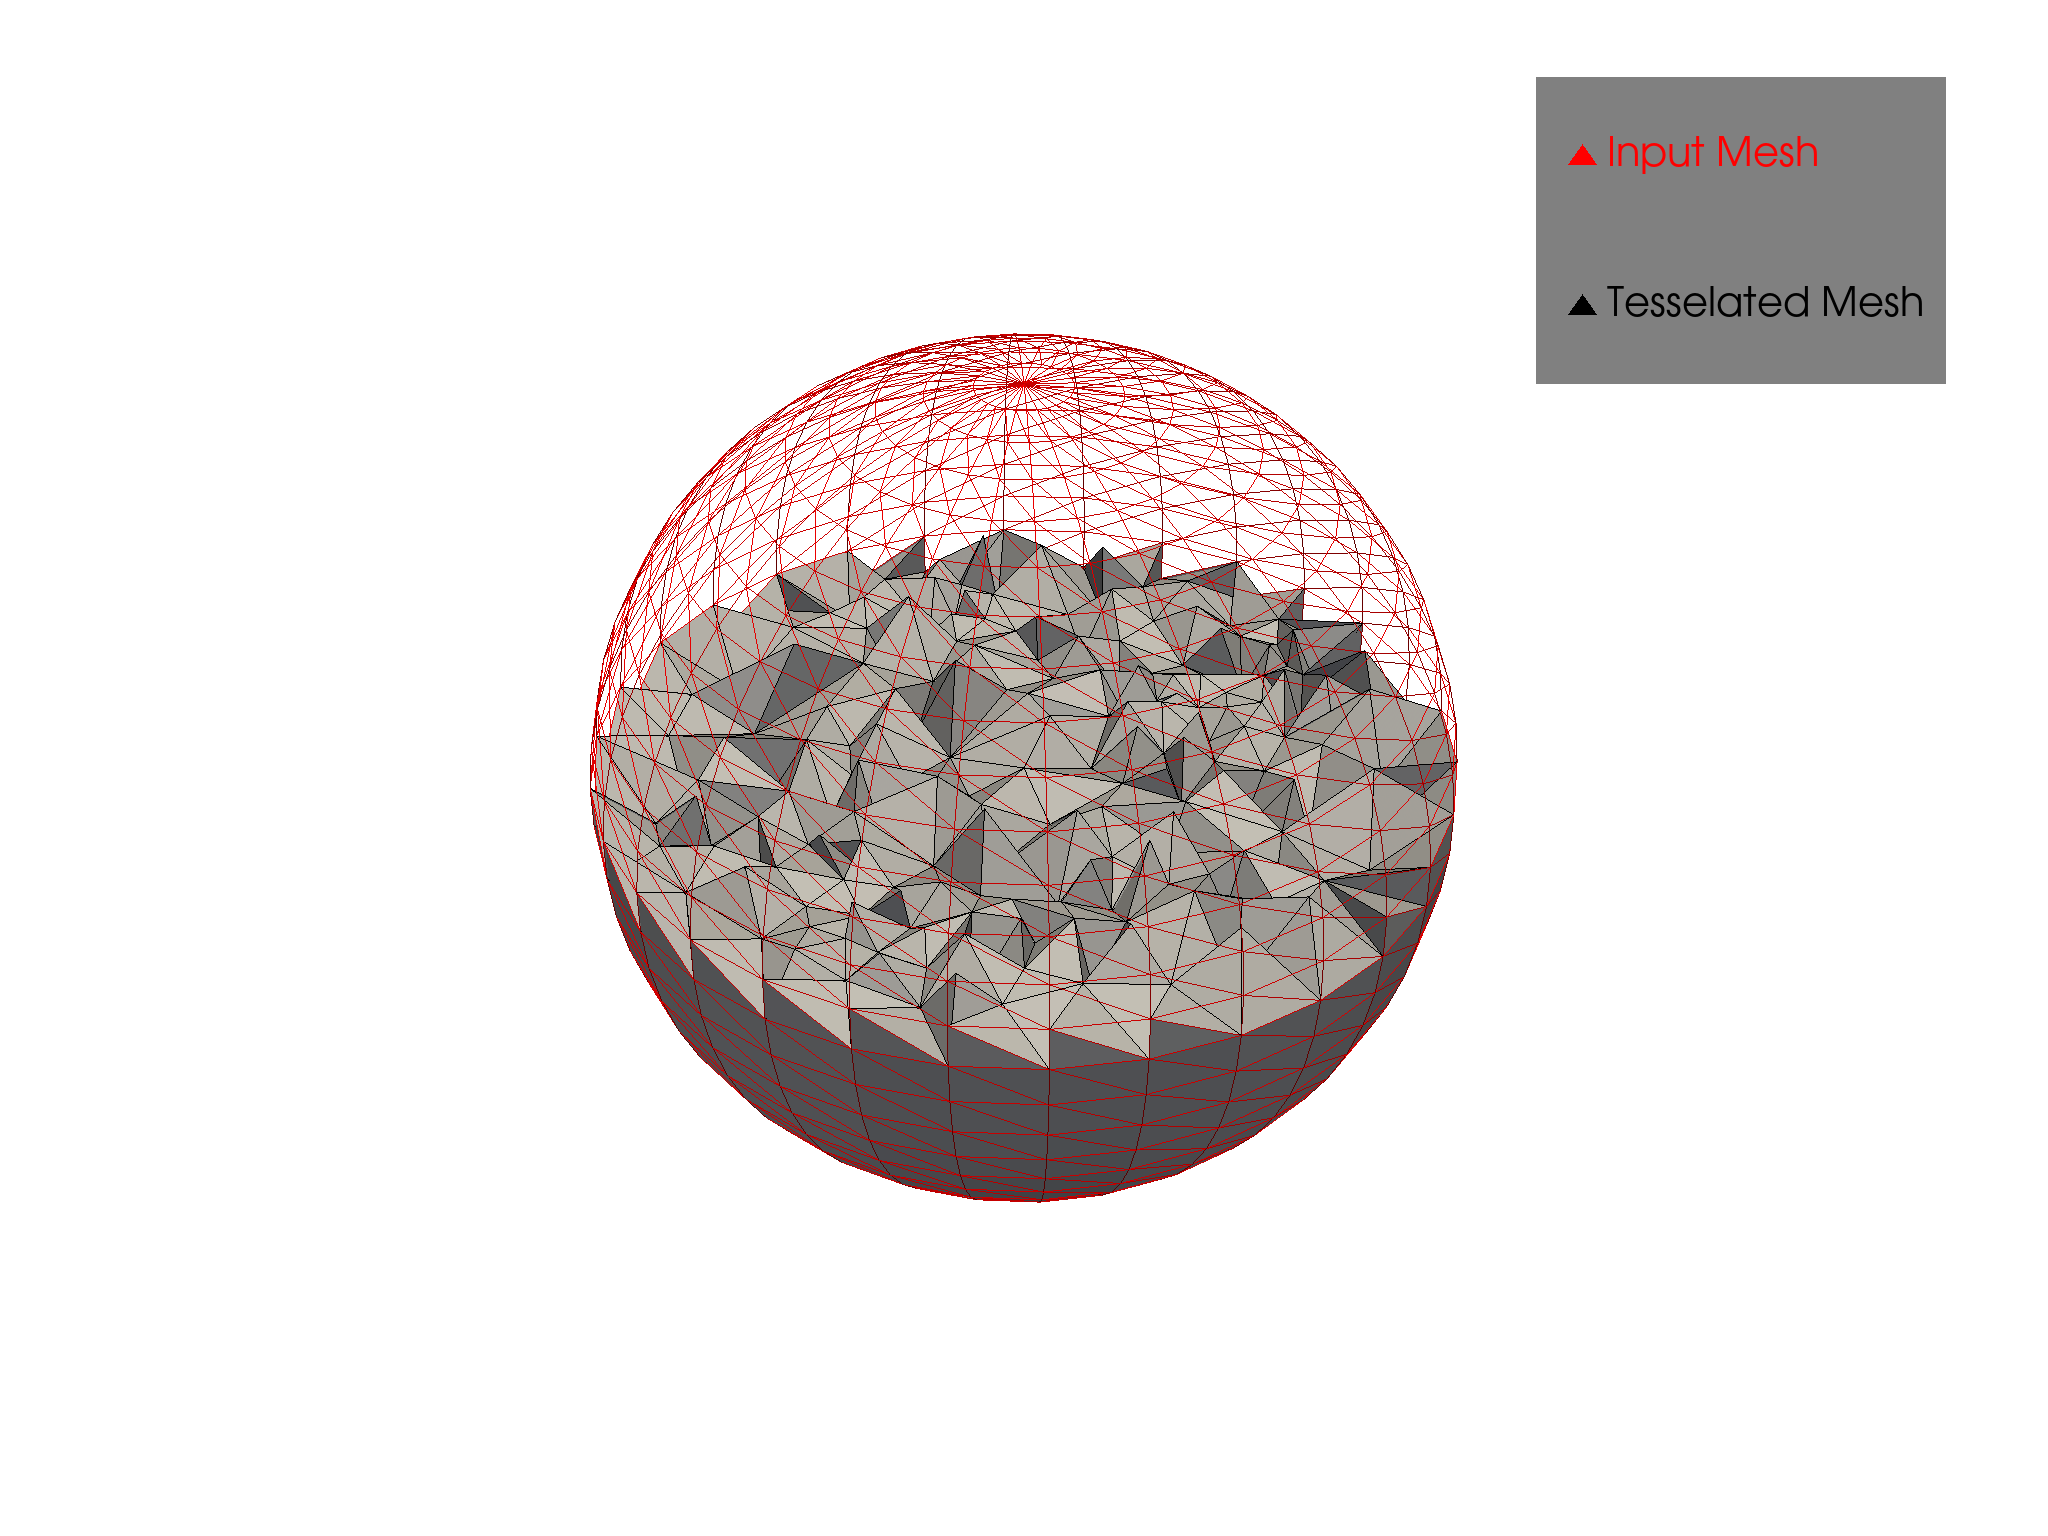
pip install .The features of the C++ TetGen software implemented in this module are primarily focused on the tetrahedralization a manifold triangular surface. This basic example demonstrates how to tetrahedralize a manifold surface and plot part of the mesh.
import pyvista as pv
import tetgen
import numpy as np
pv.set_plot_theme('document')

sphere = pv.Sphere()
tet = tetgen.TetGen(sphere)
tet.tetrahedralize(order=1, mindihedral=20, minratio=1.5)
grid = tet.grid
grid.plot(show_edges=True)Extract a portion of the sphere's tetrahedral mesh below the xy plane and plot the mesh quality.
# get cell centroids
cells = grid.cells.reshape(-1, 5)[:, 1:]
cell_center = grid.points[cells].mean(1)

# extract cells below the 0 xy plane
mask = cell_center[:, 2] < 0
cell_ind = mask.nonzero()[0]
subgrid = grid.extract_cells(cell_ind)

# advanced plotting
plotter = pv.Plotter()
plotter.add_mesh(subgrid, 'lightgrey', lighting=True, show_edges=True)
plotter.add_mesh(sphere, 'r', 'wireframe')
plotter.add_legend([[' Input Mesh ', 'r'],
                    [' Tessellated Mesh ', 'black']])
plotter.show()
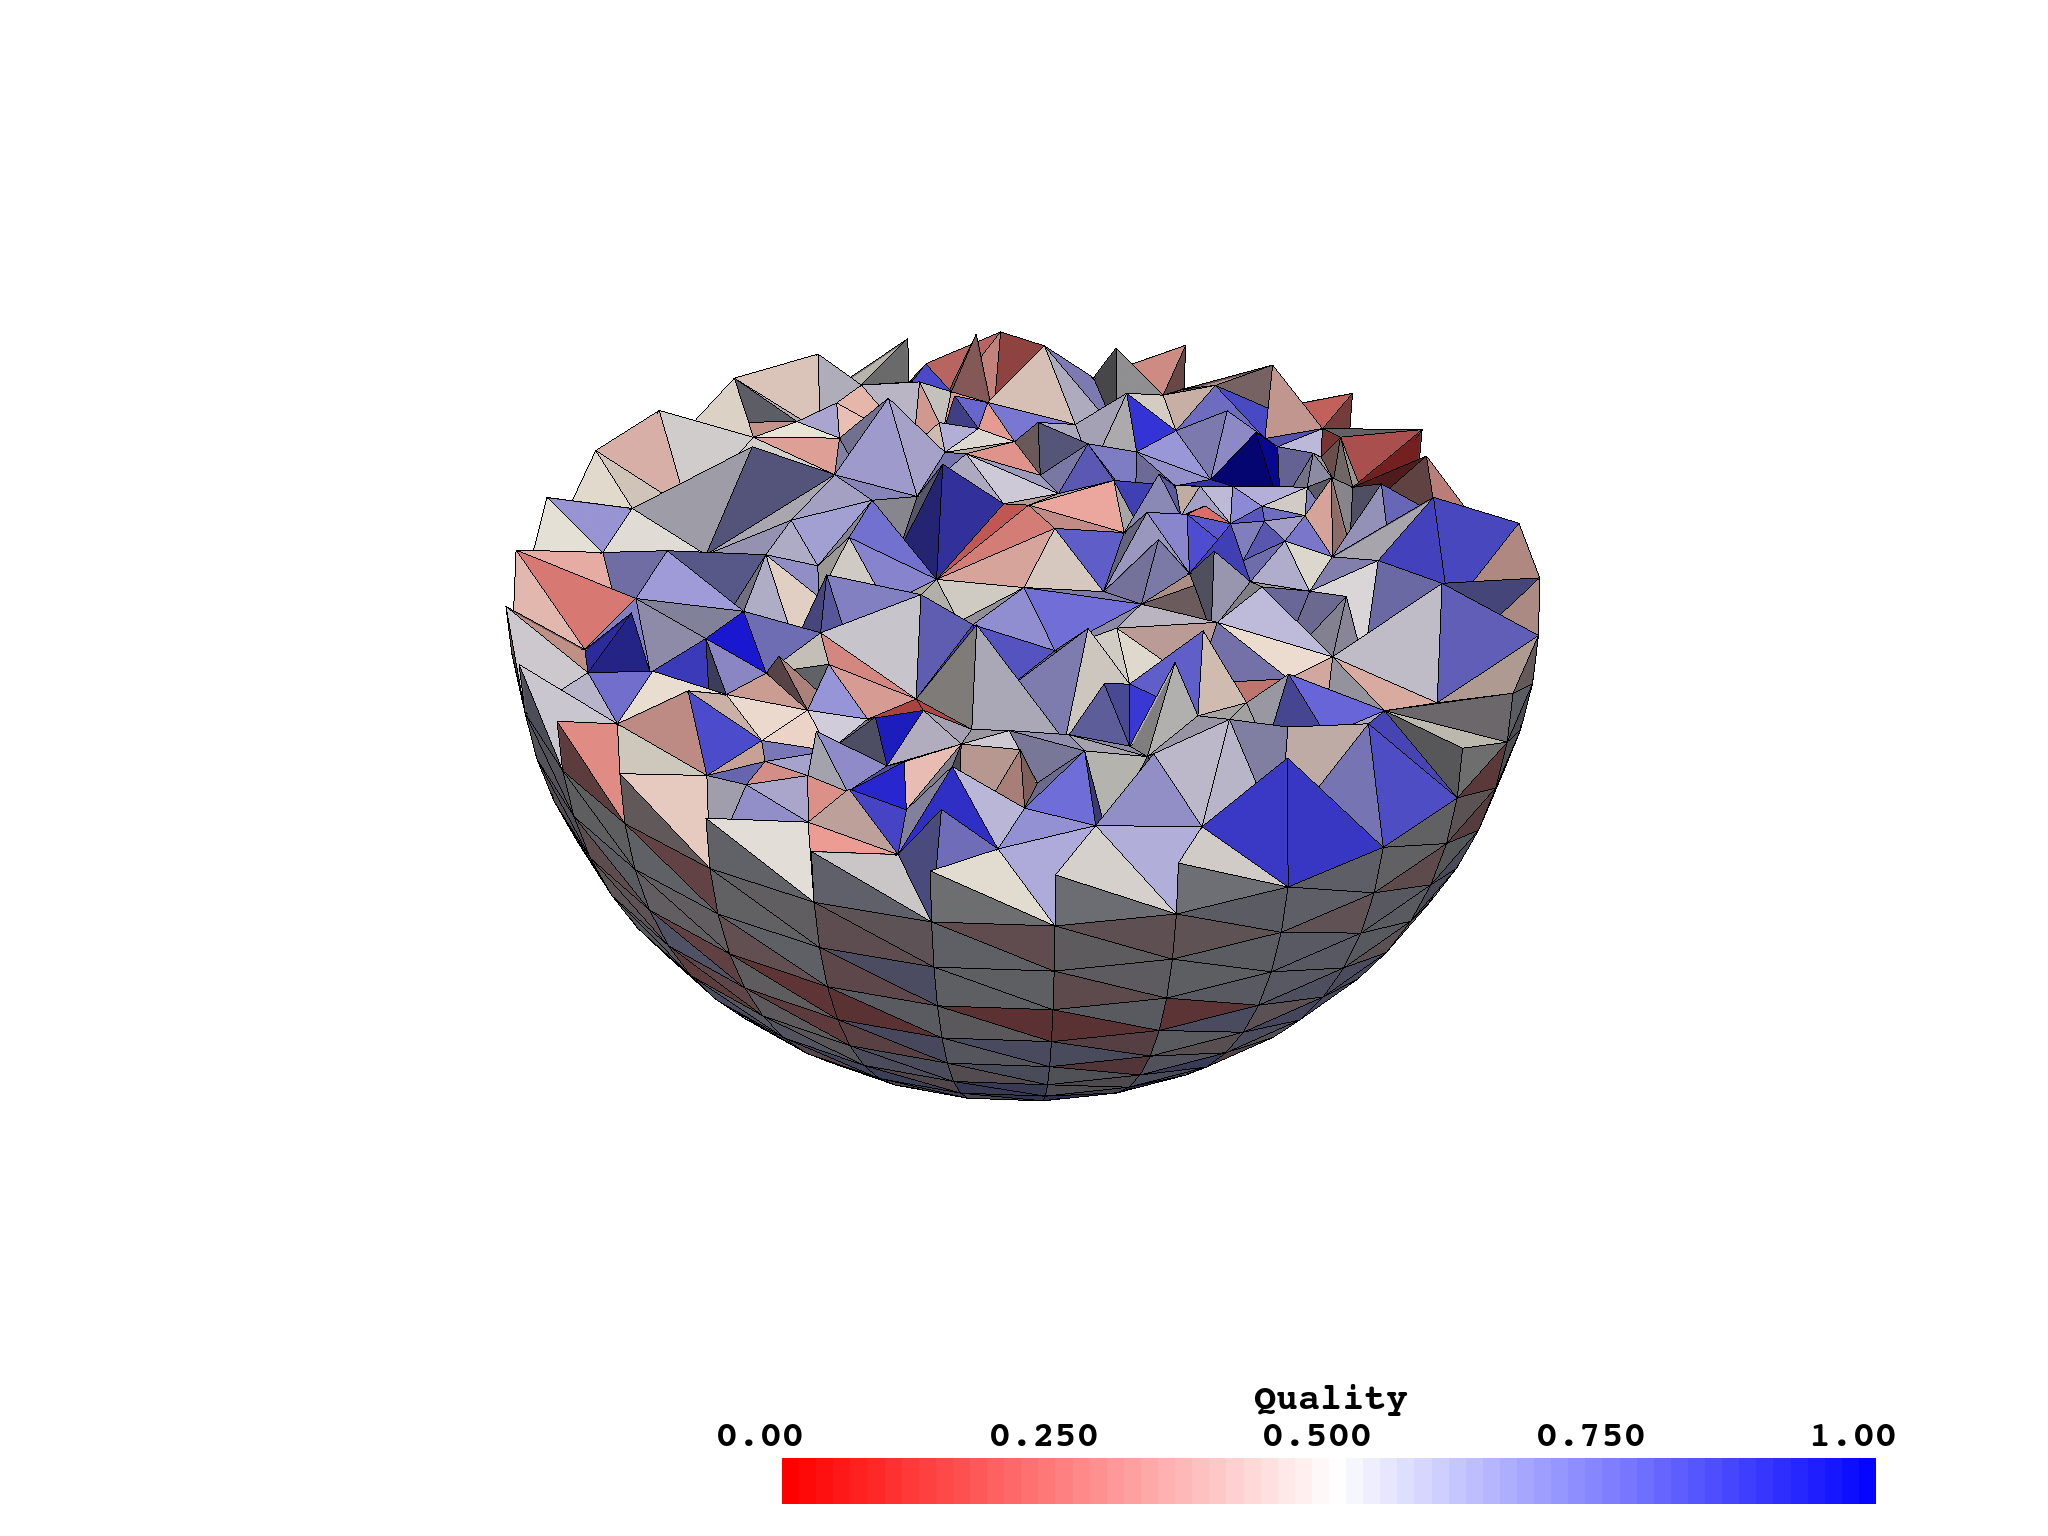
Here is the cell quality as computed according to the minimum scaled jacobian.
Compute cell quality

>>> cell_qual = subgrid.compute_cell_quality()['CellQuality']

Plot quality

>>> subgrid.plot(scalars=cell_qual, stitle='Quality', cmap='bwr', clim=[0, 1],
...              flip_scalars=True, show_edges=True)
A background mesh in TetGen is used to define a mesh sizing function for adaptive mesh refinement. This function informs TetGen of the desired element size throughout the domain, allowing for detailed refinement in specific areas without unnecessary densification of the entire mesh. Here's how to utilize a background mesh in your TetGen workflow:
- Generate the Background Mesh: Create a tetrahedral mesh that spans the entirety of your input piecewise linear complex (PLC) domain. This mesh will serve as the basis for your sizing function.
- Define the Sizing Function: At the nodes of your background mesh, define the desired mesh sizes. This can be based on geometric features, proximity to areas of interest, or any criterion relevant to your simulation needs.
- Optional: Export the Background Mesh and Sizing Function: Save your background mesh in the TetGen-readable .node and .ele formats, and the sizing function values in a .mtr file. These files will be used by TetGen to guide the mesh generation process.
- Run TetGen with the Background Mesh: Invoke TetGen, specifying the background mesh. TetGen will adjust the mesh according to the provided sizing function, refining the mesh where smaller elements are desired.
Full Example
To illustrate, consider a scenario where you want to refine a mesh around a specific region with increased detail. The following steps and code snippets demonstrate how to accomplish this with TetGen and PyVista:
Prepare Your PLC and Background Mesh:
import pyvista as pv
import tetgen
import numpy as np

# Load or create your PLC
sphere = pv.Sphere(theta_resolution=10, phi_resolution=10)

# Generate a background mesh with desired resolution
def generate_background_mesh(bounds, resolution=20, eps=1e-6):
    x_min, x_max, y_min, y_max, z_min, z_max = bounds
    grid_x, grid_y, grid_z = np.meshgrid(
        np.linspace(xmin - eps, xmax + eps, resolution),
        np.linspace(ymin - eps, ymax + eps, resolution),
        np.linspace(zmin - eps, zmax + eps, resolution),
        indexing="ij",
    )
    return pv.StructuredGrid(grid_x, grid_y, grid_z).triangulate()

bg_mesh = generate_background_mesh(sphere.bounds)
Define the Sizing Function and Write to Disk:
# Define sizing function based on proximity to a point of interest
def sizing_function(points, focus_point=np.array([0, 0, 0]), max_size=1.0, min_size=0.1):
    distances = np.linalg.norm(points - focus_point, axis=1)
    return np.clip(max_size - distances, min_size, max_size)

bg_mesh.point_data['target_size'] = sizing_function(bg_mesh.points)

# Optionally write out the background mesh
def write_background_mesh(background_mesh, out_stem):
    """Write a background mesh to a file.

    This writes the mesh in tetgen format (X.b.node, X.b.ele) and a X.b.mtr file
    containing the target size for each node in the background mesh.
    """
    mtr_content = [f"{background_mesh.n_points} 1"]
    target_size = background_mesh.point_data["target_size"]
    for i in range(background_mesh.n_points):
        mtr_content.append(f"{target_size[i]:.8f}")

    pv.save_meshio(f"{out_stem}.node", background_mesh)
    mtr_file = f"{out_stem}.mtr"

    with open(mtr_file, "w") as f:
        f.write("\n".join(mtr_content))

write_background_mesh(bg_mesh, 'bgmesh.b')
Use TetGen with the Background Mesh:
Directly pass the background mesh from PyVista to
tetgen:tet_kwargs = dict(order=1, mindihedral=20, minratio=1.5) tet = tetgen.TetGen(mesh) tet.tetrahedralize(bgmesh=bgmesh, **tet_kwargs) refined_mesh = tet.grid
Alternatively, use the background mesh files.
tet = tetgen.TetGen(sphere)
tet.tetrahedralize(bgmeshfilename='bgmesh.b', **tet_kwargs)
refined_mesh = tet.grid
This example demonstrates generating a background mesh, defining a spatially varying sizing function, and using this background mesh to guide TetGen in refining a PLC. By following these steps, you can achieve adaptive mesh refinement tailored to your specific simulation requirements.
Software was originally created by Hang Si based on work published in TetGen, a Delaunay-Based Quality Tetrahedral Mesh Generator.


