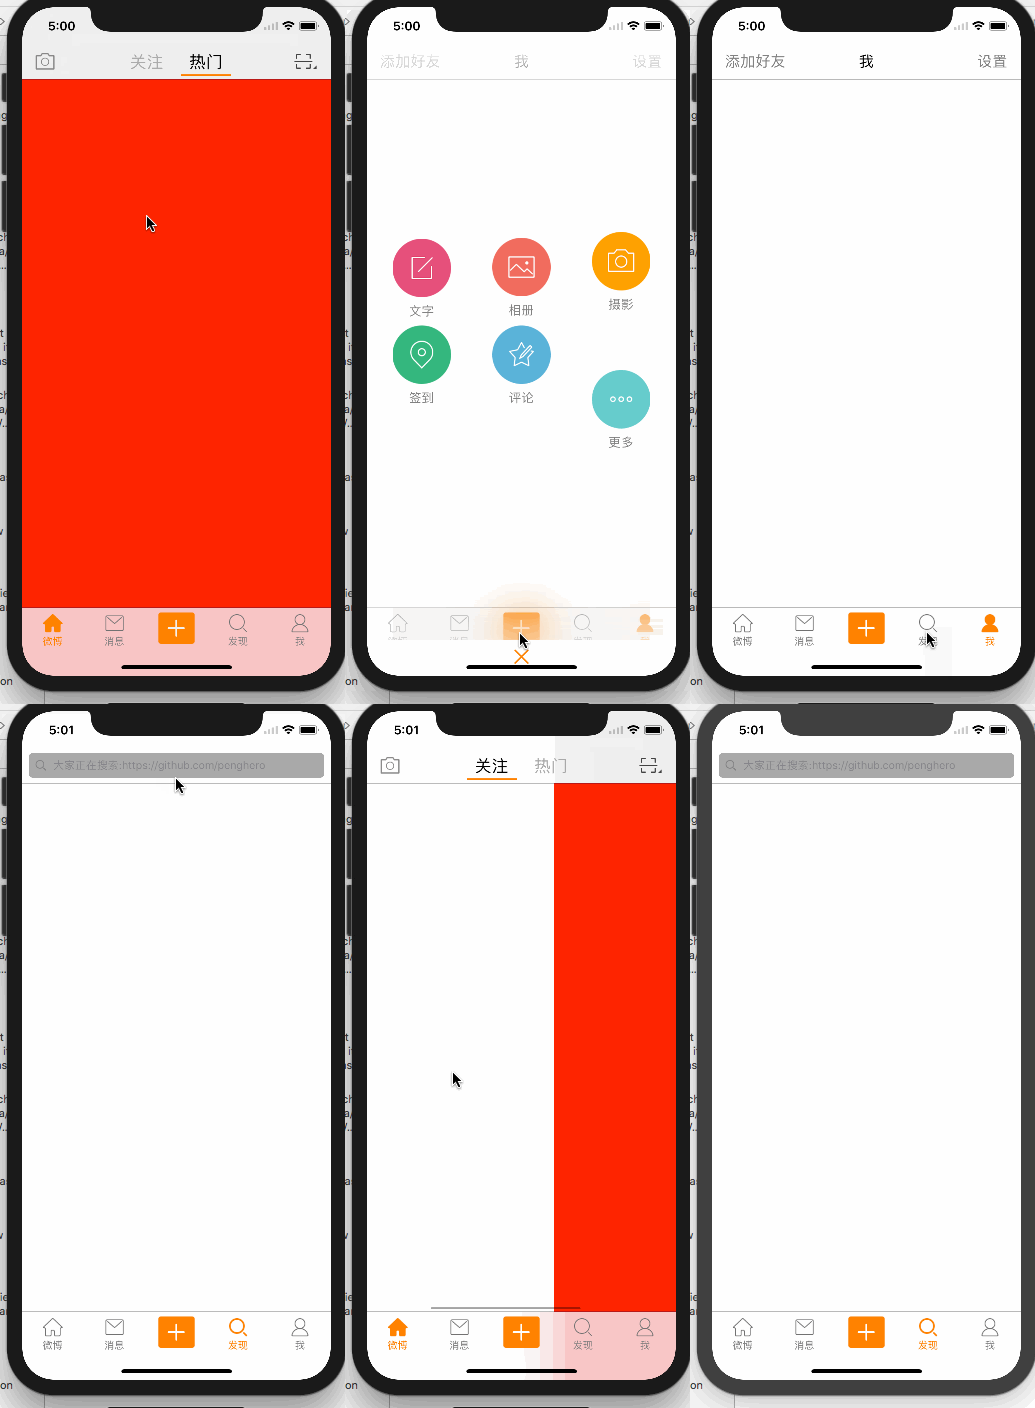
鹏哥哥高仿新浪框架 自定义TabBarController和NavController适合新手学习
1.自定义特殊的TabBar 例如本项目中的加号 创建 PGGAddTabBar并继承与UITabBar 1.1首先 我们需要先定义一个代理 作用是接收响应事件
 @protocol PGGTabBarDelegate <UITabBarDelegate>
 @optional
 - (void)tabBarDidClickPlusButton:(PGGAddTabBar *)tabBar;
 @end
1.2然后 声明成属性
@property(nonatomic,weak)id <PGGTabBarDelegate> delegate;
1.3在 -(id)initWithFrame:(CGRect)frame中自定义你自己的特殊TabBarItem
-(id)initWithFrame:(CGRect)frame {
    self = [super initWithFrame:frame];
    if (self) {
        UIButton *plusBtn = [[UIButton alloc] init];
        [plusBtn setBackgroundImage:[UIImage imageNamed:@"tabbar_compose_button"] forState:UIControlStateNormal];
        [plusBtn setBackgroundImage:[UIImage imageNamed:@"tabbar_compose_button_highlighted"] forState:UIControlStateHighlighted];
        [plusBtn setImage:[UIImage imageNamed:@"tabbar_compose_icon_add"] forState:UIControlStateNormal];
        [plusBtn setImage:[UIImage imageNamed:@"tabbar_compose_icon_add_highlighted"] forState:UIControlStateHighlighted];
        plusBtn.size = plusBtn.currentBackgroundImage.size;
        [plusBtn addTarget:self action:@selector(plusClick) forControlEvents:UIControlEventTouchUpInside];
        [self addSubview:plusBtn];
        self.plusBtn = plusBtn;
    }
    return self;
}
1.4调用代理获取响应方法
-(void)plusClick {
    if ([self.delegate respondsToSelector:@selector(tabBarDidClickPlusButton:)]) {
        [self.delegate tabBarDidClickPlusButton:self];
    }
}
1.5 在-(void)layoutSubviews方法中进行位置处理
-(void)layoutSubviews {
    [super layoutSubviews];
    self.plusBtn.centerX = self.width *0.5;
    //判断是否是iphoneX 在X上位置显示靠下 需重新设定
    if (kDevice_Is_iPhoneX) {
        self.plusBtn.centerY = self.height *0.3;
    } else {
        self.plusBtn.centerY = self.height *0.5;
    }
    CGFloat tabBarButtonW  = self.width / 5;
    CGFloat tabbarButtonIndex = 0;
    for (UIView *child in self.subviews) {
        Class class = NSClassFromString(@"UITabBarButton");
        if ([child isKindOfClass:class]) {
            child.width = tabBarButtonW;
            child.x = tabbarButtonIndex *tabBarButtonW;
            tabbarButtonIndex ++;
            if (tabbarButtonIndex == 2) {
                tabbarButtonIndex ++;
            }
        }
    }
}
2.自定义PGGTabBarController 继承与UITabBarController 2.1添加子控制器
    PGGWeiBoViewController *home = [[PGGWeiBoViewController alloc]init];
    [self addChildViewController:home title:@"微博" image:@"tabbar_home" selImage:@"tabbar_home_selected"];

    PGGNewsViewController *messageCenter = [[PGGNewsViewController alloc] init];
    [self addChildViewController:messageCenter title:@"消息" image:@"tabbar_message_center" selImage:@"tabbar_message_center_selected"];

    PGGFindViewController *discover = [[PGGFindViewController alloc] init];
    [self addChildViewController:discover title:@"发现" image:@"tabbar_discover" selImage:@"tabbar_discover_selected"];

    PGGMyViewController *profile = [[PGGMyViewController alloc] init];
    [self addChildViewController:profile title:@"我" image:@"tabbar_profile" selImage:@"tabbar_profile_selected"];
*子控制器方法
 - (void)addChildViewController:(UIViewController *)childVc  title:(NSString *)title image:(NSString *)image selImage:(NSString *)selImage{
    static NSInteger index = 0;
    childVc.tabBarItem.title = title;
    childVc.tabBarItem.image = [[UIImage imageNamed:image] imageWithRenderingMode:UIImageRenderingModeAlwaysOriginal];
    childVc.tabBarItem.selectedImage = [[UIImage imageNamed:selImage] imageWithRenderingMode:UIImageRenderingModeAlwaysOriginal];
    childVc.tabBarItem.tag = index;
    index++;
    //每个控制器单独包装一个导航控制器
    PGGNavigationController *nav = [[PGGNavigationController alloc]initWithRootViewController:childVc];
    [self addChildViewController:nav];}
2.2更换系统自带的tabbar
PGGAddTabBar *tab = [[PGGAddTabBar alloc]init];
tab.delegate = self;
[self setValue:tab forKey:@"tabBar"];
2.3 在 + (void)initialize进行 TabBarItem的字体颜色统一设置
+ (void)initialize{
    //设置未选中的TabBarItem的字体颜色、大小
NSMutableDictionary *attrs = [NSMutableDictionary dictionary];
attrs[NSFontAttributeName] = [UIFont systemFontOfSize:12];
attrs[NSForegroundColorAttributeName] = [UIColor grayColor];
    //设置选中了的TabBarItem的字体颜色、大小
NSMutableDictionary *selectedAttrs = [NSMutableDictionary dictionary];
selectedAttrs[NSFontAttributeName] = [UIFont systemFontOfSize:12];
selectedAttrs[NSForegroundColorAttributeName] =  [UIColor orangeColor];
UITabBarItem *item = [UITabBarItem appearance];
[item setTitleTextAttributes:attrs forState:UIControlStateNormal];
[item setTitleTextAttributes:selectedAttrs forState:UIControlStateSelected];}
2.4 实现点击特殊tabBarItem的响应方法
-(void)tabBarDidClickPlusButton:(PGGAddTabBar *)tabBar
2.5 最后 在APPDelegate中 将其设定为根控制器即可 自定义TabBarController完成
当自定义的按钮超出TabBar高度后 超出部分不响应事件 处理办法为重写 - (UIView *)hitTest:(CGPoint)point withEvent:(UIEvent *)event方法
 - (UIView *)hitTest:(CGPoint)point withEvent:(UIEvent *)event {
/*这一个判断是关键,不判断的话push到其他页面,点击自定义按钮的位置也是会有反应的
 *self.isHidden == NO 说明当前页面是有tabbar的,那么肯定是在导航控制器的根控制器页面
 *在导航控制器根控制器页面,那么我们就需要判断手指点击的位置是否在自定义按钮身上
 *是的话让自定义按钮自己处理点击事件,不是的话让系统去处理点击事件就可以了
 */
     if (self.isHidden == NO) {
         /* 将当前tabbar的触摸点转换坐标系,转换到发布按钮的身上,生成一个新的点 */
         CGPoint newPoint = [self convertPoint:point toView:self.plusBtn];
         /* 判断如果这个新的点是在自定义按钮身上,处理突出部分的自定义按钮*/
         if ( [self.plusBtn pointInside:newPoint withEvent:event]) {
             return self.plusBtn;
         }else{
             /*如果点不在自定义按钮身上,直接让系统处理*/
             return [super hitTest:point withEvent:event];
         }
     }
     else {
         /* tabbar隐藏后,那么说明已经push到其他的页面了,这个时候还是让系统去判断最合适的view处理*/
         return [super hitTest:point withEvent:event];
     }
  }
1.自定义PGGNavigationController继承与UINavigationController 2.重写-(void)pushViewController:(UIViewController *)viewController animated:(BOOL)animated 方法处理跳转后 隐藏TabBarController 以及返回按钮的定义等事件
-(void)pushViewController:(UIViewController *)viewController animated:(BOOL)animated {
    if (self.childViewControllers.count > 0) {
        //push后隐藏TabBarController
        viewController.hidesBottomBarWhenPushed = YES;
        viewController.navigationItem.leftBarButtonItem = [UIBarButtonItem itemWithTarget:self action:@selector(back) image:@"navigationbar_back" heighlightImage:@"navigationbar_back_highlighted"];
    }
    //这句super的push要放在后面, 让viewController可以覆盖上面设置的leftBarButtonItem
    [super pushViewController:viewController animated:animated];
    //解决iPhone X push页面时 tabBar上移的问题
    CGRect frame = self.tabBarController.tabBar.frame;
    frame.origin.y = [UIScreen mainScreen].bounds.size.height - frame.size.height;
    self.tabBarController.tabBar.frame = frame;
}
3.在 +(void)initialize方法中 进行一些统一设置 例如 导航栏背景颜色 字体颜色大小 左右按钮背景颜色 以及按钮的一些状态等等
    //导航栏背景颜色
    [[UINavigationBar appearance] setBarTintColor:[UIColor whiteColor]];
    //导航栏左右按钮字体颜色
    [[UINavigationBar appearance] setTintColor:[UIColor grayColor]];
        //修改标题字体颜色及大小
    [[UINavigationBar appearance] setTitleTextAttributes:@{NSFontAttributeName:[UIFont systemFontOfSize:18],NSForegroundColorAttributeName:[UIColor blackColor]}];
    UIBarButtonItem *item= [UIBarButtonItem appearance];
        //设置导航栏按钮字体颜色
    NSMutableDictionary *textArr = [NSMutableDictionary dictionary];
    textArr[NSForegroundColorAttributeName] = [UIColor orangeColor];
    textArr[NSFontAttributeName] = [UIFont systemFontOfSize:15];
    [item setTitleTextAttributes:textArr forState:UIControlStateNormal];
        //不可选中状态
    NSMutableDictionary *disableTextArr = [NSMutableDictionary dictionary];
    disableTextArr[NSForegroundColorAttributeName] = [UIColor lightGrayColor];
    disableTextArr[NSFontAttributeName] = [UIFont systemFontOfSize:15];
    [item setTitleTextAttributes:disableTextArr forState:UIControlStateDisabled];
}
4.注意处理自定义返回按钮后 滑动手势失效的问题 在- (void)viewDidLoad 中添加即可解决该问题
self.interactivePopGestureRecognizer.delegate = nil;
- load和initialize的共同特点 *在不考虑开发者主动使用的情况下,系统最多会调用一次 *如果父类和子类都被调用,父类的调用一定在子类之前 *都是为了应用运行提前创建合适的运行环境 *在使用时都不要过重地依赖于这两个方法,除非真正必要
- load方法相关要点 *调用时机比较早,运行环境有不确定因素。具体说来,在iOS上通常就是App启动时进行加载,但当load调用的时候,并不能保证所有类都加载完成且可用,必要时还要自己负责做auto release处理。 *补充上面一点,对于有依赖关系的两个库中,被依赖的类的load会优先调用。但在一个库之内,调用顺序是不确定的。 *对于一个类而言,没有load方法实现就不会调用,不会考虑对NSObject的继承。 *一个类的load方法不用写明[super load],父类就会收到调用,并且在子类之前。 *Category的load也会收到调用,但顺序上在主类的load调用之后。不会直接触发initialize的调用。
- initialize方法相关要点 *initialize的自然调用是在第一次主动使用当前类的时候(lazy,这一点和Java类的“clinit”的很像)。 *在initialize方法收到调用时,运行环境基本健全。 *initialize的运行过程中是能保证线程安全的。 *和load不同,即使子类不实现initialize方法,会把父类的实现继承过来调用一遍。注意的是在此之前,父类的方法已经被执行过一次了,同样不需要super调用。 *由于initialize的这些特点,使得其应用比load要略微广泛一些。可用来做一些初始化工作,或者单例模式的一种实现方案。
有问题 请联系 [email protected]
感谢GitHub上开源大神
原因:Xcode 10 默认使用的build system是New build system,与Xcode9不同导致
1)第一种方法 不修改build system 根据error 日志,script phase “[CP] Copy Pods Resources”,而且与output有关,应该是使用了cocoapods导致的,尝试删除该项目target-Copy Pods Resources-Output Files,成功解决问题。选中项目target -> Build phase -> Copy Pods Resources -> Output Files -> 移除TARGETBUILDDIR/ TARGET BUILDD IR/{UNLOCALIZED_RESOURCES_FOLDER_PATH} 然后重新编译,OK 。
用这种方式紧接着会有下面的错误: error: Cycle in dependencies between targets ‘yooweiExtension’ and ‘yoowei’; building could produce unreliable results. Cycle path: yooweiExtension → yoowei → yooweiExtension Cycle details: → Target ‘yooweiExtension’: CodeSign /Users/galahad/Library/Developer/Xcode/DerivedData/yoowei-drnrntneloepunakcqbcdycudqeh/Build/Products/Debug-iphoneos/yooweiExtension.appex
○ Target ‘yooweiExtension’: ProcessProductPackaging /Users/galahad/Library/Developer/Xcode/DerivedData/yoowei-drnrntneloepunakcqbcdycudqeh/Build/Intermediates.noindex/yoowei.build/Debug-iphoneos/yooweiExtension.build/yooweiExtension.appex.xcent
○ Target ‘yooweiExtension’ has target dependency on Target ‘yoowei’
→ Target ‘yoowei’ has target dependency on Target ‘yooweiExtension’
○ That command depends on command in Target ‘yooweiExtension’: script phase “[CP] Check Pods Manifest.lock”
对应的解决方案:选中项目target -> Build phase -> Target Dependencies 去掉相互的依赖即可
2)第二种方法 修改build system (个人感觉这种方式较好,不会每个项目搞一遍) 在Xcode菜单栏 -> File -> Workspace Setting,将build system修改为legacy build system,然后clean后编译。
