Oracle Container Engine for Kubernetes (OKE) is the Oracle-managed Kubernetes service on Oracle Cloud Infrastructure (OCI).
In this demo, we will show how to create a Kubernetes cluster, and install Kubeflow within it.
Kubeflow is an open-source platform for machine learning and MLOps on Kubernetes introduced by Google. The different stages in a typical machine learning lifecycle are represented with different software components in Kubeflow, including model development, model training, model serving, and automated machine learning.
Once we have Kubeflow installed, we'll use it to create a Jupyter notebook environment so you can have your own self-hosted Jupyter environment to run GPU and High-Performance Computing (HPC) workloads seamlessly.
To run our demo's workflow, we will use the Cloud Shell built into the Oracle Cloud Console but can also be run from your local workstation.
You can watch the solution's video here.
- An Oracle Cloud Infrastructure (OCI) Account
- The tenancy shall have access to NVIDIA A10 Tensor Core GPU(s). Although it's not compulsory (you could run Kubeflow on CPU), launching this AI workload will work best with GPUs.
This guide can be run in many different ways, but in all cases, you will need to be signed into your Oracle Cloud Infrastructure tenancy.
⚠️ Kubeflow 1.5.0 is not compatible with Kubernetes version 1.22 and onwards. To install Kubeflow 1.5.0 or older, set the Kubernetes version of your OKE cluster to v1.21.5.
We will install Kubeflow 1.8.1 on OKE using Kubernetes versions 1.29.1 and onwards running on Oracle Linux 8.
Suppose you provision an OKE cluster manually or deploy with your own terraform. In that case, you must turn off the OKE in-transit encryption option and apply the cloud-init script to enable Istio.
This section describes how to:
- Create a Kubernetes cluster using OKE and The Terraform OKE Module
- Accessing OKE
- Installing Kubeflow and how to expose the Kubeflow Dashboard
-
Launch an OCI Cloud Shell instance within your OCI tenancy. Once you're inside, let's clone this repository to get access to the resources available:
git clone https://github.com/oracle-devrel/kubeflow-oke.git
-
To Create a Kubernetes cluster clone The Terraform OKE Module repository to deploy OKE Cluster
git clone https://github.com/oracle-terraform-modules/terraform-oci-oke.git
-
Obtain the OCIDs we will need for the next step:
echo $OCI_TENANCY
echo $OCI_REGION
echo $OCI_COMPARTMENT
-
Edit the
kubeflow-oke/terraform.tfvars.examplefile. We need to set 4 variables: the compartment and tenancy OCIDs, your home region (see all region identifiers here) and the region identifier where you want to deploy Kubeflow. From here, you can also review other settings, including security settings around control plane access, bastions and operators. If needed, change the Kubernetes version to match the version supported by the Kubeflow version you are installing. Consider the node pool setup and if you want to use the cluster autoscaler.Review the number of nodes in each node pool, in this example we are using three node pools.
- System for running system processes, e.g. Prometheus server.
- App for running actual applications, e.g. the kubeflow runtime.
- Processing for executing your actual analysis in, if you want this to auto scale set
autoscaletoTrueand modifymax_node_pool_sizeto meet your needs.
-
Copy the
terraform.tfvars.exampleasterraform.tfvarsin terraform-oci-oke folder. -
Copy the
provider.tfin terraform-oci-oke folder. -
If you aren't running this installation in your OCI Cloud Shell instance, you will need to configure OCI's security credentials for Terraform. From terraform-oci-oke folder init Terraform:
terraform init
-
Plan the deployment, and let's save the plan to a file:
terraform plan --out=kubeflow.plan
-
Apply the deployment (run the script):
terraform apply kubeflow.plan
Now you need to follow the OCI Kubernetes Environment instructions for getting your Kubernetes config information and adding it to your local kubeconfig.
-
Click Access Cluster on the
Cluster detailspage: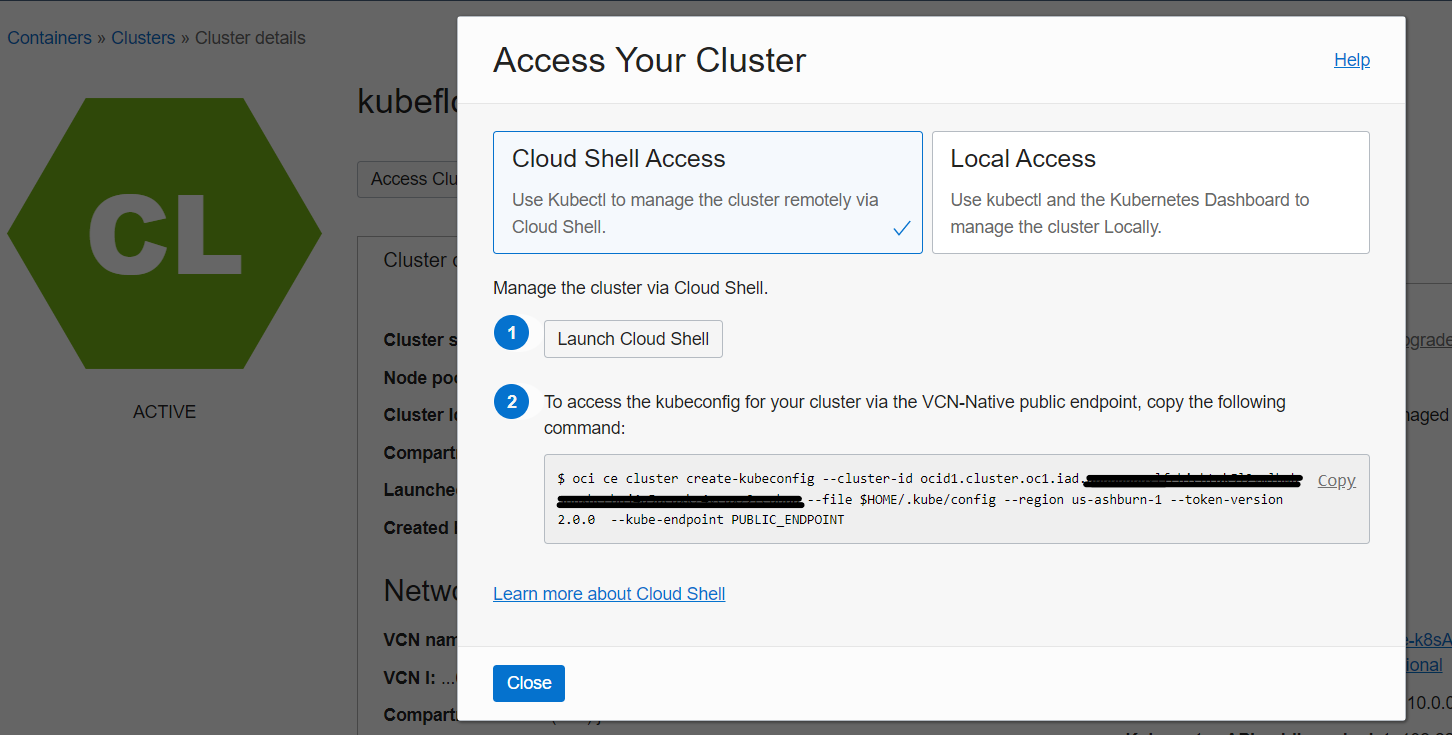
-
You can either choose to run Kubernetes on the Cloud Shell (easiest) or on your own machine. It's recommended to use Cloud Shell, as otherwise you'd need to install OCI CLI and authenticate yourself. Accept the default Cloud Shell Access and click Copy to copy the
oci ce cluster create-kubeconfig ...command. -
To access the cluster, paste the command into your Cloud Shell session and hit Enter.
-
Verify that the
kubectlis working by using theget nodescommand:kubectl get nodes
-
Repeat this command multiple times until all three nodes show
Readyin theSTATUScolumn:When all three nodes are
Ready, your OKE installation has finished successfully.

Now that the cluster is ready, we can begin to install Kubeflow within the OKE cluster.
-
If you're running in a Compute Instance and not Cloud Shell, you will need to install
Kustomize:curl -s "https://raw.githubusercontent.com/kubernetes-sigs/kustomize/master/hack/install_kustomize.sh" | bash
-
Let's run the
install-kubeflow.shscript in the kubeflow-oke folder to set up the version ofkustomiseand specify whichkubeflowbranch to use:./install-kubeflow.sh
-
The script output will provide you with the URL, login and password to access Kubeflow console.
-
Your kubeflow dashboard is at
https://<IP_ADDRESS>. Login as[email protected]:This is your kubeflow password for user [email protected]: xxxxxx
-
(Optional) To destroy, you must remove the non-Terraform constructed OCI resources, specifically the Istio gateway load balancer. The easiest way here is to remove the service:
kubectl delete service istio-ingressgateway -n istio-systemThis project welcomes contributions from the community. Before submitting a pull request, please review our contribution guide.
Please consult the security guide for our responsible security vulnerability disclosure process.
Copyright (c) 2024 Oracle and/or its affiliates.
Licensed under the Universal Permissive License (UPL), Version 1.0.
See LICENSE for more details.
ORACLE AND ITS AFFILIATES DO NOT PROVIDE ANY WARRANTY WHATSOEVER, EXPRESS OR IMPLIED, FOR ANY SOFTWARE, MATERIAL OR CONTENT OF ANY KIND CONTAINED OR PRODUCED WITHIN THIS REPOSITORY, AND IN PARTICULAR SPECIFICALLY DISCLAIM ANY AND ALL IMPLIED WARRANTIES OF TITLE, NON-INFRINGEMENT, MERCHANTABILITY, AND FITNESS FOR A PARTICULAR PURPOSE. FURTHERMORE, ORACLE AND ITS AFFILIATES DO NOT REPRESENT THAT ANY CUSTOMARY SECURITY REVIEW HAS BEEN PERFORMED WITH RESPECT TO ANY SOFTWARE, MATERIAL OR CONTENT CONTAINED OR PRODUCED WITHIN THIS REPOSITORY. IN ADDITION, AND WITHOUT LIMITING THE FOREGOING, THIRD PARTIES MAY HAVE POSTED SOFTWARE, MATERIAL OR CONTENT TO THIS REPOSITORY WITHOUT ANY REVIEW. USE AT YOUR OWN RISK.