- 0. Logistics
- 1. Containers introduction
- 2. Docker introduction
- 3. Docker build process deep dive
- 4. Docker deployment deep dive
- 5. Summary and recommended resources
Course organisation: This course is designed to be a standalone, 1.5-2h tutorial / workshop. It is designed with Docker novices in mind and as such covers mainly introductory containers and Docker concepts. However, some concepts covered during this workshop, such as streamlining the build process can be of interest to the regular Docker practitioners. If you are already familiar with container and Docker basics and are following this course on your own, you may skip Sections 1 and 2 and go directly to Sections 3 and 4.
Further reading for more advanced users and those who would like to go beyond the scope of this course is given in Section 5.
Course timeline:
| Section | Section Name | Length |
|---|---|---|
| 0 | Logistics | 5 minutes |
| 1 | Containers Introduction | 5 minutes |
| 1.1 | What are containers | 2 minutes |
| 1.2 | What containers are not | 2 minutes |
| 1.3 | Why do you (and don't) need containers | 1 minute |
| 2 | Docker introduction | 40 minutes |
| 2.1 | Basic components of Docker | 20 minutes |
| 2.2 | Building Docker containers | 20 minutes |
| 3 | Docker build process deep dive | 35 minutes |
| 3.1 | Build context | 5 minutes |
| 3.2 | Efficient and safe build of containers | 10 minutes |
| 3.3 | Reducing the size of containers | 20 minutes |
| 4 | Docker deployment deep dive | 30 minutes |
| 4.1 | Running containers efficiently and safely | 20 minutes |
| 4.2 | Distributing containers | 10 minutes |
| 5 | Summary and recommended resources | 5 minutes |
| Total | 120 minutes |
Code and lesson notes: This README file serves as a master document for the entire course. All the code is presented in the form of snippets here. Each section has a corresponding directory containing the full code and separate lesson files with information relevant to just that given section. These files do not contain any additional information and are used to separate the content into more logical chunks. These directories also contain the multimedia files, such as images, used in the corresponding course sections.
Conventions used in this document:
-
long(er) code or short commands that are just being introduced use code blocks -
short commands that are not new and file pathsare inlined
Software installation: To get the most out of this course it is essential that you try the examples and run the code provided. To do that, you will need a computer with a working Docker installation. Please go to the official Docker installation guide and follow the instructions to install Docker for your operating system. This course will be focused on the introductory Docker uses and is expected to work on all the supported platforms. We recommend you try to install the software at least few days before the workshop, so that you have all the required software on the day. We also recommend that you create a Docker Hub account for the last session on this workshop.
Installation drop-in session: Even though Docker is now officially supported on the most popular Operating Systems, as with any software there can be some problems with the installation and the initial configuration. To make sure that there are no problems on the day of the workshop, we will be organising an installation drop-in session a few days before the workshop. If you would like to receive any help with the installation and setup procedures, please register your interest using this form.
Bugs and suggestions: If you find a mistake in the course, be it a code mistake or a small typo, or have suggestions on how to improve this course please let us know by starting a new issue. We welcome all the suggestions on how to make this course more effective and efficient at introducing researchers to good containerisation practices.
You may hear people say they are "running an image" or "running a container". These terms are often (incorrectly!?) used interchangeably.
In this workshop, we refer to a (container) image as the collection of
software that you build up and bundle together. You then can run this image.
At that point it becomes a container, where you can run your software and perform all the other operations
you would normally perform on your host Operating System (OS). Think of it as
similar to the difference between an .exe file and a running application that
clicking this file starts. .exe file has all the components necessary to run the application,
but you actually have to run it to make use of it.
The most important feature of containers, and where their real strength comes from, is that unlike "regular" applications, they can and often do perform all their work in isolation. Your containers do not have to know what the rest of your OS is up to. They don't even have to have an access to the same files as your host OS (although, as we will see later, you can enable this access), or share the same network (again it is possible to achieve that, but it's not the default setting).
You will often hear the expression that "containers are like VMs", or "like VMs, but lighter". This may make sense on the surface: there are fewer moving components in the case of containers and the end result might be the same for the end user.
Containers remove a lot of components of virtual machines though: they do not virtualise the hardware, they do not have to contain a fully-fledged guest OS to operate. They have to rely on the host OS instead.
For a more in-depth explanation of the differences between VMs and containers, please see this website by the IBM Cloud Team
- Containers will provide a reproducible work environment.
- They go beyond just sharing your code: you provide a fully-working software with all its required dependencies (modules, libraries, etc.).
- You can build self-contained images that meet the particular needs of your project. No need to install software "just in case", or install something to be used just once.
- You are no longer tied to the software and library versions installed on your host system. Need python3, but only python2 is available? There is an image for that.
- Your software still depends on hardware you run it on - make sure your results are consistent across different hardware architectures.
- Not the best for sharing large amounts of data (see Section 4.1) inside the image (same as you wouldn't use git to share a 10GB file).
- Additional safety concerns, as Docker gives extra power to the user "out of the box". There is potential to do some damage to the host OS by an inexperienced or malicious user if Docker is not configured and used properly.
Now that we covered the basic ideas behind images and containers, it is time to focus on one technology in particular - Docker. Since its initial release in 2013, Docker has been widely adopted in many areas of research and the ‘industry‘. It is used to provide access to e-commerce and streaming services, machine learning platforms, scientific pipelines (CERN, SKA, NASA).
More generally, you should use it as a tool for distributing consistent software environments. Currently it is only one of many existing container technologies that researchers can choose from. Two popular alternatives are Singularity and Podman. Some solutions offer better support for High Performance Computing, while others provide a low-level control of the environment. There really is something for everyone.
It is possible that after taking this course and familiarising yourself with other containerisation solutions, you will decide that Docker is not the ideal fit for your requirements. Despite the strong competition and some shortcomings, Docker is still a popular choice and is often seen as a standard for containers.
You should have Docker installed by now. For our first exercise / example, we will run a short Docker command to download the Hello World of Docker images and start our very first Docker container.
$ docker container run hello-world

Unable to find image 'hello-world:latest' locally
latest: Pulling from library/hello-world
b8dfde127a29: Pull complete
Digest: sha256:9f6ad537c5132bcce57f7a0a20e317228d382c3cd61edae14650eec68b2b345c
Status: Downloaded newer image for hello-world:latest

Hello from Docker!
This message shows that your installation appears to be working correctly.

To generate this message, Docker took the following steps:
 1. The Docker client contacted the Docker daemon.
 2. The Docker daemon pulled the "hello-world" image from the Docker Hub.
    (amd64)
 3. The Docker daemon created a new container from that image which runs the
    executable that produces the output you are currently reading.
 4. The Docker daemon streamed that output to the Docker client, which sent it
    to your terminal.

To try something more ambitious, you can run an Ubuntu container with:
 $ docker run -it ubuntu bash

Share images, automate workflows, and more with a free Docker ID:
 https://hub.docker.com/

For more examples and ideas, visit:
 https://docs.docker.com/get-started/
-
The command that we execute
$ docker container run hello-worldinstructs Docker that we would like to start a container using a
hello-worldimage. This command can also be written asdocker run hello-world, omitting thecontainerpart. This change was introduced in 2017 with a major overhaul of the Docker CLI (Command Line Interface). If the version of Docker installed on your machine, comes from before these changes were introduced (we strongly recommend that you upgrade it due to security reasons), the full command will not work and you will have to use the short version. This course however is written with the new versions of Docker in mind and will follow the convention of using the extended versions of the commands. -
The next few lines
Unable to find image 'hello-world:latest' locally
latest: Pulling from library/hello-world
b8dfde127a29: Pull complete
Digest: sha256:9f6ad537c5132bcce57f7a0a20e317228d382c3cd61edae14650eec68b2b345c
Status: Downloaded newer image for hello-world:latest
tells us that Docker was not able to find this image on our machine and has to download it from the external repository (more about repositories in Section 4.2). If you have used this particular image in the past (when for example testing your Docker installation from Section 0), you will not see any information about Docker trying to download the image.
You could also separate the
docker container run ...command above into two instructions:$ docker image pull hello-world $ docker container run hello-worldIn this case we are very explicit and tell Docker to first download (pull) the image from the external repository and then start the container based on that image. If you already have the image on your host machine, you can skip the
pullcommand. In this case, including thedocker image pullcommand separately can be seen as a bit redundant as Docker takes care of any missing images withdocker container run. You can however just pull the image and not run it at all, or pull it when you have access to the Internet and later start the container when you are offline. -
The rest of the output
The rest of the output is the most interesting part. It is an innocent-looking list, but as items 3 and 4 from that list explain, that particular part of the output was generated INSIDE the container and only then sent back to the terminal for us to see. That means we have successfully created and run our very first Docker container.
-
Examine the list of locally stored images
How does Docker know whether it has to download the image or that the image is already present on your computer? Can you have this knowledge as well? Docker keeps track of all the images and layers that you download. There usually is a directory on your system which contains all the currently downloaded images and the associated SHA256 keys used to identify them. This ensures that the same layer or image is not downloaded twice and can be reused if necessary. For an in-depth description on how Docker stores images, please refer to this help guide.
The placement and structure of relevant directories can be different depending on your Docker installation and require root permissions to access. There is however a short command that lists all the locally available images:
$ docker image lsDepending on how long (if at all) you have been using Docker for, the output will show only a single image that we have used above or multiple (as many as few tens of) images, as seen below (this is what I see when I run the above command on my work PC - you will see something different)
REPOSITORY                 TAG                      IMAGE ID       CREATED         SIZE
<none>                     <none>                   670fa2d9f98c   2 months ago    3.14GB
<none>                     <none>                   2187b33a009b   2 months ago    714MB
<none>                     <none>                   16b9ad7fc05d   2 months ago    3.12GB
python                     3.7-alpine               6c59ae21a586   2 months ago    41.6MB
redis                      alpine                   f7cdff500577   2 months ago    32.3MB
ubuntu                     18.04                    3339fde08fc3   3 months ago    63.3MB
nvidia/cuda                10.0-devel-ubuntu18.04   f1cb864ecfaf   3 months ago    2.24GB
nvidia/cuda                10.2-devel-ubuntu18.04   5fe1e15ef79b   3 months ago    2.96GB
hello-world                latest                   d1165f221234   3 months ago    13.3kB
jupyter/scipy-notebook     latest                   dab5e9968512   7 months ago    2.7GB
nvidia/cuda                9.2-cudnn7-devel         0a6a8962363e   8 months ago    2.88GB
nvidia/cuda                9.2-base                 7def1f9b9d8d   9 months ago    80.8MB
nvidia/cuda                9.2-base-ubuntu18.04     7def1f9b9d8d   9 months ago    80.8MB
nvidia/cuda                9.2-devel-ubuntu18.04    b06eca0e3d4a   9 months ago    2.2GB
cuda                       8.0-base-ubuntu16.04     f240c010c4f2   10 months ago   142MB
ubuntu                     16.04                    005d2078bdfa   14 months ago   125MB
rabbitmq                   3.8.2                    b8956a8129ef   16 months ago   151MB
nvidia/cuda                9.2-devel-ubuntu16.04    1874839f75d5   19 months ago   2.35GB
nvidia/cuda                10.0-base-ubuntu18.04    841d44dd4b3c   19 months ago   110MB
If you know its name, you can list just a specific image:
$ docker image ls hello-worldor even use wildcards if you are not sure about the full image name (was it
hello-worldorhello_world?):$ docker image ls hello*We can now examine in detail the output of one of the above commands:
REPOSITORY    TAG       IMAGE ID       CREATED        SIZE
hello-world   latest    d1165f221234   3 months ago   13.3kB
This output tells us that there is a single image starting with the word
helloavailable locally on our machine (hello-worldto be exact), with thelatesttag. We will talk more about the importance of tags in Section 2.2 - for now just treat them as an extra bit of information about the version of the image. Next comes the image ID, which is a shortened version of the SHA256 key (or digest, using Docker vocabulary) used to identify the image, information on when the image was created. This information refers to when the image was first built and not pulled - this particular image was created 3 months ago, even though I had downloaded it only 2 minutes before pasting this output in the snipped above. At the end, the size of the image is shown.We have used the most basic version of the image listing command, with the exception of using wildcards. For a complete reference and advanced examples, such as formatting and filtering, please visit this docker images reference. Quick note: the above document refers to a
docker imagescommand, which is an alias to the fulldocker image lscommand. All the options however will work with both versions of this command. You can still use it as a reference for the--formatand--filteroptions. -
Examine currently running images
We can examine currently running images::
$ docker container lsIf you execute this command after launching our first container you will see...
CONTAINER ID IMAGE COMMAND CREATED STATUS PORTS NAMESnothing really. This means there are no containers running at this moment in time.
When we launched our
hello-worldcontainer above, it started, it did the job it was designed to do and it stopped immediately. In the case of thehello-worldimage, the designers decided it should print out a helpful output once the container is launched successfully, but that may not always be the case.We still have an option to check whether our container was started at all. We can force Docker to list all the containers with the extra
-aoption:$ docker container ls -a CONTAINER ID IMAGE COMMAND CREATED STATUS PORTS NAMES 7dd021096f75 hello-world "/hello" 3 hours ago Exited (0) 3 hours ago trusting_herschelIn this case we actually get some useful information about our container we have just run. We see that we launched the container, it run and it exited with code 0, meaning a successful, error-free execution. We can also see when the container was created and when it completed its execution. As you have seen, we get the results from the
hello-worldcontainer pretty much immediately, and therefore theCREATEDandExitedtimes are the same, but generally this is not the case.Every container has a "human-readable" name assigned to it at launch. It makes it easier to refer to the container using that name instead of the container ID, listed in the first column of the above output. These names are randomly generated from a list of adjectives and famous scientists and Docker does not guarantee the name will repeat for the same container (it is extremely unlikely your container will have the same name as the one listed above).
It is therefore important to provide a memorable name with the
runcommand using--nameoption to ensure reproducible and predictable deployment. This is especially important when you run multiple containers at the same time, e.g. making it easy to differentiate front- and backend Node-based containers that can have the same underlying image, or rely on scripts and want to have predictable parameters. Naming of containers will be discussed in more detail in Section 4.1.If you are running containers right now, you will see them as "Up", as below
$ docker container ls -a CONTAINER ID IMAGE COMMAND CREATED STATUS PORTS NAMES f1d9fa05caae rabbitmq:3.8.2 "docker-entrypoint.s…" 2 months ago Up 5 minutes rabid_rabbit -
Remove the container
Exited containers can be thought of as being hibernated - they are not running, their internal state is saved and they can be woken up and run again. When we are satisfied with the results provided by our container launch, we might need to remove it. We can do this with the help of
container rmcommand:$ docker container rm trusting_herschelHere we used the Docker-assigned name to remove the container. We can also use the container ID to achieve the same result. Make sure you replace the name above with the name or the container ID that you got by running the
docker container ls -acommand.Question: what happens if you run the
docker container lsanddocker container ls -acommands now, after removing the container? -
Remove the image
We made sure that the container was no longer running and then we removed it. What if we want to go one step further and want to get rid of the underlying image? Docker has a fairly intuitive command for that as well - instead of removing a container, we tell it to remove the image instead:
$ docker image rm  hello-world
Untagged: hello-world:latest
Untagged: hello-world@sha256:9f6ad537c5132bcce57f7a0a20e317228d382c3cd61edae14650eec68b2b345c
Deleted: sha256:d1165f2212346b2bab48cb01c1e39ee8ad1be46b87873d9ca7a4e434980a7726
Deleted: sha256:f22b99068db93900abe17f7f5e09ec775c2826ecfe9db961fea68293744144bd
In this case we use the image name and Docker prints out the confirmation that it was removed successfully.
Question: what happens if you try to launch a container based on the
hello-worldimage again, as we have done at the start of this section? Think for a moment about what you expect to happen before running theruncommand again.
We now know the basics of managing Docker images and containers. We learned how to download an existing image and launch a container based on it. That might be all that you need in the end. Docker has been around since 2013, and you can many images that contain some of the most popular software. Often they will be enough to meet your needs. Just go to the Docker Hub and see for yourself how many images there are available (8,125,970 at the time of writing).
Chances are however that you work in a specialised field and none of these millions of images will do what you need, or they do, but not exactly how you would like them to. One of the main driving forces behind the increasing use of containers is the ability for the developers to package their software inside the image and provide end users with a stable environment. You can do it with your software as well, and that is what we are going to do now.
The development of every Docker image starts with a Dockerfile. It is a recipe that contains a series of commands for installing and configuring software packages included in your image. As we will see below, we can think of a Dockerfile as a collection of regular shell expressions combined with an extra Docker syntax that tells Docker how to construct the image. If you have used a *nix system before, this Dockerfile should look familiar:
FROM ubuntu:18.04

WORKDIR /software

RUN apt-update && apt -y install git \
    && git clone https://github.com/mmalenta/docker_tutorial

CMD ./docker_tutorial/02_docker_into/scripts/hello_docker.sh
In this workshop we cover only the most basic Dockerfile syntax and build options. For more detailed information, please consult the Dockerfile reference.
-
The first line
FROM ubuntu:18.04is a must for your Dockerfile. The
FROMinstruction tells Docker which base image to use. Think about it like a basic OS installation on your new machine: you install bare-bones OS and then add the required software.Here we tell Docker to use a pre-build image as the foundation we will build upon. We use an
ubuntu:18.04base image. There are base images available for all the most popular Linux operating systems (or as close as possible to what you may need) as well as Windows.Not only we tell Docker to use an ubuntu image, but also specify an additional tag. This tag allows you to document possible multiple versions of the same software stack. If no tag is specified, the
latesttag is used by default. This is bad practice from the reproducibility point of view as you always download the newest version of the software and can run into problems with dependencies and software stability. We will talk about this in more detail in Section 3.2. -
Let's install some software
The next line:
WORKDIR /softwaresets the working directory for the following
RUNandCMDinstructions. Think of it as the usualcdwith extra powers. If the directory exists,WORKDIRwill set it as a working directory for the following commands. If however the directory does not exist,WORKDIRwill first create it before setting it as your working directory.Question: what happens if we do not use the
WORKDIRinstruction? Where do all the files go?We then proceed to install some software:
RUN apt update && apt -y install git \
  && git clone https://github.com/mmalenta/docker_tutorial
The above line is exactly what you would run when installing software on your Debian-based machine, with the additional
RUNinstruction which tells Docker to execute the command and include the results in the image. The outcome is not unexpected - our new image will havegitinstalled and the repository for this course will be cloned into the/software/docker_tutorial/directory (remember we changed the directory for theRUNcommand withWORKDIRinstruction above).We divide the command into multiple lines by using
\(backslash), which tells Docker that these lines form a singleRUNcommand. There is nothing stopping us from writing the whole command on a single line, but that can produce unreadable Dockerfiles.It is important to note that you will require a working Internet connection to be able to execute this particular
RUNcommand, as you would normally do when running apt. This is not the case for everyRUNcommand, as some Dockerfiles work on files stored locally. -
Let's actually run some software
The last line
CMD ./docker_tutorial/02_docker_into/scripts/hello_docker.shtells Docker to execute the
hello_docker.shscript when we launch our container using thedocker container runcommand.
We are halfway there. Now that our recipe is ready, we need to convert it into an image.
docker image build -f 02_docker_intro/Dockerfile.02 --tag docker_intro:v0.1 .
Here we instruct Docker daemon to take our Dockerfile we saved under
02_docker_intro/Dockerfile.02 (if you are currently in a different directory
than the course root, make sure that you change the Dockerfile path
accordingly) and use it to build an image called docker_intro:v0.1. We can
name our Dockerfile however we want - there are no rigid naming conventions,
but make sure that you use descriptive names, especially if you are
developing multiple Dockerfiles. By default, Docker tries to use a
Dockerfile simply called Dockerfile from the current directory.
That is why we use -f option to force the use of our file with a more
descriptive name.
We then give our image a name consisting of the main name
docker_intro and give it a version tag v0.1 (you may name your image
however you want - this is just an example). If no tag is provided, Docker will
use latest as the default tag. At the end comes the full stop ..
It is actually a part of our docker image build command and you have to remember
to include it. It is used to specify the build context. Build context
specifies files and resources that will be available during the build process
and which we will be able to use. In the case of the command above we specify
the current directory . as our build context. This makes all the files and
directories present in it available to the Docker daemon during the building phase.
Once we run the build command above, Docker will first parse the provided Dockerfile to find any syntactic errors, prepare and send the build context to the Docker daemon and execute each command that we included inside our Dockerfile. The output will look something like this
Sending build context to Docker daemon  88.58kB
Step 1/4 : FROM ubuntu:18.04
 ---> 3339fde08fc3
Step 2/4 : WORKDIR /software
 ---> Running in eef9438e28cd
Removing intermediate container eef9438e28cd
 ---> e1b217f6b63c
Step 3/4 : RUN apt update && apt -y install git     && git clone https://github.com/mmalenta/docker_tutorial
 ---> Running in 486d573d82f4
We can now run our very own image using the run command we have learned above.
Exercise (10 minutes): Using the 02_docker_intro/Dockerfile.02 Dockerfile as a
starting point, create 3 separate Dockerfiles:
- Very basic Dockerfile with just the
FROMinstruction - Add a
RUNinstruction that installsgitfrom your preferred repository - Add another
RUNinstruction that removes git
Build all 3 Dockerfiles with different tags. Can you notice any differences in the
build progress output? What about the size difference of each image (use
docker image ls as described in
Section 2.1)? Anything surprising?
If you are stuck or unsure use 3 Dockerfiles provided in the
02_docker_intro directory (extensions .02a, .02b and .02c). Before
you do that though, make sure you give it a go on your own and do not
hesitate to ask if you run into any problems!
It is quite common for projects to keep their code and data together. It is not a problem if your codebase provides a few .csv files or few kiB of data. However, the size of your dataset can become a significant problem if there are many GiBs of data, which is quite common in the Machine Learning workflows. This poses not only some well-known challenges, such as how to share your data, but can also negatively affect your Docker image development and deployment if not taken care of properly.
As described above, after specifying the build context as part of our docker image build command, all the files and directories and made available for the build
process. That is what the Sending build context to Docker daemon 88.58kB
from the build progress output means.
As Docker has to scan for all the files present in the specified context and
send them to the deamon for processing, the size of your context can have an
impact on the execution time of your docker image build command.
We can run a relatively simple test to get a better idea on the negative
effect of increasing build context size. First, remove the image we built in
the previous section. Then run the build command we used previous, but now
time its execution
time docker image build -f 02_docker_into/Dockerfile.02 --tag docker_intro:v0.1 .
Sending build context to Docker daemon  91.14kB
...
real	0m27.827s
user	0m0.060s
sys	0m0.027s
I will let you be the judge of whether 30s on installing git and cloning a repository is a lot or not.
Now let's create a large file in our context. Use the dd command to create
a 1GiB test.dat file in the root course directory (create a smaller file
if you do not have enough space, but make sure the file is at least few tens
of MiB in size)
dd if=/dev/urandom of=test.dat bs=32M count=32Now repeat the process from above: remove the previous image and build a new one while timing the execution
time docker image build -f 02_docker_into/Dockerfile.02 --tag docker_intro:v0.1 .
Sending build context to Docker daemon  1.074GB
...
real	0m39.051s
user	0m0.651s
sys	0m1.097s
That is more than 10s longer build time! We run each command only once and the numbers can
vary between the runs and will depend on your machine! Even if we take hardware
differences and random execution variations into account, we will see that
the increased build context makes the entire build process longer and we did
not even use this file for our build!
10 extra seconds might not seem like a lot, but we "only" included a single
1GiB file and can already notice an increase in the build time.
In general, make sure you only include the files that you are 100% sure will
be required as part of your build context (e.g. you use a COPY instruction
to copy some local files into your image).
Question: What would happen if you were creating a Machine Learning pipeline with a Dockerfile inside a directory with tens of GiBs of training examples? What if you had to rebuild the image multiple times a day?
Exercise (2 minutes): think about different strategies you could use to reduce the
size of your build context. How much data do you need available during the
build? Is moving your Dockerfile to a separate, empty directory enough? Do you
need to use a .dockerignore file?
-
Layers and their use
Now let us go back to the build exercise from Section 2.2. You were asked to build 3 separate images. Did you notice anything interesting about the sizes of created images? Anything unexpected? My results surely are
$ docker image ls
REPOSITORY                 TAG                      IMAGE ID       CREATED          SIZE
docker_intro               v0.1a                    3339fde08fc3   3 months ago     63.3MB
docker_intro               v0.1b                    03b4f80d21dc   12 minutes ago   194MB
docker_intro               v0.1c                    def68fd55a96   3 seconds ago    195MB
The first Dockerfile (image tag v0.1a) does nothing else than just pulling a base image. The second recipe (v0.1b) installs the git package and all its dependencies. That results in a relatively large image for achieving such a simple task, as git uses more than 100MB of disk space. The third Dockerfile (v0.1c) illustrates how beginner Docker developers may attempt to remove packages. It looks like the package is removed correctly, as git can no longer be accessed inside the container. However, the size of the underlying image did not decrease. On the contrary, it is slightly larger, even though the removed packages should free around 100MB of space.
This is a result of how Docker handles images and their layers. Each of the FROM and RUN commands in the example Dockerfiles, creates a new layer. Each new layer contains the record of the differences introduced since the previous layer. Eventually, all the layers are combined into the final image. As a result, the layer installing the package is still included in the image. The final layer and its RUN instruction effectively hides the git command from the user. Additionally, this happens in a new layer, which is linked to the previous layers, increasing the image size.
Leaving such artefacts behind may not seem like a problem in the case of small packages. Modern pipelines however can depend on multiple executables, libraries and intermediate files. The size of the image can grow quickly if these are not removed properly. This can put stress on storage and increase push and pull times to and from a repository. Not removing intermediate products properly can also have important security implications. Any potential files containing login details or other sensitive information that are added into the image and not removed in the same layer, can then be viewed by anyone having access to the image. In such a situation, an improperly built image can not only make the development more cumbersome, but can potentially compromise multiple systems.
Exercise (3 minutes): based on what we have learned about layers so far, could you think of an easy way of ensuring that the package is actually removed? When you have the answer, compare it with the
Dockerfile.03. Extra: what are the advantages and disadvantages of such a solution?
-
Use only packages you need
Certain packages, such as text editors and debugging tools are often installed "just in case". A text editor can be useful when a quick modification is required, and could be considered harmless, as such packages are generally small. Even small packages can quickly add up and create bloated images. If such tools are required, the best practice is to maintain multiple im- ages. Having separate images for the development and production deployments provide the necessary flexibility in case changes to the code are required. At the same time it separates the two and ensures that a clean image is made available for actual research.
This requirement is also important when using base images. Although a great starting point for prototyping, they are often meant to cover all the most common use cases. As an example, the official CUDA 9.2 development image contains most of the CUDA libraries. If the researcher requires only the most basic CUDA functional- ity, for example when using custom CUDA kernels, the CUDA 9.2 image would install multiple unnecessary libraries and profiling tools. These alone can increase the final image size from a few hundred MBs to few GBs. The best practice is to identify the min- imum required ecosystem, use a basic official image, if available (e.g. cuda:9.2-base vs cuda:9.2-devel) and install all the necessary packages and libraries by hand.
-
Use multi-stage builds
Small and clean Docker images can be maintained with the help of multi-stage builds. This approach simplifies the build process when external packages and libraries are required. It removes the need for complex Dockerfiles and external scripts. When used properly, multi-stage builds can not only keep the size of the final images down, but also reduce the build time and simplify the maintenance of different image versions. Dockerfile.03multi contains a simple example of a multi-stage build. It is also shown in the code snipped below:
FROM ubuntu:18.04 as downloader

WORKDIR /software

RUN apt update && apt -y install git \
    && git clone https://github.com/mmalenta/docker_tutorial

FROM ubuntu:18.04

WORKDIR /software
COPY --from=downloader /software/docker_tutorial ./docker_tutorial
Unlike all the previous Dockerfiles we have worked with, this one has two
FROMinstructions. EachFROMline starts a new build stage, independent of the previous one(s). All the necessary tools and files are downloaded in the first stage here. The secondFROMstage starts with a clean sheet, no matter how many things were installed in the previous stage. Every stage can use a different base image (here we use the same image for both stages, but you could use something else - alpine maybe?) and copies only the required parts of the first stage. We copy the contents of this workshop's git repository. At the end, we have a complete image, with all the workshop files in it as previously and thegitpackage was correctly removed. Additionally we do not have to worry about installing and removing software in the same line as presented in the first Dockerfile of this section.REPOSITORY TAG IMAGE ID CREATED SIZE docker_intro v0.1a 3339fde08fc3 3 months ago 63.3MB docker_intro v0.1b 03b4f80d21dc 12 minutes ago 194MB docker_intro v0.1c def68fd55a96 3 seconds ago 195MB docker_intro v0.1multi f5309e4e946f About a minute ago 63.4MBThe increase in the image size is caused by the actual files we have downloaded from this workshop's repository.
When we use a multi-stage workflow, we not only limit the number of files present in the final image, but can also benefit from running lighter runtime libraries in the second stage and using heavier development libraries while compiling our software in the first stage.
Warning: multi-stage builds were introduced in 2017, so if you have a version of Docker older than that, you will not be able to build the above image! As before, we urge you to update your Docker to the most recent version on security grounds!
We are not limited to using only 2 stages. You can use as many stages as makes sense in your development workflow. You may find it necessary to have one stage for the initial installation, the next stage for moving the build products around and an additional stage for including some test data.
We also no not have to use all of the stages during our build
$ docker image build --target downloader -f 03_docker_build_deep/Dockerfile.03multi --tag docker_intro:v0.1multi_first .Here we instruct Docker to finish the build process at the end of the first stage. We end up with the same image contents (but not the same image) as when using Dockerfile that installs git and pulls the repository. That is why it is essential to name our build stages: not only we use these names to refer to the individual stages inside our Dockerfile, but can also use them with our
buildcommand.Exercise (5 minutes): add an extra stage to the
Dockerfile0.3multi. It does not have to do anything fancy (echo Hello Worldwill suffice). Try different variations of build command with different build targets. Are the results as you expected?As multi-stage builds are now the recommended way of building more complex images, we are not going to cover the builder pattern. You may however still come across it, especially when working on some older systems that do not have a new enough version of Docker installed. In your spare time, compare the builder pattern to the multi-stage builds. Which one do you find easier to follow and understand (you are not expected to answer "multi-stage" builds, just because we covered them here)?
During the workshop we provide just a brief overview of the most essential parts of Docker security you may need to consider as a beginner user. For a more detailed information please consult Docker security documentation
-
Making data available inside your containers
In the previous section we cloned the workshop's directory directly into the image during the build time. What if you have data available on your host machine and you would like to share with your users?
We can do it during the build process by slightly modifying our previous Dockerfile. First however, let's create a 512MiB test data file in the root workshop directory:
$ dd if=/dev/urandom of=test_data.dat bs=32M count=16
This new Dockerfile executes the same instructions as in the previous multi-stage builds example. Additionally, at the end of the second stage, it copies the data we have just created inside the image, to make it available to all the users running the container:
FROM ubuntu:18.04

WORKDIR /software
COPY --from=downloader /software/docker_tutorial ./docker_tutorial
COPY test_data.dat ./
We use the
COPYinstruction to copy our file inside the image. We build the image the same way we did in Section 2.2.Exercise (5 minutes): using the commands you have already learned, build a new image using the Dockerfile provided with this section. Take note of the build time (you can
timeit), anything special about the build context? What about the size of the final container? Extra: what happens if you specify your build context to somewhere else than our workshop root directory? Does theCOPYcommand still work?If we now launch the container and execute the ls command inside the software directory, we can see that our
test_data.datfile is present:$ docker container run --rm docker_intro:v0.1infile ls -l
Copying the data directly into your image can work if you have a small dataset. What do you do though if you have (tens of) GBs of data? As you can see, copying the data increases the size of that image. The data becomes an integral part of our image. There are situations where you might not (or even can't) do that. You might be dealing with some sensitive data or rely on the user to provide their own data that your software is designed to process.
Instead of sharing the data at the build time, you can do it when you launch your container by using bind mounts. Bind mounts are used to expose data stored on the host machine to the processes running inside your container. This way we can make data stored on the host machine available inside the container without increasing the image size.
We use our original multi-stage image and launch it with the additional options that mount the data inside the container:
$ docker container run --rm --mount type=bind,source=$(pwd)/test_data.dat,target=/software/inside_data.dat docker_intro:v0.1multi ls -l
total 524296
drwxr-xr-x 5 root root      4096 Jun 28 20:12 docker_tutorial
-rw-rw-r-- 1 1000 1000 536870896 Jun 29 12:06 inside_data.dat
The
--mountoption may seem a bit verbose if you have not seen it before, but it should be fairly easy to understand. First we specify thetype=bindto tell Docker to use a bind mount (it is not the only type of mount we can have, but we are not going to cover them here). We then provide two [key]:[value] pairs separated by a comma ( , ) that specify the source and target directory and/or file. As we are using distinctive keys, the order of the pairs is not important, but try to keep it in some order for consistency.Here we make only a single file available inside the container, but it is also possible to make whole directories available and bound to a directory inside your container.
IMPORTANT: bind mounts do not create a copy of the data! Your data is shared between your host and container environments. Any changes that you make to your data on the host side, will be visible inside the container and vice versa. Be careful if you are manipulating any data that you cannot afford to corrupt - it might be safer to make a copy in this case!
Making data available inside your container at a runtime has some obvious drawbacks. With that approach, your data and your software are no longer placed in a single environment. You have to rely on your end-users to provide their own data or to be able to access your data from external sources. This can also increase the development time for your software, as you have to take into account and prevent errors that users can introduce if their data does not meet your requirements. The decision on whether to include the data inside your image during the build time or as a mount during the runtime will be entirely up to you and will depend on your project and user requirements.
Exercise (3 minutes): list some pros and cons of both methods of including the data. When it is more beneficial to use one method over the other? Should you care at all?
-
Changing user
Launching our container the way we did in Section 2.1 may seem innocent enough, but comes with a serious security problem.
Exercise (3 minutes): use one of the images we built in Section 3.2 and launch a container in interactive mode using the command below
$ docker container run -it --rm docker_intro:v0.1multi_firstAnything worrying at the command line prompt? What if you run
id?If I run this container, I see this on my command line (you will most likely see a different ID, as it is the container ID)
root@cf3178c55928:/software# id
uid=0(root) gid=0(root) groups=0(root)
We are running as root inside the container! If you are not careful (or not used to having root privileges), you can damage your containerised environment or even your host operating system. Consider a simple example, not necessarily malicious - this could easily be a result of mistyping or copying a command wrong
!! DO NOT EXECUTE THE FOLLOWING CODE ON YOUR COMPUTER !!
I TAKE NO RESPONSIBILITY IF YOU DO AND DAMAGE YOUR HOST OS
$ docker container run -it --rm -v /:/software docker_intro:v0.1multi_first
root@a90f853bf2b4:/software# ls -l
drwxr-xr-x   2 root root  4096 Jun 17 15:07 bin
drwxr-xr-x   3 root root  4096 Jun 25 07:48 boot
drwxrwxr-x   2 root root  4096 Aug 12  2018 cdrom
drwxr-xr-x  21 root root  4840 Jun 29 10:06 dev
...
root@0a90f853bf2b4:/software# touch ./bin/hello
We have made a (simple) mistake and mounted our host root directory to the
/softwaredirectory inside the container. Because we are arootuser by default inside the container, we can make changes to the host system files: we can add possibly malicious scripts or remove vital files.It is essential for security reasons to specify a non-root user when launching a Docker container with the help of
--useroption. We can use this option to specify which user form the host OS to use. Docker and your host OS share the list of user IDs and group IDs, even though the do not share the usernames (as we shall see with the next example).We can now run our mistyped command in a slightly more secure manner:
$ docker container run --user 1000:1000 -it --rm -v /:/software docker_intro:v0.1multi_first
groups: cannot find name for group ID 1000
I have no name!@75523ff70e1d:/software$ ls
drwxr-xr-x   2 root root  4096 Jun 17 15:07 bin
drwxr-xr-x   3 root root  4096 Jun 25 07:48 boot
drwxrwxr-x   2 root root  4096 Aug 12  2018 cdrom
drwxr-xr-x  21 root root  4840 Jun 29 10:06 dev
...
I have no name!@75523ff70e1d:/software$ touch ./bin/hello
touch: cannot touch './bin/hello': Permission denied
We have launched a new container with user ID 1000 and group ID 1000 (the format is
--user [user ID]:[group ID]). As we have not created this user inside the container, Docker has no idea who that user is exactly, but we can still perform various tasks with the same permissions as the original user on the host OS. Most importantly, we are no longer allowed to mess with the host OS root directory, as indicated above by thePermission deniederror.Make sure you never launch any containers without specifying a non-root user! It may seem as an unnecessary extra step, especially if you just "quickly run something for some tests", but adding this short and easy option can significantly reduce possible malicious attack vectors and also limit the consequences of any mistakes you or your fellow Docker users can (and will) make.
If you expect to run Docker on a regular basis in production environment, e.g. as a web server or a real-time machine learning pipeline, consider creating a separate user with privileges limited to just parts required for your workflow and then always use this user when launching your containers.
-
Running the "standard" Docker daemon requires root privileges. Unless you are in charge of the computational resources, you may not be able to install it on your own. Your IT support might not be willing to do this either due to various concerns.
With the most recent versions of Docker (Docker Engine v20.10 released at the end of 2020 has a fully-matured support) it is possible to run the Docker daemon without root privileges. The installation however still requires some root privileges. After that however, you can run your own personal Docker deployment that you can use as a regular user.
By default and by a conscious security design decisions, rootless mode comes with some limitations. For example, you can no longer use privileged ports (ports with numbers < 1024). This can affect workflows that depend on the access to these ports, such as web servers. It is still possible to expose the privileged ports if absolutely necessary, but not possible by default.
Even if you have root privileges on your machine, consider running Docker in rootless mode if you do not require any advanced configuration options made available with the "full root" version. This effectively further separates your workspace from the inner components of your host OS.
-
Containers offer a great way to run a reproducible development and work environments. We have build multiple images over the course of this workshop. At this stage we alone have access to this reproducibility. If you create an image that is used not only by you, but by other members of your research team or even wider audience - you will need a way to share it.
One of the most popular ways of sharing Docker images is through the Docker Hub repository. To access this service you need to create a free account. Once you have your account ready, you can start sharing your images. First you need to correctly tag an existing image:
$ docker image tag docker_intro:v0.1a [Docker Hub ID]/docker_intro:v0.1a
The above command takes our existing image
docker_intro:v0.1aand gives it a second name[Docker Hub ID]/docker_intro:v.0.1a, where[Docker Hub ID]is the username you selected when setting up the Docker Hub account. By default, Docker will expect to use Docker Hub as a repository and the[Docker Hub ID]/tells it which account to push the image to$ docker image push [Docker Hub ID]/docker_intro:v0.1infile ...
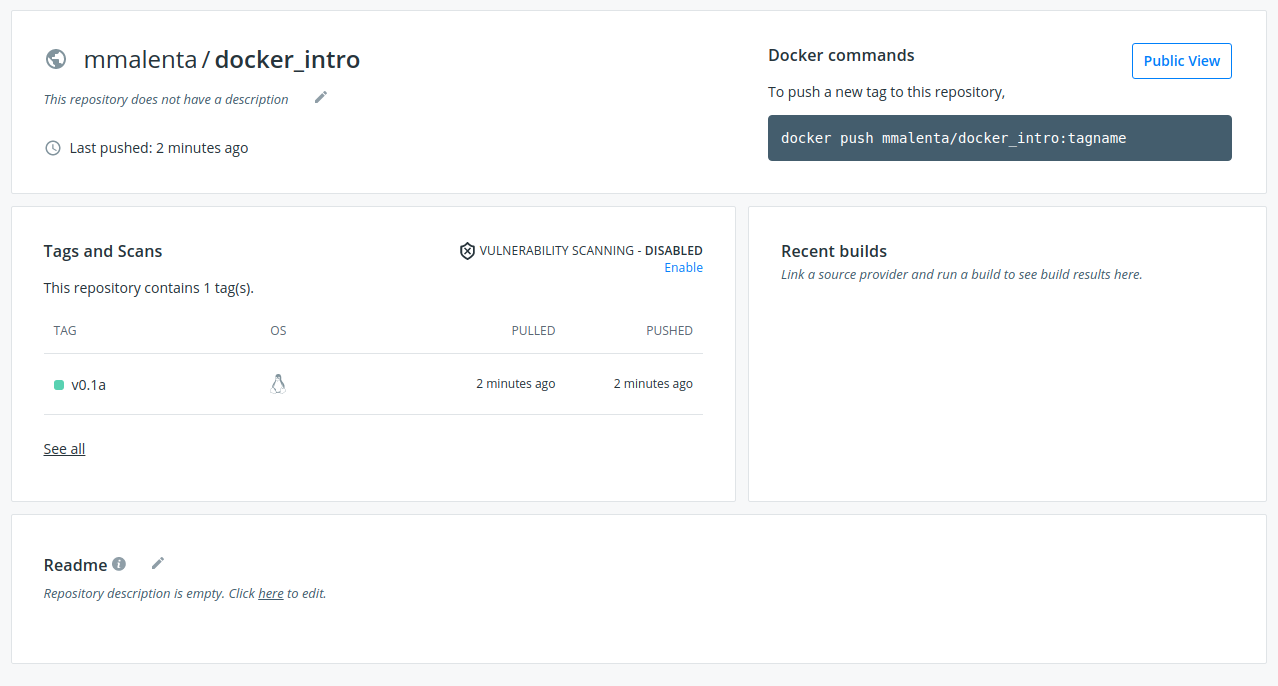
Depending on the size of the image you are pushing and your connection speed, this upload can take up to a few minutes to complete. Now our image is safely stored in an online repository and you can see its details from your Docker Hub account:
We can now safely delete the local copy of the image we have just pushed and the original version to make sure we removed all the references:
$ docker image rm mmalenta/docker_intro:v0.1a
$ docker image rm docker_intro:v0.1a
If we need this particular image again, we can pull it back from the repository:
docker image pull mmalenta/docker_intro:v0.1a
v0.1a: Pulling from mmalenta/docker_intro
Digest: sha256:141d4a94a045f5b42bf6a6c74d9d868beab0ab5c5352de132f2a6068e1bd8d16
Status: Downloaded newer image for mmalenta/docker_intro:v0.1a
docker.io/mmalenta/docker_intro:v0.1a
The output tells us that repository has a newer version of the image than the one found on the host (host doesn't really have one at all at the moment) and that it was successfully downloaded. Depending on which images you have on the host machine, Docker may download a whole new image, just few new layers or nothing at all.
-
Private Docker registry
This is an optional section, which contains some more complex information than the rest of the workshop. You are therefore not required to run any code that is shown here. This information is provided to make you aware of alternatives to the online repositories in case they no longer meet your needs. If you are interested in learning more about private registries, please refer to the satellite course.
Instead of storing your images with an external provider that you have no control over, you may decide that setting up a private registry is a more suitable way of keeping your images safe.
We will run a very basic registry on our host machine listening on port 5050 (use any other host port if this one is already in use):
$ docker container run -d -p 5050:5000 --name registry registry:2
$ docker container ls
CONTAINER ID   IMAGE                          COMMAND                  CREATED         STATUS         PORTS                    NAMES
0824f476861e   registry:2                     "/entrypoint.sh /etc…"   5 seconds ago   Up 4 seconds   0.0.0.0:5050->5000/tcp   registry
We can see that the registry is listening on address
0.0.0.0and port5050. We can now save our image in that registry in a similar fashion to when we were using Docker Hub.First we tag the image:
$ docker image tag docker_intro:v0.1a localhost:5050/docker_intro:v0.1aIn this case, instead of simply specifying our Docker Hub username, we need to provide DNS or IP and port of our private registry. Here we use a local registry, but there is nothing stopping you from having your private registry on the other side of the globe. Then we push exactly like before:
$ docker image push localhost:5050/docker_intro:v0.1a
6f15325cc380: Pushed
1e77dd81f9fa: Pushed
030309cad0ba: Pushed
v0.1a: digest: sha256:141d4a94a045f5b42bf6a6c74d9d868beab0ab5c5352de132f2a6068e1bd8d16 size: 943
The image is now stored in our private repository.
Here we used a very simple setup, with all the default parameters and run the repository on our machines. If you decide that private repository is the most suitable solution for you and your team, you can configure it accordingly and make it accessible through the Internet if necessary.
Exercise (3 minutes): what are pros and cons of both hosted and private repositories? How can you make sure that you and the users of your software can access it quickly and easily?

Free resources:
- Official Docker documentation
- Official Docker YouTube channel
- Explore Docker Hub
- Explore NGC Catalog
Paid resources:
I do not receive any financial incentives from publishers, authors or online platforms for referring students to the resources listed below. These simply represent my subjective list of resources I have found useful in the past.