Exploiting temporal information for 3D pose estimation
This code is released for the paper "Exploiting temporal information for 3D human pose estimation", accepted for ECCV 2018. https://arxiv.org/pdf/1711.08585.pdf
Watch our demos:
- https://www.youtube.com/watch?v=Cc2ficlalXE&feature=youtu.be
- https://www.youtube.com/watch?v=jbJNb0aoLYY&feature=youtu.be
- https://www.youtube.com/watch?v=MVeaen5vGxQ
Please cite our work if you use this code.
- h5py
- tensorflow 1.0 or later
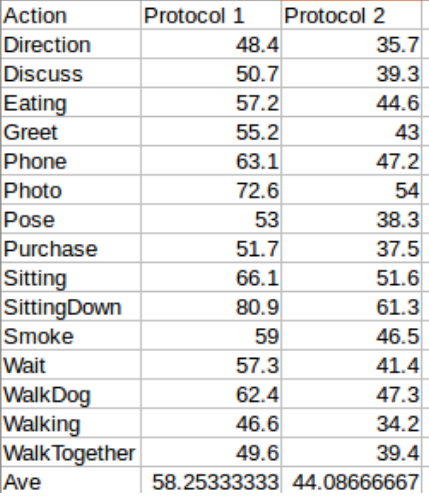
Due to a bug in the evaluation section of our code (see issue #3), our results should be approximately 58.5 mm for protocol 1 and 44 mm for protocol 2 (not 51.9mm and 42.0mm as reported in our paper). We sincerely apologize for our mistake in the code and thank Lin Jiahao ([email protected]) for letting us know of the bug. Below is the result on Human3.6M:
To train from the scratch use the command:
python temporal_3d.py --use_sh --camera_frame --dropout 0.5
Use the flag --use_sh if you want to use the stacked_hourglass detections. Otherwise omit the flag (for ground truth 2D).
You can download a pre-trained model for testing, visualization and fine-tuning from: https://drive.google.com/file/d/1j2jpwDpfj5NNx8n1DVqCIAESNTDZ2BDf/view?usp=sharing
Download and untar the file. Copy the contents in Pose_3D/temporal_3d_release/trained_model/All/dropout_0.5/epochs_100/adam/lr_1e-05/linear_size1024/batch_size_32/use_stacked_hourglass/seqlen_5/
To evaluate the pre-trained model call:
python temporal_3d.py --use_sh --camera_frame --dropout 0.5 --load 1798202 --evaluate
In this case, 1798202 passed to the load flag is the global iteration number. Change it if you want to test any of your own trained models.
Do not use the evaluate flag if you want to fine-tune an existing model.
python temporal_3d.py --use_sh --camera_frame --dropout 0.5 --load 1798202
We provided a sample set of frames and 2D detections (from stacked-hourglass detector) in the directory Pose_3D/temporal_3d_release/fed/.
If you want to use other detection and images, set the flags --data_2d_path abd --imag_dir appropriately
To create a movie run the command:
python create_movie.py --use_sh --camera_frame
This will produce a set of visualizations this:

