The robot uses a simple sensor to avoid obstacles. This kind of system is used in Mars rovers, autonomous cars and the bots built for all kinds of robotics competitions.
Moreover, the following parts were used in its mechanical design:
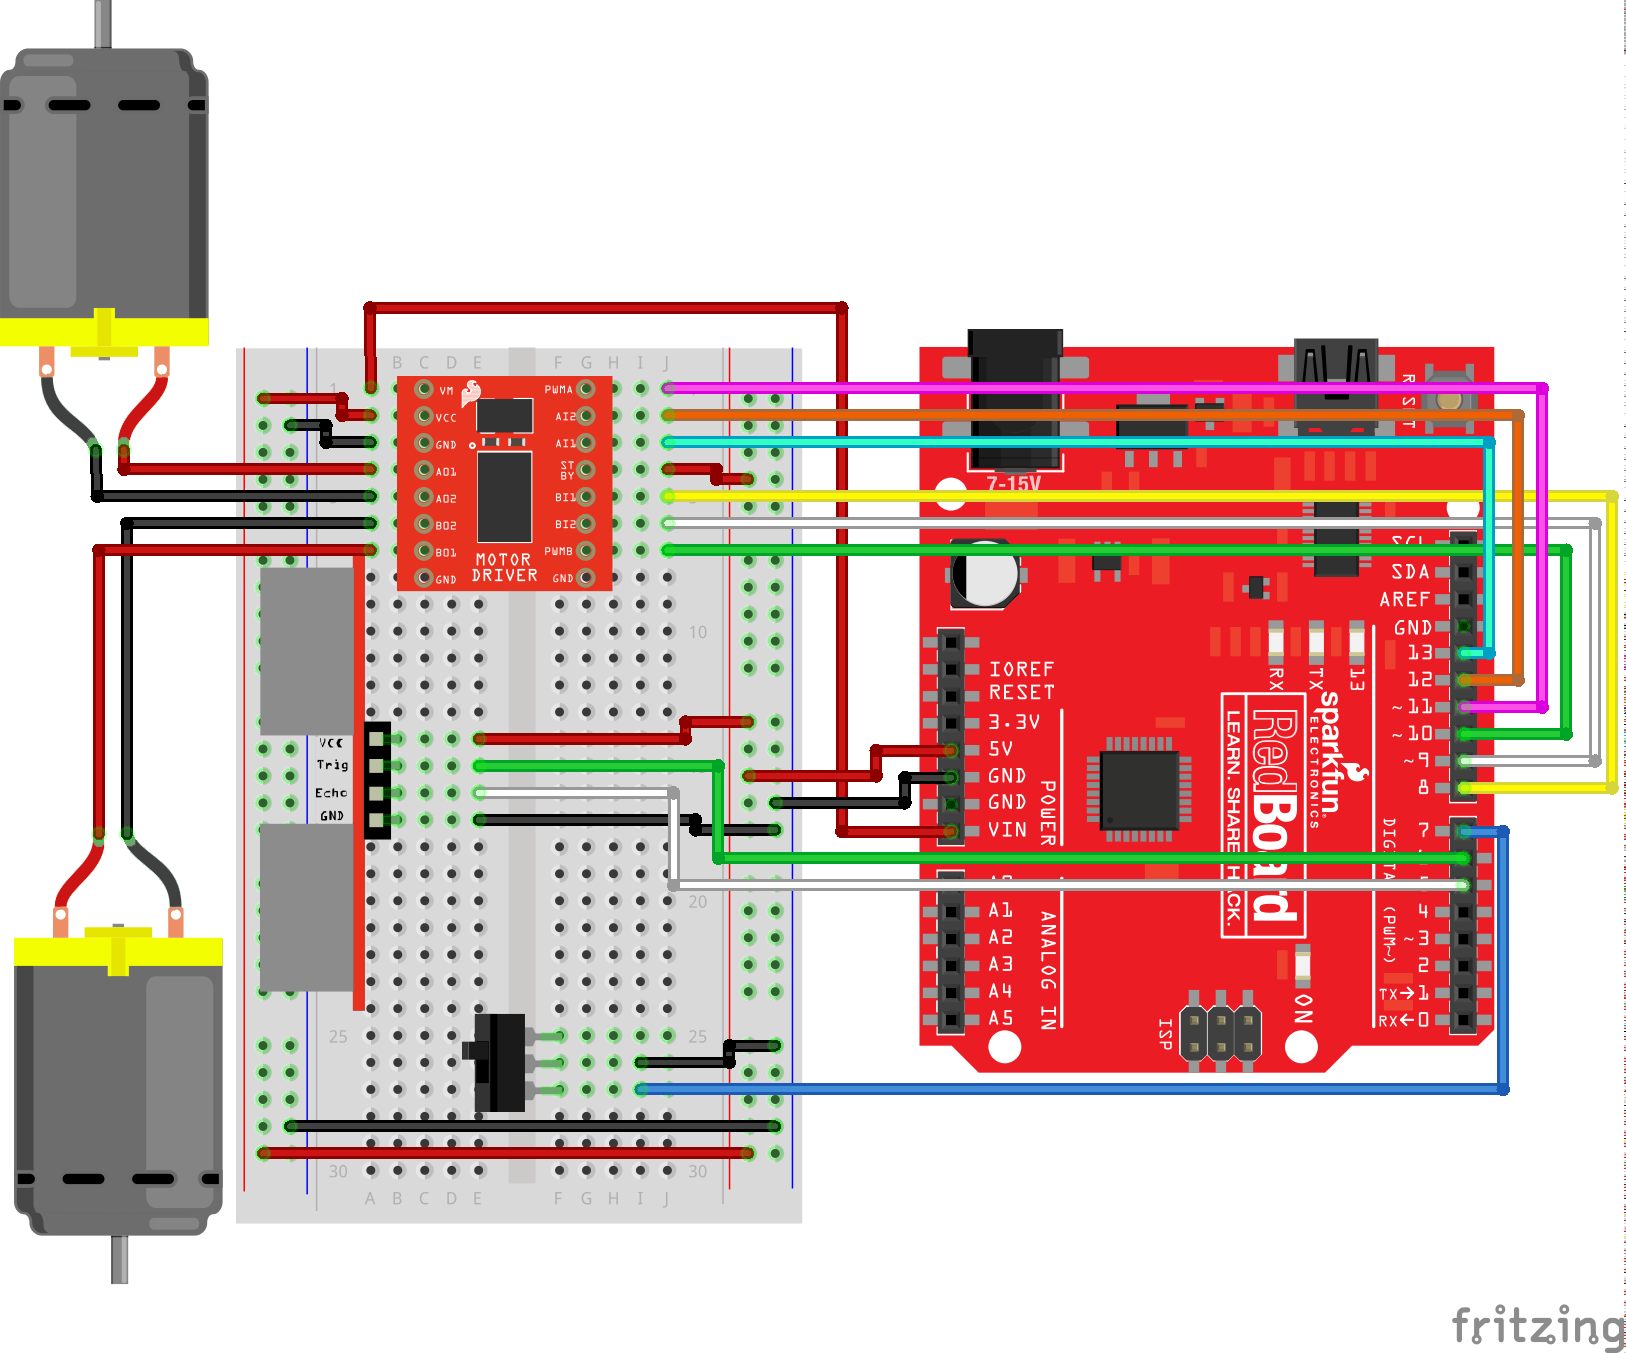
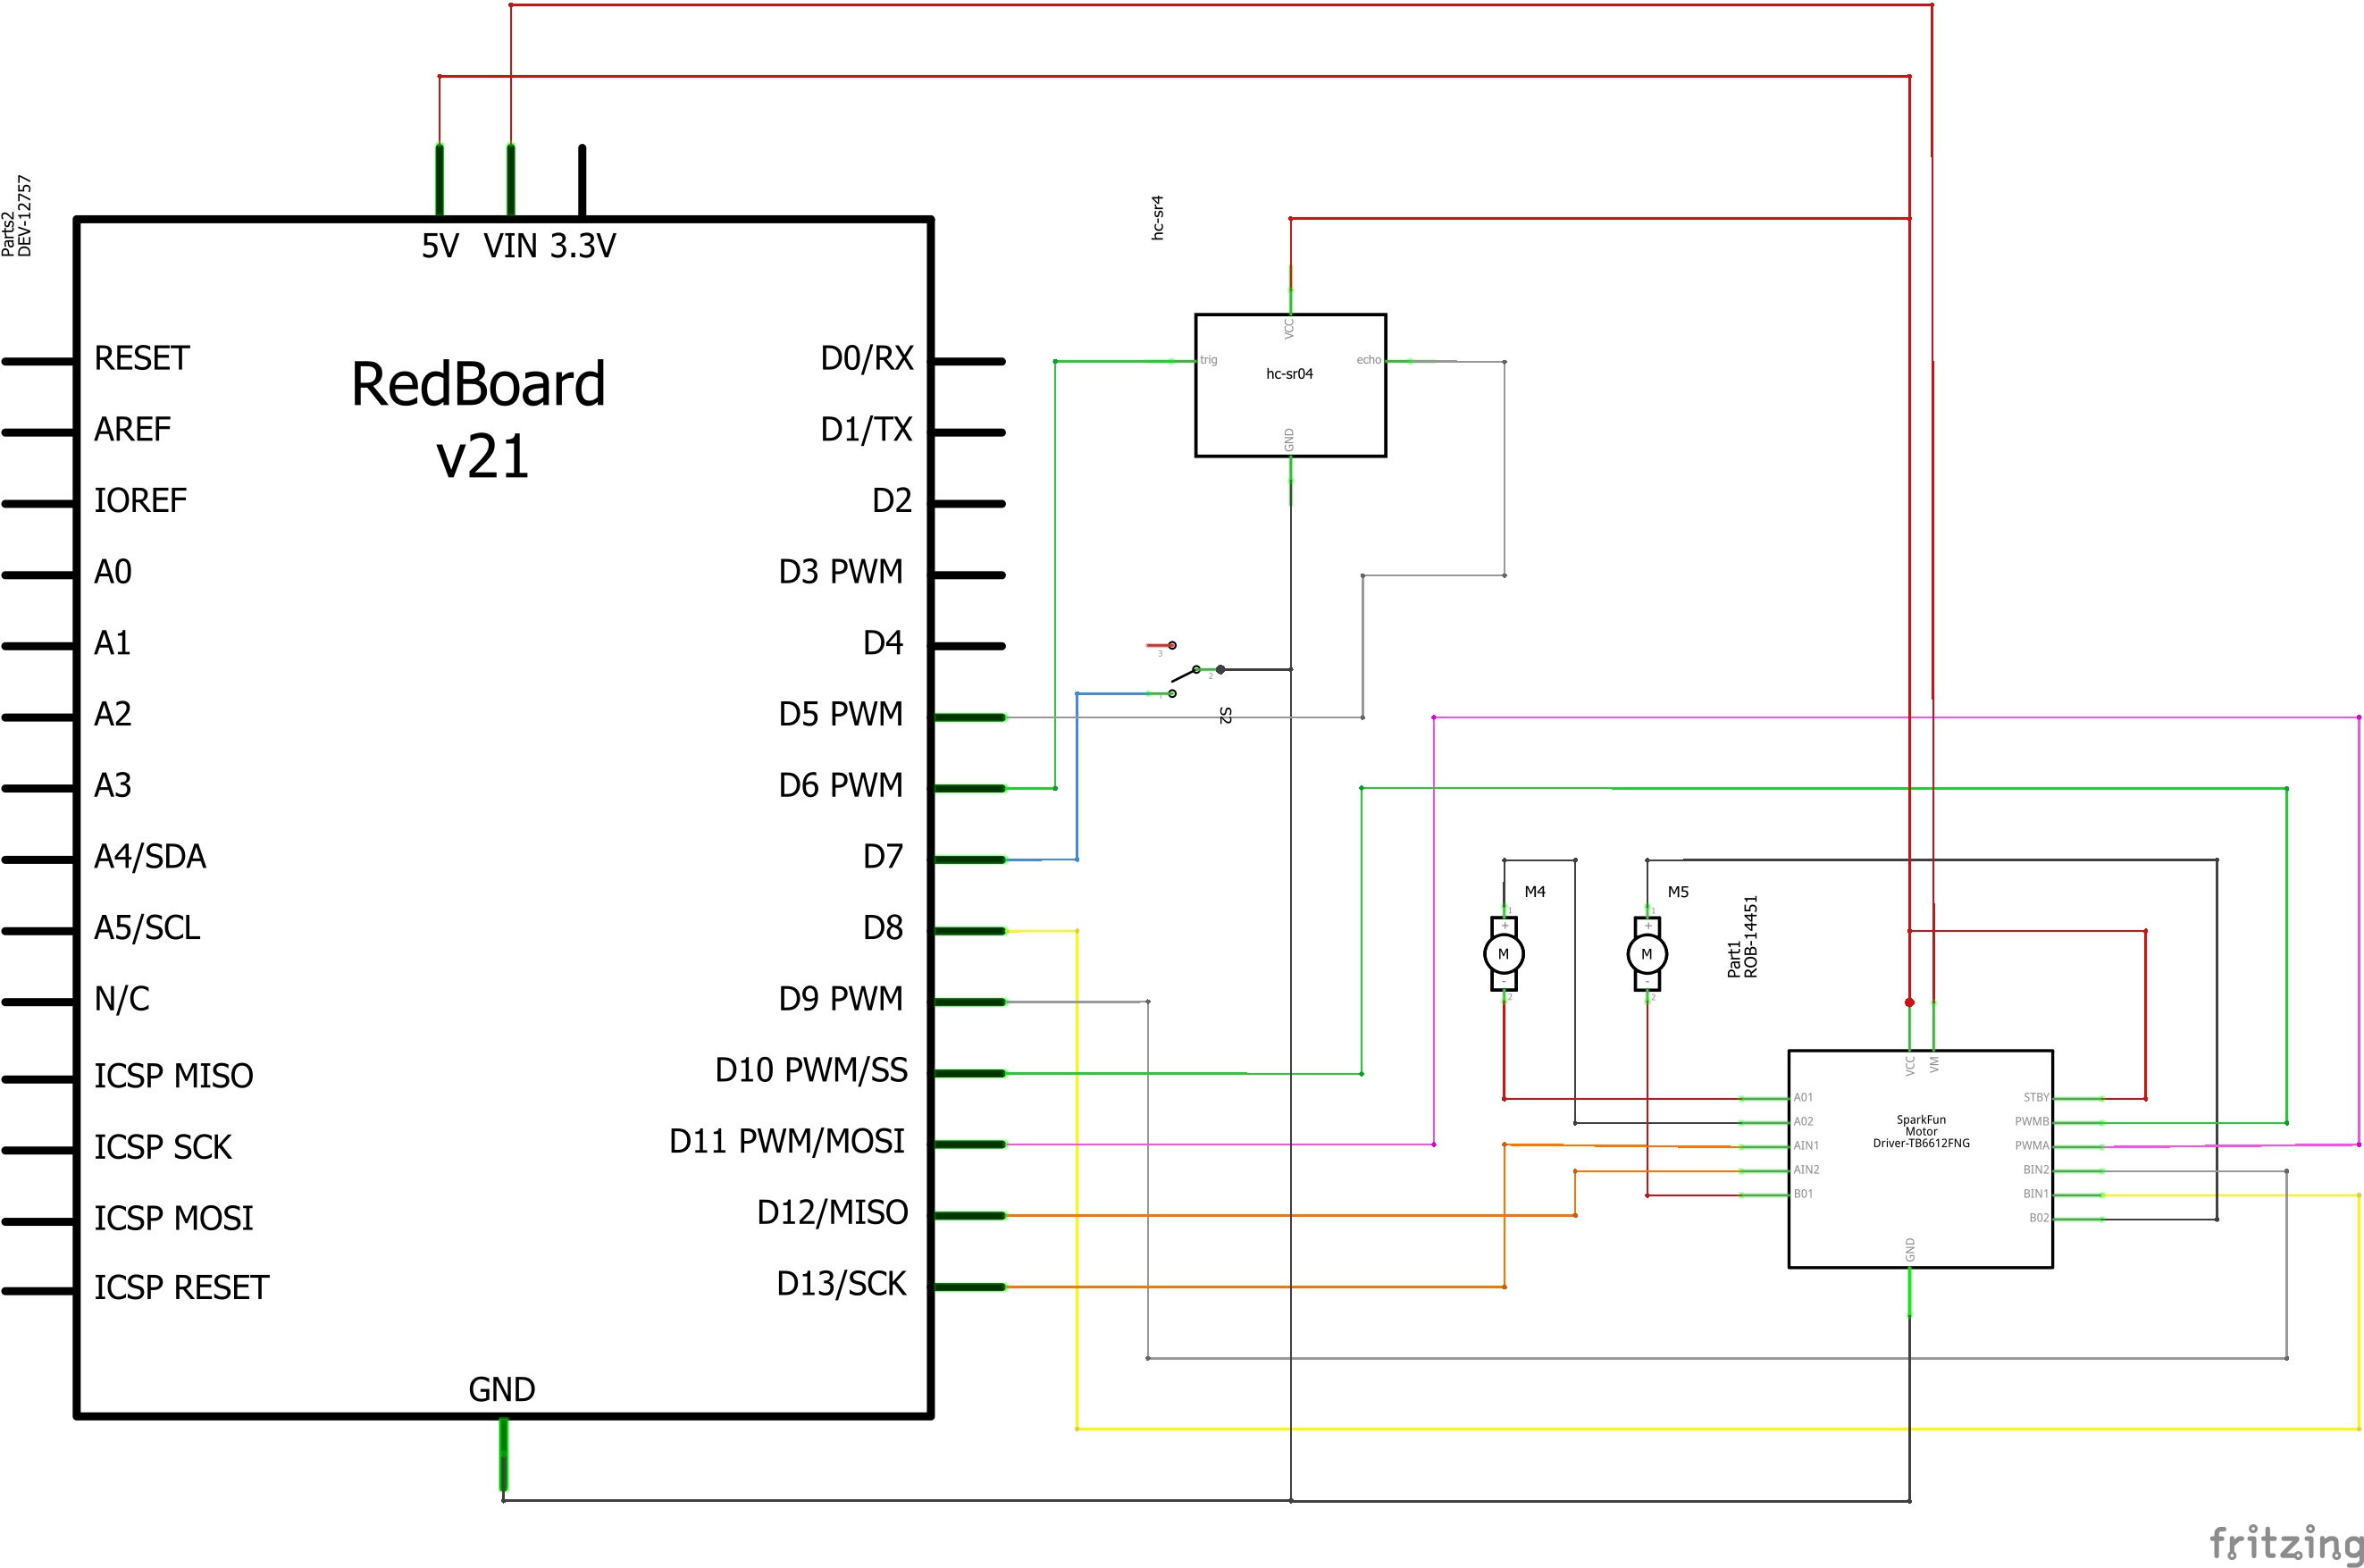
1) TB6612FNG motor driver.
2) Switch.
3) 20 jumper wires.
4) 2 gear motors(DC).
5) HC-SR04 ultrasonic distance sensor.
6) Dual lock tape.
7) Binder clip.
8) 2 wheels.
9) 4 AA batteries.
10) SparkFun RedBoard micro-controller.
There are three steps involved. First, you get motors and sensors running using Arduino drivers. Then you develop basic building blocks so that you can move the robot and read its sensors. Finally, use that sensor data to develop smart, complex software routines to create the robot's desired behavior(avoid obstacles in its path).
In addition to, the robot will sit still when the switch is turned off. When the switch is turned on, the robot will drive forward until it senses an object.
The word 'robotics' can mean a lot of things. For some people, it is anything that moves by itself; kinetic art is robotics. To other people, robotics means something that is mobile or something that can move itself from place to place. There is actually a field called mobile robotics; automatic vacuum cleaners, such as a Roomba or a Neato, fall into this category. To me robotics falls somewhere in between kinetic art and mobile robotics.
A robot is technology that applies logic to perform a task in an automated manner. This is a fairly broad definition, but robotics is a fairly broad field. It can cover everything from a child’s toy to the automatic parallel parking capabilities in some automobiles.
© Jeff Cicolani 2018 1 J. Cicolani, Beginning Robotics with Raspberry Pi and Arduino, https://doi.org/10.1007/978-1-4842-3462-4_1
pinMode(pin, mode)Configures the specified pin to behave either as an input or an output. See the Digital Pins page for details on the functionality of the pins.
As of Arduino 1.0.1, it is possible to enable the internal pullup resistors with the mode INPUT_PULLUP. Additionally, the INPUT mode explicitly disables the internal pullups.
digitalRead(pin)Reads the value from a specified digital pin, either HIGH or LOW.
  void setup() {
  Serial.begin(9600);
  pinMode(buttonPin, INPUT);
}
The setup() function is called when a sketch starts. Use it to initialize variables, pin modes, start using libraries, etc. The setup() function will only run once, after each powerup or reset of the Arduino board.
 void loop() {
  if (digitalRead(buttonPin) == HIGH) {
    Serial.write('H');
  }
  else {
    Serial.write('L');
  }

  delay(1000);
}
After creating a setup() function, which initializes and sets the initial values, the loop() function does precisely what its name suggests, and loops consecutively, allowing your program to change and respond. Use it to actively control the Arduino board.
 pulseIn(pin, value)
pulseIn(pin, value, timeout)
Reads a pulse (either HIGH or LOW) on a pin. For example, if value is HIGH, pulseIn() waits for the pin to go from LOW to HIGH, starts timing, then waits for the pin to go LOW and stops timing. Returns the length of the pulse in microseconds or gives up and returns 0 if no complete pulse was received within the timeout.
The timing of this function has been determined empirically and will probably show errors in longer pulses. Works on pulses from 10 microseconds to 3 minutes in length.
Install my-project with npm
  npm install my-project
  cd my-project
HVAC systems in offices and schools interfere with the performance of the ultrasonic distance sensor. The airflow from these ducts can interfere with the waves sent from the sensor, creating noise and resulting in bad readings.