This is an example README file demonstrating a suggested structure for README files of software projects on GitHub. You can copy this README.md file into your project repository and edit the text as needed.

- Introduction
- Installation
- Quick start
- Usage
- Known issues and limitations
- Getting help
- Contributing
- License
- Acknowledgments
A common convention in software development is to place a file named README at the top level of a project's source code repository. The file is used to provide basic documentation about the project. The file you are reading now is intended as a self-documenting template for README files, as well an illustration of what the file can be expected to look like. Its structure is based on many other people's examples and recommendations for README files, as well as the author's own experiences of creating open-source projects and repositories over three decades. It is written in Markdown format, but could easily be converted to other formats.
For a real software project, the Introduction section – which you are presently reading – should summarize the motivations for creating the software, the need(s) addressed by the software, what the software does, and optionally, links to resources that can help orient readers. Ideally, this section should be short and use plain language. Keep in mind that not all readers will be familiar with the topic area.
Begin this Installation section by describing prerequisites needed to use the software. Examples include required hardware, operating systems, software frameworks, compilers, and/or interpreters.
Next, provide step-by-step instructions for installing your software, preferably with examples of commands that can be copy-pasted by readers into their computing environments. If your software can be installed using common installers or package managers (e.g., pip, npm, brew, apt, etc.), illustrate how it can be done using code blocks in the Markdown file so that it's clear to readers. For example,
pip install yoursoftwareFor installation methods that don't involve command lines, providing screenshots along with written instructions can help readers figure out what they need to do.
Subsections may be appropriate within this Installation section for different operating systems or particularly complicated installations. Keep in mind, though, that the more complicated the installation process is, the more likely that users will encounter difficulties and give up.
Nobody wants to read long explanations about how to use your software before they can try it, especially while they are still deciding whether to try it. A Quick start section right after the installation instructions can help readers figure out what's involved.
Explain the minimal configuration (if any) required to use the software, then provide the simplest example or command that demonstrates actual functionality implemented by your software. If your software is command-line oriented, provide examples (again in code blocks in the Markdown file).
yoursoftware argument1 argument2If your software is not command-line oriented, providing static screenshots annotated with arrows or other guidance is a good approach to showing readers how to use the software. The temptation to use embedded videos or animated GIFs here may be strong, but it is better to resist it, or at least to use them only as a way to augment and not replace written explanations. It takes people longer to watch a video than to skim textual descriptions on a page, which can annoy potential users; moreover, some users turn off video players in their browsers and may not even see the embedded video content.
The Usage section would explain in more detail how to run the software, what kind of output or behavior to expect, and so on. It would cover basic operations as well as more advanced uses.
Some of the information in this section will repeat what is in the Quick start section. This repetition is unavoidable, but also, not entirely undesirable: the more detailed explanations in this Usage section can help provide more context as well as clarify possible ambiguities that may exist in the more concise Quick start section.
If your software is complex and has many features, it may be better to create a dedicated website for your documentation (e.g., in GitHub Pages, Read the Docs, or similar) rather than to cram everything into a single linear README file. In that case, the Usage section can be shortened to just a sentence or two pointing people to your documentation site.
When learning how to use anything but the simplest software, new users may appreciate beginning with basic features and modes of operation. If your software has a help system of some kind (e.g., in the form of a command-line flag such as --help, or a menu item in a GUI), explaining it is an excellent starting point for this section.
The basic approach for using this README file is as follows:
- Copy the README source file to your repository
- Delete the body text but keep the section headings
- Replace the title heading (the first line of the file) with the name of your software
- Save the resulting skeleton file in your version control system
- Continue by writing your real README content in the file
The first paragraph in the README file (under the title at the top) should summarize your software in a concise fashion, preferably using no more than one or two sentences as illustrated by the circled text in the figure below.
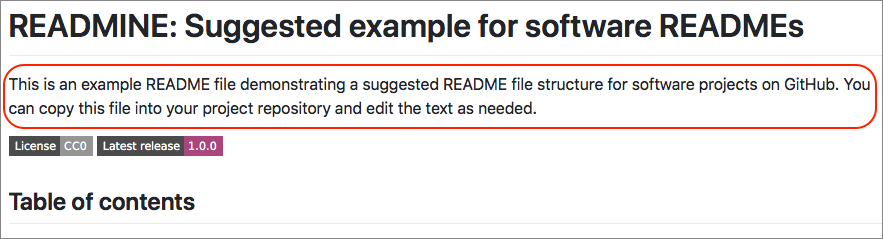
Figure: Screenshot showing elements of the top portion of this file.
The space under the first paragraph and before the Table of Contents is a good location for optional badges, which are small visual tokens commonly used on GitHub repositories to communicate project status, dependencies, versions, DOIs, and other information. (Two example badges are shown in the figure above, under the circled text.) The particular badges and colors you use depend on your project and personal tastes.
Some projects need to communicate additional information to users and can benefit from additional sections in the README file. It's difficult to give specific instructions here – a lot depends on your software, your intended audience, etc. Use your judgment and ask for feedback from users or colleagues to help figure out what else is worth explaining.
In this section, summarize any notable issues and/or limitations of your software. If none are known yet, this section can be omitted (and don't forget to remove the corresponding entry in the Table of Contents too); alternatively, you can leave this section in place and write something along the lines of "none are known at this time".
Inform readers how they can contact you, or at least how they can report problems they may encounter. This could take the form of a request to use the issue tracker on your repository. Some projects have associated discussion forums or mailing lists, and this section is a good place to mention those.
If your project accepts open-source contributions, this is where you can welcome contributions and explain to readers how they can go about it. Mention the CONTRIBUTING.md file in your repository, if you have one.
This section should state any copyright asserted on the project materials as well as the terms of use for the software, files and other materials found in the project repository.
This README file is itself distributed under the terms of the Creative Commons 1.0 Universal license (CC0). The license applies to this file and other files in the GitHub repository hosting this file. This does not mean that you, as a user of this README file in your software project, must also use CC0 license! You may use whatever license for your work you prefer, or whatever you are required to use by your employer or sponsor.
This final section is where you should acknowledge funding and/or institutional support, prior work that influenced or inspired your project, resources that you used (such as other people's software), important contributions from other people, and anything else that deserves mention. After all, nothing is truly done in isolation; everything is built on top of something, and we all owe debts to other projects and people who helped us, supported us, and influenced us.
For example, in the process of developing this file, I used not only my own ideas: I read many (sometimes contradictory) recommendations for README files, examined real READMEs in actual use, and tried to distill the best ideas into the result you see here. Sources included the following:
- Readme Driven Development
- How to Write a Good README
- How To Write A Great README
- How to Write an Awesome Readme
- Readme Best Practices
- Art of README
- Making a useful README file for research projects
- Tips for Making your GitHub Profile Page Accessible
- Make a README
- ReadMe.so
- common readme
- Standard Readme
- CFPB Open Source Project Template Instructions
- README-Template.md
- open-source-template
- Feedmereadmes: A README Help Exchange
- Awesome README List
- Top ten reasons why I won't use your open source project