- Compatibility
- Set up your environment
- Deploy the Application
- Configure Adaptive Policy Sync
- Backup/Restore
- Troubleshooting
- This tool has been tested with the following versions of Cisco ISE:
- ISE 2.4 - Patch 13
- Caveat: pxGrid does not push SGACL updates, so these can only be captured via manual sync. (CSCvu35506)
- ISE 2.6 - Patch 7
- Caveat: pxGrid does not push SGACL updates, so these can only be captured via manual sync. (CSCvu35506)
- ISE 2.7 - Patch 2
- ISE 3.0 - Release
- ISE 2.4 - Patch 13
- See this article for Cisco Meraki requirements.
- Current Unit Tests Used before each Commit:
- Current Code Coverage:
- Unit Test Summary:
    - test_ise_dashboard_unable_to_sync_first   With ISE set to Authoritative Source, Dashboard should be unable to sync first
    - test_ise_iseserver_can_sync               With ISE set to Authoritative Source, ISE should be able to sync first
    - test_ise_dashboard_can_sync_next          With ISE set to Authoritative Source, Dashboard should be able to sync after ISE
    - test_dashboard_ise_unable_to_sync_first   With Meraki Dashboard set to Authoritative Source, ISE should be unable to sync first
    - test_dashboard_can_sync                   With Meraki Dashboard set to Authoritative Source, Dashboard should be able to sync first
    - test_dashboard_ise_can_sync_next          With Meraki Dashboard set to Authoritative Source, ISE should be able to sync after Dashboard
    - test_sgts_in_database                     Expected SGTs must have Dashboard and ISE IDs in the DB; Default SGTs must have ISE IDs in the DB
    - test_sgacls_in_database                   Expected SGACLs must have ISE IDs in the DB; Default SGACLs must have ISE IDs in the DB
    - test_policies_in_database                 Expected Policies must have ISE IDs in the DB; Default Policies must have ISE IDs in the DB
    - test_ise_sync_success                     Perform a full sync and ensure SGTs, SGACLs and Policies have synced correctly
    - test_update_element_success               Perform a full sync and then update each side for SGT, SGACL and Policy - change should replicate correctly
    - test_update_element_revert                Perform a full sync and then update wrong side for SGT, SGACL and Policy - change should get reverted
    - test_delete_element_success               Perform a full sync and then delete SGT, SGACL and Policy from each side - delete should replicate correctly
    - test_delete_element_revert                Perform a full sync and then delete SGT, SGACL and Policy from each non-auth side - delete should get reverted
    - PXGridTests                               Configure environment and sync, set SGTs to sync, sync again. Perform updates to SGT/SGACL/EgressPolicy, verify changes propegate via pxGri.
    - APITests                                  Configure environment via API and sync, then set SGTs to sync via API. Verify changes replicate correctly. Test multiple Dashboard Orgs when ISE is auth source.
    - BrowserTests                              Configure environment via AdP Sync Setup process and sync, then set SGTs to sync via UI. Verify changes replicate correctly.
- Enable API access in your Meraki dashboard organization and obtain an API key (instructions)
- Keep your API key safe and secure, as it is similar to a password for your dashboard. You will supply this API key to Adaptive Policy Sync later.
- If you plan to integrate with pxGrid for ISE Push-Notifications, you will need to create a new pxGrid Certificate for your application.
- Navigate to ISE Admin GUI via any web browser and login
- Navigate to Administration -> pxGrid Services
- Click on the Certificates tab
- Fill in the form as follows:
- I want to: Generate a single certificate (without a certificate signing request)
- Common Name (CN): {fill in any name - this is the name your client will be listed with the pxGrid Clients list}
- Description: {fill in any description}
- Certificate Download Format: Certificate in Privacy Enhanced Electronic Mail (PEM) format, key in PKCS8 PEM format (including certificate chain)
- Certificate Password: {fill in a password}
- Confirm Password: {fill in the same password as above}
- Click the 'Create' button. A zip file should download to your machine
- You can configure ISE to automatically accept certificate-based connections, or you can manually approve your client later. To automatically accept certificate-based connections, perform the following:
- Navigate to ISE Admin GUI via any web browser and login
- Navigate to Administration -> pxGrid Services
- Click on the Settings tab
- Check the box 'Automatically approve new certificate-based accounts' and then click 'Save'
mkdir $HOME/adaptivepolicy
docker pull joshand/adaptive-policy-ise-sync:latest
docker run -it -p 8000:8020 \
     --restart unless-stopped \
     --name=Adaptive-Policy-ISE-Sync \
     -e DJANGO_SUPERUSER_USERNAME=admin \
     -e DJANGO_SUPERUSER_PASSWORD=password \
     -e [email protected] \
     -e DJANGO_SUPERUSER_APIKEY=1234567890abcdefghijklmnopqrstuvwxyz1234 \
     -v $HOME/adaptivepolicy:/opt/app/adaptive_policy_sync/config \
     joshand/adaptive-policy-ise-sync:latest
git clone https://github.com/meraki/adaptive-policy-ise-sync.git
cd adaptive-policy-ise-sync/
virtualenv venv --python=python3
source venv/bin/activate
pip install -r requirements.txt
python manage.py makemigrations
python manage.py migrate
python manage.py createsuperuser
Username (leave blank to use 'username'): admin
Email address: [email protected]
Password:
Password (again):
Superuser created successfully.

python manage.py drf_create_token admin
Generated token 1234567890abcdefghijklmnopqrstuvwxyz1234 for user admin

python manage.py runscript tasks &
python manage.py runserver 8000
-
Access your Adaptive Policy Sync Instance using the port that you've configured (http:https://127.0.0.1:8000 if you used the examples above)
-
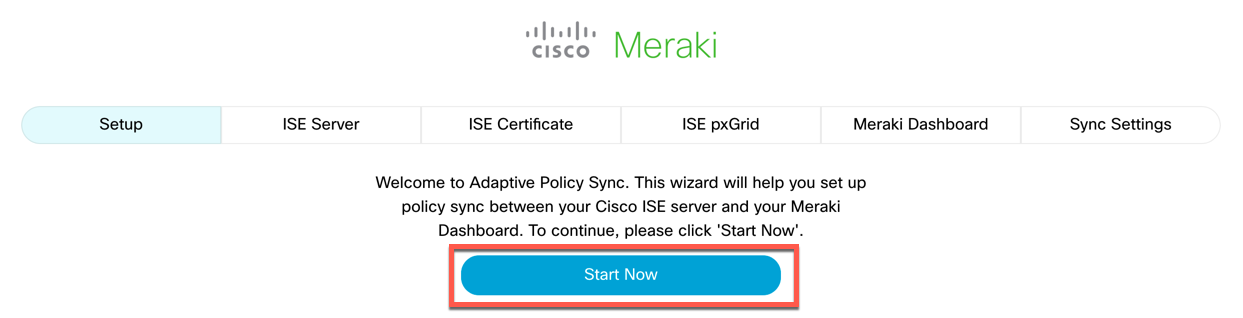
Click the "Start Now" button to begin the configuration process.
-
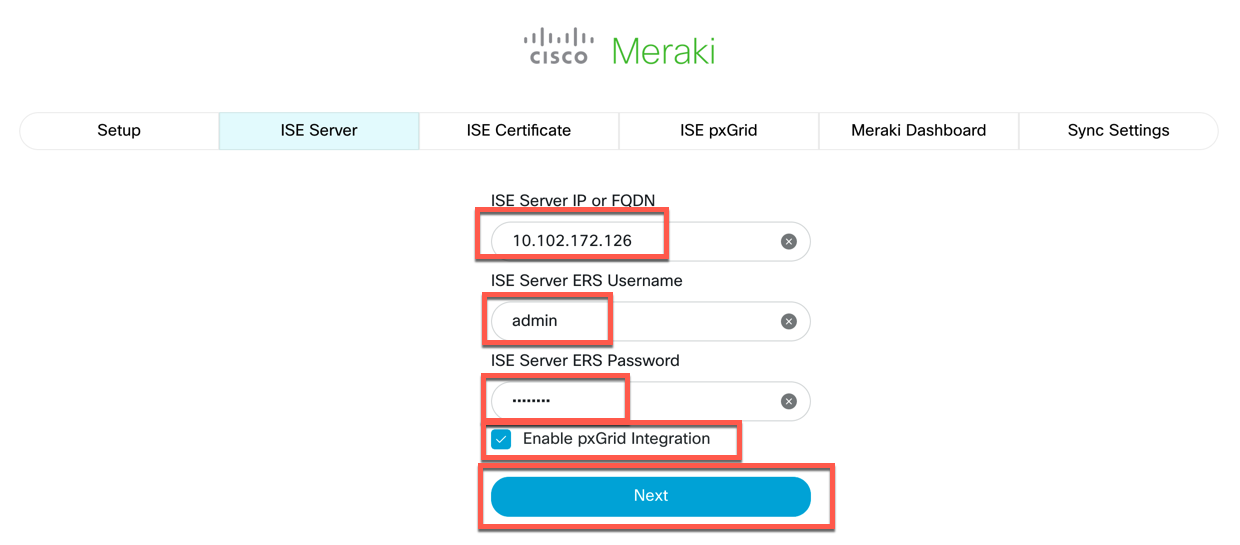
Enter the IP Address or Fully Qualified Domain Name of your ISE Server, the username and password of the user that you created for ERS access via the instructions above. If you will be utilizing pxGrid integration, check the box "Enable pxGrid Integration". Click Next.
-
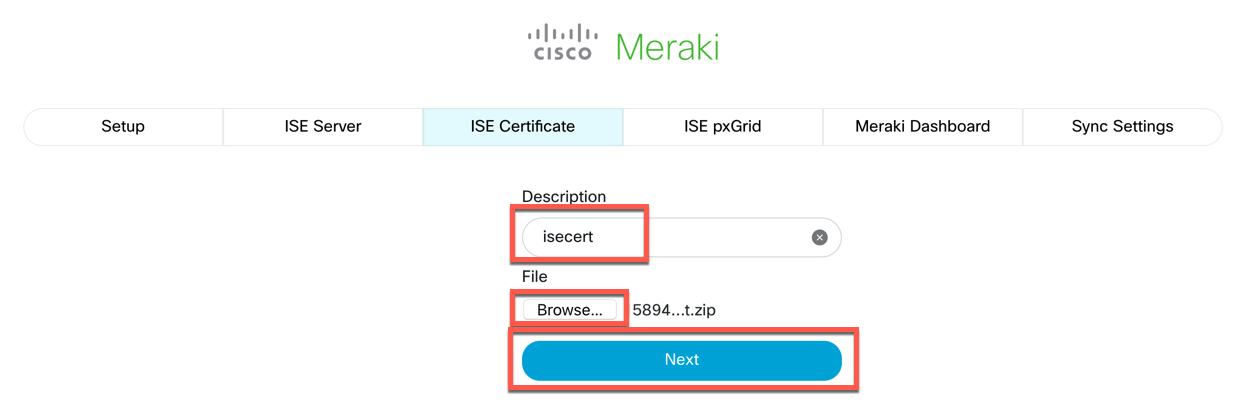
If you chose to configure pxGrid Integration, you will need to upload the Certificate that you generated in ISE for your client. Give it a description, then click the Browse... button.
-
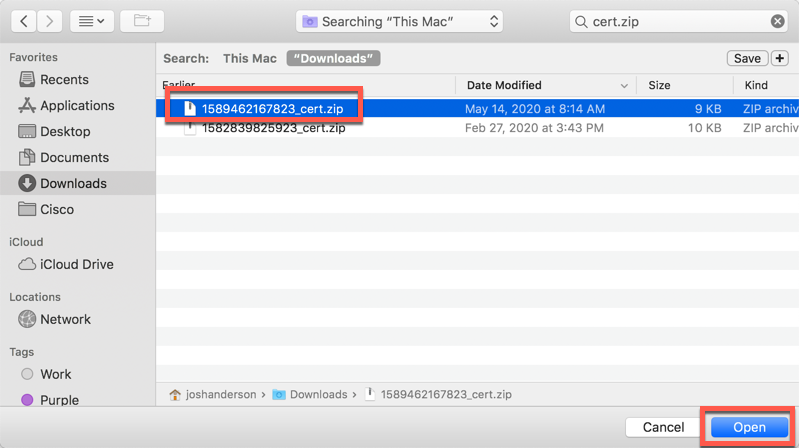
Navigate to the location that you downloaded the certificate ZIP file to, select the file, then click Open. When you return to the previous screen, click the Next button.
-
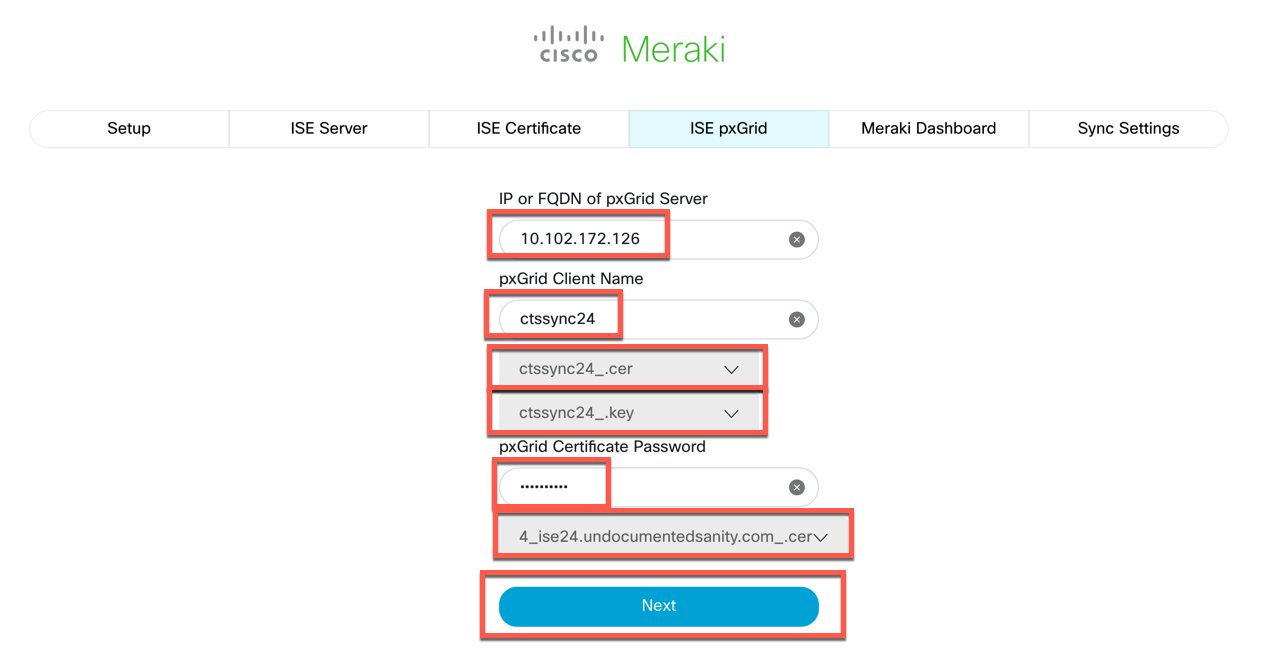
Enter the IP Address or Fully Qualified Domain Name of your ISE Server (that has pxGrid enabled), enter the Client Name that you configured in ISE. Then select the .cer and .key files cooresponding to that client. Enter the password that you set for your client. Then, choose the .cer file for the ISE node that you specified as the pxGrid server. Click Next.
-
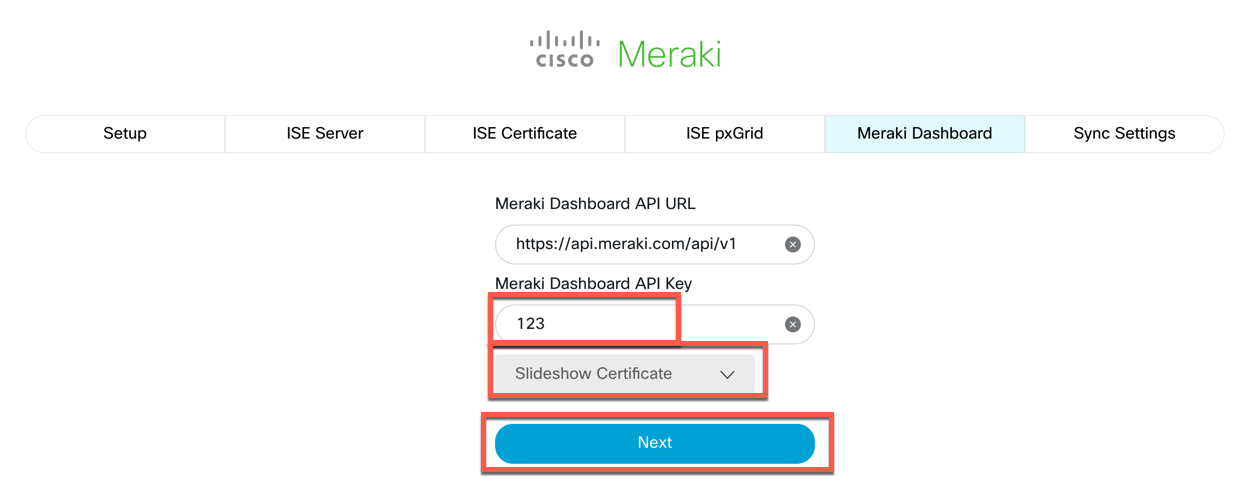
Generally, you will not need to change the Meraki Dashboard API URL. Enter your Dashboard API Key, then Tab to the next field or click somewhere in the open window. Adaptive Policy Sync will generate a list of Organiations that your API key has access to and display them in the dropdown list. Select the Organization that you will be using for Adaptive Policy. Then, click Next.
-
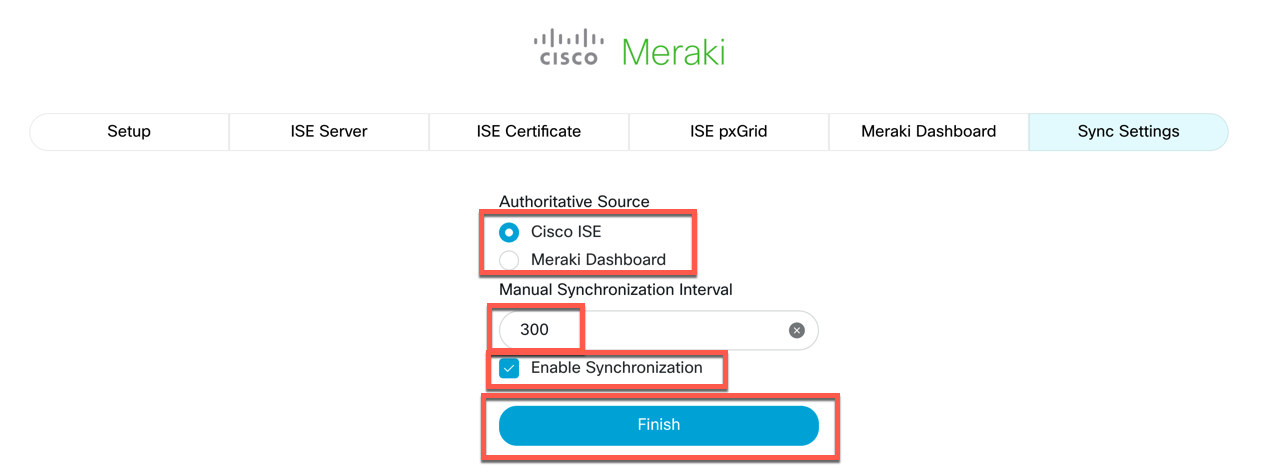
Now, choose the authoritative source for Policy. This will be used to determine which source to use if there are configuration conflicts, and it will control which policy source will be used if policy objects are deleted. Set the Manual Synchronization Interval, ensure that the "Enable Synchronization" box is checked, then click Finish.
-
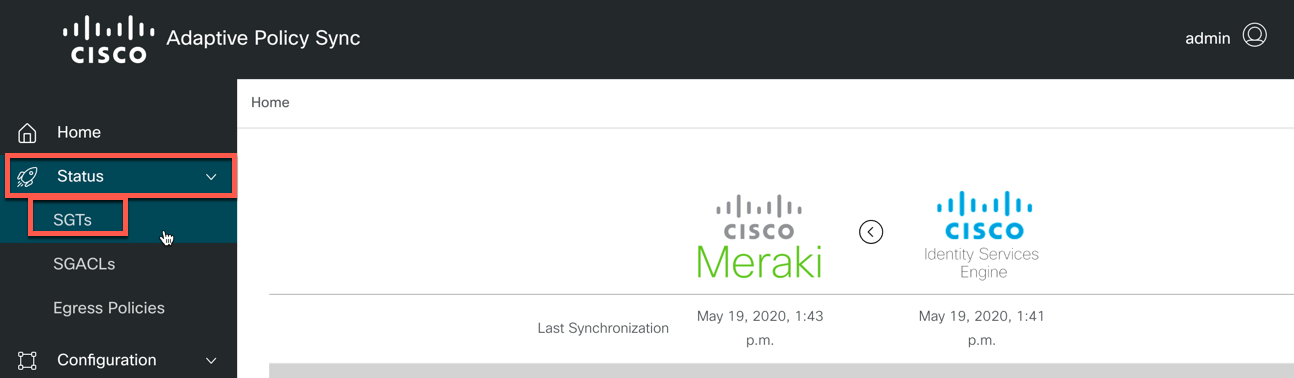
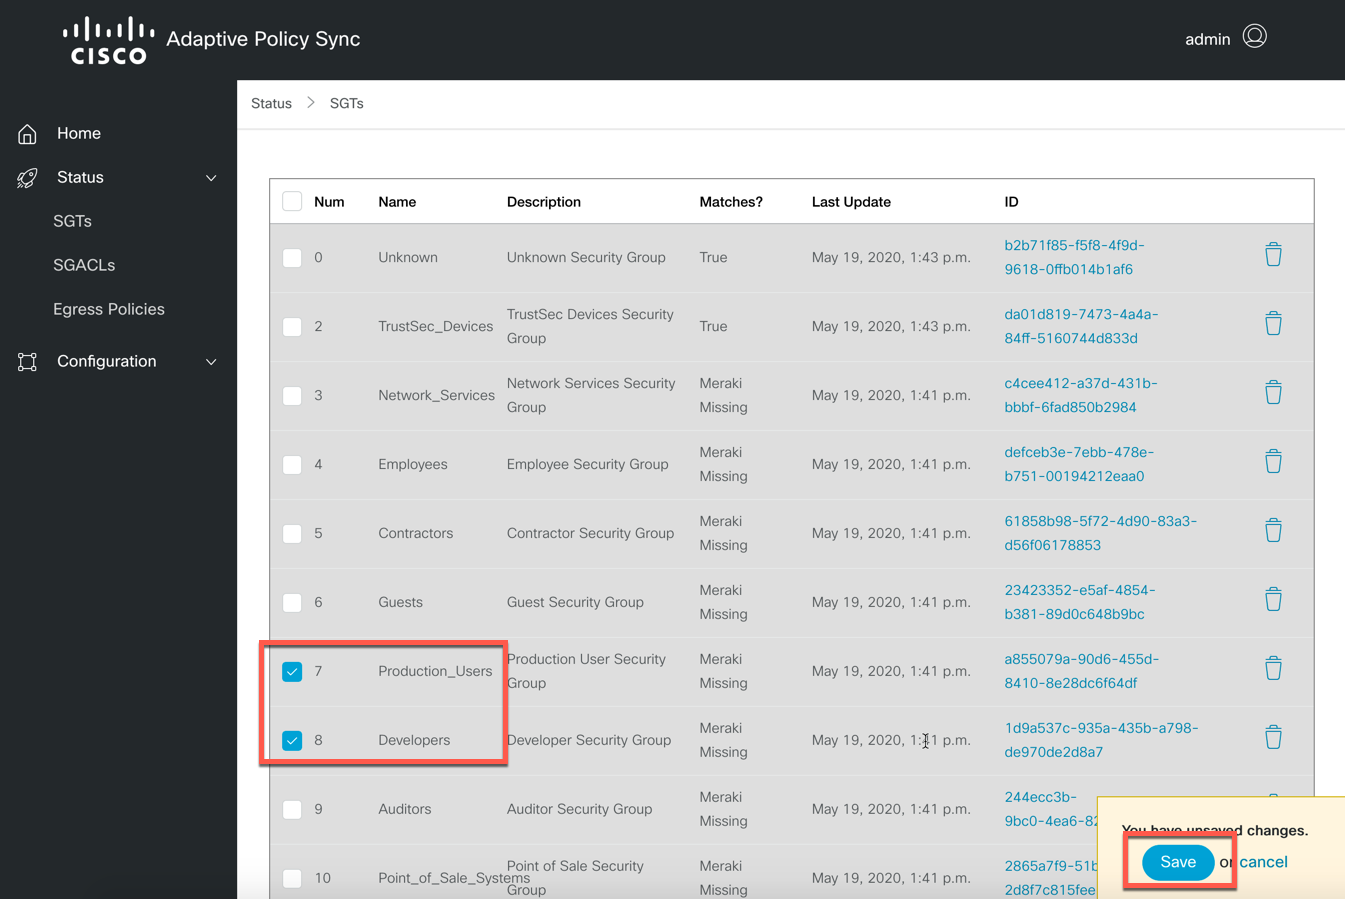
You will be taken to the Adaptive Policy Sync Landing page. In the left navigation pane, navigate to Status -> SGTs.
-
Select the checkbox for all of the SGTs you wish to sync. When complete, click the "Save" button.


- Above, you generated a new API token. You can use it with the API by passing it as an Authorization header as a Bearer token (Authorization: Bearer 1234567890abcdefghijklmnopqrstuvwxyz1234).
- Add your Dashboard Organization to Adaptive Policy Sync using the following API call. You will need to provide your Organization ID that you would like to connect to Adapative Policy sync.
curl -L -H "Authorization: Bearer 1234567890abcdefghijklmnopqrstuvwxyz1234" -H 'Content-Type: application/json' -X POST --data-binary '{"orgid": "1234567890"}' http:https://127.0.0.1:8000/api/v0/organization/ {"id":"11112222-3333-4444-5555-666677778888","url":"http:https://127.0.0.1:8000/api/v0/organization/11112222-3333-4444-5555-666677778888/","orgid":"1234567890","force_rebuild":false,"skip_sync":false,"last_update":"2020-10-16T23:17:13.525068Z","last_sync":null} - Add your Meraki Dashboard Instance to Adaptive Policy Sync using the following API call. You will need to provide your Meraki Dashboard API key that you would like to connect to Adapative Policy sync.
curl -L -H "Authorization: Bearer 1234567890abcdefghijklmnopqrstuvwxyz1234" -H 'Content-Type: application/json' -X POST --data-binary '{"description": "My Meraki Dashboard","apikey": "1234567890abcdefghijklmnopqrstuvwxyz1234","webhook_enable": true,"webhook_ngrok": true,"webhook_url": "","organization":["11112222-3333-4444-5555-666677778888"]}' http:https://127.0.0.1:8000/api/v0/dashboard/
{"id":"11112222-3333-4444-5555-666677778888","url":"http:https://127.0.0.1:8000/api/v0/dashboard/11112222-3333-4444-5555-666677778888/","description":"My Meraki Dashboard","baseurl":"https://api.meraki.com/api/v1","apikey":"1234567890abcdefghijklmnopqrstuvwxyz1234","organization":["11112222-3333-4444-5555-666677778888"],"force_rebuild":false,"last_update":"2020-10-16T23:19:06.267462Z","last_sync":null,"webhook_enable":true,"webhook_ngrok":true,"webhook_url":""}
- Add your Cisco ISE Server to Adaptive Policy Sync using the following API call. You will need to provide your ISE ERS Admin username and password.
curl -L -H "Authorization: Bearer 1234567890abcdefghijklmnopqrstuvwxyz1234" -H 'Content-Type: application/json' -X POST --data-binary '{"description": "My ISE Server","ipaddress": "10.1.2.3","username": "ersadmin","password": "erspassword","pxgrid_enable": false'} http:https://127.0.0.1:8000/api/v0/iseserver/
{"id":"11112222-3333-4444-5555-666677778888","url":"http:https://127.0.0.1:8000/api/v0/iseserver/11112222-3333-4444-5555-666677778888/","description":"My ISE Server","ipaddress":"10.1.2.3","username":"ersadmin","password":"erspassword","force_rebuild":false,"skip_sync":false,"last_update":"2020-04-14T21:49:55.635413Z","last_sync":null,"pxgrid_enable":false,"pxgrid_ip":null,"pxgrid_cliname":null,"pxgrid_clicert":null,"pxgrid_clikey":null,"pxgrid_clipw":null,"pxgrid_isecert":null}
- Upload the certificate ZIP file to Adaptive Policy Sync using the following API call. The description field is arbritrary and can be set to anything you like.
curl -L -H "Authorization: Bearer 1234567890abcdefghijklmnopqrstuvwxyz1234" -F "description=isecerts" -F "file=@1582839825923_cert.zip" -X POST http:https://127.0.0.1:8000/api/v0/uploadzip/ - View a list of all files that were part of the ZIP file in order to get their ID numbers using the following API call. To make it easier to read, you will want to pipe the output through a JSON formatter such as 'jq', 'python -mjson.tool', 'json_pp', or 'jsonpretty' to name a few.
curl --silent -L -H "Authorization: Bearer 1234567890abcdefghijklmnopqrstuvwxyz1234" -X GET http:https://127.0.0.1:8000/api/v0/upload/ | jq{ "count": 6, "next": null, "previous": null, "results": [ { "id": "11112222-3333-4444-5555-666677778888", "url": "http:https://127.0.0.1:8000/api/v0/upload/11112222-3333-4444-5555-666677778888/", "description": "isecerts-upload/1582839825923_cert.zip-upload/CertificateServicesEndpointSubCA-iseserver_.cer", "file": "http:https://127.0.0.1:8000/api/v0/upload/upload/CertificateServicesEndpointSubCA-iseserver_.cer", "uploaded_at": "2020-04-14T21:39:23.179183Z" }, { "id": "11112222-3333-5555-4444-666677778888", "url": "http:https://127.0.0.1:8000/api/v0/upload/11112222-3333-4444-5555-666677778888/", "description": "isecerts-upload/1582839825923_cert.zip-upload/CertificateServicesNodeCA-iseserver_.cer", "file": "http:https://127.0.0.1:8000/api/v0/upload/upload/CertificateServicesNodeCA-iseserver_.cer", "uploaded_at": "2020-04-14T21:39:23.181974Z" }, { "id": "11112222-4444-3333-5555-666677778888", "url": "http:https://127.0.0.1:8000/api/v0/upload/11112222-4444-3333-5555-666677778888/", "description": "isecerts-upload/1582839825923_cert.zip-upload/CertificateServicesRootCA-iseserver_.cer", "file": "http:https://127.0.0.1:8000/api/v0/upload/upload/CertificateServicesRootCA-iseserver_.cer", "uploaded_at": "2020-04-14T21:39:23.186234Z" }, { "id": "11112222-4444-5555-3333-666677778888", "url": "http:https://127.0.0.1:8000/api/v0/upload/11112222-4444-5555-3333-666677778888/", "description": "isecerts-upload/1582839825923_cert.zip-upload/ctssync.yourdomain.com_.cer", "file": "http:https://127.0.0.1:8000/api/v0/upload/upload/ctssync.yourdomain.com_.cer", "uploaded_at": "2020-04-14T21:39:23.176694Z" }, { "id": "11112222-5555-4444-3333-666677778888", "url": "http:https://127.0.0.1:8000/api/v0/upload/11112222-5555-4444-3333-666677778888/", "description": "isecerts-upload/1582839825923_cert.zip-upload/ctssync.yourdomain.com_.key", "file": "http:https://127.0.0.1:8000/api/v0/upload/upload/ctssync.yourdomain.com_.key", "uploaded_at": "2020-04-14T21:39:23.191285Z" }, { "id": "11112222-5555-3333-4444-666677778888", "url": "http:https://127.0.0.1:8000/api/v0/upload/11112222-5555-3333-4444-666677778888/", "description": "isecerts-upload/1582839825923_cert.zip-upload/iseserver_.yourdomain.com_iseserver_.yourdomain.com.cer", "file": "http:https://127.0.0.1:8000/api/v0/upload/upload/iseserver_.yourdomain.com_iseserver_.yourdomain.com.cer", "uploaded_at": "2020-04-14T21:39:23.188911Z" } ] } - Add your Cisco ISE Server to Adaptive Policy Sync using the following API call. You will need to provide your ISE ERS Admin username and password. A few additional notes:
- "pxgrid_cliname" : should match the Common Name that you used to generate the certificate
- "pxgrid_clicert" : the "id" of the .cer file that was generated for your client. In the example above, this would be the ctssync.yourdomain.com_.cer file.
- "pxgrid_clikey" : the "id" of the .key file that was generated for your client. In the example above, this would be the ctssync.yourdomain.com_.key file.
- "pxgrid_isecert" : the "id" of the .cer file that was provide for the ISE pxGrid server that you are supplying an IP Address for. In the example above, this would be the iseserver_.yourdomain.com_iseserver_.yourdomain.com.cer file.
curl -L -H "Authorization: Bearer 1234567890abcdefghijklmnopqrstuvwxyz1234" -H 'Content-Type: application/json' -X POST --data-binary '{"description": "My ISE Server","ipaddress": "10.1.2.3","username": "ersadmin","password": "erspassword","pxgrid_enable": true,"pxgrid_ip": "10.1.2.3","pxgrid_cliname": "ctssync","pxgrid_clicert": "11112222-4444-5555-3333-666677778888","pxgrid_clikey": "11112222-5555-4444-3333-666677778888","pxgrid_clipw": "certpassword","pxgrid_isecert": "11112222-5555-3333-4444-666677778888"}' http:https://127.0.0.1:8000/api/v0/iseserver/ {"id":"11112222-3333-4444-5555-666677778888","url":"http:https://127.0.0.1:8000/api/v0/iseserver/11112222-3333-4444-5555-666677778888/","description":"My ISE Server","ipaddress":"10.1.2.3","username":"ersadmin","password":"erspassword","force_rebuild":false,"skip_sync":false,"last_update":"2020-04-14T21:49:55.635413Z","last_sync":null,"pxgrid_enable":true,"pxgrid_ip":"10.1.2.3","pxgrid_cliname":"ctssync","pxgrid_clicert":"11112222-4444-5555-3333-666677778888","pxgrid_clikey":"11112222-5555-4444-3333-666677778888","pxgrid_clipw":"certpassword","pxgrid_isecert":"11112222-5555-3333-4444-666677778888"} - If you elected to not automatically accept certificate-based connections, you will need to check ISE after about 5 minutes (or you can re-start the app to trigger this immediately) in order to approve the pxGrid connection from your client.
- Navigate to ISE Admin GUI via any web browser and login
- Navigate to Administration -> pxGrid Services
- Click on the All Clients tab
- Check the box cooresponding to your client, then click the 'Approve' button.
- Next, establish a syncronization session between your configured ISE server and your configured Meraki Dashboard instance using the following API call. You will need the ID numbers of your Dashboard instance and your ISE Server that were created above. You can specify a value in seconds for "sync_interval" - this represents how often Adaptive Policy Sync will request updated data from Cisco ISE and Meraki Dashboard and push Synchronization Changes.
curl -L -H "Authorization: Bearer 1234567890abcdefghijklmnopqrstuvwxyz1234" -H 'Content-Type: application/json' -X POST --data-binary '{"description": "Sync Session","dashboard": "11112222-3333-4444-5555-666677778888","iseserver": "11112222-3333-4444-5555-666677778888","ise_source": true,"sync_enabled": true,"apply_changes": true,"sync_interval": 300}' http:https://127.0.0.1:8000/api/v0/syncsession/
{"id":"11112222-3333-4444-5555-666677778888","url":"http:https://127.0.0.1:8000/api/v0/syncsession/11112222-3333-4444-5555-666677778888/","description":"Sync Session","dashboard":"11112222-3333-4444-5555-666677778888","iseserver":"11112222-3333-4444-5555-666677778888","ise_source":true,"force_rebuild":false,"sync_enabled":true,"apply_changes":true,"sync_interval":300,"last_update":"2020-04-14T21:59:31.496696Z"}
- By default, no tags are synchronized between Cisco ISE and Meraki Dashboard. You will need to enable synchronization on any tags that you wish to synchronize. First, get a list of all tags that Adaptive Policy Sync has learned using the following API call. To make it easier to read, you will want to pipe the output through a JSON formatter such as 'jq', 'python -mjson.tool', 'json_pp', or 'jsonpretty' to name a few.
curl --silent -L -H "Authorization: Bearer 1234567890abcdefghijklmnopqrstuvwxyz1234" -H 'Content-Type: application/json' -X GET http:https://127.0.0.1:8000/api/v0/tag/ | jq
{
  "count": 2,
  "next": null,
  "previous": null,
  "results": [
    {
      "id": "11112222-3333-4444-5555-666677778888",
      "url": "http:https://127.0.0.1:8000/api/v0/tag/11112222-3333-4444-5555-666677778888/",
      "name": "Employees",
      "description": "Organization Employees",
      "do_sync": false,
      "syncsession": "11112222-3333-4444-5555-666677778888",
      "tag_number": 4,
      "meraki_id": none,
      "ise_id": "11112222-3333-4444-5555-666677778888",
      "last_update": "2020-04-15T15:00:17.911065Z",
      "in_sync": false
    },
    {
      "id": "11112222-3333-5555-4444-666677778888",
      "url": "http:https://127.0.0.1:8000/api/v0/tag/11112222-3333-5555-4444-666677778888/",
      "name": "Guest",
      "description": "Guest Users",
      "do_sync": false,
      "syncsession": "11112222-3333-4444-5555-666677778888",
      "tag_number": 5,
      "meraki_id": none,
      "ise_id": "11112222-3333-4444-5555-666677778888",
      "last_update": "2020-04-15T15:00:17.894175Z",
      "in_sync": false
    }
  ]
}
- Enable synchronization on all tags that you wish to synchronize. Use the following API call in order to enable synchronization.
curl -L -H "Authorization: Bearer 1234567890abcdefghijklmnopqrstuvwxyz1234" -H 'Content-Type: application/json' -X PATCH --data-binary '{"do_sync": true}' http:https://127.0.0.1:8000/api/v0/tag/11112222-3333-4444-5555-666677778888/ {"id":"11112222-3333-4444-5555-666677778888","url":"http:https://127.0.0.1:8000/api/v0/tag/11112222-3333-4444-5555-666677778888/","name":"Employees","description":"Organization Employees","do_sync":true,"syncsession":"11112222-3333-4444-5555-666677778888","tag_number":4,"meraki_id":none,"ise_id":"11112222-3333-4444-5555-666677778888","last_update":"2020-04-15T15:05:17.054369Z","in_sync":false} curl -L -H "Authorization: Bearer 1234567890abcdefghijklmnopqrstuvwxyz1234" -H 'Content-Type: application/json' -X PATCH --data-binary '{"do_sync": true}' http:https://127.0.0.1:8000/api/v0/tag/11112222-3333-5555-4444-666677778888/ {"id":"11112222-3333-5555-4444-666677778888","url":"http:https://127.0.0.1:8000/api/v0/tag/11112222-3333-5555-4444-666677778888/","name":"Guest","description":"Guest Users","do_sync":true,"syncsession":"11112222-3333-4444-5555-666677778888","tag_number":5,"meraki_id":none,"ise_id":"11112222-3333-4444-5555-666677778888","last_update":"2020-04-15T15:05:17.054369Z","in_sync":false} - Check tag synchronization status by running the same call that you issued in step 1. Notice that these tags now show "in_sync": true. Note: it may take some time depending on your configured "sync_interval"
curl --silent -L -H "Authorization: Bearer 1234567890abcdefghijklmnopqrstuvwxyz1234" -H 'Content-Type: application/json' -X GET http:https://127.0.0.1:8000/api/v0/tag/ | jq
{
  "count": 2,
  "next": null,
  "previous": null,
  "results": [
    {
      "id": "11112222-3333-4444-5555-666677778888",
      "url": "http:https://127.0.0.1:8000/api/v0/tag/11112222-3333-4444-5555-666677778888/",
      "name": "Employees",
      "description": "Organization Employees",
      "do_sync": false,
      "syncsession": "11112222-3333-4444-5555-666677778888",
      "tag_number": 4,
      "meraki_id": "28",
      "ise_id": "11112222-3333-4444-5555-666677778888",
      "last_update": "2020-04-15T16:12:39.705857Z",
      "in_sync": true
    },
    {
      "id": "11112222-3333-5555-4444-666677778888",
      "url": "http:https://127.0.0.1:8000/api/v0/tag/11112222-3333-5555-4444-666677778888/",
      "name": "Guest",
      "description": "Guest Users",
      "do_sync": false,
      "syncsession": "11112222-3333-4444-5555-666677778888",
      "tag_number": 5,
      "meraki_id": "27",
      "ise_id": "11112222-3333-4444-5555-666677778888",
      "last_update": "2020-04-15T16:12:39.695225Z",
      "in_sync": true
    }
  ]
}
-
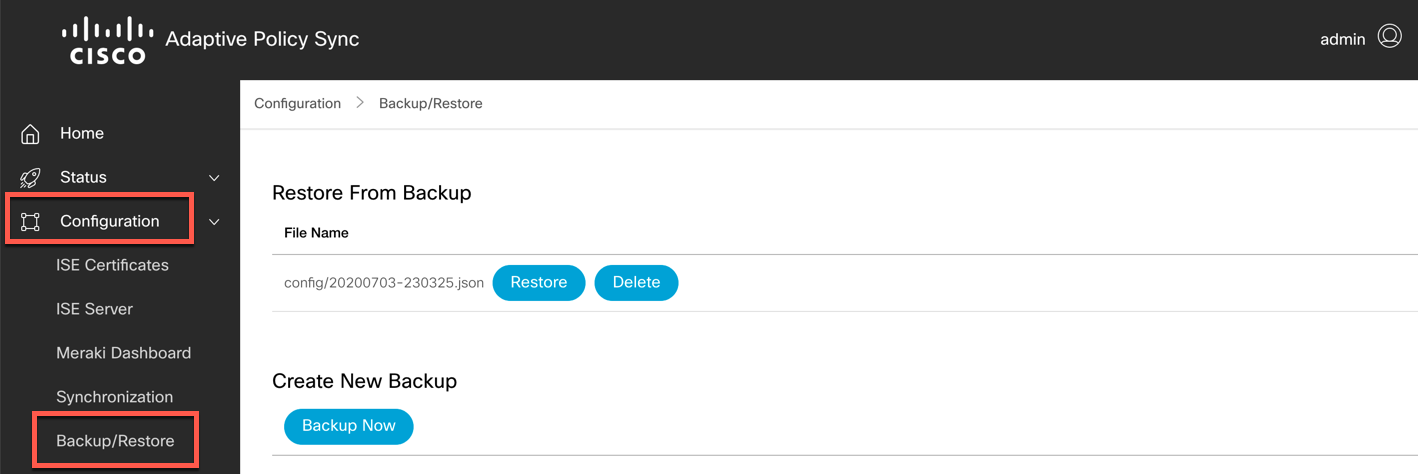
Open the Adaptive Policy Sync Interface. In the left navigation pane, navigate to Configuration -> Backup/Restore.
-
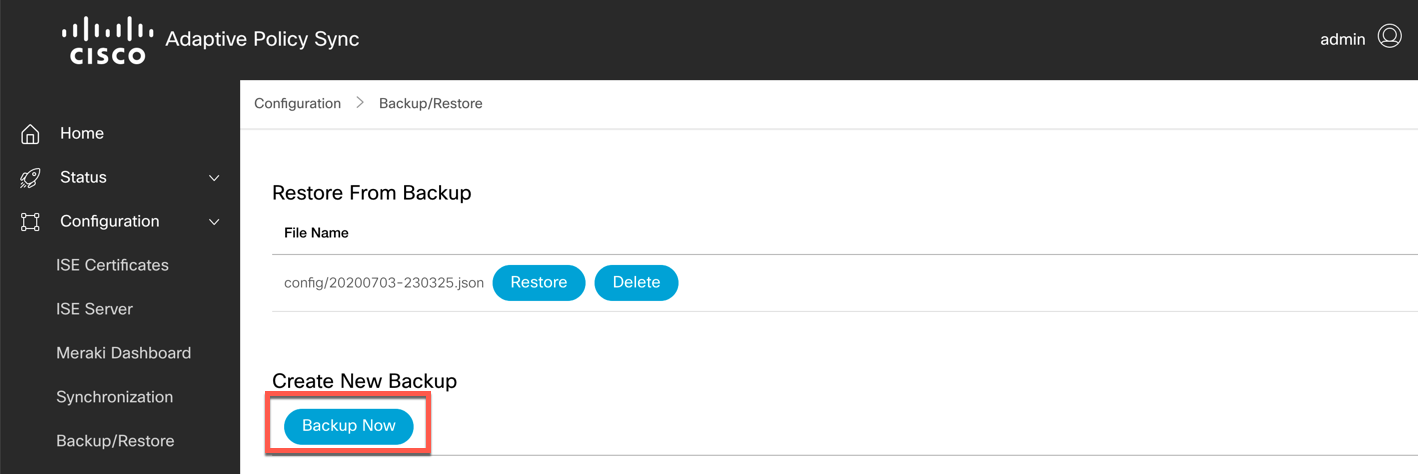
To create an immediate backup, click the "Backup Now" button. This will generate a backup file in JSON format, and will be stored in the "config" directory. If you are using the Docker command provided above, the config directory will map to the "adaptivepolicy" directory in your machine profile directory.
-
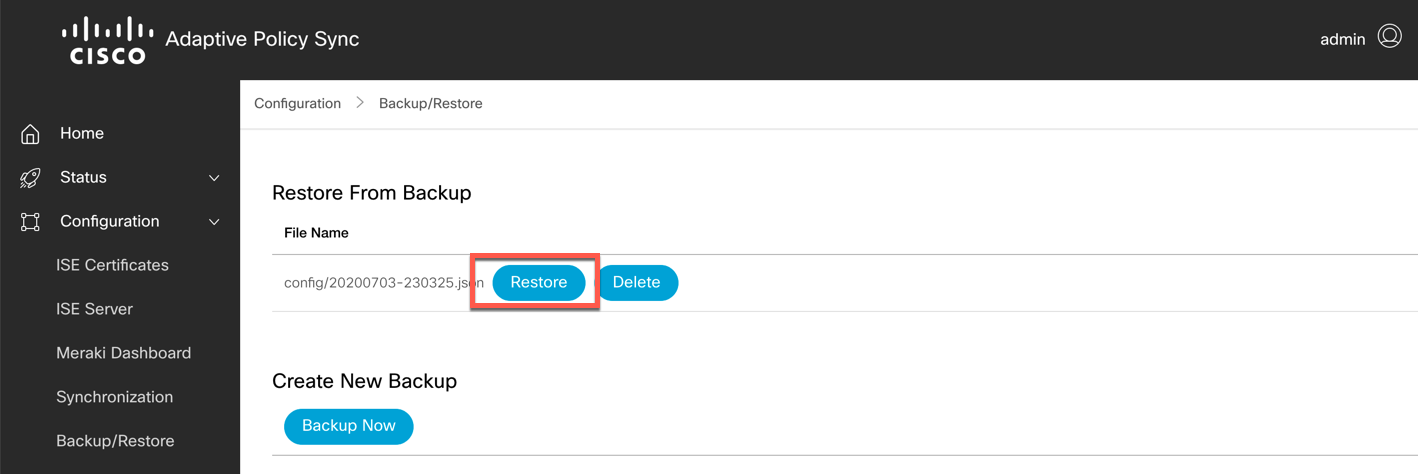
To restore the database from a backup file, click the "Restore" button next to the backup file in question. The file will be loaded into the Database immediately.
-


- To create an immediate backup, execute the Backup API call. The resulting backup file will be in JSON format, and will be stored in the "config" directory. If you are using the Docker command provided above, the config directory will map to the "adaptivepolicy" directory in your machine profile directory.
curl -L -H "Authorization: Bearer 1234567890abcdefghijklmnopqrstuvwxyz1234" -H 'Content-Type: application/json' -X POST http:https://127.0.0.1:8000/api/v0/backup/ {"filename": "20200703-230325.json"} - To restore the database from a backup file, execute the Restore API call. The file will be loaded into the Database immediately.
curl -L -H "Authorization: Bearer 1234567890abcdefghijklmnopqrstuvwxyz1234" -H 'Content-Type: application/json' -X POST http:https://127.0.0.1:8000/api/v0/backup/
{"success": true}
-
Tags are not synchronizing.
-
API
- You can get more synchronization detail for a specific tag if you issue the following command:
curl --silent -L -H "Authorization: Bearer 1234567890abcdefghijklmnopqrstuvwxyz1234" -H 'Content-Type: application/json' -X GET http:https://127.0.0.1:8000/api/v0/tag/11112222-3333-4444-5555-666677778888/?detail=true | jq
- You can get more synchronization detail for a specific tag if you issue the following command:
-
UI
-
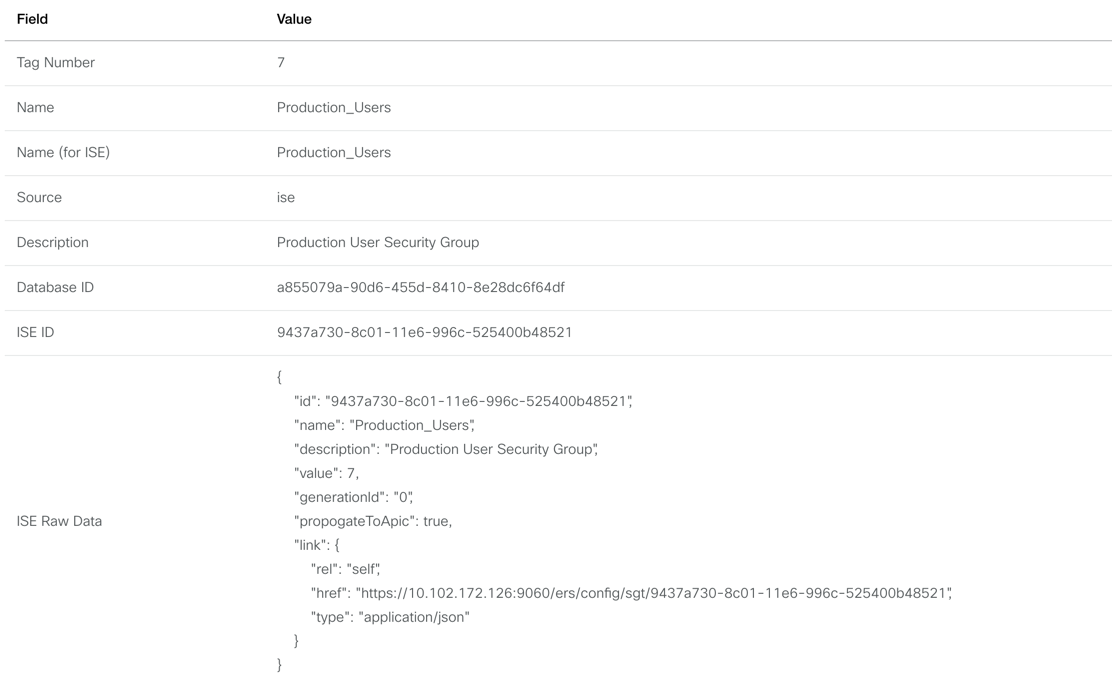
You can get synchronization detail for a specific tag by selecting the UUID of that tag in the UI under Status -> SGTs.
-
-
This will show you the raw data being received by the Meraki Dashboard API as well as the ISE ERS API. The "match_report" field (Sync Details in the UI) will show you what components match or do not match. The "update_dest" (Who Needs Update? in the UI) field will show whether Meraki Dashboard or Cisco ISE needs to be updated. The "push_config" field (Config Push in the UI) will show you the specific API call that will be issued in order to make an update.
-
-
Database Access
- In the event that there is a database-related problem, you can access the built-in database using http:https://127.0.0.1:8000/admin (if you used the examples above). Log in using the same credentials you use for the UI itself.
