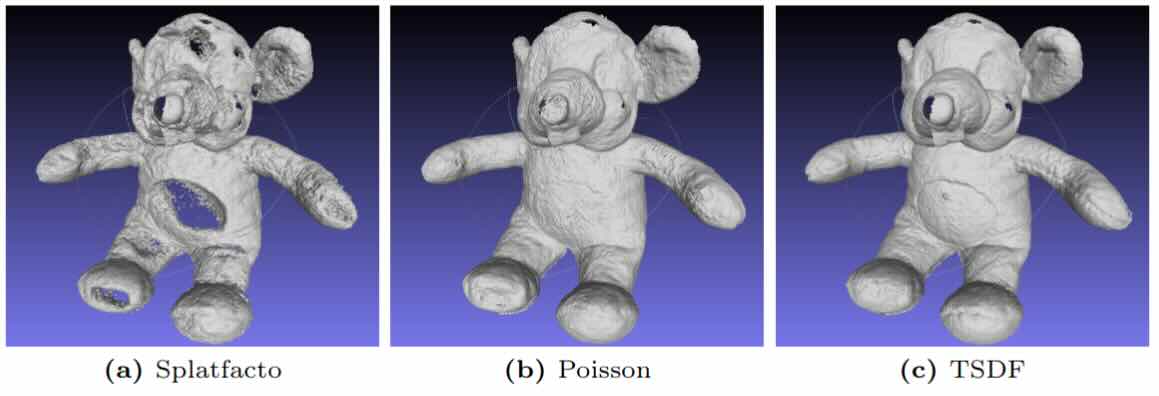
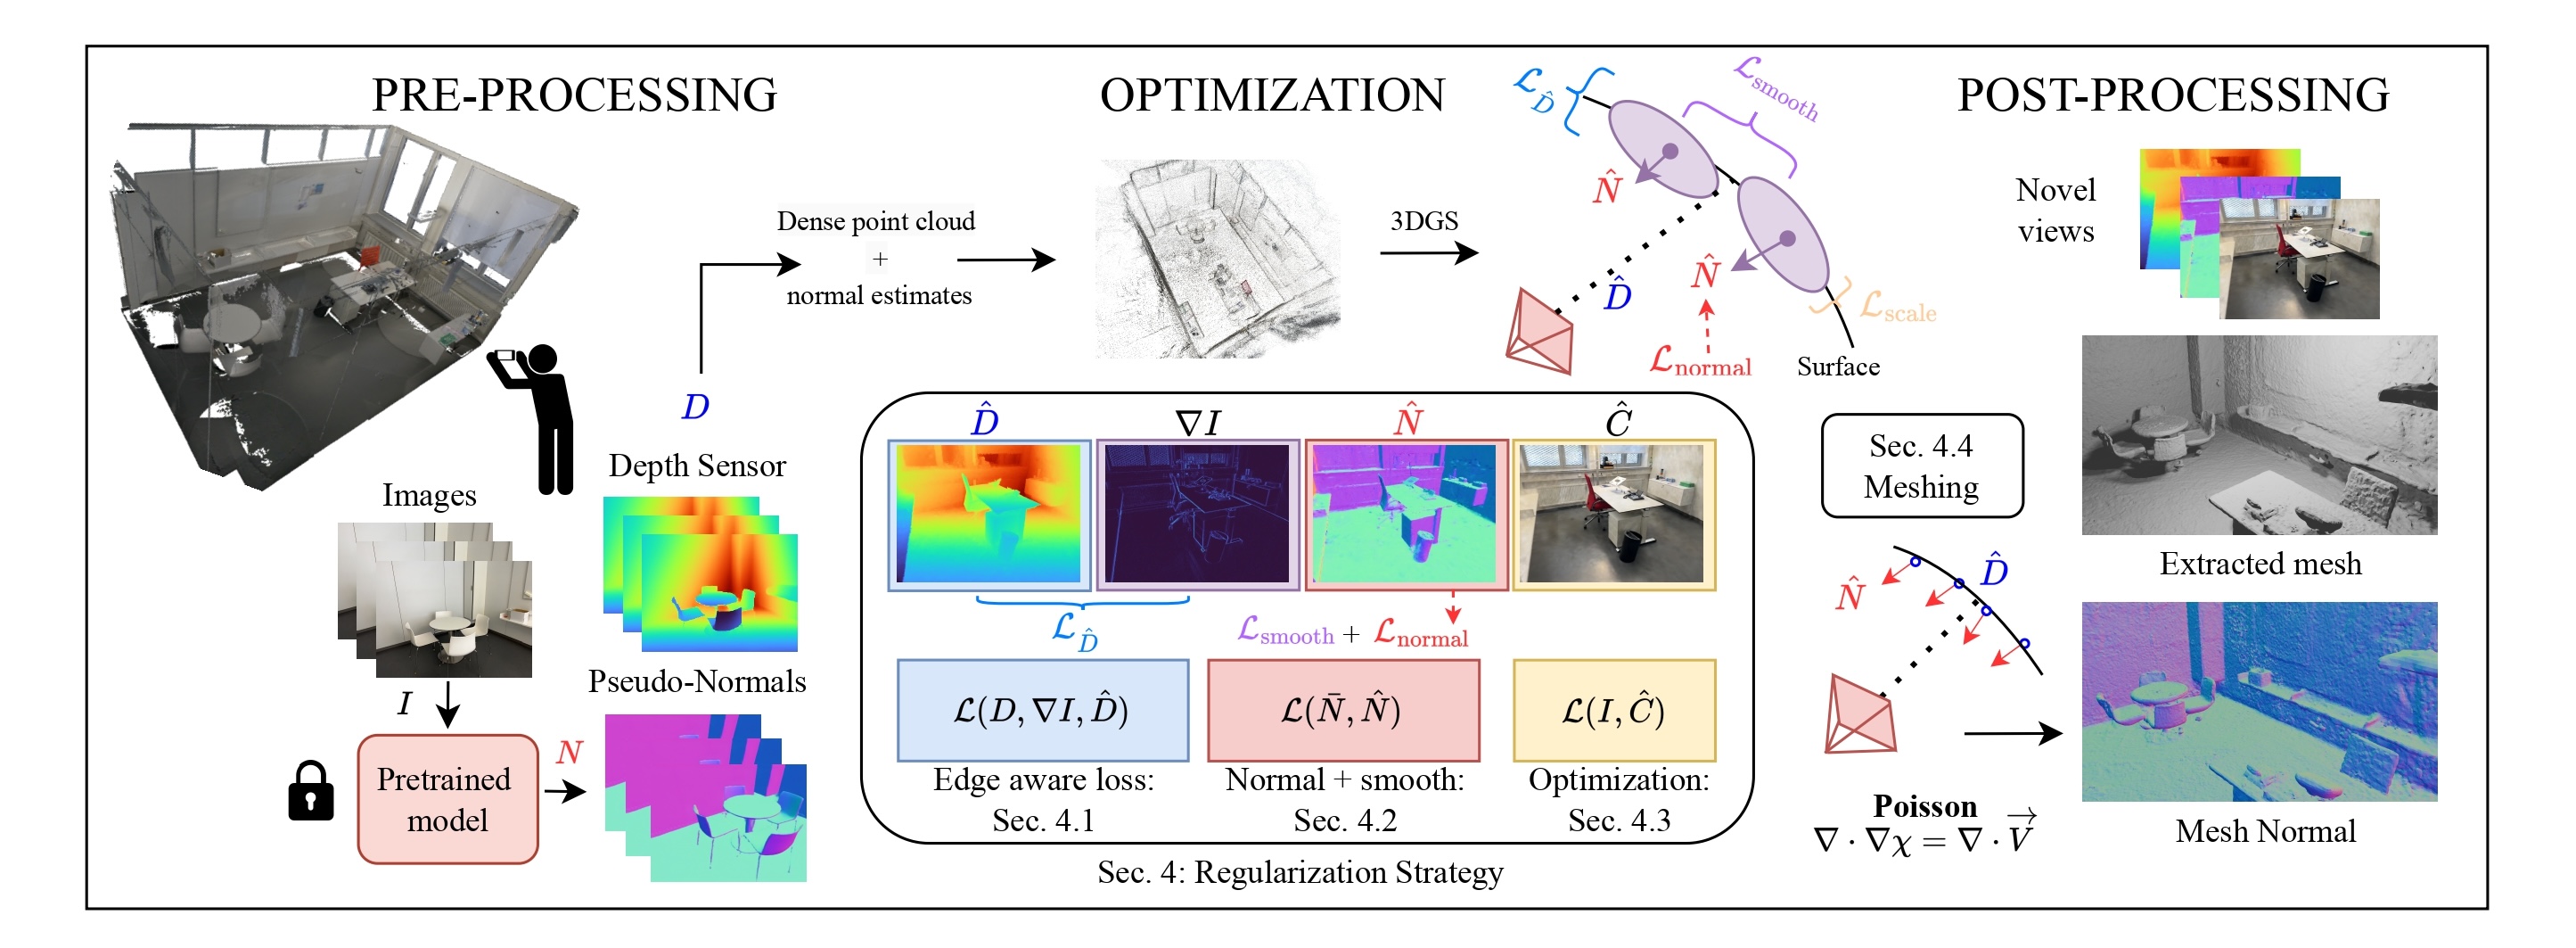
This repo implements depth and normal supervision for 3DGS and several mesh extraction scripts.
Demo:teaser.mp4
Table of Contents
- 17.10.2024: FusionSense improves DN-Splatter in sparse settings for robotic tactile applications! 🚀
- 04.09.2024: Support Open3d TSDF to extract mesh, support Patch-based Depth Correlation Loss from SparseGS for monodepth supervision, support visualizing normal estimates from the Gaussian geometry and estimated surface normal from depths, support colmap SFM point cloud initialization for MuSHRoom dataset.
- 14.06.2024: Support gsplat v1.0.0 🚀. Faster training and better memory consumption. Training with
--pipeline.model.predict_normalsis about 20% slower than without. - 16.04.2024: Support for DSINE monocular normal supervision.
- 20.04.2024:
dn-splatter-big: a variant featuring less aggressive Gaussian culling threshold, which leads to an increased number of Gaussians in the optimized scene. On certain datasets, this can lead to better novel-view synthesis results.
Method 1. Using Conda and Pip
Follow installation instructions for [Nerfstudio](https://docs.nerf.studio/quickstart/installation.html). This repo is compatible with a `nerfstudio` conda environment.Clone and install DN-Splatter
```bash
conda activate nerfstudio
git clone https://github.com/maturk/dn-splatter
cd dn_splatter/
pip install setuptools==69.5.1
pip install -e .
```
Method 2. Using Pixi
Download the [pixi package manager](https://pixi.sh/latest/), this will manage the installation of cuda/pytorch/nerfstudio for youClone and install DN-Splatter
git clone https://github.com/maturk/dn-splatter
cd dn_splatter/
pixi install
To run an example
pixi run exampleTo activate conda enviroment
pixi shellThis repo registers a new model called dn-splatter with various additional options:
| Command | Description |
|---|---|
| --pipeline.model.use-depth-loss (True/False) | Enables depth supervision |
| --pipeline.model.depth-loss-type (MSE, LogL1, HuberL1, L1, EdgeAwareLogL1, PearsonDepth) | Depth loss type |
| --pipeline.model.depth-lambda (Float 0.2 recommended) | Regularizer weight for depth supervision |
| --pipeline.model.use-normal-loss (True/False) | Enables normal loss |
| --pipeline.model.use-normal-tv-loss (True/False) | Normal smoothing loss |
| --pipeline.model.normal-supervision (mono/depth) | Whether to use monocular or rendered depths for normal supervision. 'depth' default. |
| --pipeline.model.two-d-gaussians (True/False) | Encourage 2D gaussians |
Please check the dn_model.py for a full list of supported configs (some are only experimental).
For larger indoor captures with sensor depth data (e.g. MuSHRoom / ScanNet++ datasets):
ns-train dn-splatter --data PATH_TO_DATA \
                 --pipeline.model.use-depth-loss True \
                 --pipeline.model.depth-lambda 0.2 \
                 --pipeline.model.use-normal-loss True \
                 --pipeline.model.use-normal-tv-loss True \
--pipeline.model.normal-supervision (mono/depth) \We also provide a dn-splatter-big variant that increases the number of Gaussians in the scene which may enhance the quality of novel-view synthesis. This increases training time and hardware requirements. Simply replace the dn-splatter keyword with dn-splatter-big in the above commands.
To train with a specific depth loss, use the flag: --pipeline.model.depth-loss-type DepthLossType where DepthLossType is one of ["MSE", "LogL1", "HuberL1", "L1", "EdgeAwareLogL1", "PearsonDepth"]
For sensor depth supervision we reccommend EdgeAwareLogL1 loss. For monocular depth supervision, we recommend the relative Pearson correlation loss PearsonDepth.
To extract a mesh, run the following command:
gs-mesh {dn, tsdf, o3dtsdf, sugar-coarse, gaussians, marching} --load-config [PATH] --output-dir [PATH]We reccommend using gs-mesh o3dtsdf.
Mesh algorithm details
Export a mesh with the gs-mesh --help command. The following mesh exporters are supported.
| gs-mesh | Description | Requires normals? |
|---|---|---|
| gs-mesh dn | Backproject depth and normal maps to Poisson | Yes |
| gs-mesh tsdf | TSDF Fusion algorithm | No |
| gs-mesh o3dtsdf | TSDF Fusion algorithm used in 2DGS paper | No |
| gs-mesh sugar-coarse | Level set extractor from SuGaR (Sec 4.2 from the paper) | Both |
| gs-mesh gaussians | Use Gaussian xyzs and normals to Poisson | Yes |
Use the --help command with each method to see more useful options and settings.
For very small object captures, TSDF works well with 0.004 voxel size and 0.02 SDF trunc distance.

But TSDF can fail in larger indoor room reconstructions. We reccommend Poisson for more robust results with little hyperparameter tuning.

Generate pseudo ground truth normal maps
The `dn-splatter` model's predicted normals can be supervised with the gradient of rendered depth maps or by external monocular normal estimates using the flag `--pipeline.model.normal-supervision (mono/depth)`. To train with monocular normals, you need to use an external network to predict them.We support generating low and hd monocular normal estimates from a pretrained omnimodel and from DSINE.
You need to download the model weights first:
python dn_splatter/data/download_scripts/download_omnidata.pyThen generate normal maps using the following command:
python dn_splatter/scripts/normals_from_pretrain.py
        --data-dir (path to data root which either has a transforms.json or images/ folder)
        --img-dir-name (if transforms.json file is not found, use images in this folder (default /images))
        --resolution {low, hd} (low default and reccommended)
We highly reccommend using low res normal maps, since generating HD versions from omnidata (that match the dataset image size) is very time consuming.
To generate normals from DSINE, run the following command:
python dn_splatter/scripts/normals_from_pretrain.py --data-dir [PATH_TO_DATA] --model-type dsineIf using DSINE normals for supervision, remember to use the --normal-format opencv in your ns-train command. An example command is as follows:
ns-train dn-splatter --pipeline.model.use-normal-loss True --pipeline.model.normal-supervision mono replica --data ./datasets/Replica/ --normals-from pretrained --normal-format opencvDefault save path of generated normals is data_root/normals_from_pretrain
And to enable training with pretrained normals, add --normals-from pretrained flag in the dataparser.
NOTE: different monocular networks can use varying camera coordinate systems for saving/visualizing predicted normals in the camera frame. We support both OpenGL and OpenCV coordinate systems. Each dataparser has a flag --normal-format [opengl/opencv] to distinguish between them. We render normals into the camera frame according to OpenCV color coding which is similar to Open3D. Some software might have different conventions. Omnidata normals are stored in OpenGL coordinates, but we convert them to OpenCV for consistency across the repo.
Convert dataset to COLMAP format
If your dataset has no camera pose information, you can generate poses using COLMAP.
Convert a dataset of images to COLMAP format with
python dn_splatter/scripts/convert_colmap.py --image-path [data_root/images] --use-gpu/--no-use-gpuGenerate scale aligned mono-depth estimates
If your dataset has no sensor depths, and you have a COLMAP processed dataset, we provide a script to generate scale aligned monocular depth estimates. Scale alignment refers to solving for the scale ambiquity between estimated monocular depths and the scale of your input COLMAP poses.
This script generates sfm_depths/ and mono_depth/ directories in the data root:
<data>
|---image_path
|   |---<image 0>
|   |---<image 1>
|   |---...
|---sfm_depths
|   |---<sfm_depth 0>
|   |---<sfm_depth 1>
|   |---...
|---mono_depth
|   |---<mono_depth 0>.png
|   |---<mono_depth 0>_aligned.npy
The dataset is expected to be in COLMAP format (contains a colmap/sparse/0 folder in data root) since SfM points are required.
python dn_splatter/scripts/align_depth.py --data [path_to_data_root] \
                                      --skip-colmap-to-depths, --no-skip-colmap-to-depths \
                                      --skip-mono-depth-creation, --no-skip-mono-depth-creation \
NOTE: if faced with the following error:
TypeError: expected size to be one of int or Tuple[int] or Tuple[int, int] or Tuple[int, int, int], but got size with types [<class 'numpy.int64'>, <class 'numpy.int64'>]
Downgrading from Torch 2.1.2 to 2.0.1 solves the issue.
Generate only mono depth estimates skipping SfM alignment
To skip SfM alignment and just render monocular depths for your dataset, use the following script:
python dn_splatter/scripts/align_depth.py --data [path_to_data_root] \
                                      --skip-colmap-to-depths  --skip_alignment \
For casually captured RGB-D streams, consider using SpectacularAI SDK for iPhone/Android or Oak/RealSense/Kinect sensor streams. For LiDaR enabled smartphones, download the app from the Apple/Play store and capture your data.
Once you have gathered the data, process the inputs into a Nerfstudio suitable format (calculate VIO poses and create a transforms.json file with poses and depth frames):
pip install spectacularAI
python dn_splatter/scripts/process_sai.py [PATH_TO_SAI_INPUT_FOLDER] [PATH_TO_OUTPUT_FOLDER]
To train with the custom data:
ns-train dn-splatter --data PATH_TO_DATA \
                 --pipeline.model.use-depth-loss True \
                 --pipeline.model.depth-lambda 0.2 \
                 --pipeline.model.use-normal-loss True \
                 --pipeline.model.use-normal-tv-loss True \
                 --pipeline.model.normal-supervision depth \
For other custom datasets, use the Nerfstudio conventions and train with the above command.
Other preprocessed datasets are supported by dataparsers with the keywords mushroom, replica, scannetpp, nrgbd, dtu, coolermap.
To train with a dataset use the following:
ns-train dn-splatter [OPTIONS] [mushroom/replica/scannet/nrgbd/dtu/coolermap] --data [DATASET_PATH]Dataparsers have their own options, to see the full list use ns-train dn-splatter [mushroom/replica/scannet/nrgbd/dtu/coolermap] --help. Some useful ones are:
  --depth-mode        : ["sensor","mono","all", "none"] determines what depths to load.
  --load-normals      : [True/False] whether to load normals or not.
  --normals-from      : ["depth", "pretrained"] generate pseudo-ground truth normals from depth maps or from pretrained omnimodel.
  --normal-format     : ["opengl", "opencv"] What coordinate system normals are saved in camera frame.
  --load-pcd-normals  : [True/False] initialise gaussian scales/rotations based on estimated SfM normals.
COLMAP datasets
For arbitrary COLMAP processed datasets, we expect the following directory structure<base_dir>
|---image_path
| |---<image 0>
| |---<image 1>
| |---...
|---colmap
|---sparse
|---0
|---cameras.bin
|---images.bin
|---points3D.bin
Use the coolermap dataparser with COLMAP datasets as follows:
ns-train dn-splatter [OPTIONS] coolermap --data [DATASET_PATH]MuSHRoom
MuSHRoomSupport for Kinect and iPhone RGB-D trajectories.
Download per-room datasets with python dn_splatter/data/download_scripts/mushroom_download.py --room-name [name]
(OPTIONAL) Download Faro scanner reference depths with python dn_splatter/data/mushroom_utils/reference_depth_download.py
Use the mushroom dataparser as follows:
ns-train dn-splatter \
--pipeline.model.use-depth-loss True \
--pipeline.model.depth-lambda 0.2 \
--pipeline.model.use-normal-loss True \
--pipeline.model.normal-supervision (mono/depth) \
mushroom --data [DATASET_PATH] --mode [kinect/iphone]
To get MuSHRoom iPhone sequence with colmap SFM initialized point cloud:
python dn_splatter/scripts/poses_to_colmap_sfm.py --transforms_path [path/transformations_colmap.json] --run_colmap

ns-train dn-splatter \
--pipeline.model.use-depth-loss True \
--pipeline.model.depth-lambda 0.2 \
--pipeline.model.use-normal-loss True \
--pipeline.model.use-normal-tv-loss True \
--pipeline.model.normal-supervision (mono/depth) \
mushroom --data [DATASET_PATH] --mode iphone --create_pc_from_colmap True
For easy use, we provide the result of the converted COLMAP pose and point cloud in zenodo.
Replica
ReplicaDownload the dataset with python dn_splatter/data/download_scripts/replica_download.py
Use the replica dataparser as follows:
ns-train dn-splatter
--pipeline.model.use-depth-loss True \
--pipeline.model.depth-lambda 0.5 \
--pipeline.model.use-normal-loss True \
--pipeline.model.use-normal-tv-loss True \
--pipeline.model.normal-supervision (mono/depth) \
replica --data [DATASET_PATH] --sequence [office0/office1/office2/office3/office4/room0/room1/room2]
ScanNet++
ScanNet++We use the following sequences:
8b5caf3398
b20a261fdf
First process the sequences according to the ScanNet++ toolkit:
Extract the undistorted images with:
python -m dslr.undistort_colmap dslr/configs/undistort_colmap.yml
and extract iphone rgb, mask and depth frames with:
python -m iphone.prepare_iphone_data iphone/configs/prepare_iphone_data.yml
Use the scannetpp dataparser as follows
ns-train dn-splatter  \
--pipeline.model.use-depth-loss True \
--pipeline.model.depth-lambda 0.2 \
--pipeline.model.use-normal-loss True \
--pipeline.model.use-normal-tv-loss True \
scannetpp --sequence [8b5caf3398/b20a261fdf] --data [DATASET_PATH]
Neural-RGBD
Neural-RGBDDownload with python dn_splatter/data/download_scripts/nrgbd_download.py
ns-train dn-splatter [OPTIONS] nrgbd --sequence whiteroomDTU
DTUDownload with python dn_splatter/data/download_scripts/dtu_download.py
ns-train dn-splatter gsdf --sequence scan65 --data [DATASET_PATH] Tanks and Temples
Tanks and TemplesFirst download the advanced scenes from the official website.
We extract colmap poses with from the following
python dn_splatter/scripts/convert_colmap.py --image-path [path_to_image_folder] --use-gpu / --no-use-gpu
ns-train dn-splatter [OPTIONS] coolermap --data [DATASET_PATH] Please see dn_splatter/eval/eval_instructions.md for more details.
To run DN-Splatter on an entire dataset of sequences (potentially in parallel with multi-GPU cluster), you can use the dn_splatter/eval/batch_run.py script.
For evaluating rgb, depth, and pointcloud metrics (optional), run the following command:
ns-eval --load-config [PATH_TO_CONFIG] --output-path [JSON_OUTPUT_PATH]To render train/eval images also add the flag --render-output-path [PATH_TO_IMAGES]
To get mesh metrics for the MuSHRoom dataset, run the following command:
python dn_splatter/eval/eval_mesh_mushroom_vis_cull.py --gt_mesh_path [GT_Mesh_Path] --pred_mesh_path [Pred_Mesh_Path] --output --device [iphone/kinect] To get mesh metrics for other datasets ScanNet++/Replica or custom datasets, run the following command:
python dn_splatter/eval/eval_mesh_vis_cull.py --gt-mesh-path [GT_Mesh_Path] --pred-mesh-path [Pred_Mesh_Path] --transformation_file [Path_to_transform_file] --dataset_path [Dataset path]--transformation_file path is the path of the transform.json generated when training scannetpp here.
--dataset_path is the path to the dataset folder, e.g. datasets/scannetpp/data/b20a261fdf/iphone
I want to thank Tobias Fischer, Songyou Peng and Philipp Lindenberger for their fruitful discussions and guidance, especially concerning mesh reconstruction. This project is built on various open-source software, and I want to thank the Nerfstudio team for their great efforts maintaining and extending a large project allowing for these kinds of extensions to exist.
If you find this work useful in your research, consider citing it:
@misc{turkulainen2024dnsplatter,
        title={DN-Splatter: Depth and Normal Priors for Gaussian Splatting and Meshing},
        author={Matias Turkulainen and Xuqian Ren and Iaroslav Melekhov and Otto Seiskari and Esa Rahtu and Juho Kannala},
        year={2024},
        eprint={2403.17822},
        archivePrefix={arXiv},
        primaryClass={cs.CV}
}
We welcome any bug fixes, issues/comments, or contributions. Also, if you have any suggestions or improvements, let me know!
I want to thank Pablo Vela for contributing the DSINE normal predictor into this project and allowing for an alternative (much easier) installation with Pixi.
