NFC signal sniffer and protocol decoder using SDR receiver, for demodulation and decoding NFC-A, NFC-B, NFC-F and NFC-V signals in real-time up to 424 Kbps.
By using an SDR receiver it is possible to capture, demodulate and decode the NFC signal between the card and the reader.
Currently, detection and decoding is implemented for:
- NFC-A (ISO14443A): 106kbps, 212kbps and 424kbps with ASK / BPSK modulation.
- NFC-B (ISO14443B): 106kbps, 212kbps and 424kbps with ASK / BPSK modulation.
- NFC-V (ISO15693): 26kbps and 53kbps, 1 of 4 code and 1 of 256 code PPM / BPSK modulation (pending FSK).
- NFC-F (ISO18092): Preliminary support to 212kbps and 424kbps with manchester modulation.
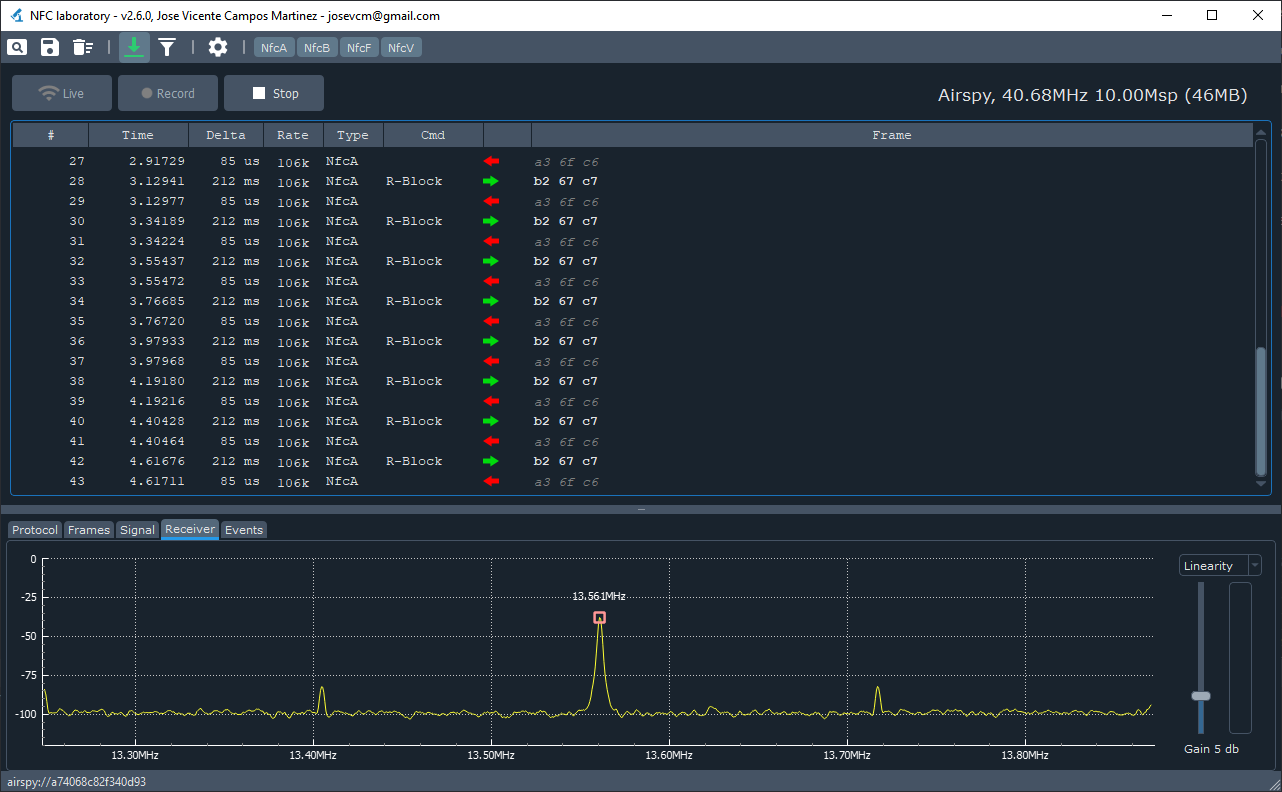
Signal spectrum view.
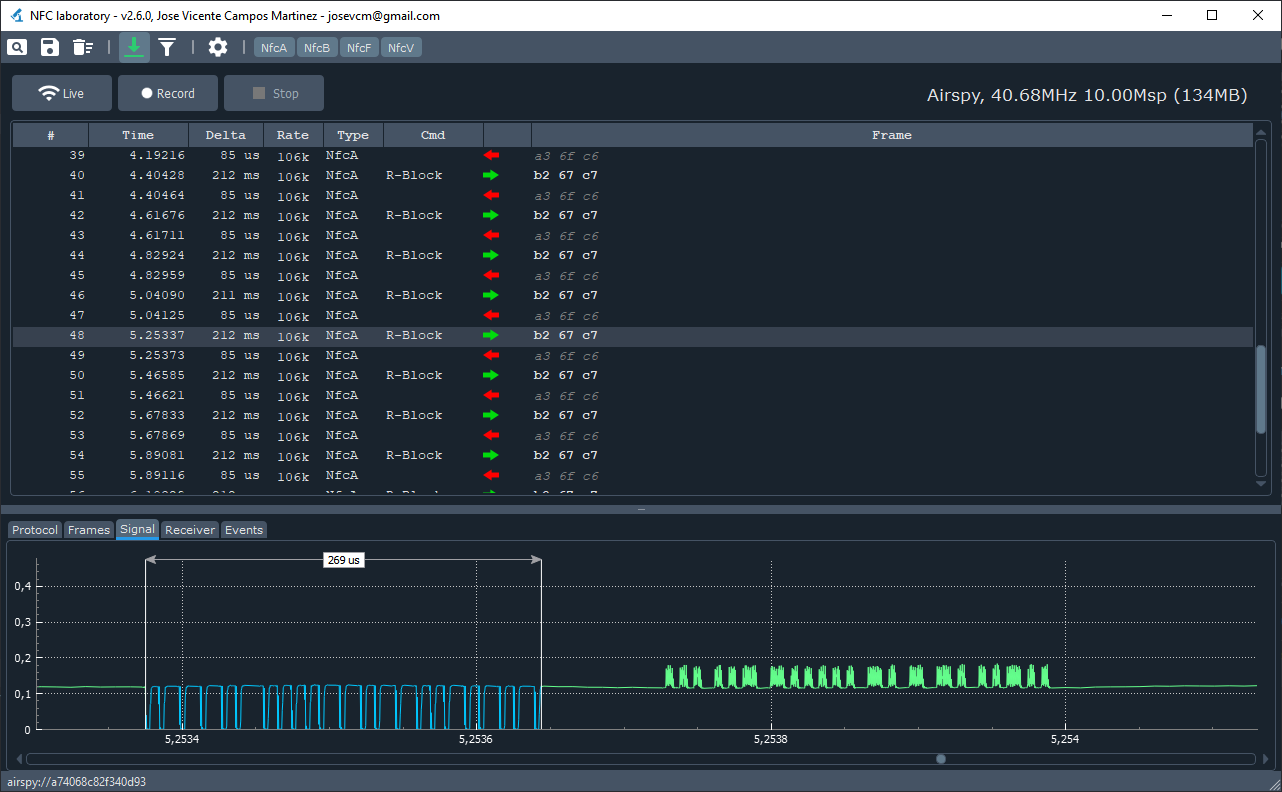
Signal wave view.
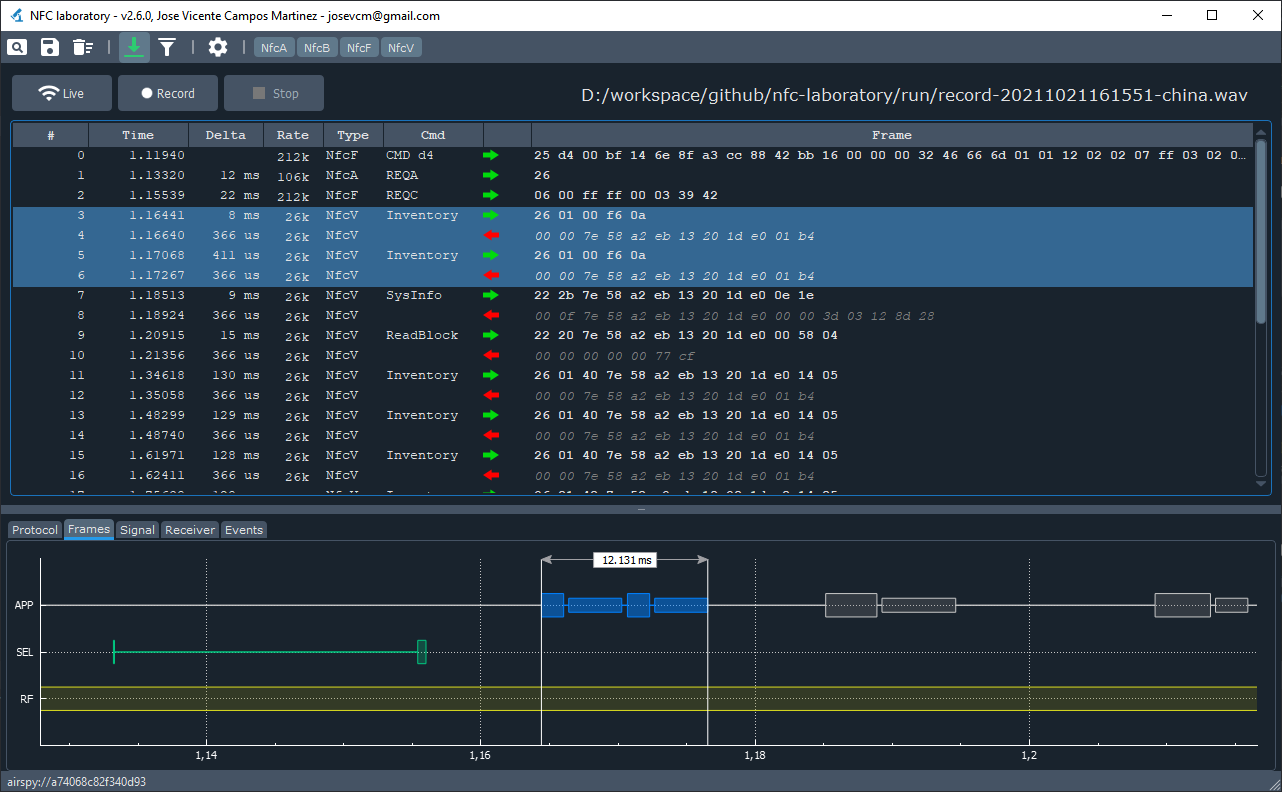
Signal frame and protocol time measurement.
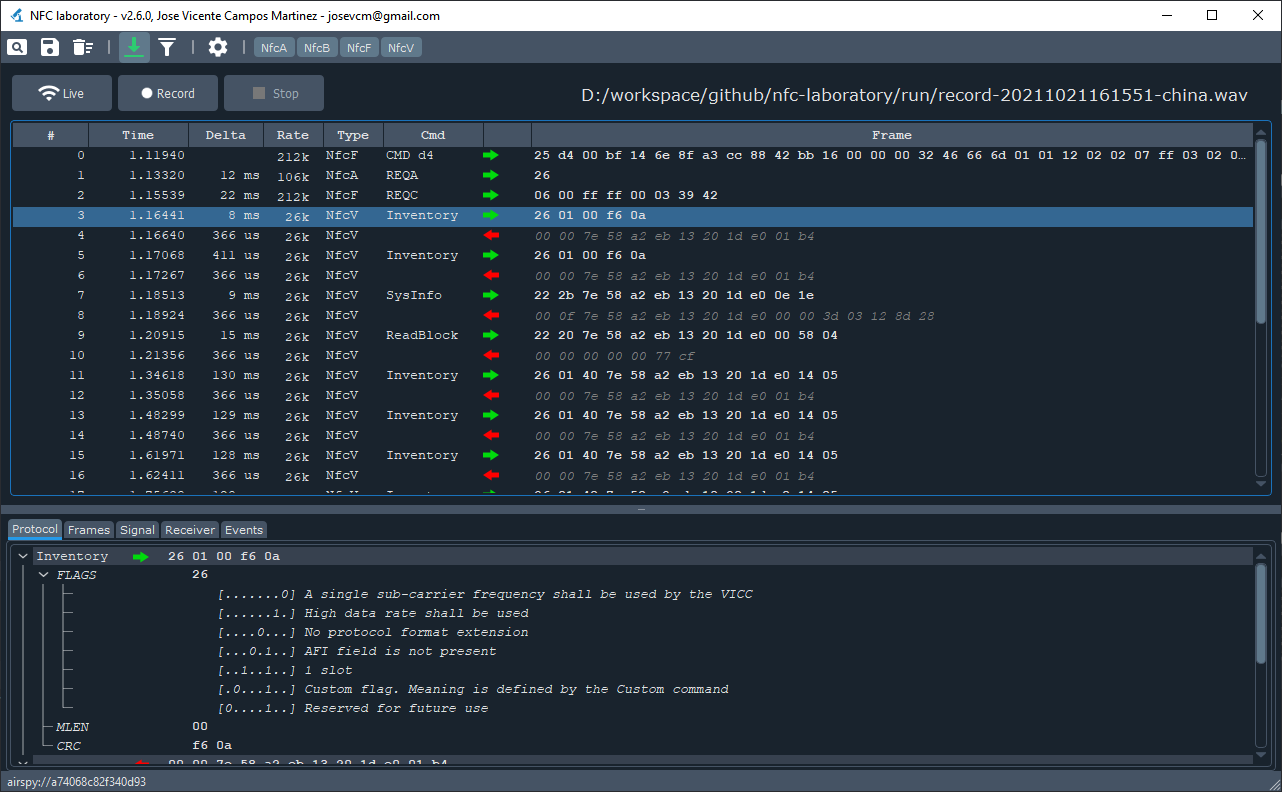
Protocol detail view.
The configuration file is found in conf/nfc-lab.conf and consists of the following sections:
[settings]
device=airspy
It indicates which will be the SDR device to use in case of detecting several. If only one is connected, it does not apply.
[window]
followEnabled=true
filterEnabled=false
defaultWidth=1280
defaultHeight=760
Stores the status of the window and controls, nothing very interesting.
[decoder]
powerLevelThreshold=0.01
Indicates the absolute minimum signal strength to start decoding, 0.5 is the maximum peak.
[decoder.nfca]
enabled=true
minimumModulationThreshold=0.90
maximumModulationThreshold=1.00

[decoder.nfcb]
enabled=true
minimumModulationThreshold=0.08
maximumModulationThreshold=1.00

[decoder.nfcf]
enabled=true
minimumModulationThreshold=0.08
maximumModulationThreshold=1.00

[decoder.nfcv]
enabled=true
minimumModulationThreshold=0.90
maximumModulationThreshold=1.00
Each of the sections controls the parameters for the indicated technology. It allows activating or not its detection and the minimum and maximum modulation depths in percentage to detect the signal. The values that appear here are recommended.
[device.airspy]
gainMode=1
gainValue=4
tunerAgc=false
mixerAgc=false
centerFreq=40680000
sampleRate=10000000
Configuration parameters for the Airspy receiver, the best performance is obtained by tuning in 3rd harmonic at 40.68Mhz.
[device.rtlsdr]
gainMode=1
gainValue=125
tunerAgc=false
mixerAgc=false
centerFreq=40680000
sampleRate=2400000
Configuration parameters for the RTL-SDR receiver, the best performance is obtained by tuning to the 2nd harmonic at 27.12Mhz.
Decoding with this device is quite limited due to its low sampling frequency and 8-bit resolution, it will not offer the necessary quality, is supported only as a reference to experiment with it.
[keys.default]
s00=000000000000, 000000000000
s01=000000000000, 000000000000
s02=000000000000, 000000000000
s03=000000000000, 000000000000
s04=000000000000, 000000000000
s05=000000000000, 000000000000
s06=000000000000, 000000000000
s07=000000000000, 000000000000
s08=000000000000, 000000000000
s09=000000000000, 000000000000
s10=000000000000, 000000000000
s11=000000000000, 000000000000
s12=000000000000, 000000000000
s13=000000000000, 000000000000
s14=000000000000, 000000000000
s15=000000000000, 000000000000
At the moment these keys are not used, in the future their objective is to decrypt on the fly the communication with a Mifare classic card.
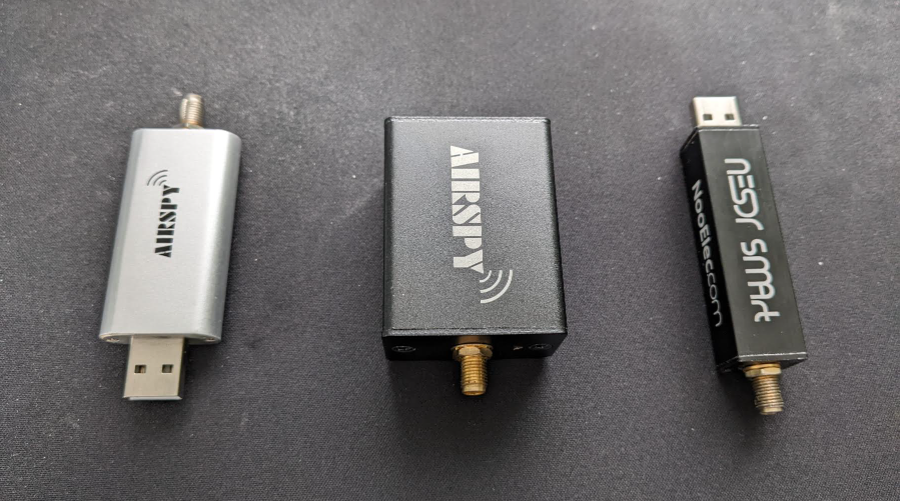
I have tried several receivers obtaining the best results with AirSpy Mini, I do not have more devices, but surely it works with others.
-
AirSpy Mini or R2: Better results, tuning the third harmonic at 40.68Mhz, with a sampling frequency of 10 Mbps, with these parameters it is possible to capture the communication up to 424 Kbps.
-
RTL SDR: It works by tuning the second harmonic at 27.12Mhz, due to the limitation in the maximum sampling frequency of 3Mbps and its 8 bits of resolution only allows you to capture the commands up to 106Kbps and some responses in very clean signals.
Receivers tested:
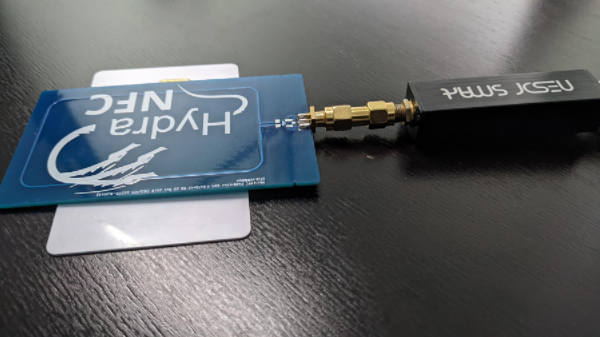
Nooelec RTL-SDR with HydraNFC calibration coil:
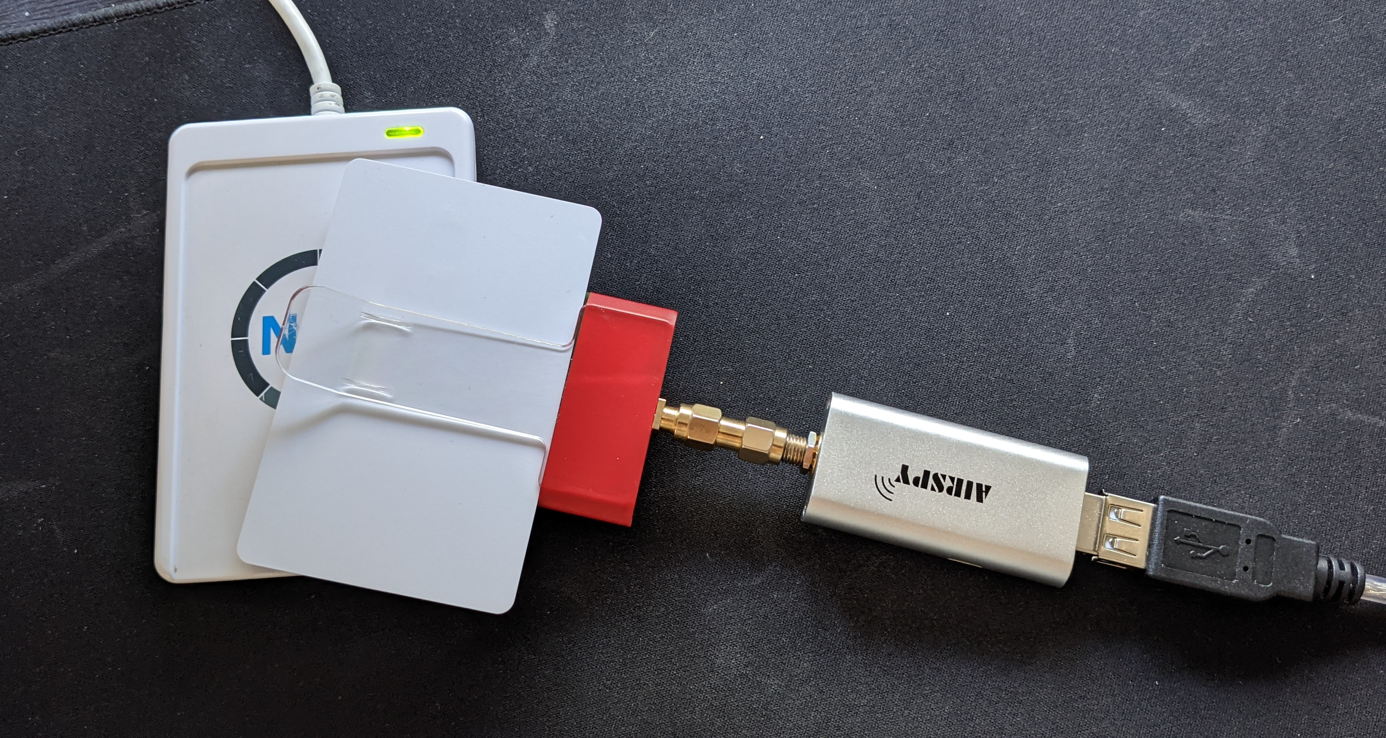
AirSpy with custom antenna and ARC122U reader:
To avoid the use of harmonics it is possible to use an up-converter and thus tune directly to the carrier frequency of 13.56Mhz, although I have not tried this combination.
The demodulator is designed to run in real time, so it requires a recent computer with a lot of processing capacity.
During development, I have opted for a mixed approach where some optimizations are sacrificed in favor of maintaining clarity in the code and facilitating its monitoring and debugging.
For this reason it is possible that certain parts can be improved in performance, but I have done it as a didactic exercise rather than a production application.
The application allows you to read and write files in two different formats:
-
WAV: Reading signals in standard WAV format with 1 or 2 channels is supported. In the first case, it should contain
the sample of the signal in absolute real values. If 2 channels are used they should contain the sampling of the I / Q components. -
JSON: The analyzed signal can be stored in a simple JSON text file or read back from one of them.
In the "wav" folder you can find a series of samples of different captures for the NFC-A, NFC-B, NFC-F and NFC-V modulations with their corresponding analysis inside the "json" files.
These files can be opened directly from the NFC-LAB application through the toolbar to see their analysis, but the main objective is to pass the unit tests and check the correct operation of the decoder.
To run the unit tests, the "nfc-test" artifact must be compiled and launched using the path to the "wav" folder as an argument, for example:
nfc-test.exe ../wav/
TEST FILE "test_NFC-A_106kbps_001.wav": PASS
TEST FILE "test_NFC-A_106kbps_002.wav": PASS
TEST FILE "test_NFC-A_106kbps_003.wav": PASS
TEST FILE "test_NFC-A_106kbps_004.wav": PASS
TEST FILE "test_NFC-A_212kbps_001.wav": PASS
TEST FILE "test_NFC-A_424kbps_001.wav": PASS
TEST FILE "test_NFC-A_424kbps_002.wav": PASS
TEST FILE "test_NFC-B_106kbps_001.wav": PASS
TEST FILE "test_NFC-B_106kbps_002.wav": PASS
TEST FILE "test_NFC-F_212kbps_001.wav": PASS
TEST FILE "test_NFC-F_212kbps_002.wav": PASS
TEST FILE "test_NFC-V_26kbps_001.wav": PASS
TEST FILE "test_NFC-V_26kbps_002.wav": PASS
TEST FILE "test_POLL_ABF_001.wav": PASS
TEST FILE "test_POLL_AB_001.wav": PASS
This project has two main components and is based on Qt5 and MinGW-W64:
- /src/nfc-app: Application interface based on Qt Widgets
- /src/nfc-lib: A core library without dependencies of Qt (for other uses)
And it can be compiled with mingw-g64, a minimum version is required to support C++17, recommended 9.0 or higher.
- Qt5 framework 5.x for Windows, see https://www.qt.io/offline-installers
- A recent mingw-w64 for windows, see https://www.mingw-w64.org/downloads
- CMake version 3.17 or higher, see https://www.cmake.org/cmake/resources/software.html
- Git-bash or your preferred client for Windows, see https://gitforwindows.org/
Using git-bash, download repository:
$ git clone https://github.com/josevcm/nfc-laboratory.git
Cloning into 'nfc-laboratory'...
remote: Enumerating objects: 1629, done.
remote: Counting objects: 100% (1003/1003), done.
remote: Compressing objects: 100% (776/776), done.
remote: Total 1629 (delta 188), reused 990 (delta 179), pack-reused 626
Receiving objects: 100% (1629/1629), 32.09 MiB | 10.60 MiB/s, done.
Resolving deltas: 100% (312/312), done.
Updating files: 100% (975/975), done.
Prepare release makefiles, or change CMAKE_BUILD_TYPE=Debug and -B cmake-build-debug for debug output:
$ cmake.exe -DCMAKE_BUILD_TYPE=Release -G "CodeBlocks - MinGW Makefiles" -S nfc-laboratory -B cmake-build-release
-- The C compiler identification is GNU 8.1.0
-- The CXX compiler identification is GNU 8.1.0
-- Detecting C compiler ABI info
-- Detecting C compiler ABI info - done
-- Check for working C compiler: D:/develop/mingw-w64/x86_64-8.1.0-posix-seh-rt_v6-rev0/mingw64/bin/gcc.exe - skipped
-- Detecting C compile features
-- Detecting C compile features - done
-- Detecting CXX compiler ABI info
-- Detecting CXX compiler ABI info - done
-- Check for working CXX compiler: D:/develop/mingw-w64/x86_64-8.1.0-posix-seh-rt_v6-rev0/mingw64/bin/g++.exe - skipped
-- Detecting CXX compile features
-- Detecting CXX compile features - done
-- USB_LIBRARY: C:/Users/jvcampos/build/nfc-laboratory/dll/usb-1.0.20/x86_64-w64-mingw32/lib/libusb-1.0.dll.a
-- GLEW_LIBRARY: C:/Users/jvcampos/build/nfc-laboratory/dll/glew-2.1.0/x86_64-w64-mingw32/lib/libglew32.dll.a
-- FT_LIBRARY: C:/Users/jvcampos/build/nfc-laboratory/dll/freetype-2.11.0/x86_64-w64-mingw32/lib/libfreetype.dll.a
-- Configuring done
-- Generating done
-- Build files have been written to: C:/Users/jvcampos/build/cmake-build-release
Launch build:
$ cmake.exe --build cmake-build-release --target nfc-lab -- -j 6
Scanning dependencies of target mufft-sse
Scanning dependencies of target mufft-sse3
Scanning dependencies of target rt-lang
Scanning dependencies of target mufft-avx
Scanning dependencies of target airspy
Scanning dependencies of target rtlsdr
[  1%] Building C object src/nfc-lib/lib-ext/mufft/CMakeFiles/mufft-sse.dir/src/main/cpp/x86/kernel.sse.c.obj
[  2%] Building C object src/nfc-lib/lib-ext/mufft/CMakeFiles/mufft-sse3.dir/src/main/cpp/x86/kernel.sse3.c.obj
[  3%] Building C object src/nfc-lib/lib-ext/mufft/CMakeFiles/mufft-avx.dir/src/main/cpp/x86/kernel.avx.c.obj
[  4%] Building CXX object src/nfc-lib/lib-rt/rt-lang/CMakeFiles/rt-lang.dir/src/main/cpp/Executor.cpp.obj
[  4%] Building C object src/nfc-lib/lib-ext/airspy/CMakeFiles/airspy.dir/src/main/cpp/airspy.c.obj
[  5%] Building C object src/nfc-lib/lib-ext/rtlsdr/CMakeFiles/rtlsdr.dir/src/main/cpp/librtlsdr.c.obj
....
[100%] Linking CXX executable nfc-lab.exe
[100%] Built target nfc-lab
To run the application correctly it is necessary to deploy the Qt components together with the libraries, fonts and the generated artifact.
mkdir qt-deploy
cp -rf nfc-laboratory/dat/conf/ qt-deploy/
cp -rf nfc-laboratory/dat/fonts/ qt-deploy/
cp nfc-laboratory/dll/glew-2.1.0/x86_64-w64-mingw32/bin/*.dll qt-deploy/
cp nfc-laboratory/dll/usb-1.0.20/x86_64-w64-mingw32/bin/*.dll qt-deploy/
cp nfc-laboratory/dll/freetype-2.11.0/x86_64-w64-mingw32/bin/*.dll qt-deploy/
cp cmake-build-release/src/nfc-app/app-qt/nfc-lab.exe qt-deploy/
Run windeployqt.exe tool to create required folders and copy required Qt DLLs
$ windeployqt.exe --release --compiler-runtime --no-translations --no-system-d3d-compiler --no-angle --no-opengl-sw qt-deploy/nfc-lab.exe
C:\Users\jvcampos\build\qt-deploy\nfc-lab.exe 64 bit, release executable
Adding Qt5Svg for qsvgicon.dll
Direct dependencies: Qt5Core Qt5Gui Qt5PrintSupport Qt5Widgets
All dependencies   : Qt5Core Qt5Gui Qt5PrintSupport Qt5Widgets
To be deployed     : Qt5Core Qt5Gui Qt5PrintSupport Qt5Svg Qt5Widgets
Updating Qt5Core.dll.
Updating Qt5Gui.dll.
Updating Qt5PrintSupport.dll.
Updating Qt5Svg.dll.
Updating Qt5Widgets.dll.
Updating libgcc_s_seh-1.dll.
Updating libstdc++-6.dll.
Updating libwinpthread-1.dll.
Patching Qt5Core.dll...
Creating directory C:/Users/jvcampos/build/qt-deploy/iconengines.
Updating qsvgicon.dll.
Creating directory C:/Users/jvcampos/build/qt-deploy/imageformats.
Updating qgif.dll.
Updating qicns.dll.
Updating qico.dll.
Updating qjpeg.dll.
Updating qsvg.dll.
Updating qtga.dll.
Updating qtiff.dll.
Updating qwbmp.dll.
Updating qwebp.dll.
Creating directory C:/Users/jvcampos/build/qt-deploy/platforms.
Updating qwindows.dll.
Creating directory C:/Users/jvcampos/build/qt-deploy/printsupport.
Updating windowsprintersupport.dll.
Creating directory C:/Users/jvcampos/build/qt-deploy/styles.
Updating qwindowsvistastyle.dll.
Application is ready to use!
If you do not have an SDR receiver, I have included a small capture sample signal in file "wav/capture-424kbps.wav" that serves as an example to test demodulation.
Thanks to bvernoux for this instructions:
Working solution is to use Qt Creator (Tested with latest Qt Creator 5.0.1 with Qt 5.15.2 + mingw81_64 ) then import the nfc-laboratory/CMakeLists.txt project and built it with MinGW 64-bit (Tested with success with Qt 5.15.2 + mingw81_64 on Windows10Pro 21H1) Example of batch used(requires msys2/linux cp/rm commands) to do the deployment (after build of the release version with Qt Creator)
set qtpath=C:\Qt\5.15.2\mingw81_64\bin\
set PATH=%qtpath%;%PATH%
set execpath="%qtpath%\windeployqt.exe"
set nflab_git_path=D:\_proj\__Lab_Tools\NFC\nfc-laboratory
set build_path=%nflab_git_path%\..\build-nfc-laboratory-Desktop_Qt_5_15_2_MinGW_64_bit-Release\src\nfc-app\app-qt

cp %build_path%/nfc-lab.exe ./
%execpath% --no-translations --no-system-d3d-compiler --no-angle --no-opengl-sw nfc-lab.exe

cp %qtpath%\libgcc_s_seh-1.dll ./
cp %qtpath%\libwinpthread-1.dll ./
cp %qtpath%\libstdc++-6.dll ./

cp -a %nflab_git_path%\dat\conf ./
cp -a %nflab_git_path%\dat\fonts ./

cp %nflab_git_path%\dll\glew-2.1.0\x86_64-w64-mingw32\bin\libglew32.dll ./
cp %nflab_git_path%\dll\freetype-2.11.0\x86_64-w64-mingw32\bin\libfreetype.dll ./
cp %nflab_git_path%\dll\usb-1.0.20\x86_64-w64-mingw32\bin\libusb-1.0.dll ./
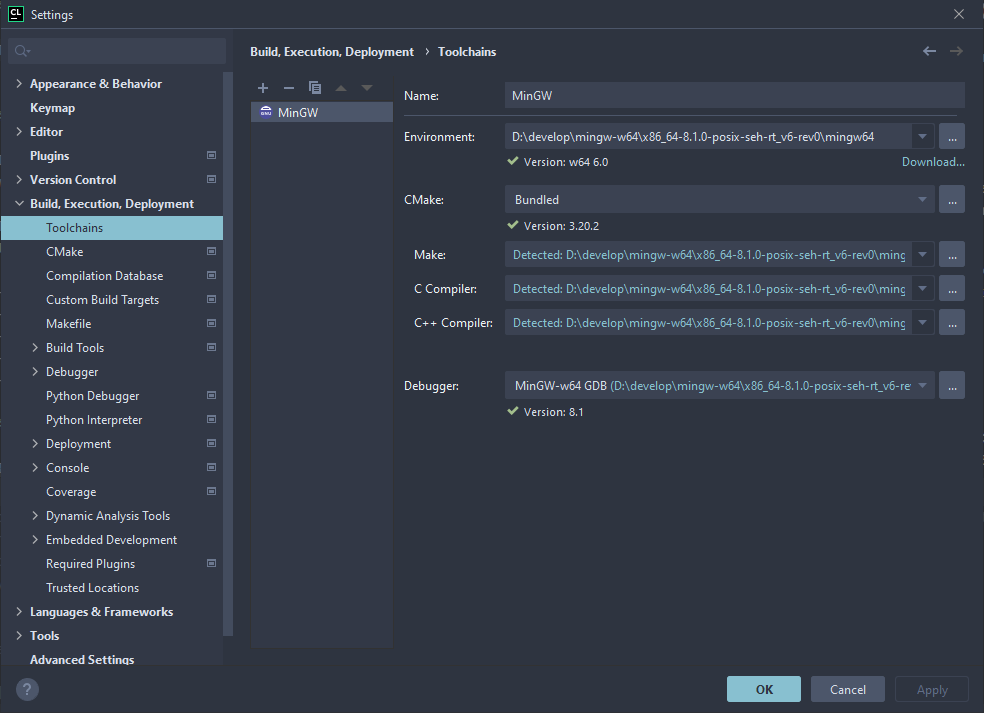
This is my favorite IDE and that I use for all projects.
Install all prerequisites, and register MinGW toolchain in File->Settings->Build, Execution, Deployment->Toolchains
Next download project from GITHUB and create new CMake project from source, then build release and debug verions.
Prepare the Qt deployment environment by executing the script build-runenv.ps1, now is ready to launch!
If you think it is an interesting job or you plan to use it for something please send me an email and let me know, I will be happy to exchange experiences, thank you very much.
This project is published under the terms of the MIT license, however there are parts of it subject to other types of licenses, please check if you are interested in this work.
- AirSpy SDR driver at
src/nfc-lib/lib-ext/airspysee https://github.com/airspy/airspyone_host - RTL SDR driver at
src/nfc-lib/lib-ext/rtlsdrsee https://osmocom.org/projects/rtl-sdr - nlohmann json at
src/nfc-lib/lib-ext/nlohmannsee https://github.com/nlohmann/json - mufft library at
src/nfc-lib/lib-ext/mufftsee https://github.com/Themaister/muFFT - QCustomPlot at
src/nfc-app/app-qt/src/main/cpp/3party/customplotsee https://www.qcustomplot.com/ - QDarkStyleSheet at
src/nfc-app/app-qt/src/main/assets/themesee https://github.com/ColinDuquesnoy/QDarkStyleSheet
Precompiled installer for x86 64 bit can be found in repository
Normal NFC cards work on the 13.56 Mhz frequency, therefore the first step is receive this signal and demodulate to get the baseband stream. For this purpose any SDR device capable of tuning this frequency can be used, i have the fantastic and cheap AirSpy Mini capable of tuning from 24Mhz to 1700Mhz. (https://airspy.com/airspy-mini/)
However, it is not possible to tune 13.56Mhz with this receiver, instead I use the second harmonic at 27.12Mhz or third at 40.68Mhz with good results.
The received signal will be composed of the I and Q components as in the following image.
From these components the real magnitude is calculated using the classic formula sqrt (I ^ 2 + Q ^ 2). Let's see a capture of the signal received in baseband (after I/Q to magnitude transform) for the REQA command and its response:
As can be seen, it is a signal modulated in 100% ASK that corresponds to the NFC-A REQA 26h command of the NFC specifications, the response of the card uses something called load modulation that manifests as a series of pulses on the main signal after the command. This is the most basic modulation, but each of the NFC-A / B / F / V standards has its own characteristics.
The standard corresponds to the ISO14443A specifications which describe the way it is modulated as well as the applicable timings.
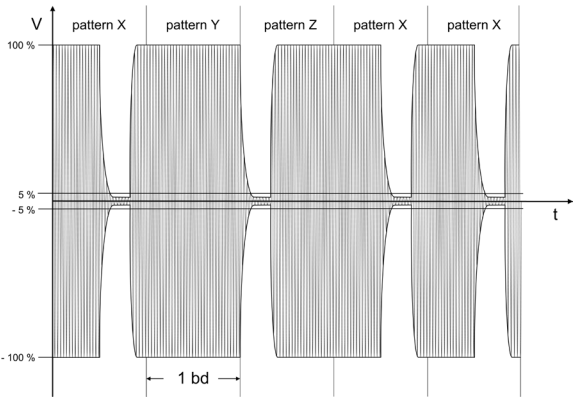
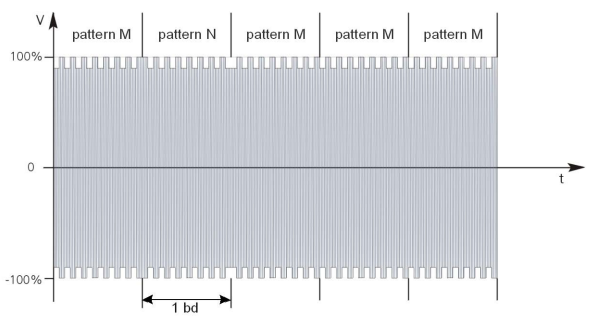
Reader frames are encoded using 100% ASK with modified miller encoding.
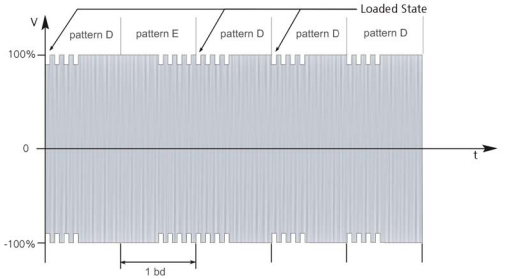
When the speed is 106 Kbps card responses are encoded using manchester scheme with OOK load modulation over a subcarrier at 848 KHz.
For higher speeds, 212 kbps, 424 kbps and 848 kbps it uses a NRZ-L with binary phase change modulation, BPSK, over same subcarrier.
The standard corresponds to the ISO14443B specifications which describe the way it is modulated as well as the applicable timings.
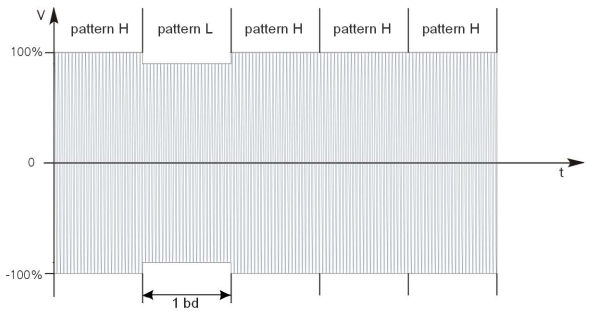
Reader frames are encoded in 10% ASK using NRZ-L encoding.
Responses from the card are encoded with binary phase change modulation, BPSK, using NRZ-L encoding.
The standard corresponds to the ISO18092 and JIS.X.6319 specifications which describe the way it is modulated as well as the applicable timings.
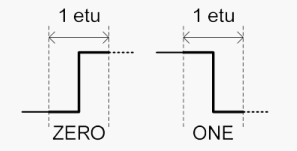
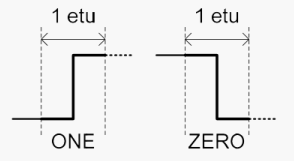
Support speeds from 212 kbps to 848 kbps, both reader and card frames are encoded using either observed or reversed manchester as see below.
Observed manchester modulation.
Reversed manchester modulation.
The standard corresponds to the ISO15693 specifications which describe the way it is modulated as well as the applicable timings.
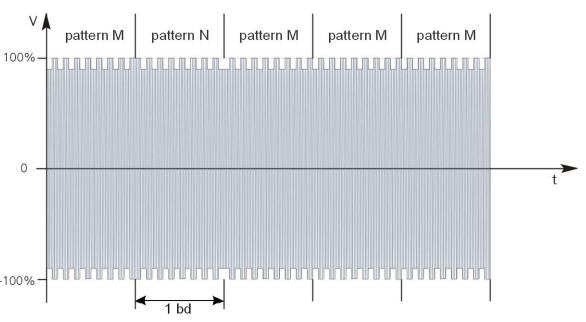
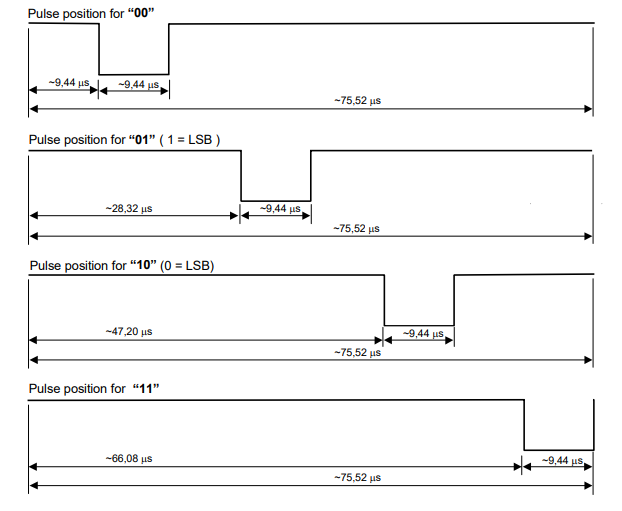
The coding is based on pulse position modulation (PPM) where the information is encoded by modifying the time when the pulse is located within each time slot.
There are two modes, 1 of 4 and 1 of 256, where each symbol encodes 2 and 8 bits respectively, this is the example for the first one.
Card responses are encoded using manchester OOK with 848 subcarrier as of NFC-A.
Depending on the encoding, the possible speeds are 26Kbps and 53Kbps, however these cards can be read from greater distances.
Now we are going to see how to decode this.
Before starting to decode each of these modulations, it is necessary to start with a series of basic signals that will help us in the rest of the process.
The concepts that I am going to explain next are very well described on Sam Koblenski's page (https://sam-koblenski.blogspot.com/2015/08/everyday-dsp-for-programmers-basic.html) which I recommend you read to fully understand all the processes related to the analysis that we are going to carry out.
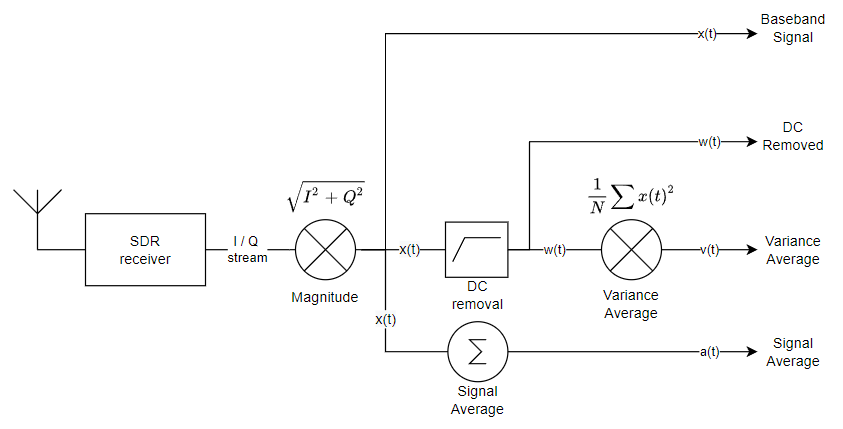
Remember that the sample received from the SDR receiver is made up of the I / Q values, therefore the first step is to obtain the real signal.
Once we have the real signal, it is necessary to eliminate the continuous component (DC) that will greatly facilitate the subsequent analysis process. For this we will use a simple IIR filter.
To calculate the modulation depth we need to know the envelope of the signal as if it were not modulated by the pulses or sub-carrier, for this we will use a simple slow exponential average.
Finally we will obtain the standard deviation or variance of the signal that will help us to calculate the appropriate detection thresholds based on the background noise.
An example of each component, x(t), w(t), v(t) and a(t).
As we have seen in the description, the NFC-A / B / F / V standards will use different modulations but all are based on two basic techniques, amplitude modulation and phase modulation.
For the encoding of each symbol they use Miller, Manchester or NRZ-L. The first two can be detected by correlation techniques and for NRZ-L it is enough to detect the level of the signal at each point of synchronization, let's see it in detail.
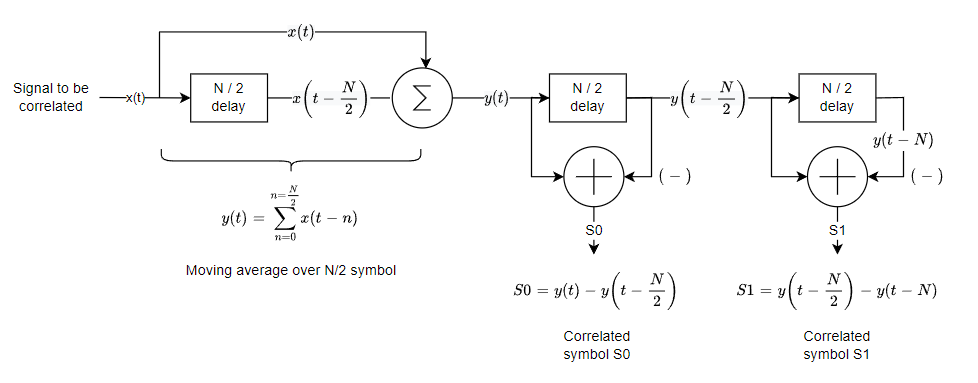
The correlation operation is a measure of how much one signal resembles another that serves as a reference. It is used intensively in digital signal analysis. With analog signals, the correlation of each sample x(t) requires N multiplications, therefore a symbol needs N^2 multiplications, being a costly process.
But since the reference signal is digital, it only has two possible values 0 or 1, which greatly simplifies the calculation by eliminating all the multiplications, allowing the correlation to be carried out by process a simple moving average.
These would be the two basic symbols that we need to carry out the correlation, if you study a little the operations that need to be carried out you will see that they are reduced to calculating the mean over the duration of the symbol and then obtaining the difference between the critical points, t = 0, t = N / 2 and t = N as seen in next diagram.
We will widely use this operation to extract the information within the NFC signals
For ASK modulated signals, it is enough to carry out the correlation described above on the baseband signal x(t). Below is the correlation functions for the two basic symbols S0, S1 used to calculate all the others. Last value is function SD and represent the absolute difference between S0 and S1 necessary to detect the timmings.
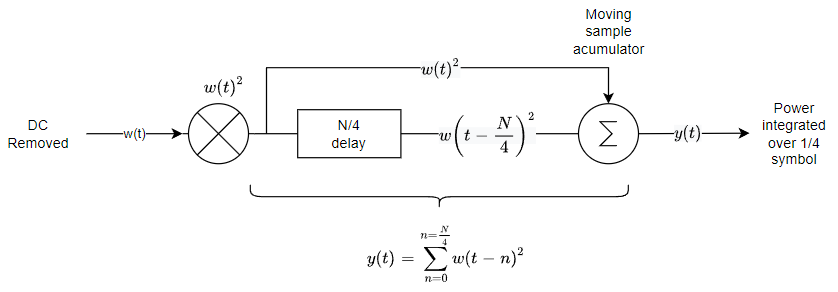
When the speed is 106 kbps, the answer can be extracted by applying the same technique, but instead of using the signal x(t) we will do it with w(t) multiplying it by itself obtaining a measure of the power that we will then integrate over 1/4 of the symbol period, in such a way that we will obtain a fairly clear ASK signal to be able to apply the correlation described above, this is the diagram of the process.
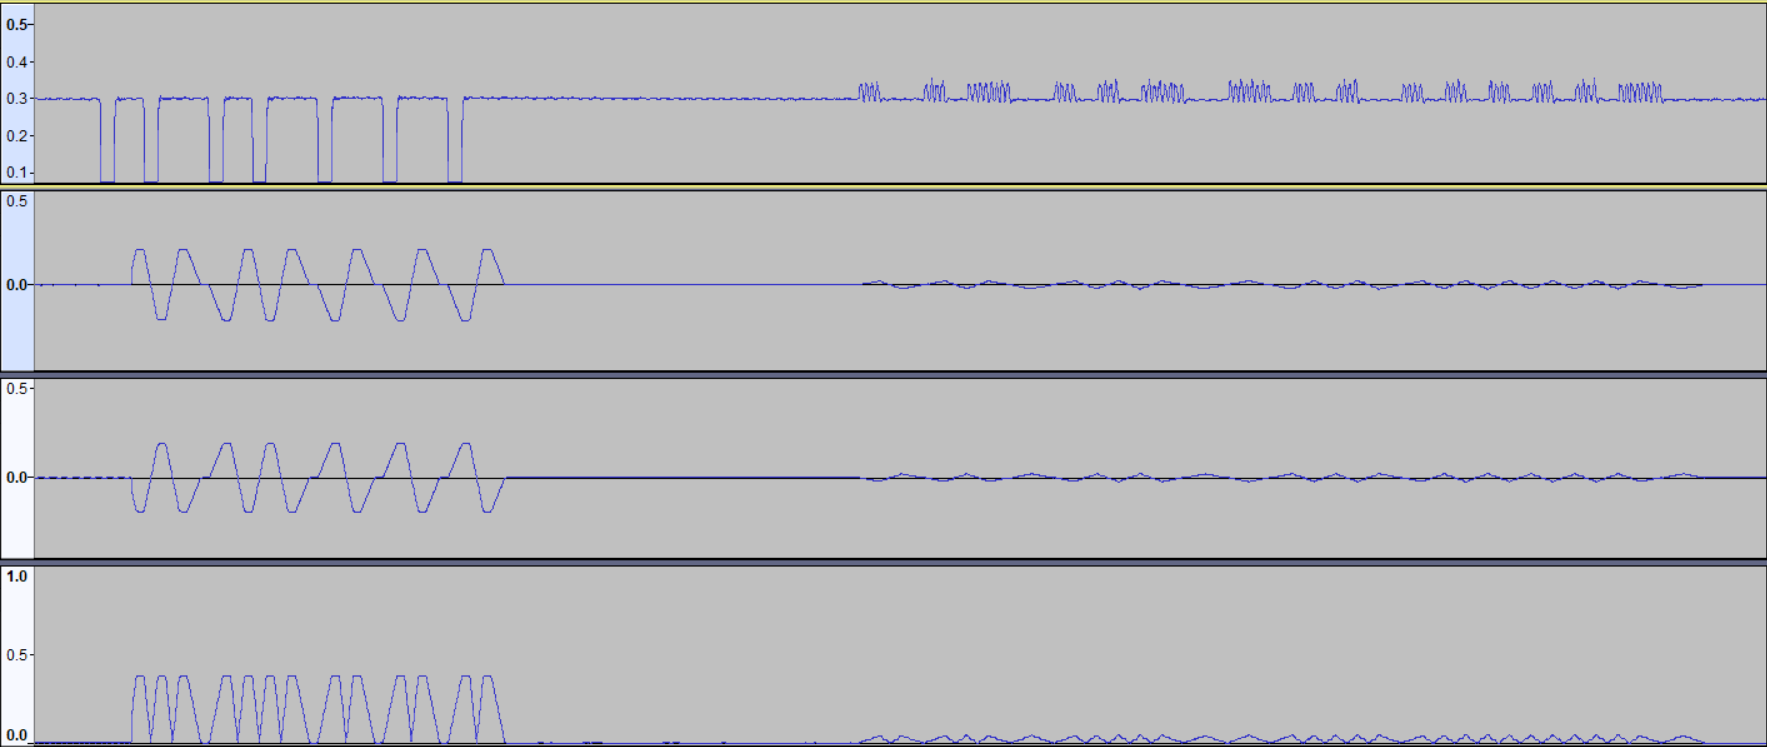
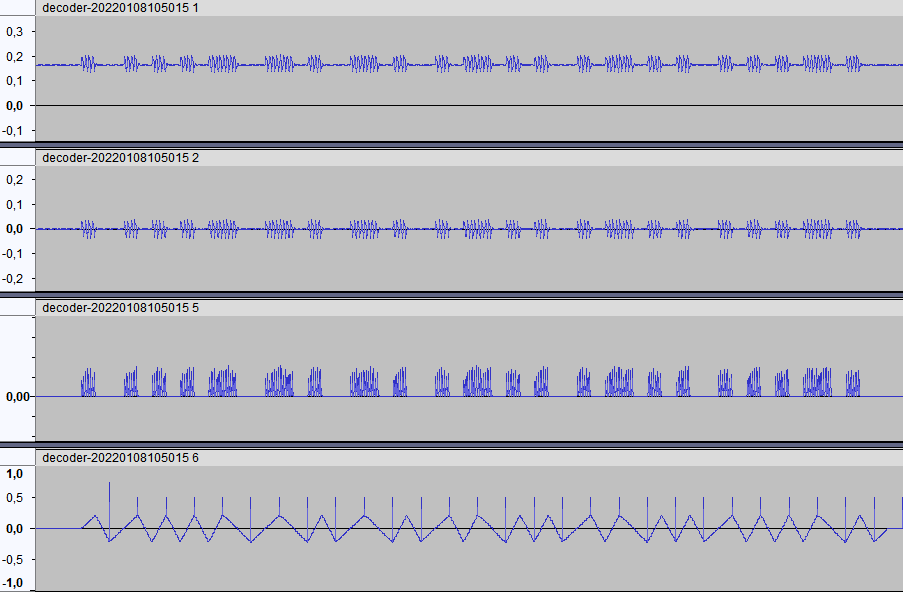
Card is much weaker but enough to allow its detection using the same technique for patterns E, D, F, here it is shown in better scale the process described. From top to bottom the signals are: x(t), w(t), w(t)^2 and y(t).
For BPSK demodulation a reference signal is required to detect the phase changes (carrier recovery), since that is complex I have chosen to implement it by multiplying each symbol by the preceding one, so that it is possible to determine the value of symbols through the changes produced between then.
It is very important that the signal does not contain a DC shift, therefore the signal w(t) obtained previously is taken as input to the process.
Below you can see the signal modulated in BPSK for a response frame at 424Kbps, followed by the demodulation y(t) and integration process over a quarter of a symbol r(t).
Finally, by checking if the result is positive or negative, the value of each symbol can be determined. It is somewhat more complex since timing and synchronization must be considered but with this signal is straightforward detect symbol values.
From the correlation process we obtain a flow of symbols where it is already possible to apply the specific decoding defined in each of the standards, NFC-A / B / F / V. Each symbol correlation is evaluated in the appropriate instants according to the synchronization.
The correlation process begins with the calculation of the S0 and S1 values that represent the basic symbols subsequently used to discriminate between the NFC patterns X, Y, Z, E, D, F, M, N etc. that are subsequently interpreted by a state machine in accordance with the specifications of ISO ISO14443A, ISO14443B, ISO15693 and Felica to obtain a byte stream that can be easily processed.
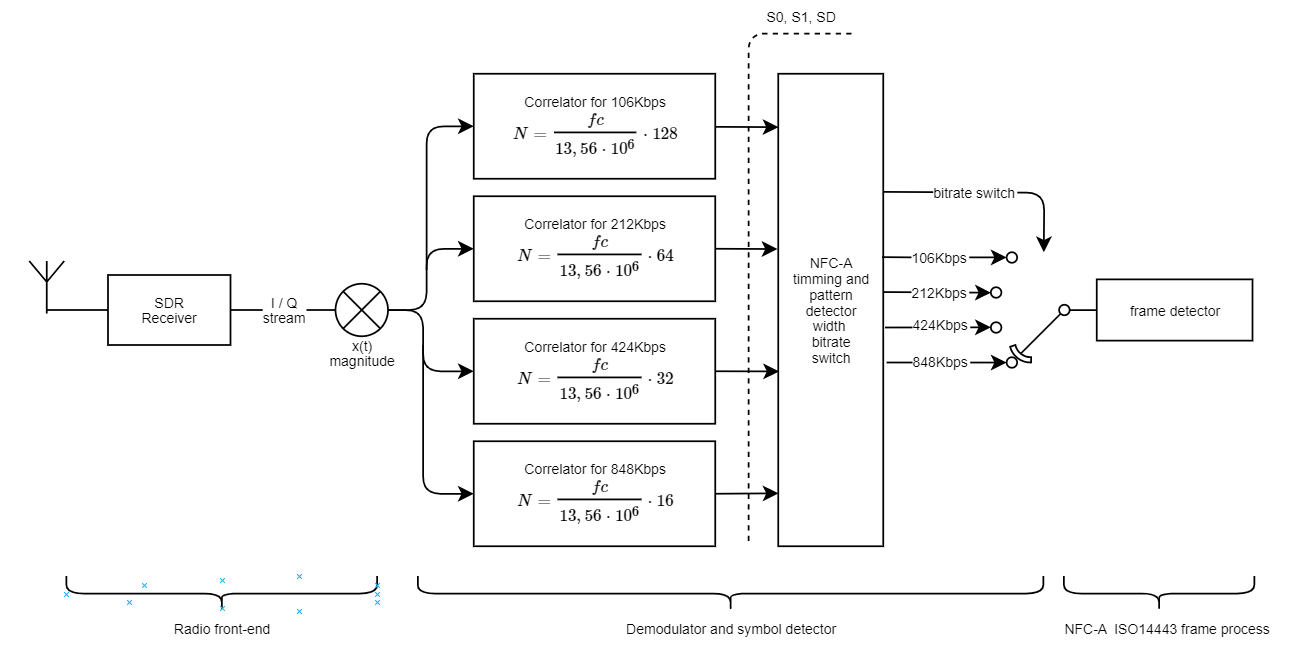
So, we have seen how demodulation is performed, but how does this apply when there are different speeds? Well, since we do not know in advance the transmission speed it is necessary to apply the same process for all possible speeds through a bank of correlators. Really only is necessary to do it for the first symbol of each frame, once the bitrate is known the rest are decoded using that speed.
