- Python / Broadlink powered Telegram bot
- Control your home/office devices with Telegram
- Introduction
- Requirements
- Getting Started
- Running the application
- Screenshots
- Videos
- Future features / Improvements
- Project Limitation
- Contributing
- License
Control various devices such as (TV, Aircon, Set Top Box) with this Telegram Bot!
- Supports various household appliances
- Only approved users can use the bot
- In-line keyboard menu to control your devices
- Learn and add commands to JSON file for device's commands
- Add / Delete users
- Query server's last handled request / command
- Python 3.6+
- Python Telegram Bot
- Python-Broadlink
- Supported Broadlink Devices
- Create new bot in Telegram
- Find @BotFather in Telegram
- Type
/helpfor commands - Key in
/newbotand save your bot id and secret

- Populate shortcut commands to your Telegram bot


- Find @BotFather in Telegram
- Type
/setcommandsin Telegram - Paste the following text snippet to Telegram
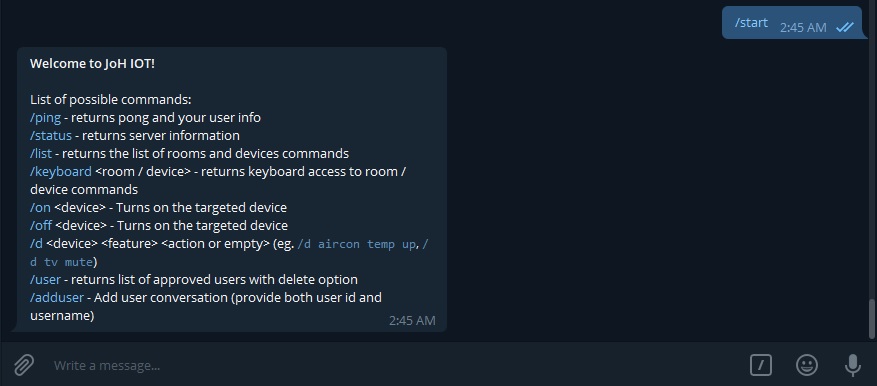
start - list of general commands
ping - returns pong and your user info
status - returns server information
list - returns the list of rooms and devices commands
keyboard - returns keyboard access to rooms commands
user - returns list of approved users with delete option
adduser - Add user conversation (provide both user id and username)
- Success!, Botfather will notify
Success! Command list updated. /help

- Unbox Device

- USB Cable, RM3 Device
- Connect RM3 device with power with USB cable
- Install Mobile App and configure RM3 device
- Install Broadlink's e-Control App Link
- Press on
+and thenAdd device


You may refer to https://github.com/mjg59/python-broadlink#example-use if the above steps did not work
- Unbox Device

- SP2 Smart Plug
- Plug SP2 into socket
- Install Mobile App and configure SP2 device
- Install Broadlink's e-Control App Link
- Press on
+and thenAdd device

You may refer to https://github.com/mjg59/python-broadlink#example-use if the above steps did not work
- To add a room, use the following JSON format and add it to
devices.jsonfile - Supports one RM device per room only
- Add the RM device's MAC address that you are placing in the room (for RMMINI) (To get device's IP or MAC address, refer to Learning Commands)
- MAC address value should be used from the device list from the app (without the colon
:) - See Other Broadlink Devices for more details with adding other Broadlink devices
eg. Adding Office
{
	"office": {
		"mac_address": "780f771abcde",
		"broadlink_type": "RMMINI",
		"devices": [],
		"broadlink_devices": []
	}
}
| Types | Devices |
|---|---|
| 1 | Air-con |
| 2 | TV |
| 3 | Set Top Box |
| 4 | Projector |
| 5 | Amplifier |
- Model is not used at the moment
- Add to room's
deviceslist - To add device(s) into a room, use the following JSON format
eg. Office's Aircon
{
	"type": 1,
	"id": "office-aircon",
	"brand": "daikin",
	"model": "super-multi-nx"
}
- Brand name and model are used
- Key value of Command interface name -> Command String (from bytearray)
- All device's commands should have at least
power_onandpower_offkey / value - Contribute to the project by committing your device's commands (
commands.json)
eg. Daikin Aircon commands
{
	"1": {
		"daikin": {
			"some-model": {
				"power_on": "26005002100e0e0e0f0e0e0e0f0e0e00034473380f2a0f0e0f0e0e0e0e2a0f0e0f0e0e0e0f0e0e2a0f0e0e2a0f2a0f0e0f290f2a0f2a0f2a0f2a0f0e0e0f0e2a0f0e0e0e0f0e0e0e0f0e0e0e0e0f0e0e0e0e0f0e0e2a0f0e0f290f0f0e0e0e0e0f291029100e0e0e0e0f0e0e0e0e0f0e0e0e0f0e0e0e0f0e0e0e0e0e0f0e0e0e0f0e0e0e0f290f2a0f2a0f0e0f29100e0e2a0f2a0f00047b73380f2a0f0e0e0e0f0e0e2a0f0e0f0e0e0e0e0f0e2a0f0e0e2a0f2a0f0e0e2a0f2a0f2a0f2a0f2a0f0e0e0e0f29100e0e0e0f0e0e0e0e0e0f0e0e0e0f0e0e0e0f0e0e0e0e2a0f0e0f0e0e0e0f0e0e2a0f0e0e2a0f0e0f29102910290f0f0e0e0e0e0f29100e0e2a0f0e0e0e0f0e0e0e0f0e0e0e0f2910290f0e0f2910291029100e0e00047b73380f2a0f0e0f0e0e0e0e2a0f0e0f0e0e0e0f0e0e2a0f0e0e2b0e2a0f0e0f290f2a0f2a0f2a0f2a0f0e0e0f0e29100e0e0e0f0e0e0e0f0e0e0e0e0e0f0e0e0e0f0e0e0e0f0e0e0e0f0e0e0e0e0e0f0e0e0e0f29100e0e0e0f290f2a0f2a0f0e0f0e0e0e0f0e0e2a0f29100e0e2a0f0e0f0e0e0e0e0e0f0e0e0e0f0e0e0e0f0e0e0e0e2a0f2a0f2a0f2a0f2a0f0e0e2a0f0e0f0e0e0e0f0e0e0e0e0e0f0e0e0e0f0e0e0e0f0e0e0e0f0e0e0e0e0e0f0e0e0e0f0e0e2a0f2b0e0e0e0e0f0e0e0e0f0e0e0e0f0e0e0e0f0d0f0e0e2a0f2a0f0e0f0e0e0e0e0e0f0e0e0e0f0e0e0e0f0e0e0e0f0e0e0e0e0e0f0d0f0e0f0e0e0e0f0e0e0e0f0e0e0e0e0e0f0e0e2a0f2a0f0e0f290f0e0f0e0e0e0f0e0e0e0f0e0e0e0e2a0f0e0f0e0e0e0f0e0e0e0f0e0e0e0e0e0f0e0e0e0f0d0f0e0f0e0e0e0f000d050000000000000000",
				"power_off": "26005002100d0f0d0f0d100d0f0d1000034473371029100d0f0d0f0d1029100d0f0d100d0f0d10290f0d10291029100d0f291029102910290f2a0f0d100d0f2a0f0d100d0f0d0f0d100d0f0d100d0f0d100d0f0d0f2a0f0d1029100d0f0d100d0f291029100d0f0d100d0f0d0f0e0f0d0f0d100d0f0d100d0f0d100d0f0d0f0d100d0f0d102910290f2a0f0d1029100d0f2a0f291000047b73371029100d0f0d100d0f29100d0f0d100d0f0d10290f0e0f291029100d0f2a0f291029102910290f0e0f0d0f2a0f0d100d0f0d100d0f0d0f0d100d0f0d100d0f0d100d0f29100d0f0d100d0f0d1029100d0f29100d10290f0d100d0f0d0f2a0f2a0f0d100d0f0d100d0f0d0f0d100d0f0d1029100d0f0d0f2a0f2a0f0d100d0f0d1000047a733810290f0d100d0f0d1029100d0f0d0f0d100d0f2a0f0d10290f2a0f0d1029102910290f2a0f2a0f0d100d0f29100d0f0d100d0f0d100d0f0d100d0f0d0f0d100d0f0d100d0f0d100d0f0d0f0e0f0d0f0d100d0f0d100d0f2910291029100d0f0d100d0f0d0f2a0f2a0f0d1029100d0f0d0f0d100d0f0d100d0f0d100d0f0d0f0d10291029102910290f2a0f0d1029100d0f0d0f0d100d0f0d100d0f0d100d0f0d0f0e0f0d0f0d100d0f0d100d0f0d100d0f0d0f2a0f2a0f0d100d0f0d100d0f0d0f0d100d0f0d100d0f0d10290f2a0f0d100d0f0d100d0f0d0f0e0f0d0f0d100d0f0d100d0f0d100d0f0d0f0d100d0f0d100d0f0d100d0f0d0f0d100d0f2a0f2a0f0d10290f0d100d0f0d100d0f0d100d0f0d0f2a0f0d100d0f0d100d0f0d100d0f291029102910290f2a0f2a0f2a0f2a0f000d050000000000000000",
				"powerful": "260050020f0e0f0e0e0e0f0e0e0e0e000345723810290f0e0f0e0e0e0f29100e0e0e0f0e0e0e0e2a0f0e0f291029100e0e2a0f291029102910290f0e0f0e0e2a0f0e0f0e0e0e0f0e0e0e0e0e0f0e0e0e0f0e0e0e0f29100d0f29100e0e0e0f0e0e2a0f2a0f0e0e0e0f0e0e0e0f0e0e0e0f0e0e0e0e0e0f0e0e0e0f0e0e0e0f0e0e0e0f0e0e2a0f291029100e0e2a0f0e0e2a0f2b0e00047b73380f2a0f0e0f0e0e0e0f2a0f0e0e0e0e0e0f0e0e2a0f0e0f2910290f0e0f291029102910290f2a0f0e0f0e0e2a0f0e0e0e0f0e0e0e0f0e0e0e0f0e0e0e0f0e0e0e0e0e0f29100e0e0e0f0e0e0e0f290f0e0f0e0e2a0f2a0f2a0f2a0f0e0e0e0f0e0e2a0f0e0f290f0e0f0e0e0e0f0e0e0e0f2910290f2a0f0e0f29102910290f0e0f00047b73380f2a0f0e0e0e0f0e0e2a0f0e0f0e0e0e0e0e0f29100e0e2a0f2a0f0e0e2a0f2a0f2a0f2a0f2a0f0e0e0e0f29100e0e0e0f0e0e0e0e0e0f0e0e0e0f0e0e0e0f0e0e0e0f0e0e0e0e0e0f0e0e0e0f0e0e0e0f290f0f0e0e0e2a0f2a0f2a0f0e0e0e0f0e0e0e0f291029100e0e2a0f0e0e0e0f0e0e0e0f0e0e0e0f0e0e0e0e0e0f0e0e2a0f2a0f2a0f291029100e0e2a0f0e0f0e0e0e0e0e0f0e0e0e0f0e0e0e0f0e0e0e0e0e0f0e0e0e0f0e0e0e0f0e0e0e0f0e0e2a0f29100e0e0e0f0e0e0e0f0e0e0e0e0e0f0e0e0e0f0e0e2a0f2a0f0e0e2a0f0e0f0e0e0e0f0e0e0e0f0e0e0e0e0e0f0e0e0e0f0e0e0e0f0e0e0e0f0e0e0e0e0e0f0e0e0e0f0e0e0e0f290f2a0f0e0f29100e0e0e0f0e0e0e0e0e0f0e0e0e0f29100e0e0e0f0e0e0e0e0e0f0e0e2a0f0e0f0e0e0e0f0e0e0e0e0e0f0e0e000d050000000000000000"
			}
		}
	}
}
| Types | Devices |
|---|---|
| SP2 | Smart Plug |
| SP4 | Smart Plug |
- MP1 / MP2 / TC2 / TC3 / not supported yet
- Supports multiple Broadlink devices in a room
- Add to room's
broadlink_deviceslist - To add Broadlink device(s) into a room, use the following JSON format
eg. Office's Light with SP2
{
	"id": "office-light",
	"mac_address": "780f771888eg",
	"broadlink_type": "SP2"
}
- See Sample JSONs for more room and device examples
- Server will validate both Telegram user's ID and Name
- User will not be able to delete him/her self
- Key value of Telegram User ID -> User Name
- We have to add at least one user and add other users through the first user
eg. Add John's Telegram account with user ID 1234567 and username John
{
	"1234567": "John"
}
- Your various broadlink devices are configured and running in your network (Refer to Broadlink Device, for more details)
- Completed Step 1-9 in Run
- Installed
python-broadlinklibrary as we will be using theclicommands here - Make sure you have your device(s) Type / IP / MAC Address
- To retrieve device(s) IP / MAC address
- Open
pythonshell - Import python-broadlink library
import broadlink - Discover all devices
devices = broadlink.discover(timeout=5) - To get a list of discovered devices in the variable devices eg.
[<broadlink.rm at 0x45a62f0>] - We need the device's type, host (IP), and MAC address information
- Iterate all discovered devices print details
- For use
for d in devices: print(d.type, d.host, "".join(format(x, '02x') for x in d.mac)) - Save this information which will be used with the
cliapp
- Open
- Note: This step is currently done manually on shell, the ideal future will be a conversation command in the app to add / remove / edit device commands
- Make sure you have your device(s) Type / IP / MAC Address (refer to Pre-requisites for more details)
- Refer to library's
typedefinitions here python broadlink_cli --type <type> --host <host> --mac <mac address> --learncliapp will outputLearning.... Your RM device should light indicator will light up as white

- When it's white, point your IR remote controller to the top of the device and press the selected feature to learn the command
- The
cliapp will print out the learned data, save this value incommands.json(See Device's Commands for more details on how to save learned command) - To test learned data with
python broadlink_cli --type <type> --host <host> --mac <mac address> --send <learned data>
- Type
/keyboardto begin - First menu is to select the room

- After selecting the room, select the device in the room

- The device's feature buttons will be shown

- On successful sent of the selected feature, the app will receive a feedback from the server
- eg. App
-

- eg. Mobile
-

- Use
BackorJump to Roomsbutton to go back to previous menu or jump to select room menu - To close, press the
Closebutton and the menu keyboard will be closed


- Conversation Flow (Start conversation -> input user's user_id -> input user's username -> Successfully added user)
- Type
/adduserto begin - Input the user's user id (The user may use
/pingto find out user id) - Input the user's user name
- Success!
- At any time if you wish to cancel adding user, you can type
/canceladduserto cancel add user conversation - Type
/useror/statusto check which user(s) are approved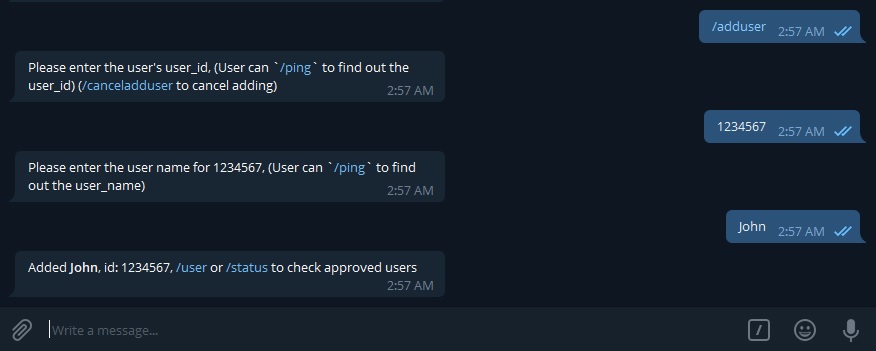

- Type
/userto begin - Select
Delete Usernext to the user you want to remove
- Select
Yesto confirm removal of the selected user orNoto go back to user menu keyboard
- On successful removal of selected user, the app will receive a feedback from the server stating the user's id and name that was removed

- To close, press the
Closebutton and the user menu keyboard will be closed


- Make sure you have Python 3.6++
- Clone or fork the repository (https://github.com/joh90/iot)
sudo apt-get install build-essential libssl-dev libffi-dev python3.6-devfor Debian / Ubuntu- Install virtualenv (
pip3 install virtualenv) (https://docs.python-guide.org/dev/virtualenvs/) - Create virtualenv for the repository (
python3 -m virtualenv <folder name>) - Activate your virtualenv (
source <folder name>/bin/activate) - Go to folder
cd iot - Install requirements
pip3 install -r requirements.txt(this might take some time) - Update
devices.jsonwith configuration - Add your telegram user to
users.json(Refer to Users) - Run!
python main.py --bot_id <BOT_ID> --bot_secret <BOT_SECRET> --name <Bot Name> - You can pass your own users and devices json file,
python main.py --helpfor more details - Find and add your bot to your Telegram
- Enjoy!
- Desktop App
- Mobile App


-
Desktop App

-
Mobile App


-
Desktop App

-
Mobile App


- Desktop App


-
Desktop App
-
Mobile App


-
Desktop App

-
Mobile App


To be added
To be added
- Improve Room / Device listing
- Use 2 columns if Inline Keyboard menu buttons are more than 8
- On / Off device in room keyboard menu level
- Sort device's feature with power on and off first
- Send / Backup JSONs
- Room / User last command (with time)
- Custom Macros
- Favorite Keyboard, custom make your own keyboard buttons
- Room / Device CRUD (conversation style)
- Learn device command (conversation style) (+ if device command cannot be found / convo command)
- Set Top Box network provider channel bindings
- Support TC2 light switches
- Support Multimedia device's menu into up / down / left / right keyboard
- Support Broadlink power strip
- Restart server
- Triggers with scheduler (on specific day / time of day / repeatable to do something)
- You have to learn your own device's command if it is not available from the project
- With IR devices, the server will not be able to know the current state, only last send commands
- If the home / office's internet goes down, you will not be able to send command to your devices
- If your computer / Raspberry-PI hosting the server dies / restart, you will not be able to send command to your devices
- 2 devices in the same room may result in both devices receiving the IR commands sent from the server
- Fork the project
- Create branch in your fork project (from master)
- Make and test your changes
- Commit to the branch you created (with meaningful commit messages)
- From your fork project, create a pull request (with meaningful comments with purpose of the change)
- Fix comments from reviewers (if any)
- Admins will merge your pull request, when it has enough approval
- Thanks for contributing!
- MIT License
Permission to use, copy, modify, and/or distribute this software for any purpose with or without fee is hereby granted, provided that the above copyright notice and this permission notice appear in all copies.