João Araujo, May 08, 2020
It's important to update your model as soon as you have new data coming to your organization. Create a pipeline to update this model is not so difficult when you have full access to your data, but re-deploy it seem to be not so simple. We have lot's of possibilities to do it and in this project I'll show you how to create a deployment pipeline in Google Kubernetes Engine using Google Cloud Endpoints (OpenAPI version) to protect it.
If you have some knowledges and want some action, please go to the Walkthrough section. In some minutes you'll have a ML model deployment pipeline ready to be used.
ml-deployment-gke/
├── README.md
├── cloudbuild.yaml
├── Dockerfile
├── app
│   ├── ml-app.py
│   ├── ml-model.pkl
│   └── requirements.txt
├── endpoint
│   ├── endpoint-config.sh
│   └── openapi.yaml
├── k8s
│   ├── deployment.yaml
│   └── service.yaml
├── caller/...
├── train/...
├── utils/...
├── screenshots/...
└── LICENSE

6 directories
In this article, I used scikit-learn Boston data set to create my ML model. It is a regression of a continuous target variable, namely, price. To make it even simpler, I trained a Linear Regression model that also belongs to scikit-learn package, but you could choose any other model (XGBoost, LightGBM, ...).
The folder named train contains a Python file, boston_problem.py, that loads the dataset, saves a JSON file for test (example.json) and saves scikit-learn model object into a Pickle file (ml-model.pkl). Here is the most important part of the code:
X.sample(1, random_state=0).iloc[0].to_json('example.json')
model = LinearRegression()
model.fit(X, y)
with open('ml-model.pkl', 'wb') as f:
   pickle.dump(model, f)
This is a very simple example of how to train a model and make it portable through the Pickle package object serialization. Whatever you go — for cloud or other computers —, if you have the same scikit-learn and Python version, you will load this Pickle file and get the same object of when it was saved.
Notice that in the boston_problem.py I put a command that prints the dataset's columns. It's important because the order of columns matter in almost every algorithm of ML. I used the output of this command in my Flask application to eliminate possible mistakes.
If you don't know anything about Flask, I recommend you to read the Todd Birchard articles [2].
The app folder contains two files: ml-model.pkl, the object that contains my exact created and trained model; andml-app.py, the application itself.
In ml-app.py I read the .pkl using the Pickle package:
with open('ml-model.pkl', 'rb') as f:
    MODEL = pickle.load(f)
After that, I created a variable that I named app and it's a Flask object. This object has a decorator called route that exposes my functions to the web framework in a given URL pattern, e.g., myapp.com:8080/ and myapp.com:8080/predict has "/" and "/predict" as routes, respectively. This decorator gives the option to choose the request method of this route. There are two main methods that can be simply described as follows:
- GET: to retrieve an information (message);
- POST: to receive an information and return the task result (another information/message);
I created one function for each method. The first is a message to know that the application is alive:
@app.route('/check', methods=['GET'])
def server_check():
    return "I'M ALIVE!"
And the second is my model prediction function:
@app.route('/predict', methods=['POST'])
def predictor():
    content = request.json
    # <...>
Remember that I said that for almost every algorithm the column order is important? I made a try/except to guarantee that:
    try:
        features = pd.DataFrame([content])
        features = features[FEATURES_MASK]
    except:
        logging.exception("The JSON file was broke.")
        return jsonify(status='error', predict=-1)
The last two command lines of the ml-app.py file runs the application into the IP 0.0.0.0 (localhost).
if __name__=='__main__':
    app.run( debug=True, host='0.0.0.0' )
The conditional statement __name__=='__main__' is because I just want to run my application if I am executing the file ml-app.py.
If you don't know what is Docker or Dockerfile, I recommend you to read these articles: Docker documentation [3] and my last project article section Docker & Dockerfile [4].
This is the Dockerfile of this project:
# a small operating system
FROM python:3.6-slim-buster
# layers to install dependencies (less prone to changes)
RUN python -m pip install --upgrade pip
COPY app/requirements.txt .
RUN pip install -r requirements.txt
# layers to copy all files (more prone to changes)
COPY . /main
# change to the application directory to execute `gunicorn`
WORKDIR /main/app
# starts application with 5 workers
CMD ["gunicorn", "--bind", ":8080", "--workers", "5", "ml-app:app"]
I choose a small operating system to build images faster and put the less prone to changes layers in the beginning. In requirements.txt I put the necessary packages and its respective versions to execute my application.
gunicorn is a lightweight WSGI HTTP server that is commonly used in production deployments. It has the capability to do some kind of load balancing creating replicas of the application's process in the container OS. This is very useful in scenarios where we have lots of simultaneous requests or when our application may fail. In the last scenario, gunicornwill kill and replace the failed process.
The --bind argument is to set the container address of the application, in this case, in the localhost in port 8080. The --workers is to set the number of replicas of the application's process. A recommended number of workers is 2*cores + 1. I choose 5 workers because I'll use nodes will 2 vCPUs in my cluster. The ml-app:app means that the object of our application is in ml-app.py and its name is app.
Kubernetes is an open-source container-orchestration system for automating application deployment, scaling, and management.
Deploy an application in Kubernetes is very simple. You only need some YAML configuration file templates. In this project I brought you two of them. A file to the deployment itself and another to the service that will expose the application. If you need to deploy you own model, you will need just to change some names, labels and container information sections. This two files are in folder k8s/. Take a look over there.
IMPORTANT: In Kubernetes, when you expose an application service, all the world can access it. This isn't secure and you'll need a API gateway to expose it. I'll use Google Cloud Endpoints to do that. If you don't know the benefits of an API gateway, check this simple Red Hat's article [5].
Kubernetes has lots of objects, take a look at this table, it's huge. However, in this project I'll need only two of them: Deployment and Service objects.
First, let's go with the Deployment object described in k8s/deployment.yaml. To explain all the sections of this YAML configuration file, I'll break it in parts 1 to 5. And then, I'll go to the k8s/service.yaml in part 6.
apiVersion: apps/v1
kind: Deployment
metadata:
  name: ml-deployment
  namespace: default
  labels:
app: ml-apiapiVersion: Which version of the Kubernetes API you'll use. If you research, you can find that Kubernetes has beta versions, features/objects, applications and other extensions. You don't need to understand this deeply.kind: What kind of object you want to create. In this case, a Deployment.metadata.name: Whatever you want. The Deployment name.metadata.namespace: Namespaces are some kind of workspaces. You can use it to organize your Kubernetes objects. I'll use thedefaultfor simplicity.metadata.labels: Whatever you want. Just choose a key and a value. Labels are another kind of organization and it can be used to filter objects in your cluster. The keyappthat I created will be used to find some objects in the process of deployment.
# <... apiVersion, kind, metadata ...>
spec:
  replicas: 2
  minReadySeconds: 5
  strategy:
    type: RollingUpdate
    rollingUpdate:
      maxSurge: 25%
maxUnavailable: 25%replicas: Number of pods running the deployment of the containers images that will be described below. Scale as you want.minReadySeconds: Waiting time after a new pod is ready to use. I'll describe below how do we know it is ready.strategy: This configuration is to set the behavior in case of a re-deployment.strategy.type: Setting this as RollingUpdate will make your re-deployment smooth. If you want to understand more about rolling updates, please go to Keilan Jackson's article [6].strategy.rollingUpdate.maxSurge: The number of pods that can be created above the defined number inreplicas. Can be integer or a percentage of the replicas (rounded down).strategy.rollingUpdate.maxUnavailable: The number of pods that can be unavailable during the update process in comparison withreplicas. Can be integer or a percentage of the replicas (rounded up).
Note: Do not set maxSurge and maxUnavailable both zero.
# <... apiVersion, kind, metadata ...>
spec:
  # <... replicas, minReadySeconds, strategy ...>
  selector:
    matchLabels:
app: ml-apiselector.matchLabels: It's like a filter that will assign to this deployment every pod that are labeled with specifics key-value pairs. In this case, the label areappand the value areml-api.
# <... apiVersion, kind, metadata ...>
spec:
  # <... replicas, minReadySeconds, strategy, selector ...>
  template:
    metadata:
      name: ml-pod
      labels:
        app: ml-api
    spec:
      containers:
      	- name: ml-container
      	  image: gcr.io/PROJECT_ID/gkecicd:COMMIT_SHA
      	  ports:
      	  	- containerPort: 8080
      	  lifecycle:
      	  	preStop:
              exec:
                command: [ "sh", "-c", "sleep 5" ]
          readinessProbe:
            initialDelaySeconds: 5
            periodSeconds: 5
            successThreshold: 1
            httpGet:
              path: /check
port: 8080template: This will be the template for deploying pods when needed, e.g., when a pod must be killed and replaced, it will use this template to create another one.template.metadata.name: Whatever you want. The prefix name of the Pod.template.metadata.labels: This needs to match the Selector filter in Part 3.template.spec: Pod specifications.template.spec.containers: List of the pods' container images. Every "-" (dash) is a new item of the list.template.spec.containers.name: Whatever you want.template.spec.containers.image: GKE can access Google Container Registry, so I used it. My image name isgkecicd.PROJECT_IDandCOMMIT_SHAare not environment variables, Kubernetes can't access it. So, we have to replace it somewhere.template.spec.containers.ports.containerPort: Every pod has an IP. ThecontainerPortwill expose the defined port of the IP to the Kubernetes cluster. In the Dockerfile was defined the port 8080, so it must be here too.template.spec.containers.lifecycle.preStop.exec.command: This sleep command is just to wait a pod to be terminated before kill it. With this, we eliminate a possible crash in a request process running in the pod that is terminating.template.spec.containers.readinessProbe: This is the definitions that will probe if a pod is ready or not. To understand howreadinessProbeworks, I recommend you to read Keilan Jackson's article [6].
To protect the application, we also need to deploy a Google Cloud Endpoint software image in our pod, configure it to listen the application port defined above (8080) and expose this application in another port. To do that, we must include another container in the list of the pod's container images.
# <... apiVersion, kind, metadata ...>
spec:
  # <... replicas, minReadySeconds, strategy, selector ...>
  template:
    # <... metadata ...>
    spec:
      containers:
        # <... My container specs ...>
      	- name: esp
          image: gcr.io/endpoints-release/endpoints-runtime:1
          args: [
            "--http_port", "8081",
            "--backend", "127.0.0.1:8080",
            "--service", "ml-model.endpoints.PROJECT_ID.cloud.goog",
            "--rollout_strategy", "managed",
          ]
          ports:
          - containerPort: 8081
Google Cloud Endpoints will help to protect, monitor, analyze and serve the model application. The image registry gcr.io/endpoints-release/endpoints-runtime:1 is a container that runs an Extensible Service Proxy (ESP) with the following arguments and values:
--http_port=8081: Port that will serve the ESP. This port must be different of the application defined port (8080).--backend=127.0.0.1:8080: The ESP and the model application are in the same pod. So, it can listen to each other. This is the address of the model application.--service: Here you'll have to put the name of your Cloud Endpoints service. It has a pattern:<NAME>.endpoints.<PROJECT_ID>.cloud.goog. I'll show later in this article how do you create this service. I chooseml-modelas name and don't putPROJECT_IDbecause I'll replace this string in the CI/CD process (you can do the same with the service NAME).--rollout_strategy=managed: This option will automatically uses the latest service configuration, without having to re-deploy or restart it.
To understand what ESP is, I recommend you to read this Google Cloud Endpoints documentation article [7].
Now, I'll describe the k8s/service.yaml YAML configuration file.
When Service object is created to expose only our container image, all the world can access it. But, remember that an ESP was deployed together with the model application to protect it. So, this Service must point to this ESP.
apiVersion: v1
kind: Service
metadata:
  name: ml-service-lb
  namespace: default
  labels:
    app: ml-api
spec:
  type: LoadBalancer
  ports:
  - port: 80
    targetPort: 8081
  selector:
    app: ml-api
Similar to the Deployment, a Service has apiVersion, kind, metadata and spec. I recommend you to choose the same label app and its value as in the Deployment specification.
spec.type: A Load Balancer will try to equally distribute the requests among the pods in your Kubernetes.spec.ports: List of ports to be exposed by the service.spec.ports.port: The port that will be exposed. The port 80 is a default port, so you can omit it when you are sending requests to the application.spec.ports.targetPort: The port that our application is running in the pods. In this case, I put an ESP to access the model application itself. So we have to choose its port (8081).spec.selector: As the Deployment selector, this will filter the pods with an specific label (app: ml-api).
You can deploy this objects and its specifications with one command line: kubectl apply -f k8s/, where the folder k8s/ is where your files are in.
To deploy this Google Cloud Endpoints service we'll use a YAML configuration file as well. This file is endpoint/openapi.yaml. I made a configuration that serves our /predictroute with POST method (as was defined). So, I'll only show the main part of the configuration:
swagger: "2.0"
# This infos will appear in Google Cloud Endpoints API page
info:
  description: "Some description"
  title: "Name of the API"
  version: "1.0.0"
host: ENDPOINTS_SERVICE_NAME
The ENDPOINTS_SERVICE_NAME must be in this pattern: <SERVICE_NAME>.endpoints.<PROJECT_ID>.cloud.goog, but there is no need to fill this if you use the endpoint/endpoint_config.sh commands:
# Environment variables to omit PROJECT_ID
export PROJECT_ID=$(gcloud config get-value project)
export SERVICE_NAME="ml-model"
export SERVICE_IP="SERVICE_IP"

export ENDPOINTS_SERVICE_NAME="${SERVICE_NAME}.endpoints.${PROJECT_ID}.cloud.goog"

# Replace environment variables in openapi.yaml file
envsubst <openapi.yaml >/tmp/openapi.yaml

# Deploy and enable the service
gcloud endpoints services deploy /tmp/openapi.yaml
gcloud services enable $ENDPOINTS_SERVICE_NAME
Again, I choose ml-model as my API name, but feel free to change. If you change the service name, you must also change it in the k8s/deployment.yaml file.
Google Cloud Builder is made of steps and this steps are defined in cloudbuild.yaml. To help in the building process we have lots of Cloud Builders, container images that can run specific commands for CI/CD purposes. In this project I needed three builders:
dockerto invoke Docker commands;gcloudto invoke a Linux terminal command;kubectlto invoke Kubernetes commands;
I'll describe each one of the steps of the cloudbuild.yaml of this project.
This step will pull an existing image (gkecicd) from the Google Container Registry. The ||operator will execute exit 0 if this pull command fails, i.e., it will not output any error message, so the building processes will not stop.
steps:
  - name: 'gcr.io/cloud-builders/docker'
    entrypoint: 'bash'
    args:
      - '-c'
      - 'docker pull gcr.io/$PROJECT_ID/gkecicd:latest || exit 0'
The environment variable PROJECT_ID doesn't need to be set.
If the first step didn't find an existing image, this command will create a new one, but if it did, this step will use the existing image as a cache in this build.
steps:
  # <...>
  - name: 'gcr.io/cloud-builders/docker'
    args:
      - 'build'
      - '-t'
      - 'gcr.io/$PROJECT_ID/gkecicd:latest'
      - '-t'
      - 'gcr.io/$PROJECT_ID/gkecicd:$COMMIT_SHA'
      - '--cache-from'
      - 'gcr.io/$PROJECT_ID/gkecicd:latest'
      - '.'
The application image name is gkecicd and I set the tag latest for build image because I want to update the latestapplication. Also, I add a tag with the commit hash code, COMMIT_SHA, to possible rollback actions.
Simply as the title of this subsection, the command will push the application's new image to the GCR with both tags, latest and $COMMIT_SHA.
steps:
  # <...>
  - name: 'gcr.io/cloud-builders/docker'
    args:
      - 'push'
- 'gcr.io/$PROJECT_ID/gkecicd'Remember that in section Deploying an application in Kubernetes I said that some strings in the YAML configuration file will be replaced? This is the moment. I used sed command to replace this values. PROJECT_ID and COMMIT_SHA are default environment variables in Google Cloud Build.
steps:
  # <...>
  - name: 'gcr.io/cloud-builders/gcloud'
    entrypoint: 'bash'
    args:
      - '-c'
      - |
        sed -i "s/PROJECT_ID/${PROJECT_ID}/g" k8s/deployment.yaml && \
sed -i "s/COMMIT_SHA/${COMMIT_SHA}/g" k8s/deployment.yamlWith this kubectlcommand you can deploy or update the model application in your Kubernetes cluster. This command applies the two configuration files in k8s/ folder. You only need to set two environment variables to access your cluster: CLOUDSDK_COMPUTE_ZONE and CLOUDSDK_CONTAINER_CLUSTER.
NOTE: Your cluster maybe regional, but still if you go to the Kubernetes Engine in Google Cloud, you would see the default zone name of your cluster.
steps:
  # <...>
  - name: 'gcr.io/cloud-builders/kubectl'
    args:
      - 'apply'
      - '-f'
      - 'k8s/'
    env:
      - 'CLOUDSDK_COMPUTE_ZONE=southamerica-east1-b'
- 'CLOUDSDK_CONTAINER_CLUSTER=ml-cluster'- Can we use this project to test it in Google Cloud?
- Of course! Lets do it right now!
In this section you'll see how easy is to deploy this pipeline. I'll break it in steps to make it even simple.
IMPORTANT: I have a free account on Google Cloud Platform and all my tests (and errors) to this project cost around 2 dollars! You'll consume much less than this. Please, go ahead and try this commands. I'll put the necessary code to leave your project as it was.
HINT: If you don't have a Linux machine or don't want to install Google Cloud SDK in your machine, just go to the incredible Google Cloud Shell. It will provide you a machine and you will be able to execute all this commands. I recommend you to use Google Chrome browser to access this shell.
First, lets set up gcloud configuration. Execute the below command and choose your user, project and default zone.
gcloud init --configuration new-config --skip-diagnosticsWe need to bind a role to the Google Cloud Build service account as a Kubernetes Engine Developer. We can do this in point and click in the settings of Cloud Build or through terminal using Google Cloud SDK (local or in cloud shell interface):
PROJECT_ID=$(gcloud config get-value project)
PROJECT_NUMBER=$(gcloud projects describe $PROJECT_ID --format='get(projectNumber)')

gcloud projects add-iam-policy-binding $PROJECT_ID \
  --member "serviceAccount:$PROJECT_NUMBER@cloudbuild.gserviceaccount.com" \
  --role "roles/container.developer"
You'll need to activate some Google Cloud APIs before go through this article. Again, you can do this in point and click or using the SDK command:
gcloud services enable container.googleapis.com \
    cloudbuild.googleapis.com \
    sourcerepo.googleapis.com \
    containeranalysis.googleapis.com \
    servicemanagement.googleapis.com \
    servicecontrol.googleapis.com \
    endpoints.googleapis.com
To work with Kubernetes, be sure that you have kubectl installed in you machine. Google Cloud Shell already has it. kubectl is a command line tool for controlling Kubernetes clusters. If you don't, please read the installation guide [1]. I recommend you to install kubectlvia Homebrew.
Now it's time to some action.
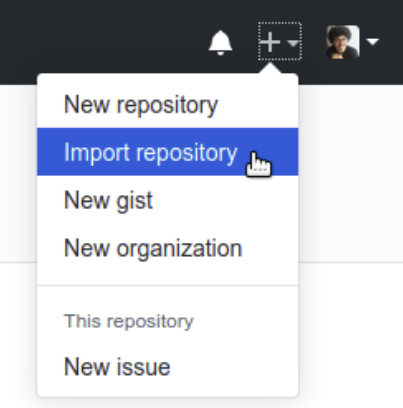
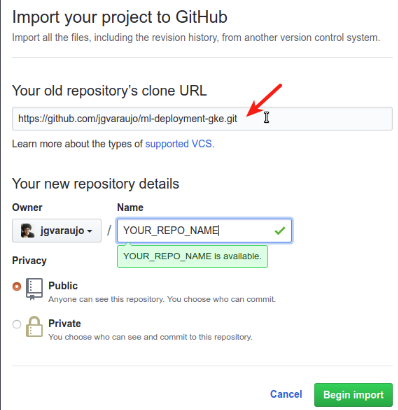
It's very simple to do this in GitHub. Click in Import repository > paste this repository's clone URL > choose a name for your new repository > and click in Begin import. Check this two images:
In my previous project in GitHub, I described how to set a Google Cloud Build trigger to a GitHub repository. Please go to Google Cloud Buid - The trigger section in this project to see how to do it [4].
IMPORTANT: If you leave Google Cloud Build trigger activated, every time that you make a git push in the repository, it will build your repository. Leave it as activated for now.
I create my Kubernetes cluster in GKE using this simple command in Linux terminal:
# define environment variables
_CLUSTER=ml-cluster         # name
_N_NODES=1                  # size
_ZONE=southamerica-east1-b  # zonal cluster
_MACHINE_TYPE=n1-highmem-2  # 2 vCPUs and 13GB vRAM

# create a cluster with this specifications
gcloud container clusters create $_CLUSTER \
    --num-nodes $_N_NODES \
    --machine-type $_MACHINE_TYPE \
    --zone $_ZONE
This command will take about 2-3 minutes to run. After that, to check if everything is up you can use the command kubectl get all. To be more specific, I like to use kubectl get nodes,pods,svc.
Clone your new repository and enter in its folder.
git clone https://github.com/YOUR_USERNAME/YOUR_REPO_NAME.git
cd YOUR_REPO_NAME
Replace YOUR_USERNAME and YOUR_REPO_NAME to your GitHub user and your new repository name.
Now, to deploy your model application you just have to make a git push. :)
git push origin masterCheck History tab in Google Cloud Build interface and you'll see your building process executing. If this your first deploy it will take 2-3 minutes, but if you are updating your application through this pipeline, it will take about 30 seconds.
After that, in the list of services (kubectl get svc) probably you will see that your service (ml-service-lb) have a pending External IP. You can run watch -n 1 kubectl get svc to run the command every second. Wait until you have your model application External IP. This will be the address of your API, write it down somewhere.
Once you are inside the project folder, you just have to execute the command below. A detailed explanation is in section Configure a Google Cloud Endpoints service.
# enter in endpoint folder, execute a script and return to project folder
cd endpoint && \
source endpoint-config.sh && \
cd ..
This command will take 1-2 minutes to run. You can safely ignore the warnings about the paths in the openapi.yaml file not requiring an API key (4th paragraph in here).
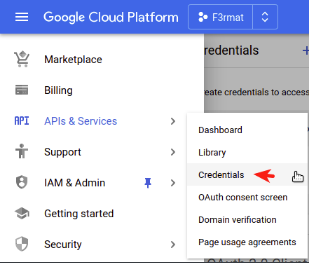
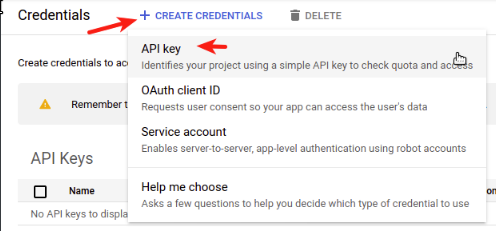
This project are describing an API that is protected, so the only way to access it is with credentials. You can create a service account to access it, but the simplest way is to creating a API Key. See the images below to know how to do that:
If you want to restrict your API key to use only in your model application in edit options you'll see API Restrictions section, click in Restrick key and then filter the name Endpoints ML API. This API name was defined in title section in endpoint/openapi.yaml file, the Cloud Endpoints service configuration file.
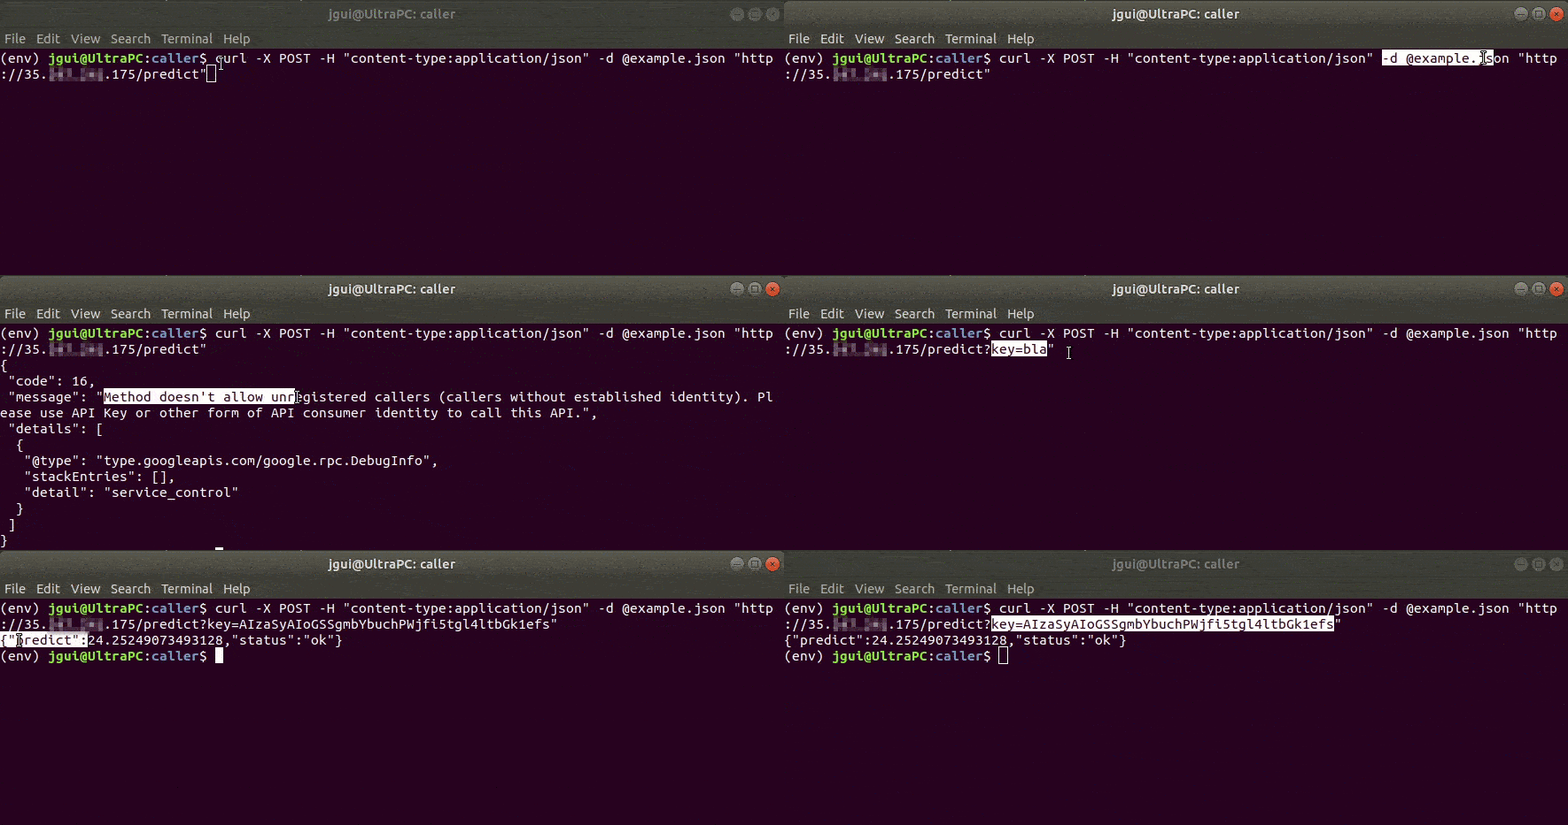
To see if your API is online, run this command:
cd caller

JKEY="{.status.loadBalancer.ingress[].ip}"
SERVICE_NAME="ml-service-lb"
SERVICE_IP=$(kubectl get svc ${SERVICE_NAME} -o jsonpath=${JKEY})
ENDPOINTS_KEY=<API-KEY>
Replace API-KEY with the above created API key. You can get SERVICE_IP from kubectl or from Google Cloud's web console.
# A GET request example
curl -X GET "http:https://${SERVICE_IP}/check?key=${ENDPOINTS_KEY}"
# A POST request example
curl -X POST -H "Content-type: application/json" -d @example.json\
"http:https://${SERVICE_IP}/predict?key=${ENDPOINTS_KEY}""Please, if you change some important feature as cluster name, cluster zone, service name and image name, replace it in below commands:
PROJECT_ID=$(gcloud config get-value project)
_CLUSTER=ml-cluster
_ZONE=southamerica-east1-b
ENDPOINTS_SERVICE_NAME="ml-model.endpoints.${PROJECT_ID}.cloud.goog"

gcloud container clusters delete $_CLUSTER --zone $_ZONE
gcloud endpoints services delete $ENDPOINTS_SERVICE_NAME
gcloud container images delete gcr.io/$PROJECT_ID/gkecicd --force-delete-tagsThank you if you read this article. I'm open to discussions and be comfortable to send me a message or create an issue.
I hope this project may help someone. In the beginning of my adventure in cloud computing I had fear to do something wrong, but in fact, everything is simple as you understand how it works piecewise and when you create the first template for what you need.
[1] Kubernetes Documentation, "Install and Set Up kubectl". (visited in May 8, 2020)
[2] Todd Birchard, "Building a Python App in Flask". July, 2008. (visited in April 20, 2020)
[3] Docker Documentation, "Docker overview". (visited in May 8, 2020)
[4] João Araujo, "Machine Learning deployment pipeline on Google Cloud Run". May 4, 2020. (visited in May 8, 2020)
[5] Red Hat, "What does an API gateway do?". (visited May 10, 2020)
[6] Keilan Jackson, "Kubernetes Rolling Update Configuration". February 26, 2020. (visited in May 11, 2020)
[7] Google Cloud Endpoints Documentation, "Comparando Extensible Service Proxy com Endpoints Frameworks". (visited in May 12, 2020)
