
The open-source DevSecOps platform for manging cloud infrastructure and cloud-native applications.
![]()
![]()
Capten streamlines the management of Kubernetes clusters, making it an ideal solution for teams or individuals who require automated cluster provisioning, application deployment, and lifecycle management in their development and testing workflows.
The all-in-one DevSecOps platform facilitates close collaboration to build and manage cloud-native ecosystems for application and infrastructure modernization, automation, and security.
Capten controlplane cluster creation supported with Capten CLI, Capten CLI distribution available for Linux, Winodws and MacOS. Capten controlplane cluster creation supported on public cloud providers like AWS and Azure.
-
AWS or Azure clound provider account
-
Azure CLI (Needed in case of using Azure cloud for cluster setup)
-
Docker (Needed in case of using Capten CLI distribution on MacOS)
-
kubectl tool to access Capten controlplane cluster
- Download and Extract the latest Capten package from Capten github repoistory release page.
wget https://github.com/intelops/capten/releases/download/<latest-release>/capten_linux.zip
unzip capten_linux.zip && cd capten- Preparted the cluster installation parameters
Update cluster installation parameters:
For AWS cluster, update cluster installation parameters in the aws_config.yaml in config folder.
| Parameter | Description |
|---|---|
| AwsAccessKey | Access key for AWS authentication |
| AwsSecretKey | Secret key for AWS authentication |
| AlbName | Name of the Application Load Balancer (ALB) |
| PrivateSubnet | CIDR block for the private subnet(s) |
| Region | AWS region where the resources will be deployed |
| SecurityGroupName | Name of the security group that controls inbound and outbound traffic |
| VpcCidr | CIDR block for the Virtual Private Cloud (VPC) |
| VpcName | Name of the Virtual Private Cloud (VPC) |
| InstanceType | Type of EC2 instance |
| NodeMonitoringEnabled | Flag indicating whether node monitoring is enabled or not (true/false) |
| MasterCount | Number of master nodes |
| WorkerCount | Number of worker nodes |
| TraefikHttpPort | Port number for HTTP traffic handled by Traefik load balancer |
| TraefikHttpsPort | Port number for HTTPS traffic handled by Traefik load balancer |
| TalosTg | Name of the target group for Talos instances |
| TraefikTg80Name | Name of the target group for port 80 traffic handled by Traefik |
| TraefikTg443Name | Name of the target group for port 443 traffic handled by Traefik |
| TraefikLbName | Name of the Elastic Load Balancer (ELB) used by Traefik |
| TerraformBackendConfigs | Configuration settings for Terraform backend (bucket name and DynamoDB table name) |
Note: For a terraform backend,create the bucket and dynamoDB table in aws console.
For Azure cluster, update cluster installation parameters in the azure_config.yaml in config folder.
| Parameter | Description |
|---|---|
| Region | The Azure region where resources will be deployed |
| MasterCount | Number of master nodes |
| WorkerCount | Number of worker nodes |
| NICs | Network Interface Controllers (NICs) for master nodes |
| WorkerNics | Network Interface Controllers (NICs) for worker nodes |
| InstanceType | Type of virtual machine instance used for nodes |
| PublicIpName | Names of public IP addresses assigned to the nodes |
| TraefikHttpPort | Port number for HTTP traffic handled by Traefik load balancer |
| TraefikHttpsPort | Port number for HTTPS traffic handled by Traefik load balancer |
| Talosrgname | Resource group name for the Talos deployment |
| Storagergname | Resource group name for storage-related resources |
| Storage_account_name | Name of the storage account used for storing images |
| Talos_imagecont_name | Name of the container within the storage account for Talos images |
| Talos_cluster_name | Name of the Talos cluster |
| Nats_client_port | Port number for NATS client communication |
- Prepare cluster application deployment parameters
Update cluster application deployment parameters in the capten.yaml in config folder.
| Parameter | Description |
|---|---|
| DomainName | Name of the domain needed for exposing the application |
| ClusterCAIssuer | The issuer of the Cluster Certificate Authority (CA) for cluster security |
| SocialIntegration | The social platform like teams or slack integrated for alerting purpose |
| SlackURL | Slack channel url (needs to be provided if slack is used for social integration) |
| SlackChannel | Name of the slack channel |
| TeamsURL | Teams channel url (needs to be provided if teams is used for social integration) |
- Create cluster
For creating the cluster, execute below command
./capten create cluster --cloud=<cloudtype> --type=talosNote: Cloud type supported are 'aws' and 'azure'
- Cluster Creation through Docker Container:
For creating the cluster through docker container (needed in case of using Capten CLI distribution on Windows or MacOS ), run the below command
docker run -v /path/to/aws_config.yaml:/app/config/awsorazure_config.yaml -it ghcr.io/intelops/capten:<latest-image-tag> create cluster --cloud=aws --type=talosPost cluster creation, kubeconfig will be generated to ./config/kubeconfig.
Access cluster using generated kubeconfig with kubectl
export KUBECONFIG=/home/capten/config/kubeconfig
kubectl get nodesFor deploying the cluster applications, execute below command
./capten setup appsCapten CLI will deploy Capten application suite and Capten Agent on Controlplane cluster.
Post application deployment, mTLS certificates are generated to access Capten Agent. mTLS certificates capten-client-auth-certs.zip generated in cert folder.
Deployed applications can be listed with helm tool
helm list -A./capten show cluster infoAdd record updating the domain name in ./config/capten.yaml and LB host in ./config/capten-lb-endpoint.yaml to any dns so that applications could be exposed.
Cluster destruction command initiates the process of removing all components associated with the cluster, such as virtual machines, instances, nodes, networking configurations, and any other resources provisioned for the cluster. It effectively undoes the setup and configuration of the cluster, deallocating resources and ensuring they are no longer in use. This command can be used when the cluster is no longer needed or to clean up resources in cloud computing, distributed systems, or container orchestration environments.
./capten destroy cluster-
For a new user, sign up on Intelops UI (https://alpha.intelops.app/)
-
For existing user, login with user credentials

- After login to Intelops UI, for new user, popup screen will be displayed for creating organisation. Create organisation and assign the roles, add cluster admin role to register new cluster

-
Provide the cluster name and upload the client certificates (./cert/capten-client-auth-certs.zip) created by Capten CLI.
-
Provide the cluster agent endpoint, Domainname configured in capten.yaml to be used for accessing the cluster
https://captenagent.<domainname>
For example agent endpoint, if 'aws.eg.com' Domainname is configure in capten.yaml,
https://captenagent.aws.eg.com
- After providing above details, register the cluster.
Capten supports Web UI luanch for supportted applications, Web UI launch supported for default applications like grafana, signoz.
Navigate for Capten controlplane cluster by clicking on the Registered cluster. Web UI launch applications listed on "Tools" tab

Launching the grafana Web UI and access grafana dashboards Click on "Prometheus" Icon to launch grafana Web UI. Web UI will be launched with single sign-on and show grafana landing page, from there navigate to view dashboards
One of the cluster-overview metrics dashboards is as shown below

Navigate for Capten controlplane cluster, Click the remove button to deregister the controlPlane cluster, it will delete registration data from Intelops cluster, to delete cluster, Capten CLI will have to be used.

Capten Plugin SDK to develop and deploy applications on Capten cluster
- Onboard Plugin applications in to Capten Plugin Store
- Deploy Plugin applications on Capten cluster
- Deploy Plugin applications on Business cluster
- Capten Cluster Storage service access for Plugin application
- Capten Cluster Vault service access for Plugin application
- Capten Cluster SDK API service access for Plugin application
- Enabling Single SignOn for Plugin application UI
Capten SDK provides a simple way to onboard the Capten Plugin Applications (Plugins or Plugin Apps) into the Capten Plugin Store.
Intelops manages the central plugin store Git repository (https://github.com/intelops/capten-plugin) to onboard and manage Capten Plugin applications. This is an open-source repository for the Capten community to onboard and manage Capten Plugin applications.
This Central Plugin Store is integrated with Capten Stack by default, and Plugins available in the Central Plugin Store can be deployed on the Capten cluster from the Capten UI.
Capten SDK supports managing a local plugin store, i.e., in your Git repository. A Git repository needs to be integrated into the Capten from Capten UI, which can then be used to onboard and manage Plugin applications.
Pre-requisites to onboard Plugin Application into this Capten Plugin Store
- Plugin Application available in helm repository accessible from Capten cluster
- Container image for plugin application available in container registry onboarded into the Capten cluster
Add the plugin application name in plugin-store/plugin-list.yaml file
plugins:
  - argo-cd
  - crossplane
  - tekton
Create a folder with plugin name plugin-store/<plugin-name>, and add plugin metadata files
- Add plugin application configuration in
plugin-store/<plugin-name>/plugin-config.yamlfile - Add plugin application Icon file in
plugin-store/<plugin-name>/icon.svg
| Attribute | Description |
|---|---|
| pluginName | Plugin application name |
| description | Plugin application description |
| category | Plugin application category |
| icon | Plugin application icon |
| versions | Plugin application supported versions |
pluginName: "argo-cd"
description: "GitOps continuous delivery tool for Kubernetes"
category: "CI/CD"
icon: "icon.svg"
versions:
  - "v1.0.2"
  - "v1.0.5"
For each supported version, create version folder plugin-store/<plugin-name>/<version> and add plugin version deployment metadata files
- add plugin application version deployment configuration in
plugin-store/<plugin-name>/<version>/plugin-config.yamlfile - add plugin application version values file in
plugin-store/<plugin-name>/<version>/values.yamlfile
** plugin application version deployment configuration attributes **
| Attribute | Description |
|---|---|
| chartName | Plugin application chart name |
| chartRepo | Plugin application chart repo |
| version | Plugin application version |
| defaultNamespace | Plugin application default namespace |
| privilegedNamespace | Plugin application privileged namespace |
| valuesFile | Plugin application values file |
| apiEndpoint | Plugin application API endpoint |
| uiEndpoint | Plugin application ui endpoint |
| capabilities | Plugin application required capabilities |
Table below shows an example of plugin application version deployment configuration
| Capabilities | Description |
|---|---|
| deploy-controlplane-cluster | Capability to deploy plugin application on control plane cluster |
| deploy-bussiness-cluster | Capability to deploy plugin application on business cluster |
| capten-sdk | Capability to access Capten cluster SDK |
| ui-sso-oauth | Capability to enable Single SignOn for plugin application UI |
| postgress-store | Capability to access Capten cluster storage service |
| vault-store | Capability to access Capten cluster vault service |
deployment:
  controlplaneCluster:
    chartName: "argo-cd"
    chartRepo: "https://kube-tarian.github.io/helmrepo-supporting-tools"
    version: "v1.0.2"
    defaultNamespace: "argo-cd"
    privilegedNamespace: false
    valuesFile: "values.yaml"
apiEndpoint: https://argo.{{.DomainName}}
uiEndpoint: https://argo.{{.DomainName}}
capabilities:
  - deploy-controlplane-cluster
  - capten-sdk
  - ui-sso-oauth
Merge all plugin configuration files into the capten plugin store Git repository
Deploy Plugin application on Capten cluster from Intelops UI(https://alpha.intelops.app/)
#1 Login to Intelops UI
Capten SDK creates resources for plugin applications for plugin-configured capabilities before deploying plugin applications to the Capten cluster.

#3 Select "Configure Apps Store" and click on "sync' button to Synchronize the plugin store

#4 Click on Deploy plugin application, Select plugin version and click on Deploy button

Capten SDK creates resources for plugin application for the configured capabilities before deploying plugin application to Capten cluster
List of supported capabilities:
- Capten SDK
- Vault Store
- Postgres Store
- This capability provides MTLS certificate for server and client authentications.
- Plugin application uses client certificate to communicate with Capten agent.
- Plugin application can server certificate to enable mtls for communication.
- This capability provides access to key secrets.
- This capability provides postgres DB setup required for the plugin application.
- Plugin application UI can be launched directly from icons shortcut in cluster widget.

- Navigate to "Capten" -> "Platform Engineering"
- In this screen plugin application can be visualized.

- First to add crossplane plugin, we need to add an empty private repository.
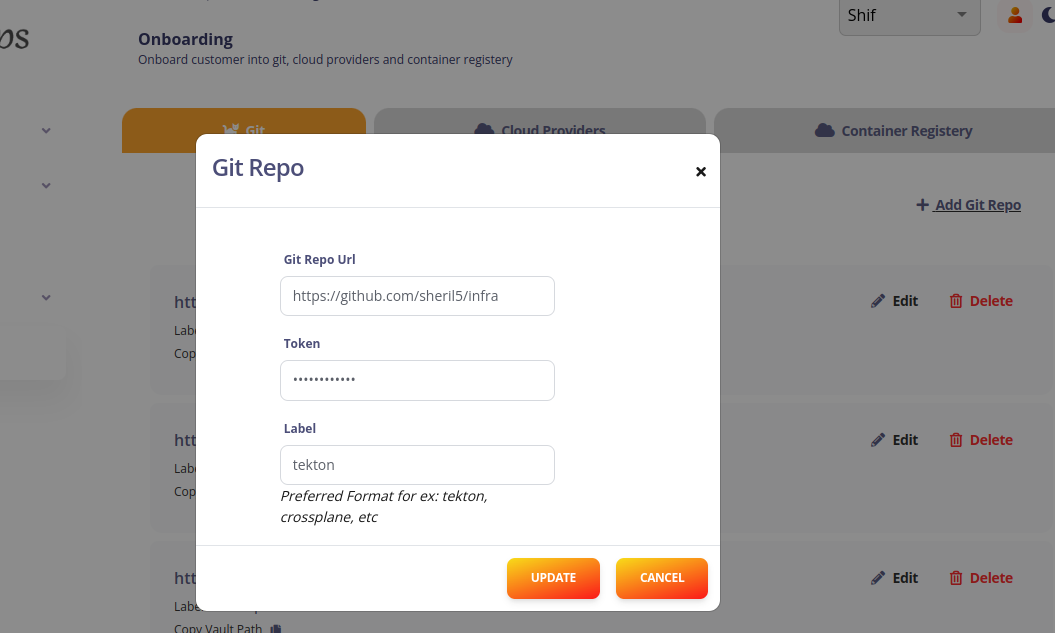
- In onboarding section, go to Git tab and click Add Git Repo.
- Enter the git repo url and the token and also set the label to crossplane.

======= Add git repository details in the mentioned section_
- Now to add cloud provider, go to Cloud Providers and click _ Add Cloud Provider_.
- Select the required cloud provider and enter the credentials for the same. (The label is set to crossplane)

Add cloud provider details in the mentioned section_
Note: The label crossplane is used by the crossplane plugin to reference both the repository and provider.
- In platform engineering section, select Setup under Crossplane plugin.
- Under providers section, select both the required provider and 'crossplane' label.
- Under configure section, click sync next to the repository which is needed to deploy the plugin.
- After the sync, the provider will get deployed and enter Healthy state in a few minutes.

Once onboarding is done both the git and provider details will be automatically populated in crossplane plugin using crossplane label_
- After the sync is successful, the crossplane objects and its argocd applications are added to the empty repository under the infra directory.
- Go to infra/clusters/cluster-configs/cluster-claim.yaml
- Uncomment the cluster-claim.yaml file (or add any required changes)
- Go to argocd UI page and sync all crossplane related applications
- After the clusterclaim is created, the business cluster creation will get triggered.

Make sure to sync all crossplane related apps_
- To delete the business cluster, remove all applications from the business cluster.
- Go to infra/clusters/cluster-configs and remove cluster-claim.yaml
- Now prune sync the cluster-config-app application (watching the cluster-claim.yaml).
- This will trigger the business cluster deletion
- To delete crossplane provider, go to capten UI.
- Under platform engineering, select Setup under Crossplane plugin
- Under providers section, select the delete option next to the provider which is to be deleted.
- This removes the provider from the cluster
- It is also possible to remove the provider from onboarding list by the delete option provided with the cloud provider

To delete the crossplane provider, click the delete button next to the provider name_
-
Login to the capten ui page
-
Onboarding git project in to capten
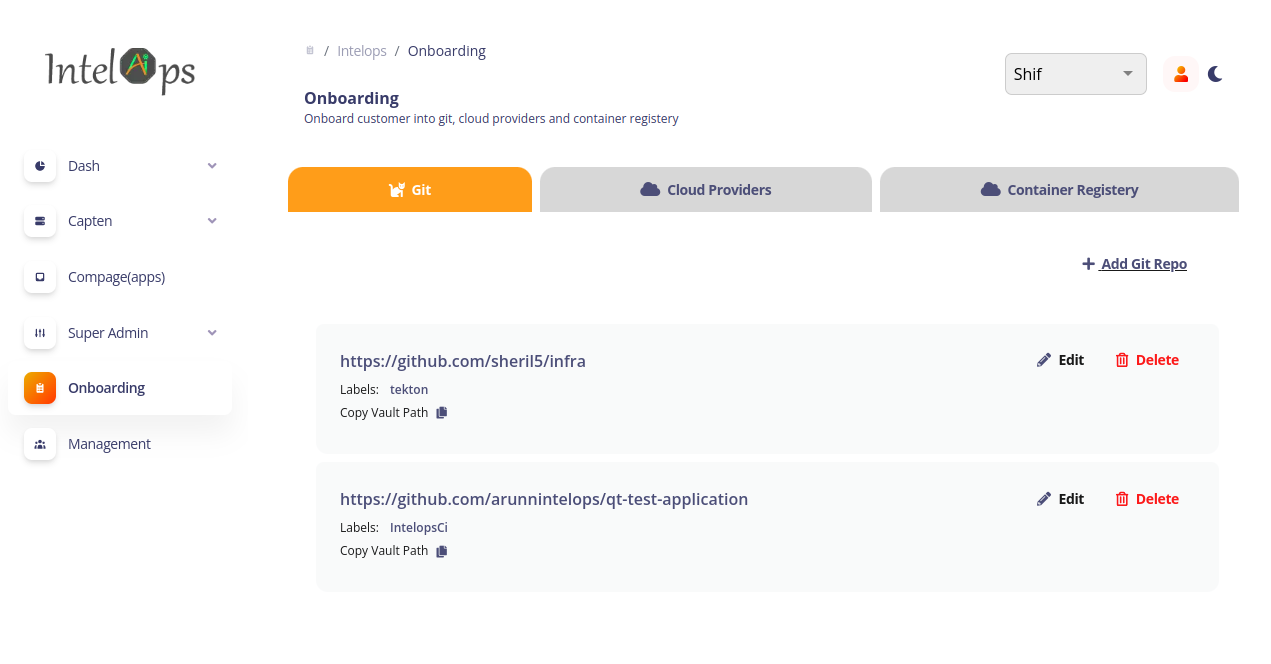
- select the
add git repofrom the git section - add the git repo url,access token and label for the customer repo (label is tekton) and the tekton ci/cd repo (label is IntelopsCi)
- select the
-
Onboarding container registry in to capten


- select
add container registryfrom container registry section - add the registry url,username,access token and label to which the built image needs to be pushed (labels is "tekton")
Go to the capten-->platform engineering ,select on the tekton plugin setup and then select the sync option under the configure section and this will configure the tekton and the neccessary floders will be created in the customer's repo


-
Use the already created tekton-pipelines namespace for the creation of pipeline.
-
- Create a secretstore from the yaml given below.Replace the server with the url which can be obtained from the kubectl command given below.
kubectl get ingress -n capten
 apiVersion: external-secrets.io/v1beta1
 kind: SecretStore
 metadata:
   name: vault-root-store
 spec:
   provider:
     vault:
       server: <"replace with the ingress host obtained from above command">
       path: "secret"
       version: "v2"
       auth:
         tokenSecretRef:
           name: "tekton-vault-token"
           key: "token"
Here, the tekton-vault-token is the secret created in tekton namespace to access the vault.Copy-paste the tekton-vault-token secret in the required namespace where the tekton pipeline will be present and then create the above secretstore.
-
Git secret
Go to onboarding-->git under the respective git project the path of the vault where the credentials of git stored can be viewed.copy the path and add it to the path in the external secret yaml as given below
Annotate the external-secret to specify the domains for which Tekton can use the credentials.
A credential annotation key must begin with tekton.dev/git- or tekton.dev/docker- and its value is the URL of the host for which Tekton will be using that credential. eg-tekton.dev/git-0: https://gitlab.com , tekton.dev/git-0: https://github.com , tekton.dev/docker-0: https://gcr.io
      apiVersion: external-secrets.io/v1beta1
      kind: ExternalSecret
      metadata:
        annotations:
          tekton.dev/git-0: "https://github.com"
        name: gitcred-external
        namespace: tekton-pipelines
      spec:
        refreshInterval: "10s"
        secretStoreRef:
          name: vault-root-store
          kind: SecretStore
        target:
          name: gitcred-capten-pipeline
        data:
        - secretKey: password
          remoteRef:
            key: <vault path cpoied from ui>
            property: accessToken
        - secretKey: username
          remoteRef:
            key: <vault path copied from ui>
            property: userID
-
Container registry secret
Go to onboarding-->container registry under the respective container registry, where the path of the vault where the credentials of container registry stored can be viewed.copy the path and add it to the path in the external secret yaml as given below
apiVersion: external-secrets.io/v1beta1 kind: ExternalSecret metadata: annotations: tekton.dev/git-0: "https://github.com" name: docker-external namespace: tekton-pipelines spec: refreshInterval: "10s" secretStoreRef: name: vault-root-store kind: SecretStore target: name: docker-credentials-capten-pipeline data: - secretKey: config.json remoteRef: key: <vault path copied from ui> property: config.json -
Cosign docker login secret
Go to onboarding-->conatainer registry under the respective container registry where the path of the vault in which the credentials of container registry stored can be viewed.copy the path and add it to the path in the external secret yaml as given below
apiVersion: external-secrets.io/v1beta1 kind: ExternalSecret metadata: annotations: tekton.dev/git-0: "https://github.com" name: cosign-docker-external namespace: tekton-pipelines spec: refreshInterval: "10s" secretStoreRef: name: vault-root-store kind: SecretStore target: name: cosign-docker-secret-capten-pipeline data: - secretKey: password remoteRef: key: <vault path copied from ui> property: password - secretKey: registry remoteRef: key: <vault path copied from ui> property: registry - secretKey: username remoteRef: key: <vault path copied from ui> property: username -
Argocd secret Use the below secret yaml and replace the password with the encoded argocd password which can be obtained by using the kubectl command and the server url is obtained from the capten ui under capten-->platform-engineering .Copy the repo url from the argocd setup ,encoded it and add it to the server url.Username is admin ,add the encoded username to the yaml given below
kubectl get secrets argocd-initial-admin-secret -n argo-cd apiVersion: v1
data:
PASSWORD: <replace with encoded argocd secret>
SERVER_URL: <repo url copied from ui>
USERNAME: <encoded username>
kind: Secret
metadata:
name: argocd-capten-pipeline
namespace: tekton-pipelines
type: Opaque
-
cosign-keys
Now the cosign keys secret is automatically created in tekton-pipelines namespace.
-
Extra-config secret
Go to onboarding-->git under the respective git project where the path of the vault in which the credentials of git stored can be viewed.copy the path and add it to the path in the external secret yaml as given below
apiVersion: external-secrets.io/v1beta1
kind: ExternalSecret
metadata:
  annotations:
    tekton.dev/git-0: "https://github.com"
  name: extraconfig-external
  namespace: tekton-pipelines
spec:
  refreshInterval: "10s"
  secretStoreRef:
    name: vault-root-store
    kind: SecretStore
  target:
    name: extraconfig-capten-pipeline
  data:
  - secretKey: GIT_TOKEN
    remoteRef:
      key: <vault path copied from ui>
      property: accessToken
  - secretKey: GIT_USER_NAME
    remoteRef:
      key: <vault path copied from ui>
      property: userID
Now commit the required pipeline,rbac,triggers and ingress in the customer repo under the directory cicd-->tekton-pipelines-->templates.Now go to the argocd ui and sync the tekton-pipelines application manually. once done the argocd will update this changes to the cluster and the pipeline,triggers,rbac and ingress will be created in the controlplane cluster

-
create a new folder qt_test in the root directory
-
place the test.yaml file which contains the testcases to test the deployed application inside the folder
-
Note that the folder name should be qt_test and file name should be test.yaml.The sample testcase is given below,
type: Test spec: id: zSn7HGzRR name: user service trigger: type: http httpRequest: method: GET url: http:https://user.svc.local/api/UserService specs: - selector: span[tracetest.span.type="http" name="GET api/UserService"] assertions: - attr:http.request.method = "GET" - attr:http.route = "api/UserService" - attr:name = "GET api/UserService" - attr:tracetest.span.name = "GET api/UserService" - attr:tracetest.span.type = "http" - attr:url.path = "/api/UserService" - attr:url.scheme = "http" - attr:user_agent.original = "Go-http-client/1.1" - selector: span[tracetest.span.type="general" name="Tracetest trigger"] assertions: - attr:tracetest.span.type = "general" - attr:tracetest.span.name = "Tracetest trigger" -
Also ensure whether the applicatin which is deployed in the business cluster is exposed
-
Then add the url of the application in the test.yaml file
-
After the execution of the pipeline we can check the qt task success and failure in the tekton-dashboard
-
when the tekton pipeline fails due to quality-trace test case, it may be due to which assertions in the test yaml getting failed or configuration error between the test app and quality-trace. We can check the quality-trace server pod logs and quality-trace otel collector logs for errors and trace ids.If the test fails due to configuration errors, then in the quality-trace server log, it can be viewed as "Trace not found" error
- If all the assertions pass,below logs is shown

- If the assertion fails,below logs is shown

- Now add the webhook url to the tekton ci/cd repo and select the event on which the tekton pipeline needs to be executed upon trigger.

-
If needed one can protect their branch using the branch protection rule which will be present under settings-->branches-->add rule
-
In the add rule select the Require status checks to pass before merging and Require branches to be up to date before merging
-
Then in the search box that appers under Require branches to be up to date before merging ,search for tekton-pipelines and add it,now whenever a pull_request is raised the check will run and once the checks is success the merge option will be visible

-
once all the setup is done and now when a pull_request event is triggered (when a pull_request is raised), the tekton pipeline will get executed and the image gets built and pushed to the container registry ,the built image is then signed using cosign and finally once the application is deployed in the bussiness cluster the qt task in the pipeline will run the testcase to test the application and the success/failure task will get executed depending upon the result of pipeline.similarly the pipeline can trigger for event such as push,tag and release
-
Also the success and failure status will be notified back to the git repo in the case of pull_request event.Note for this the branch protection rule needs to be added
-
The tekton related pipelines and tasks can be viewed in the tekton-dashboard by clicking on the details option where the check is running or by clicking on the tekton icon present under Capten-->Controlplane Cluster in the ui


Proact is CLI/CI Tool for Automating Vulnerability Management for Enhancing Software Supply Chain Security Measures.
After selecting proact from the installed apps, you will be treated with a list of schedules, if there are any. To create a new schedule click on Schedule Scan repo.

Fill all the details for the schedule and config
| Attribute | Description |
|---|---|
| Schedule Name | Name of the schedule |
| Select Container Registry | Select the container registry |
| Cron Schedule | Schedule for the job in crontab expression |
| Scan Config | Config details for the job |
 proact-schedule-details
sample config
[
    {
        "docker_image_name": "arunnintelops/qt-test-application:latest", // Docker image name
        "pyroscope_enabled": "true", // To enable pyroscope
        "pyroscope_url": "https://pyroscope.awsdemo.optimizor.app", //Url for pyroscope
        "pyroscope_app_name": "qt.test.application", //Application name in pyroscope
        "rebuild_image": "false" //Option to enable or disable rebuild image after scanning
    }
]
Afet successful scan you can view the result of the scan.
proact-schedule-results
