![]()
An abstraction layer that eases RESTful interconnections in Swift


Jayme defines a neat architecture for REST management in your Swift code.
The idea behind this library is to separate concerns: Your view controllers should handle neither networking code nor heavy business logic code, in order to stay lightweight.
The library provides a neat API to deal with REST communication, as well as default implementations for basic CRUD functionality and pagination.
##Features
- Protocol-Oriented
- Jayme was built following the concepts of protocol-oriented programming, encouraging composition over inheritance, whenever possible.
- Generics / Associated Types
- In order to provide high flexibility, generics and associated types are present in almost every definition of the library.
- In cooperation with protocol orientation, they make the library very customizable.
- Error Handling
- Jayme comes with a default list of discrete errors (
enum JaymeError). - In order to help the view controller layer differentiate meaningful UI flows, some particular scenarios, that are usually treated as
successcases, are actually encapsulated as errors inJaymeError, for instance: a response with any5xxstatus code. - If you need different error definitions, the library allows you to use your own error types, with the aid of associated types.
- Jayme comes with a default list of discrete errors (
- Futures / Results
- From experience, we've found out that the Future Pattern is a very convenient way for writing asynchronous code. In consequence, we decided to develop Jayme around that pattern.
- Future and Result are two key structures in the library. You'll need to be familiar with them.
- Logs
- Jayme includes a practical logging mechanism that can be quickly enabled or disabled. It also allows you to set a custom logging function, which proves quite useful if your project uses third party logging libraries, like CocoaLumberjack.
- Unit Tests
- Jayme is 100% unit-tested.
- Unit tests are easy to implement, and encouraged, for testing your repositories' business logic and your entities' parsing.
- No Dependencies
- This library doesn't require any external dependency in order to work.
- Nonetheless, you can integrate JSON parsing libraries (like SwiftyJSON) and make them cooperate very easily.
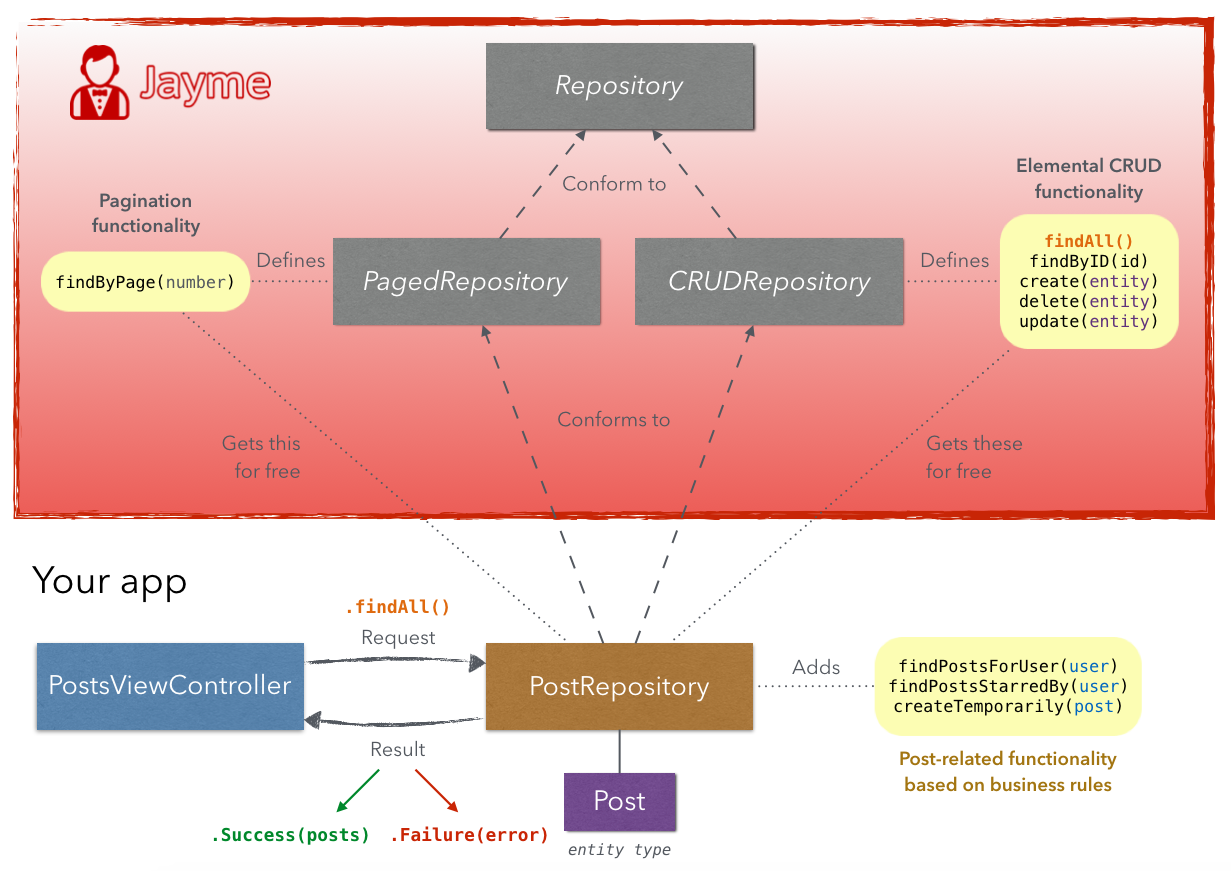
This library works around the Repository Pattern. There are some key concepts that you need to become familiar with before using it. These concepts can be outlined differently depending on how the pattern is implemented, as there are several ways of working with it.
Here is a brief description of each relevant term, based on how Jayme, in particular, implements the pattern:
- A Repository represents a collection that holds entities of a certain kind and that is capable of filtering and returning entities back, based on the needs of your application.
- Your business logic code will usually live in repositories.
- A Backend is a middleman that accepts concrete requests as input (e.g. a
DELETEto/users/123) and performs networking operations to satisfy those requests, giving results back.- Your networking code will usually live in backends.
- An Entity represents a thing that is meaningful in your application; for example, a user.
- Actually, there is no definition of a concrete
Entityin the library. Instead, repositories use entities as an associated type, namedEntityType(examples of entity types are:User,Post,Comment, and so on). Any entity type you define should conform toIdentifiable,DictionaryInitializableandDictionaryRepresentable, so that entities can be identified, initialized with a dictionary and represented through a dictionary, respectively. - As for identifying entities, Jayme takes a flexible approach: Entity identifiers (a.k.a. id's) are not tied to any concrete type (for instance:
StringorInt); instead, it's up to you to define which kind of identifier each of your entity types use. This means that you could have entity types havingIntids, others havingString, or whatever best fits your needs. You can check out the sample project to see more complex identifier scenarios.
- Actually, there is no definition of a concrete
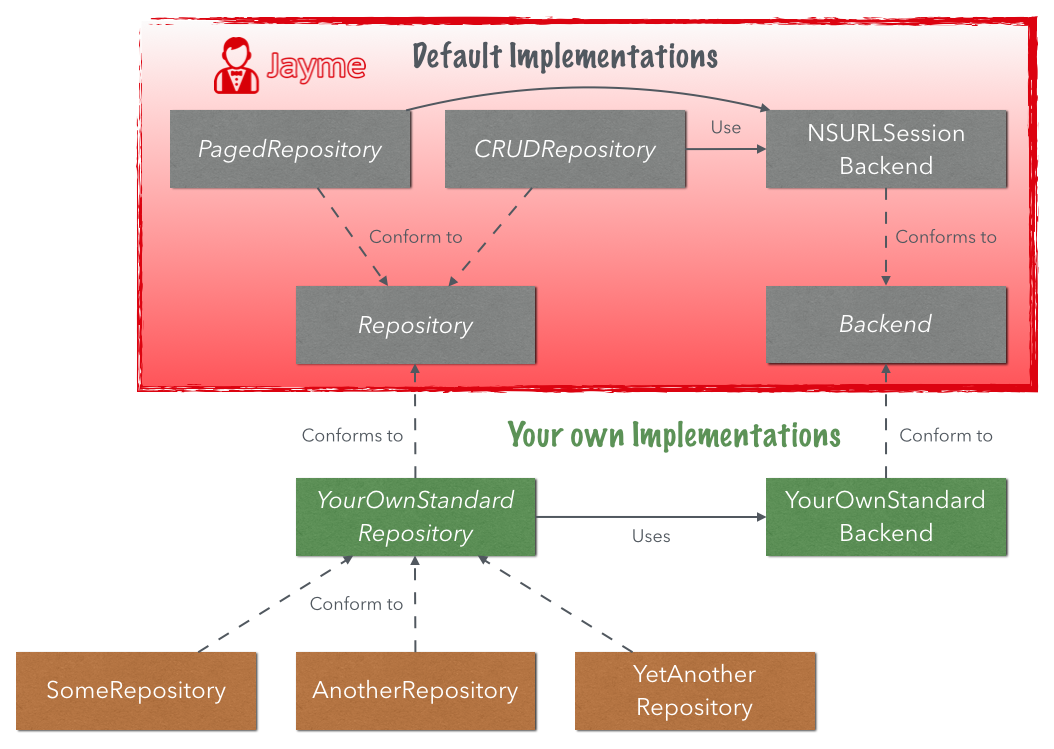
Jayme comes with some protocols and classes containing default implementations for common functionality, such as CRUD (create, read, update, delete) and pagination. There are many ways to approach those: Jayme is aimed to follow the conventions that we normally follow at Inaka.
These default implementations are:
- NSURLSessionBackend: A class that connects to a server using
NSURLSessionmechanisms. - CRUDRepository: A protocol that provides elemental CRUD functionality.
- PagedRepository: A protocol that provides read functionality with pagination.
We suggest you to take a look at these 3 files to find out how their methods work; they are easy to read and well-documented.
You will observe that they conform to Backend and Repository protocols respectively, which are very abstract. If you need to implement your own conventions, you can skip these default implementations mentioned above and write your own, as long as they conform to the Backend and Repository protocols.
In this example, you'll first learn how to setup a repository with basic CRUD functionality. At the end, you'll find instructions on how to add (and test) extra functionality to your repositories, as well as how to configure your own logging function.
By default, when you initialize a NSURLSessionBackend instance, it's created with a default configuration object, which uses basic HTTP headers for JSON communication, as well as localhost:8080 as the default base URL path. You will normally change that. You do it just like this:
extension NSURLSessionBackend {
    class func myAppBackend() -> NSURLBackend {
        let basePath = "your base URL path"
        let headers = [HTTPHeader(field: "Accept", value: "application/json"),
                       HTTPHeader(field: "Content-Type", value: "application/json")]
                       // and any header you need to use
        let configuration = NSURLSessionBackendConfiguration(basePath: basePath, headers: headers)
        return NSURLSessionBackend(configuration: configuration)
    }
}
Then, whenever you need to instantiate a backend with your configuration, instead of calling the regular NSURLSessionBackend(), you would:
let backend = NSURLSessionBackend.myAppBackend()First, you will create a User structure, for holding basic user data.
You have to make it conform to Identifiable, DictionaryInitializable and DictionaryRepresentable to match the generic EntityType that the Repository contract requires.
// User.swift
import Foundation
struct User: Identifiable {
let id: String
let name: String
let email: String
}
extension User: DictionaryInitializable, DictionaryRepresentable {
init(dictionary: [String: AnyObject]) throws {
let json = JSON(dictionary)
guard let
id = json["id"] as? String,
name = json["name"] as? String,
email = json["email"] as? String
else { throw JaymeError.ParsingError }
self.id = id
self.name = name
self.email = email
}
var dictionaryValue: [String: AnyObject] {
return [
"id": self.id,
"name": self.name,
"email": self.email
]
}
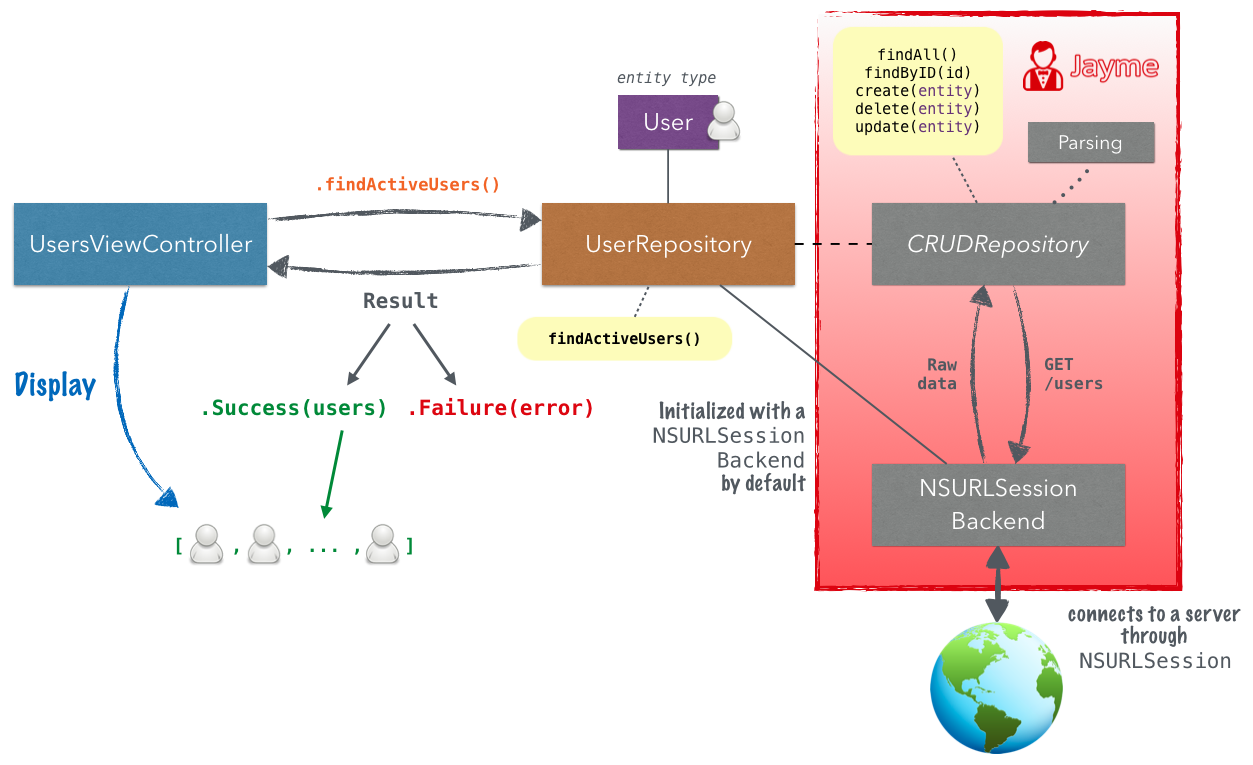
}Once you have defined your User entity, you're good to go and define its corresponding repository...
// UserRepository.swift

import Foundation

class UserRepository: CRUDRepository {

    typealias EntityType = User // 1
    let backend = NSURLSessionBackend.myAppBackend() // 2
    let name = "users" // 3

}
Notice these things here:
- A
typealiasis used in order to tie the genericEntityTypeto a concrete type (yourUser), hence letting the repository know which kind of entity it works with. BackendTypeis tied to theNSURLSessionBackendtype in the CRUDRepository definition. However, since the latter is a protocol, you still need to instantiate aNSURLSessionBackendin your concrete repository.- The
namethat you provide usually represents the name that is given for a group of these kind of entities. That name is what is going to be used for composing apathwhich, at a later stage, the backend is going to hit for basic CRUD operations (for instance:DELETE localhost:8080/users/123).
That's it! With this basic configuration you're all set to perform CRUD asynchronous operations with your users from anywhere in your app.
If you need pagination functionality, you can make your repository also conform to
PagedRepository, and you'll get that functionality for free. Check out the code documentation for further information.
Here are some examples of functions that you can call from your view controller:
UserRepository().findAll().start() { result in
    switch result {
    case .Success(let users):
        // You've got all your users fetched in this array!
    case .Failure(let error):
        // You've got a discrete JaymeError indicating what happened
    }
}
let user = User(id: "1", name: "John", email: "[email protected]")
UserRepository().create(user).start() { result in
switch result {
case .Success(let user):
// User created!
case .Failure(let error):
// You've got a discrete JaymeError indicating what happened
}
}As you might have noticed, the code at the view controller layer ends up being neat and concise.
By default, you only get five elemental methods from CRUDRepository. It happens very often that you need to add more complex functionality that is guided by the business' rules of your app. There are many examples that can be thought of. Let's simulate a simple one: You need to fetch a certain set of users (not all of them), which are find under the /users/active path in your server API.
You can define your own fetching function in UserRepository as follows:
func findActiveUsers() -> Future<[User], JaymeError> {
    let path = "\(self.name)/active"
    return self.backend.futureForPath(path, method: .GET, parameters: nil)
        .andThen { DataParser().dictionariesFromData($0.0) }
        .andThen { EntityParser().entitiesFromDictionaries($0) }
}
And easily use it, like this:
UserRepository().findActiveUsers().start() { result in
    switch result {
    case .Success(let users):
        // do your stuff
    case .Failure(let error):
        // show error
    }
}
Things to stand out here:
- The
findActiveUsers()implementation has been pretty much copied from thefindAll()one fromCRUDRepositorydefault extension, with some slight modifications. You'll realize that this kind of scenario is very common when designing your repositories' APIs with Jayme. - See the usage of
DataParserandEntityParserclasses. They include parsing functions that will often be required in your repositories (e.g. convertingNSDatainto an array of dictionaries, array of dictionaries into entities, etc.). Don't hesitate, take advantage of them! - Notice how the library encourages you to use the Future Pattern to simplify code.
Testing any custom function that you add to your own repositories allows you to guarantee that your business logic works as you would expect.
Writing these tests is optional and has a steep learning curve, but once you get the hang of it, testing your repositories becomes a piece of cake. For that reason, we encourage you to learn this process.
Here's what your repository would usually look like, when connected to a view controller:
Here's what your repository would look like, from the testing target perspective:
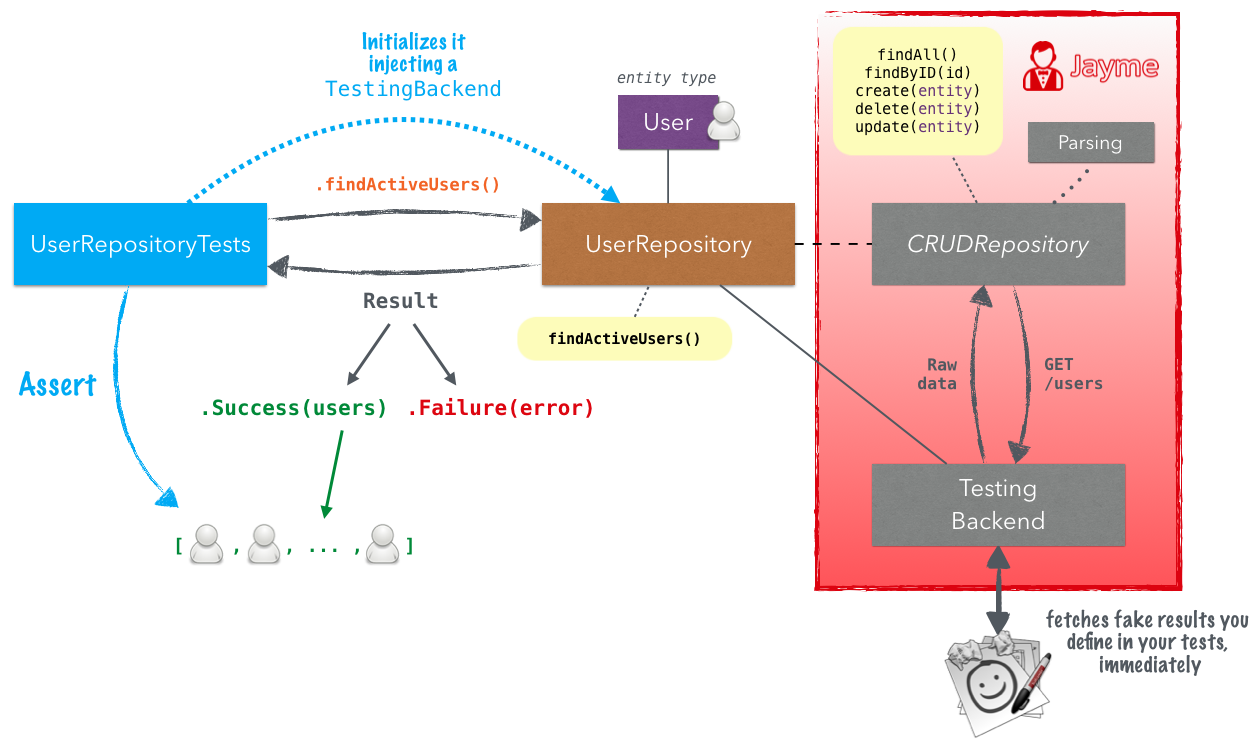
Usually, there will be three kind of asserts you'd want to perform onto a function in a repository:
- That the
pathandmethodsent to the backend are correct. - That upon a successful response, results are parsed as expected.
- That upon any failure scenario, a proper
JaymeErroris returned.
Here's a simple snippet exposing what the simplest test would be like:
func testFindActiveUsersCall() {
    self.repository.findActiveUsers()
    XCTAssertEqual(self.backend.path, "users/active")
    XCTAssertEqual(self.backend.method, .GET)
}
You can take a look at the UserRepositoryTests file to see the whole test suite.
For further information on how to configure your whole test environment, check out the sample project.
If you are relying on third party libraries to manage your logs, or if you have your own custom logging implementation, you can inject it so that Jayme uses it for its internal logging.
Here's an example exposing how to achieve that:
Jayme.Logger.sharedLogger.loggingFunction = { (items: Any..., separator: String, terminator: String) -> () in
	YourCustomLoggingFunction("\(items)")
}If you still have some hesitations about the usage of this library, there is an Example folder inside the repo containing a basic implementation of some repositories integrated with view controllers.
This sample project needs a local server to work, which you can configure really quickly by doing:
$ cd Jayme/Example/Server
$ python -m SimpleHTTPServer 8080- Jayme is available via cocoapods.
- To install it, add this line to your
Podfile:pod 'Jayme'
- Remember to add an
import Jaymestatement in any source file of your project that needs to make use of the library.
- To install it, add this line to your
For questions or general comments regarding the use of this library, please use our public hipchat room.
If you find any bug, a problem while using this library, or have suggestions that can make it better, please open an issue in this repo (or a pull request).
You can also check all of our open-source projects at inaka.github.io.