This is the end to end MLOps project I built through participated the MLOps Zoomcamp among 3 months.
This project is focus more on MLOps framework to achieved the productivity and reliability model deployment process.
This course is organized by DataTalks.Club. Appreciated the instructors put so much effort on this course, so I can learnt MLOps related skillsets for FOC. You can refer the MLOps Zoomcamp here link.
The objective of this project is to help the company identify customer’s credibility. So that it could help to reduce the manual effort.
It uses the dataset from kaggle.
The dataset contains the credit-card related information of the customer.
In this project, I implemented the MLOps framework to achieved the productivity and reliability model deployment process.
Such as experiment tracking, model registry, data version control, model deployment, testing framework and CI/CD deployment.
- Cloud: Amazon Web Service (AWS)
- Infrastructure as Code (IAC): Terraform
- Dependency Management: Pipenv
- Code Repository: Github
- Experiment Tracking: MLFlow
- Data Version Control: DVC
- Model Registry: MLFlow
- Workflow Orchestration: Prefect Cloud
- Model Deployment: containerized the model with Flask framework
- Containerization tools: Docker, Docker Compose
- Testing Framework:
- unit-testing (pytest)
- integration-testing (docker-compose)
- pre-commit (black, isort, pytest)
- CI/CD Pipeline: Github Actions
- Programming Language: Python
- download data from kaggle
- exploratory data analysis
- feature engineering
- model training
- hyperparameter tuning using hyperopts
- experiment tracking (MLFlow)
- data version control (DVC)
- model registry (MLFlow)
- workflow orchestration (Prefect Cloud)
- model deployment
- Docker
- AWS ECR
- AWS Lambda
- model monitoring (Local only)
- Evidently AI
- Prometheus
- Grafana
- Mongodb
- Docker Compose
- testing framework
- unit tetsing
- integration testing
- deepcheck
- localstack
- pylint
- precommit (black, isort, pytest)
- makefile
- IaC Tools (Terraform)
- cloud computing (AWS)
- CI/CD pipeline (Github Actions)
-
Clone the Github repository locally
git clone https://github.com/hoe94/DTC_MLOPS_Project.git
-
Create a new AWS Cloud account link
-
Create the User & Access keys in IAM
Copy the Access Key ID & Secret Access Key -
Assign the below permissions to the user created from no.3 in AWS IAM
- AmazonS3FullAccess
- AmazonEC2FullAccess
- IAMFullAccess
- AmazonRDSFullAccess
- AWSAppRunnerFullAccess
- SecretsManagerReadWrite
- AmazonEC2ContainerRegistryFullAccess
- AWSLambda_FullAccess
- AWSCodeDeployRoleForLambda
-
Download & Install the AWS CLI on your local desktop link
-
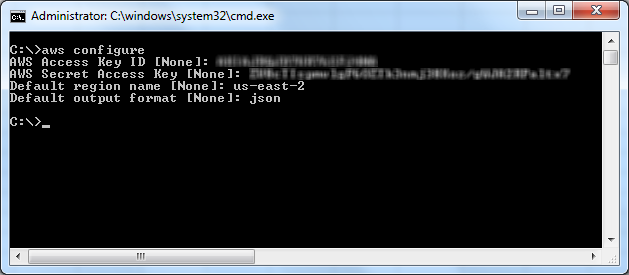
Configure the access keys by enter
aws configureon your local env.
- Create the S3 Bucket by using AWS CLI for the Terraform state bucket
aws s3 mb s3:https://[bucket_name]
Thanks for the inspriration from Nicholas to setup the MLFlow Server on AWS through Terraform.
He finds the gem on Github link about setup the MLFlow Server on AWS App Runner.
-
Download & configure the Terraform on your local env. link
-
Update the bucket under backend s3 for Terraform state bucket in terraform.tf under the path infrastructure/terraform.tf
p/s. please dont use my Terraform state bucket
-
Run the below command to provision the cloud services
terraform plan
terraform apply
-
Type "yes" when prompted to continue
-
Copy the mlflow-server-url, aws-ecr-repository & dvc_remote_storage from the outputs after complete run terraform apply
- Enter the credentials to login into mlflow-server-url
- user: mlflow
- password: asdf1234
-
Activate the pipenv
pipenv shell
-
Set the environment variables for AWS configuration. For windows user please use Git Bash.
export AWS_ACCESS_KEY_ID=[AWS_ACCESS_KEY_ID]
export AWS_SECRET_ACCESS_KEY=[AWS_SECRET_ACCESS_KEY]
-
Set the environment variables for MLFLOW_TRACKING_URI. For windows user please use Git Bash.
export MLFLOW_TRACKING_URI=[MLFLOW_TRACKING_URI]
-
Sign up an account from Prefect Cloud v2 link
-
Generate the API Key after create the workspace. Copy the API key after the creation.
-
Login into prefect on your terminals
prefect auth login -k <YOUR-API-KEY>
-
Run the batch script, init.sh to unzip & preprocess the data
./init.sh
-
Running the train.py under the path src/train.py
python src/train.py
-
These are the commands to configure the DVC
dvc init mkdir dvc_files cd dvc_files dvc add ../data --file dvc_data.dvc -
Configure the DVC remote storage by add the AWS S3 Bucket, mlops-project-dvc-remote-storage
dvc remote add myremote s3:https://mlops-project-dvc-remote-storage
-
Push the dataset metadata to AWS S3 Bucket
dvc push -r myremote
-
Build the docker image
docker build -t mlops-project-credit-score-prediction:v1 . -
Run the docker image on local env
docker run -it --rm -p 9696:9696 -e AWS_ACCESS_KEY_ID="${AWS_ACCESS_KEY_ID}" -e AWS_SECRET_ACCESS_KEY="${AWS_SECRET_ACCESS_KEY}" -e MLFLOW_TRACKING_URI="${MLFLOW_TRACKING_URI}" --name mlops-project mlops-project-credit-score-prediction:v1
-
Run the test_predict.py to test the running container
python src/test_predict.py
- Build the docker image
docker build -t lambda-function-credit-score-prediction:v1 -f lambda_function.dockerfile .
-
login into AWS ECR. Please fill in the variables, aws-region & aws-ecr-repository. Please refer back Step 2.5 for aws-ecr-repository.
aws ecr get-login-password \ --region [aws-region] \ | docker login \ --username AWS \ --password-stdin [aws-ecr-repository] -
Set the environment variables for AWS_ECR_REMOTE_URI.
AWS_ECR_REMOTE_URI=[aws-ecr-repository]
-
Push the docker images into ECR
REMOTE_TAG="v1"
REMOTE_IMAGE=${AWS_ECR_REMOTE_URI}:${REMOTE_TAG}

LOCAL_IMAGE="lambda-function-credit-score-prediction:v1"
docker tag ${LOCAL_IMAGE} ${REMOTE_IMAGE}
docker push ${REMOTE_IMAGE}
- Copy the Docker Image URL from AWS ECR
- Create the IAM role & Attach the policy by using AWS CLI for the Lambda Function
aws iam create-role --role-name Lambda-role --assume-role-policy-document file:https://lambda-role-trust-policy.json
aws iam attach-role-policy --policy-arn arn:aws:iam::aws:policy/AmazonS3FullAccess --role-name Lambda-role
aws iam attach-role-policy --policy-arn arn:aws:iam::aws:policy/AmazonEC2ContainerRegistryFullAccess --role-name Lambda-role
aws iam attach-role-policy --policy-arn arn:aws:iam::aws:policy/AWSLambdaBasicExecutionRole --role-name Lambda-role
- Create the Lambda Function by using AWS CLI
aws lambda create-function --region [aws-region] --function-name credit-score-prediction-lambda \
--package-type Image  \
--code ImageUri=[ECR Image URI]   \
--role arn:aws:iam::000300172107:role/Lambda-role  \
--timeout 60  \
--memory-size 256
Reference Link: link
Reference Link: link2
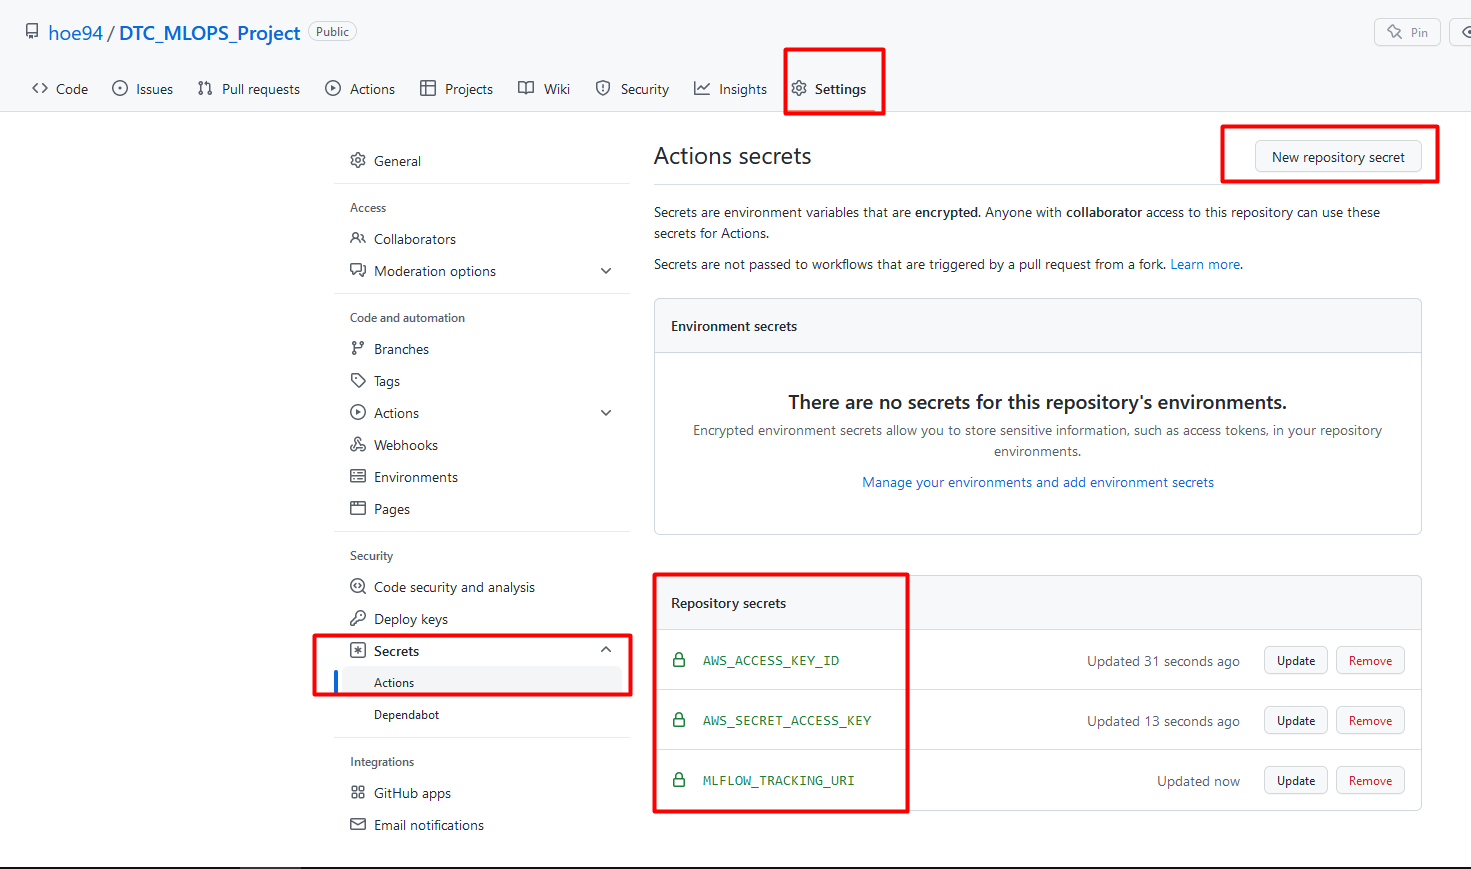
- This is the step that when you want execute the CI/CD Pipeline through Github Action by create Pull request
-
Delete the AWS Lambda, AWS ECR Docker Image & AWS S3 mlflow-model-artifact through AWS Console
-
Destroy the cloud services through Terraform
terraform destroy --auto-approve
- Go to monitoring_service folder
cd monitoring_service - Start the monitoring services (evidently AI, Prometheus, Grafana, Mongodb)
docker compose up
- Execute the traffic_simulation.py to send the data
python traffic_simulation.py
- added pre-commit into git hooks
pre-commit install- Setup the Makefile in Windows OS
-
install chocolatey package manager, using power shell (admin mode)
- tutorial 1: https://stackoverflow.com/questions/2532234/how-to-run-a-makefile-in-windows
- tutorial 2: https://chocolatey.org/install
- video tutorial: https://www.youtube.com/watch?v=-5WLKu_J_AE
-
install makefile by using choco
choco install make
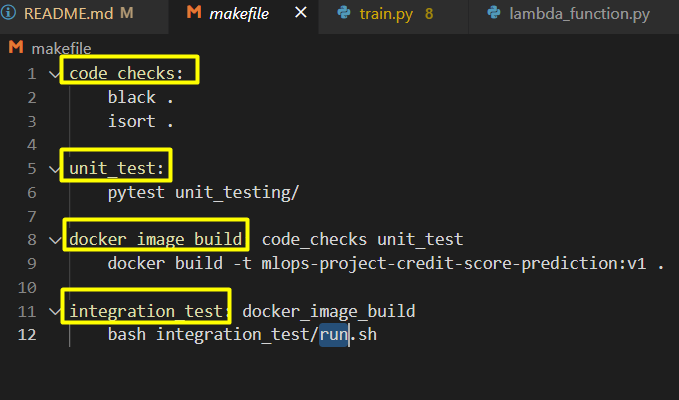
- Select the modules (code checks, unit_testing, integration_testing) from the makefile
make [module]
- Host the monitoring services (evidently AI, Prometheus, Grafana, Mongodb) on AWS Cloud through Terraform
- Standardize the AWS services creation by using AWS CLI (Step 1)
- Push the Docker Image into AWS ECR by using Terraform (Step 7)
- Create the IAM Role & Deploy the Docker Image on AWS Lambda by using Terraform (Step 8)
- Expose the Lambda function as API by using AWS API Gateway link
- Delete the items by using Terraform (Last Step no.1)
- Fix the CD pipeline on Github Actions


