A minimal academic page for academics!
FOR THE DEMO, PLEASE SEE THE LINK BELOW

- Minimal, Responsive, and Clean
- 🆕 Supports Blog Posts
- 🆕 Supports News Feed
- Supports Google Analytics
- Supports Social Links
- Supports Publications Listing
- Supports Projects Listing
To use Avicenna, you need to follow three steps:
- Setup a site with
Avicenna - Customize the site to your needs
- Build your site and deploy it to your host
The following sections are based on the mentioned steps.
There are 2 ways to install Avicenna:
- The first one is just an automated script based on the second approach(recommended).
- The sedond one is a step-by-step approach.
In this approach, all you need is to replace the my_cool_page with your desired name in the following script:
wget https://raw.githubusercontent.com/hadisinaee/avicenna/master/setup_avicenna.sh && sh setup_avicenna.sh my_cool_pageRun the site:
hugo serveNow, you should be able to see the site at https://localhost:1313
Click to see!
- You need to install Hugo first!
- Create a new site and go to the directory:
# replace the `my_cool_page` with whatever you want!
hugo new site my_cool_page

# move to your project folder
cd my_cool_page- Add the stable release of
Avicenna(themasterbranch) to yourthemesfolder:
git clone -b master [email protected]:hadisinaee/avicenna.git ./themes/avicenna- Copy the sample site to your project:
cp -R themes/avicenna/exampleSite/* ./- Run the site:
hugo serveNow, you should be able to see the site at https://localhost:1313
You can start the customization with the config.toml file. It's located a the root of your project. In this file, you can set your name, your website URL, googleAnalytics id, etc.
There is a folder named static under the root of your site's folder. Its structure is as follows:
- Profile Picture: Simply replace
profile.pngwith your profile file. Please use the same name and extenstion, e.g.profile.png. It doesn't work if you use another name or extension. - CV: You need to put your CV directly under
staticfolder. I recommend you to use the namecv.pdffor your CV file. Also, if you wanted to use another file name, you would need to change it in your introduction. See Introduction Section. - Favicon: It has the same procedure as your profile picture.
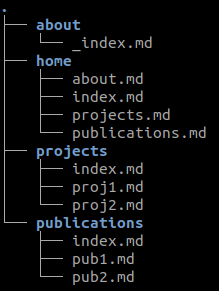
All files and folders that you need to modify lies in the content folder. The folder should look like this
Avicenna theme has three different sections: Introduction, Publications, and Projects. Based on the previous figure, you might have an intuition where you should modify. However, there are some details that I have to provide.
Introduction section is where you put details about yourself, such as your name, profile, interests, etc. To modify the introduction section, you need to edit the content/about/_index.md file.
All your publications are stored in content/publications. To create a new publication:
hugo new publications/your-pub-name.md
If was successful, you would see a message similar to the following:
YOUR_PROJECT_PATH/content/publications/your-pub-name.md
To edit the file, go to content/publications and then find your your-pub-name.md file and change it.
All your projects are stored in content/projects. To create a new project:
hugo new projects/your-project-name.md
If was successful, you would see a message similar to the following:
YOUR_PROJECT_PATH/content/projects/your-project-name.md
To edit the file, go to content/projects and then find your your-project-name.md file and change it.
- Make sure you have changed your
baseURLin theconfig.tomlfile. It should be the address you want to deployAvicennaon. - Run
hugoin the root of your project. The result will be in thepublicfolder in the root of your project. - Copy
publicfolder and move it your host server.

