Before starting the project, you should make certain preparations. Different operating systems require different steps:
##Linux: Installing Golang (Go):
-
Open the terminal.
-
Download the latest version of Golang from the official Golang website: https://golang.org/dl/
-
Extract the downloaded archive. For example, if you downloaded the archive to your home directory:
tar -C /usr/local -xzf go<VERSION>.linux-amd64.tar.gz
- Add the Go path to your profile file (e.g., .bashrc or .zshrc):
echo 'export PATH=$PATH:/usr/local/go/bin' >> ~/.bashrc
-
Apply the changes in the current terminal or restart the terminal.
-
Verify the Golang installation:
go version
Installing npm (Node.js Package Manager):
-
Open the terminal.
-
Install Node.js along with npm from the official Node.js website by running the following commands:
curl -fsSL https://deb.nodesource.com/setup_16.x | sudo -E bash -
sudo apt-get install -y nodejs
Verify the npm installation:
npm -v
Installing Golang (Go):
-
Download the latest version of Golang from the official Golang website: https://golang.org/dl/
-
Open the downloaded disk image and drag the go.pkg file into the "Applications" folder.
-
Open "Applications" and run go.pkg to start the installation process.
-
After successful installation of Golang, verify its version in the terminal:
go version
Installing npm (Node.js Package Manager):
-
Open the terminal.
-
Install Node.js along with npm from the official Node.js website by running the following command:
brew install node
Verify the npm installation:
npm -v
Installing Golang (Go):
-
Download the latest version of Golang from the official Golang website: https://golang.org/dl/
-
Run the Go installer and follow the instructions.
-
After successful installation of Golang, open the Command Prompt or PowerShell.
-
Verify the Golang installation:
go version
Installing npm (Node.js Package Manager):
-
Download the Node.js installer from the official Node.js website: https://nodejs.org/
-
Run the Node.js installer and follow the instructions.
-
After successful installation, open the Command Prompt or PowerShell.
-
Verify the npm installation:
npm -v
Now you should have Golang and npm installed on your respective operating systems, and you're ready to start!
Installing.
Golang is our backend language.
We are using version 1.17.4. You can download it from the official website GoLang, and install it according to the official instructions
Database.
For our project we use a relational database PostgreSQL, version 12.11 which you can download by following the link from the official website or you can run your database in a Docker container.
Docker.
For isolated installation of databases and servers we need a Docker, version 20.10.16 or higher, you can download it at official website
docker run --name=db -e POSTGRES_PASSWORD=‘$YOUR_PASSWORD’ -p $YOUR_PORTS -d --rm postgres

docker exec -it db createdb -U postgres ultimatedivisiondb_test
The application depends on config values that are located in the config file. (examples of configs are in the folder - configsexamples)
These actions will create a config file.
go run cmd/ultimatedivision/main.go setup
go run cmd/currencysigner/main.go setup
go run cmd/nftsigner/main.go setup
Go to that config file and edit the necessary files.
For example for MacOS system you need to put config files in:
/Users/<YOUR-USER>/Library/ApplicationSupport/Ultimatedivision/
in this place  and in such similar places, please write the full path to your folder.
Run the main server.
From the web/console directory at the root of the project read topic Web/console Initial web setup
You can run it with the command in root of the project:
go run cmd/ultimatedivision/main.go run
After this you can open console on localhost:8088 and admin panel on localhost:8087
Mini servers.
To make shure that all services are running we need to start Currency signer with spesific command. In general, we use private mini-servers when we work with signing something with a private key to protect personal data from hackers. List of these servers:
- Currency signer;
- NFT signer;
Brief information about them:
- we don't have any api in those servers;
- we have docker files/docker-compose files where these servers are already started as closed;
- we have private keys in config files, each server has its own file;
- each server has an endless cycle with an interval of work and performs its specific logic;
You will find commands for local startup under the server description.
Deployment instructions on the remote server according to the docker files in the deploy directory.
Currency signer
The currency signer runs a infinite cycle with an interval of operation that monitors the records of currency waitlist in which there is no signature and if it finds them then generates a signature and sends a transaction to transfer money.
go run cmd/currencysigner/main.go run
NFT signer
To make shure that all services are running we need to start NFT signer with spesific command.
The nft signer runs an infinite cycle with an interval of operation that monitors the records of waitlist in which there is no signature and if it finds them then generates a signature and sends a transaction to mint nft.
go run cmd/nftsigner/main.go run
**Recommendation ** Access to the server shouldn't be direct. We recommend organizing access to the server through VPN + SSH key.
To run all tests for the entire project, use the command:
go test ./...
To run the go-linter use the command:
golangci-lint run
Solution.
To make deployment independent of cloud providers, use containerization through docker images. That could be runnable on any server, as result we could switch between providers whenever we want without changing the deployment process.
File locations.
All docker files should locate in ${projectname}/deploy directory. For each service, at the project, write a separate docker file.
Naming.
According to docker files naming convention, it should have name of service before dot (ex.: signer.Dockerfile, projectname.Dockerfile).
If the project has several docker-compose files, these files should also have naming according to docker files naming convention (docker-compose.test.yml, docker-compose.local.yml).
Deployment.
For deployment use GitHub actions that trigger commands from Makefile. It will build docker images (with commit hash and latest), and it will be pushed to our docker registry. Images from docker registry will use on deployment server in docker-compose file.
Rollback to particular version.
On deployment part, create docker image with name that contains commit hash (docker-registry-address/service-name:commit-hash), as result we could rollback to particular version whenever we want.
Access to logs.
For access to logs, we use Dozzle. It's running as a separate service in docker-compose. To create login & password - pass as environment variables to docker-compose and provide credentials to QA and Devs. So that they have easy and fast access to logs.`
Metrics & graphs.
To collect standards (like CPU, Memory usage) or custom metrics we use Prometheus.
To make graphs we use Grafana which uses metrics passed by Prometheus.
Metric examples.
metrics/metrics.go
type Metric struct {
   handler  http.Handler
   newUsers Counter
}

// NewUsersInc increment Counter newUsers.
func (metric *Metric) NewUsersInc() {
   metric.newUsers.Inc()
}

// NewMetric is a constructor for a Metric.
func NewMetric() *Metric {
    newUsers := prometheus.NewCounter(prometheus.CounterOpts{
        Name: "number_registrations",
        Help: "The total number of successful registrations.",
    })

    // Create a custom registry.
   registry := prometheus.NewRegistry()

   // Register using our custom registry gauge.
   registry.MustRegister(newUsers)
   return &Metric{
        // Expose metrics.
        handler:  promhttp.HandlerFor(registry, promhttp.HandlerOpts{Registry: registry}),
        newUsers: newUsers,
    }
}
console/consoleserver/controllers/auth.go
// Register creates a new user account.
func (auth *Auth) Register(w http.ResponseWriter, r *http.Request) {
	w.Header().Set("Content-Type", "application/json")
	ctx := r.Context()

	var err error
	var request users.CreateUserFields

	if err = json.NewDecoder(r.Body).Decode(&request); err != nil {
		auth.serveError(w, http.StatusBadRequest, AuthError.Wrap(err))
		return
	}

	if !request.IsValid() {
		auth.serveError(w, http.StatusBadRequest, AuthError.New("did not fill in all the fields"))
		return
	}

	err = auth.userAuth.Register(ctx, request.Email, request.Password, request.NickName, request.FirstName, request.LastName, request.Wallet)
	if err != nil {
		switch {
		case userauth.ErrAddressAlreadyInUse.Has(err):
			auth.serveError(w, http.StatusBadRequest, userauth.ErrAddressAlreadyInUse.Wrap(err))
			return
		default:
			auth.log.Error("Unable to register new user", AuthError.Wrap(err))
			auth.serveError(w, http.StatusInternalServerError, AuthError.Wrap(err))
			return
		}
	}

	auth.metric.LoginsInc()
}
- Install node. Current node version: v18.16.1.
- Install npm. Current npm version: 9.5.1.
- Run command
npm ci. Uses to get and install dependencies only depend on package-lock.json.
npm run lint- runs eslint checks with .eslintrc config.npm run start- runs app without server on localhost.npm run build- runs app with webpack.config.json on 'production' mode on localhost. Builds the app for production to thedistfolder. It correctly bundles React in production mode and optimizes the build for the best performance. Also, automatically runs style lint rules with .stylelintrc config.npm run dev- runs app with webpack.config.js on 'development' mode. Builds the app for development to thedistfolder. Faster that build but much larger size. Also contains 'watch' development mode. Automaticaly rebuilds app when code is changed. Runs on localhost.
- cards, clubs, divisions, gameplay, marketplace, seasons, users - domain entities.
Each folder contains domain entities and services.
Each entity service serves and calls API http/ws requests. - api: holds entities API http/ws clients.
APIClient is base client that holds http/ws client and errors handler. - private: http client implementation (Custom wrapper around fetch API).
Holds DELETE, GET, PATCH, POST, PUT methods for JSON. - app contains web UI:
- components: holds UI components
- views: holds UI routes pages
- routes: routes config implementation
- static: contains project animation/fonts/images/styles.
- store: redux state store
- actions: contains domain entities actions, actions creators and thunks
- reducers: contains domain entities initial state and changes it depend on actions
- hooks: contains custom functions to display UI logic
- internal: holds custom functions to change views variables
- plugins: contains ethers web3 provider
- configs: UI constants
App uses casper blockchain:
-
contracts:
-
https://testnet.cspr.live/contract/05560ca94e73f35c5b9b8a0f8b66e56238169e60ae421fb7b71c7ac3c6c744e2 - nft
-
https://testnet.cspr.live/contract/feed638f60f5a2840656d86e0e51dc62c092e79d980ba8dc281387dbb8f80c42 - marketplace
-
https://testnet.cspr.live/contract/5aed0843516b06e4cbf56b1085c4af37035f2c9c1f18d7b0ffd7bbe96f91a3e0 - erc20 tokens
-
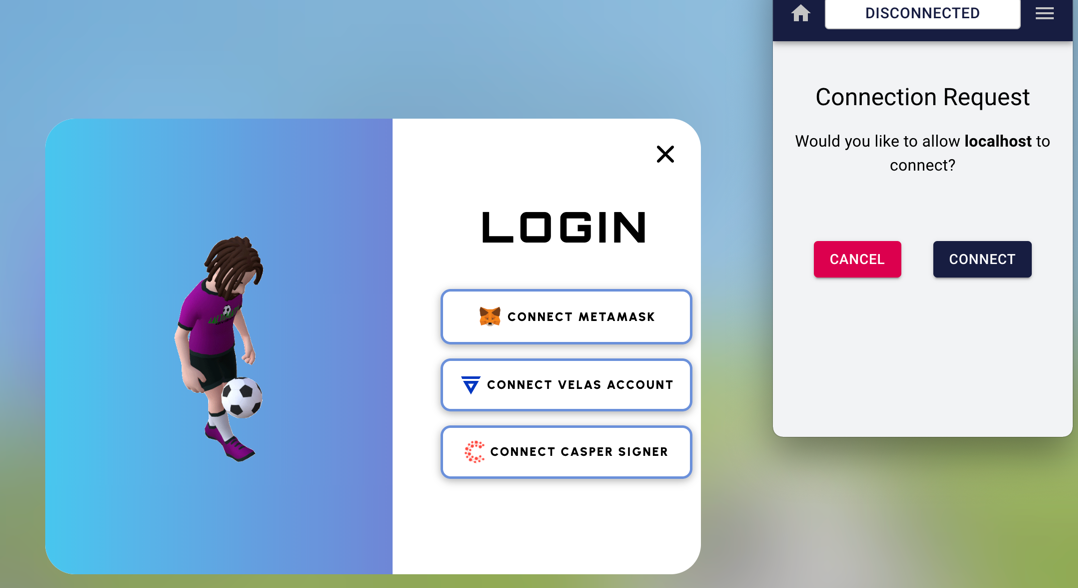
register: To register a new user, you need to install Casper Signer on the browser (right now it's only possible on localhost).
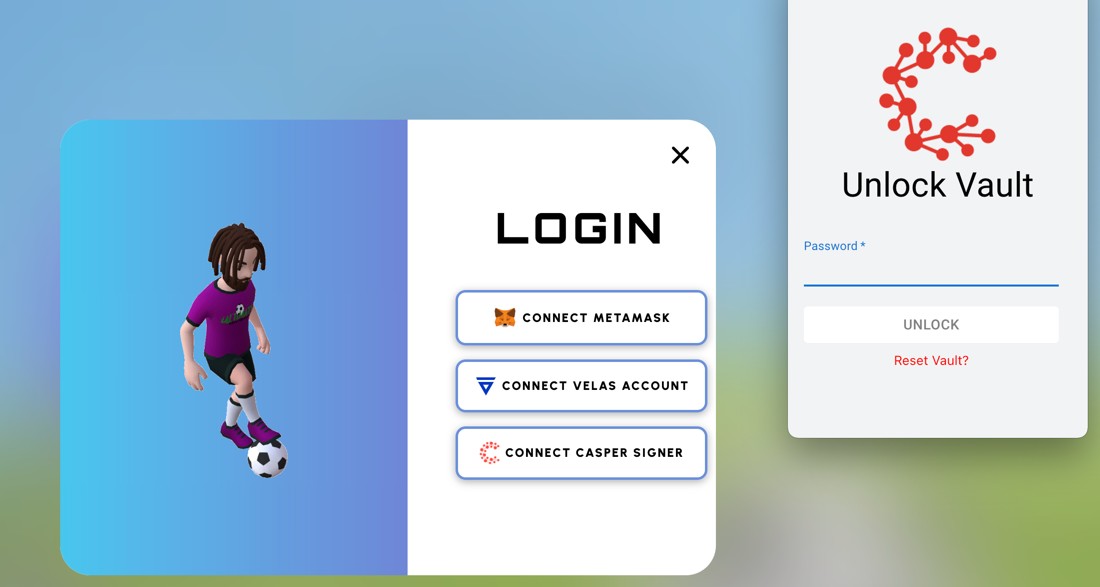 enter your password or create new account and press to connect
-
mint: In the app, the user can mint the card using Casper blockchain. For this, you need to register with Casper Signer and then go to the store where you can open the loot box and get a card (you have to run the NFT signer):
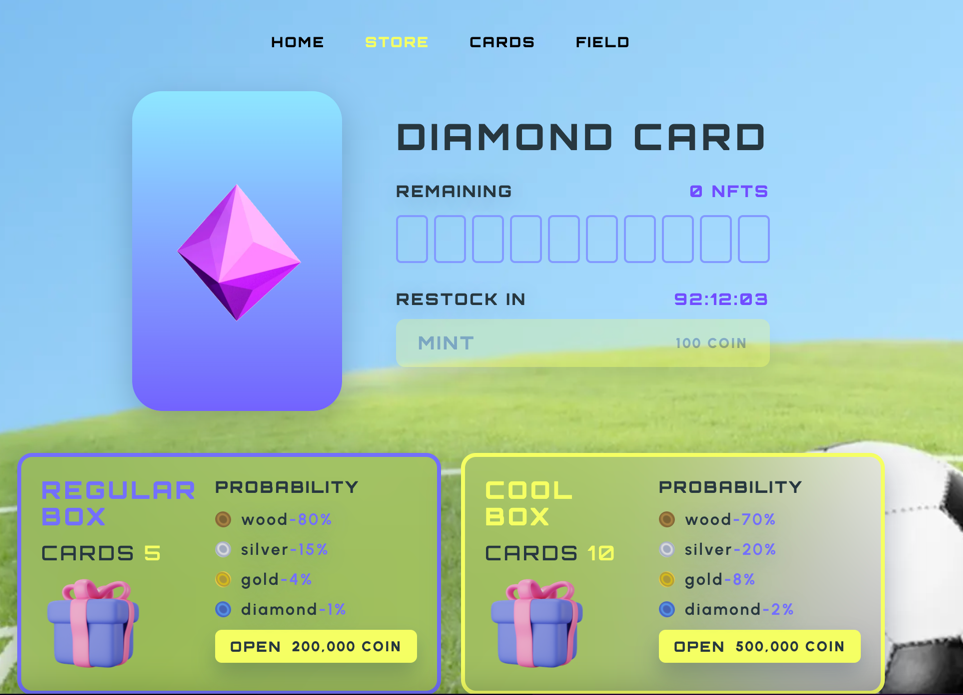 open loot box and get your cards
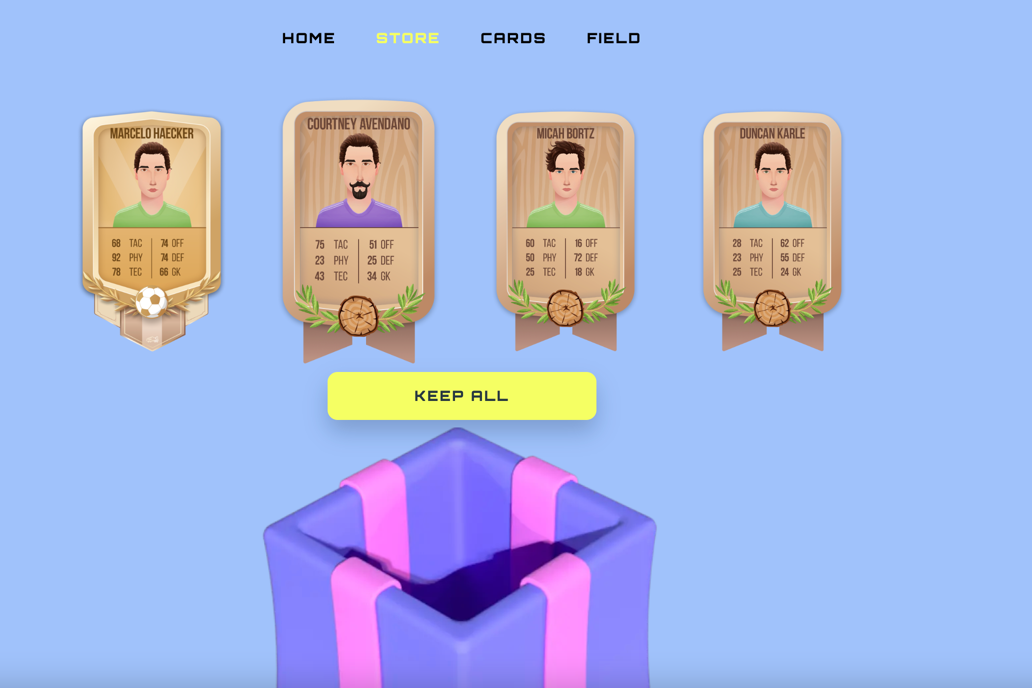 click keep all and go to cards menu
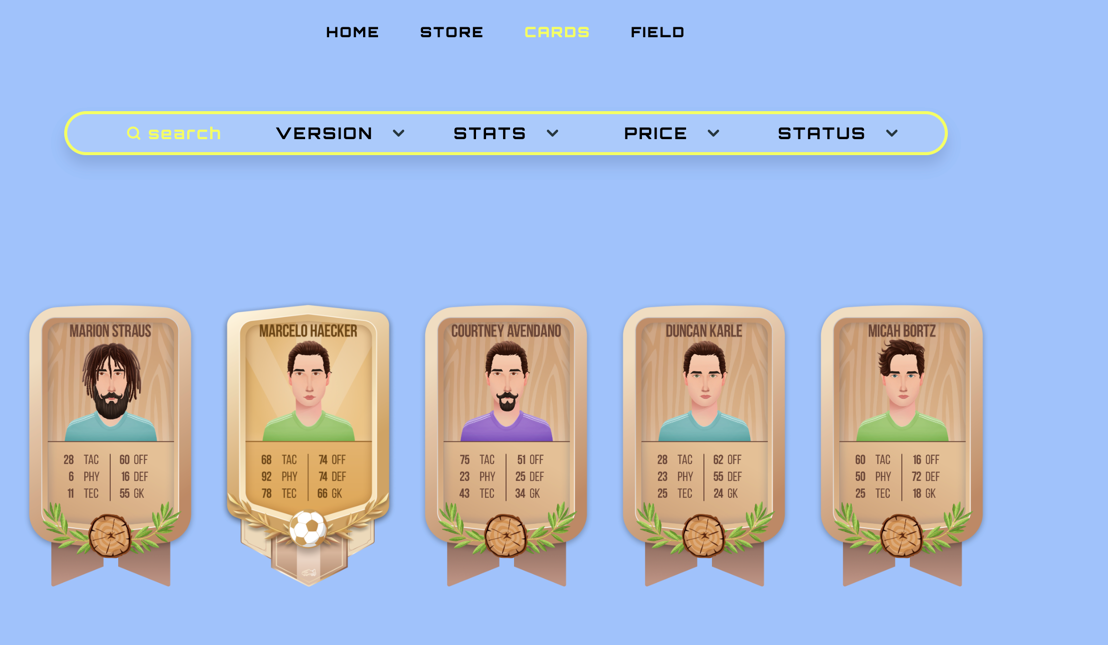 select the card you want to mint
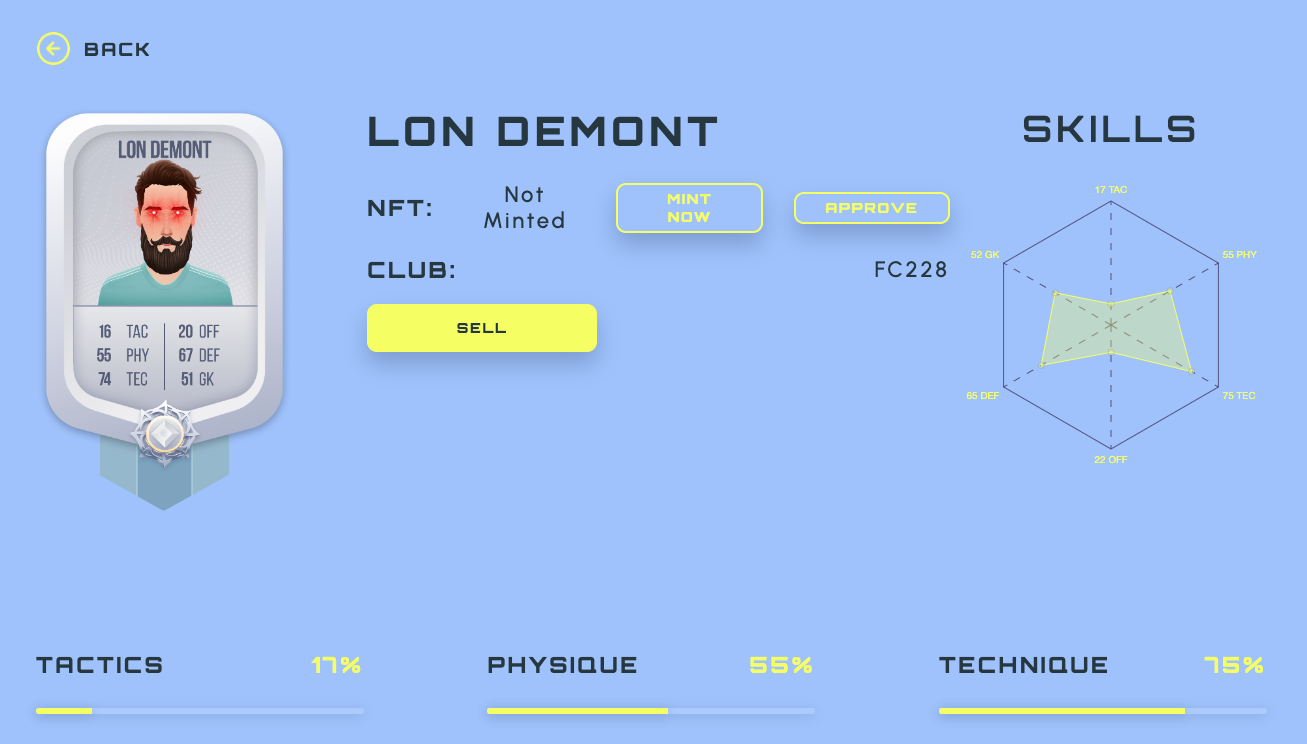 and press mint
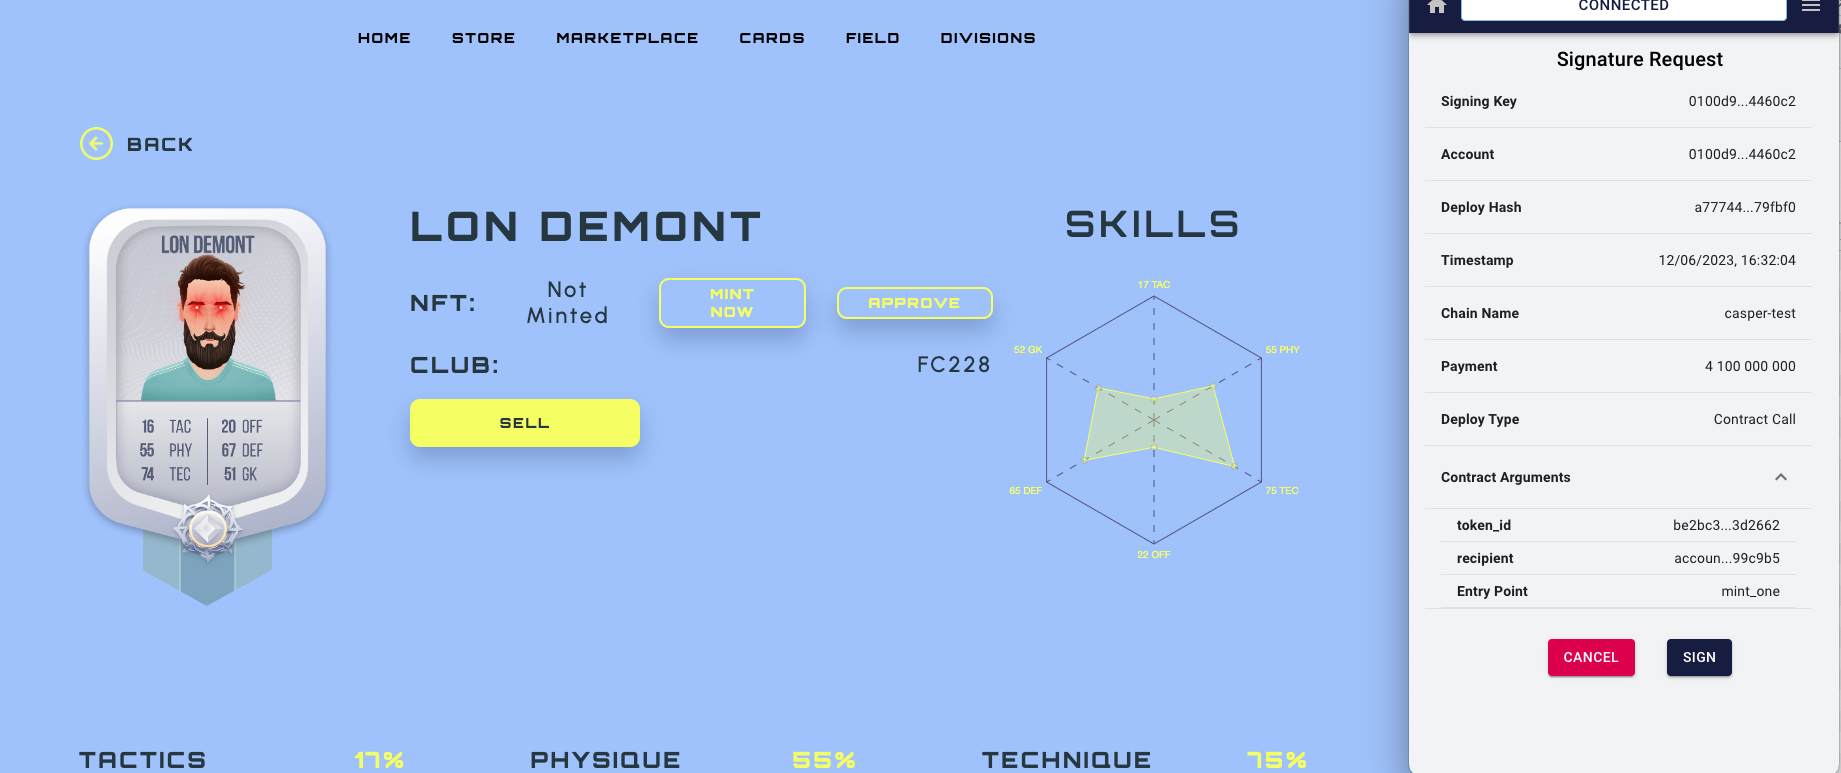 Casper signer will open and after that press the sign
your card is minted!
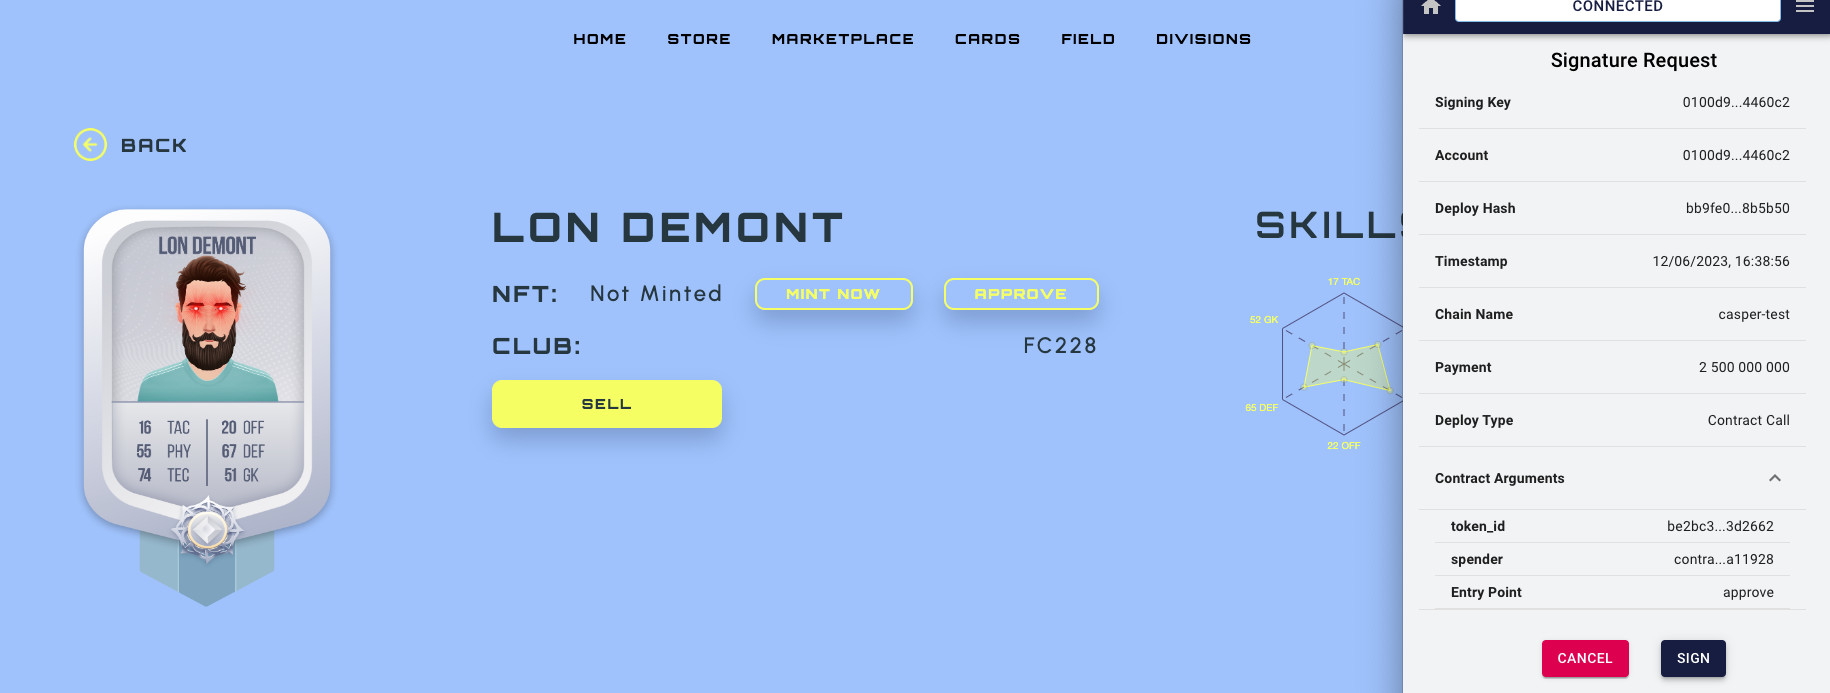
If you want your card add to marketplace you must approve it
Casper signer will open and after that press the sign
your card is minted!
If you want your card add to marketplace you must approve it
-
- token:In the app, the user can win the tokens and get it by Casper(you have to run the Currency signer):
For this you need to have a football team on they field
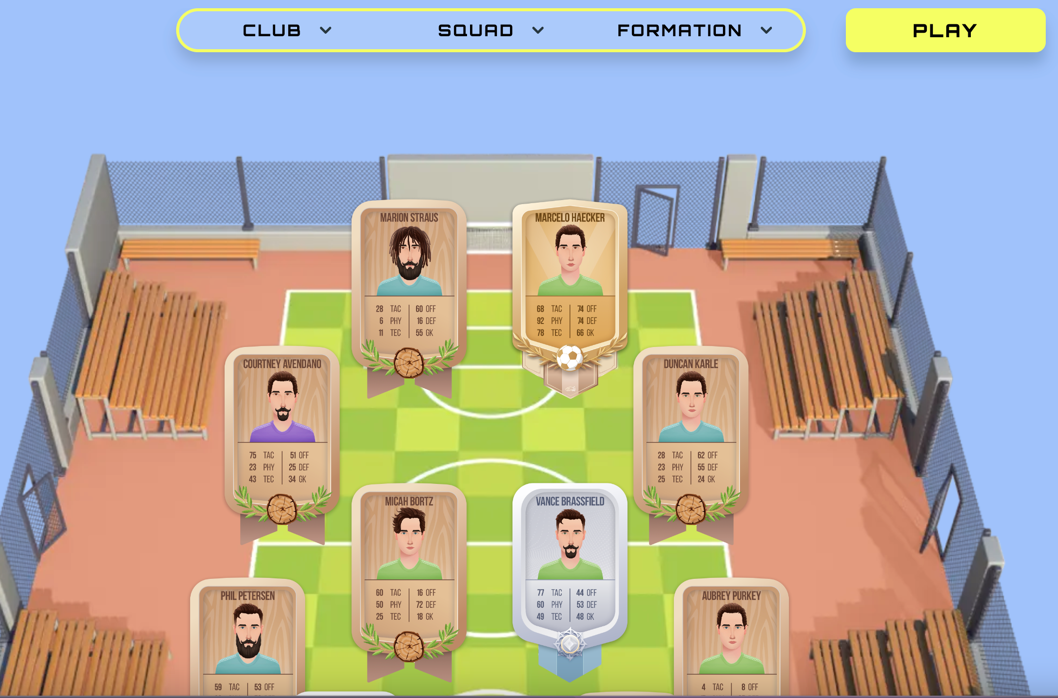 and click play
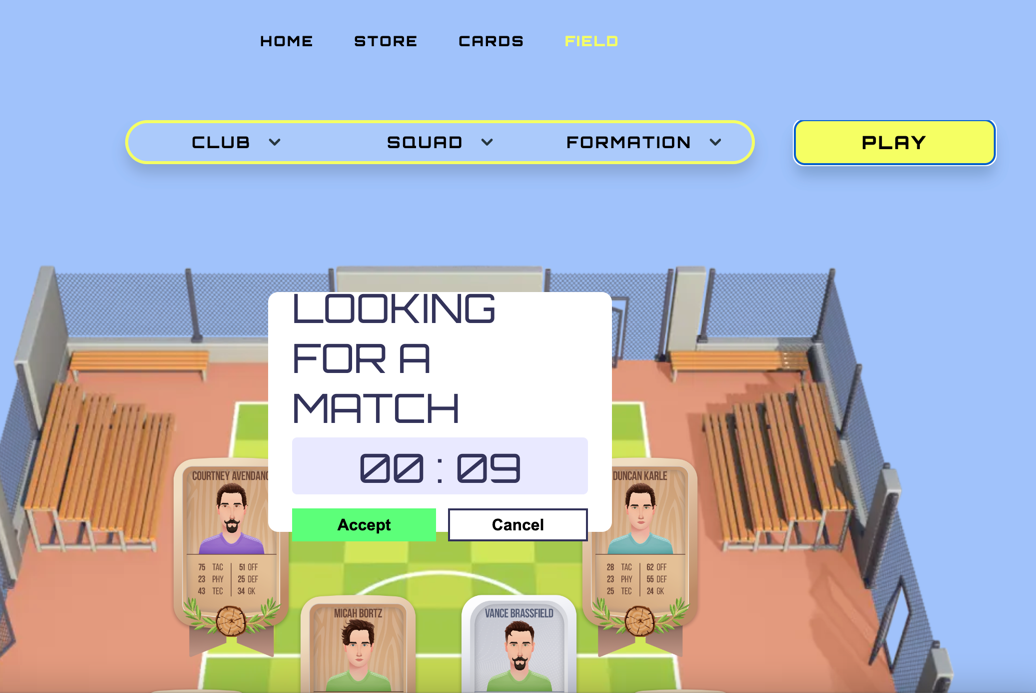 your command will be wait to another player, when he appears, you will be asked if you want to play a game
- token:In the app, the user can win the tokens and get it by Casper(you have to run the Currency signer):
For this you need to have a football team on they field


press "Accept" and the game will start, after the game is over you will receive the result, if it is a win, you can collect your reward tokens.

 And after you must approve these tokens for use it in marketplace

-
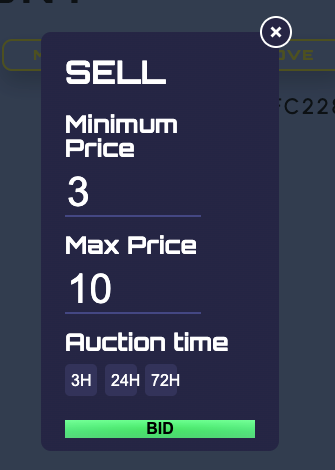
- Marketplace:In the app, the user can sell NFT by Casper:
For this you need to have minted and approved nft card and press sell it

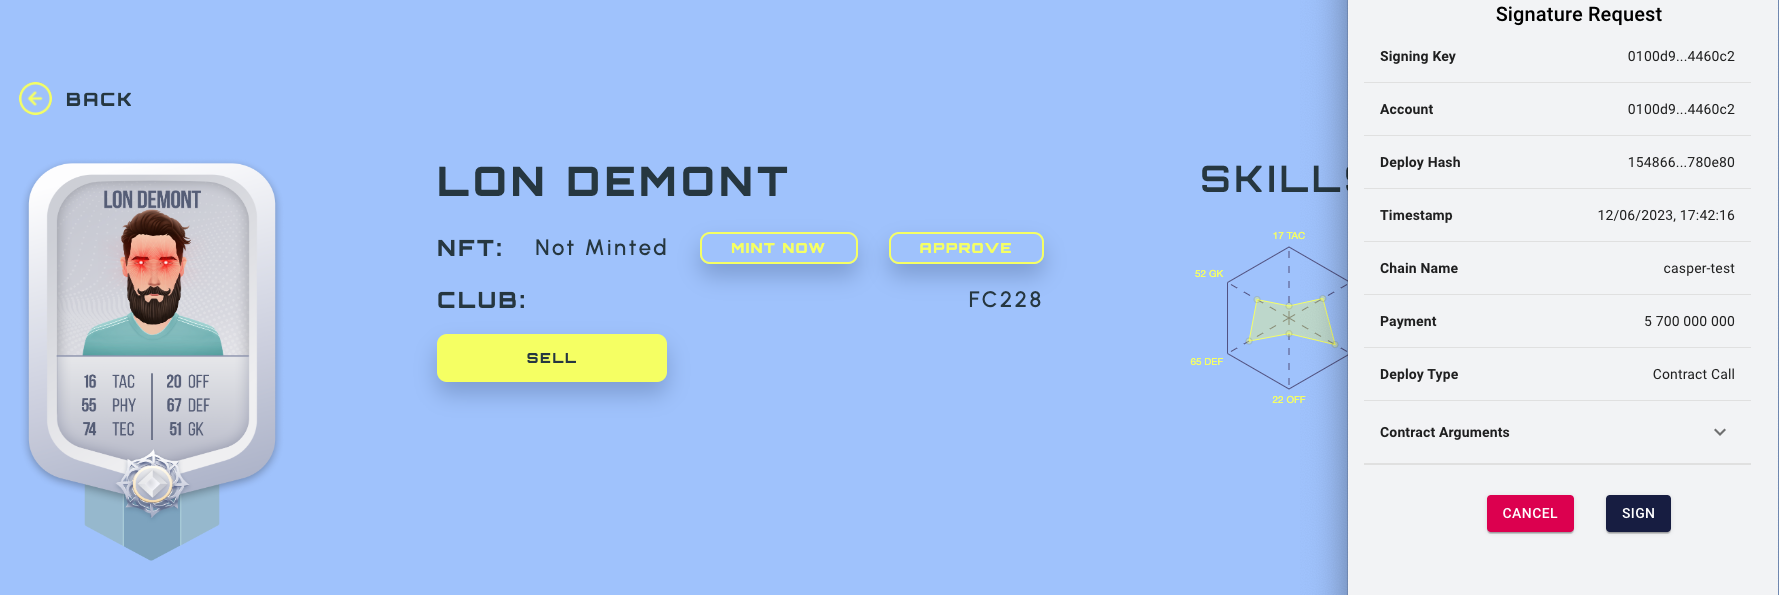 and press sign
- Marketplace:In the app, the user can sell NFT by Casper:
For this you need to have minted and approved nft card and press sell it


Your card on marketplace!

After this, another player can bid or buy now
