The assignment required two pieces of work:
- Deploying a Spark application to transform the sample dataset provided
- Deploy the infrastructure necessary to run the Spark application
The Spark application implements the following ELT pipeline, except for the pipeline test steps
I assumed a batch processing use case.
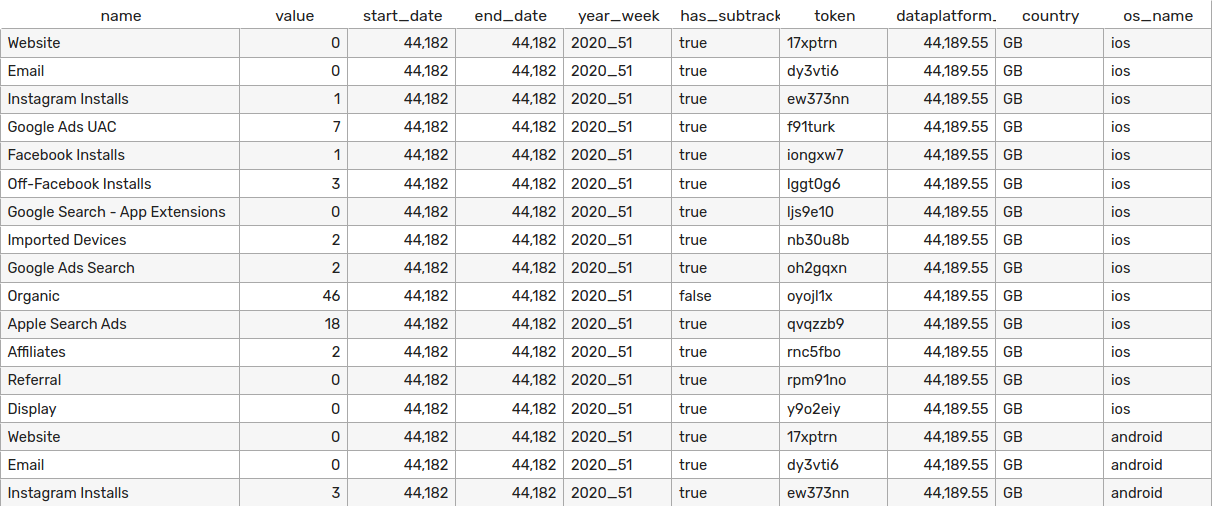
The input data is assumed to be
- an aggregated summary of the number of new users acquired through different marketing channels
- per day
- per country
- per operating system
Some propereties to keep in mind were:
- The dataset contains redundant columns, as
token,nameandhas_subtrackersare fully correlated, having a 1:1:1 mapping between their distinct values. - The table further contains aggregated rows for
countryandos_name, similar to an OLAP cube. - The date dimension is not continuous, there are date x country combinations with no data
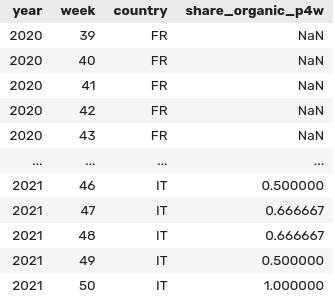
I decided to create a table showing the proportion of new users acquired via the organic channel, per week, per country, over a rolling window of past 4 weeks.
This is a high-level walkthrough, for details see scripts/transform.py.
-
Select subset of data
(df
    .filter((fn.col("os_name") == "all") & (fn.col("country") != "ALL"))
    .select(
        [
            (fn.col("name") == "Organic").alias("is_organic"),
            "value",
            "year_week",
            "country",
        ]
    )
-
Reshape and make date dimension continuous
    .groupby(["year_week", "country"]).pivot("is_organic").sum("value")
    .join(
        other=fn.broadcast(filler),
        on=['year_week', 'country'],
        how='outer'
    )
-
Apply window functions, fill missing data with zeros
    .withColumn("period", year_week_to_int(fn.col("year_week")))
    .fillna(0)
    .withColumn("sum_nonorganic_P4W", fn.sum("false").over(window_four_weeks))
    .withColumn("sum_organic_P4W", fn.sum("true").over(window_four_weeks))
-
Calculate proportion, select columns for presentation
    .select(
        [
            fn.split("year_week", "_").getItem(0).cast("int").alias("year"),
            fn.split("year_week", "_").getItem(1).cast("int").alias("week"),
            "country",
            (
                   fn.col("sum_organic_P4W")
                / (fn.col("sum_organic_P4W") + fn.col("sum_nonorganic_P4W"))
            ).alias("share_organic_p4w"),
        ]
    )
)
- The rolling window is calculated on the current week and the three preceding weeks, therefore in reality it is a rolling window of 22-28 days depending on the current day of week. However this likely doesn't have a significant practical impact on the metric, while potentially allowing to move less data around when applying the window functions. This can have a positive performance impact in case of a large dataset.
For a lack of time, I haven't implemented the data quality check steps in the pipeline, however, I had the following in mind:
1. Test between raw and staging
- To ensure the input data doesn't violate assumptions that the transformation depends on, eg. the pattern of the
year_week-column is alwaysyyyy_ww, otherwise the last select clause would not be able to separate it intoyearandweekcolumns. - To ensure the input data doesn't violate any business logic and have no errors, eg. allowed values for channel names and countries
2. Test between staging and final table
- We can also test the resulting table to make sure there are no duplicate rows, missing year-month-country combinations, etc.
- We can apply statistical checks eg. to get an automated warning in case values deviate from their historical distribution. This can be useful to detect data drift for ML applications.
For executing these tests, I would recommend using either deequ or great expectations.
- Contains input data
- Contains transformation script
- Contains bootstrap script for the EMR cluster
- EMR logs are written here
- Transformed data is written here
- Running on EC2
- Latest versions
- Security group allows inbound SSH to allow working on the cluster interactively
- IAM policy allows read and write on S3 Bucket
Due to time constraint, I haven't implemented a scheduler.
I would recommend to use Apache Airflow for scheduling.
-
Install
terraformandawscommand line tools if necessary. -
Create and source
.env-filemv .env.example .env nano .env # fill in values source .env
-
Deploy the infrastructure
cd terraform
terraform apply
Note the ID of the EMR cluster from the output of the previous command!
CLUSTER_ID= # cluster_id_from_terraform_output -
Send the Spark application for execution
noglobneeded in zsh, leave it out for bashnoglob aws emr add-steps \ --cluster-id $CLUSTER_ID \ --steps\ Type=Spark,Name="transform.py",ActionOnFailure=CONTINUE,Args=[s3:https://$TF_VAR_bucket_name/scripts/transform.py,--source_parquet,s3:https://$TF_VAR_bucket_name/data/raw/sample.snappy.parquet,--target_parquet,s3:https://$TF_VAR_bucket_name/data/output/output.snappy.parquet]Note the step id from the output of the above!
-
Optional: Check progress of Spark application
STEP_ID=  # step_id_from_output_of_aws_emr_add_steps

watch aws emr describe-step --cluster-id $CLUSTER_ID --step-id $STEP_ID
Press Ctrl+c to stop cheking.
-
Cleanup
The results are written to
s3:https://$TF_VAR_bucket_name/data/output/output.snappy.parquetStop the cluster and clean up the environment by issuing
terraform destroy -auto-approve

