Elastic HTCondor OpenStack Scaling - Pronounced EOS
This script is for dynamic creation and deletion of OpenStack virtual machines that run HTCondor execute nodes. It is intended for a scenario where you want to run a compute cluster with a low overhead when the usage is low, and you want to be able to dynamically scale up and scale down your cluster as the usage increases or decreases. There currently is support for similar functionality in HTCondor, called condor_annex, but it only works with amazon. It seems like there will be OpenStack support in future releases which will render this script obsolete. There's also the HTCondor grid universe for OpenStack, but it has no dynamic scaling. Many others have built various methods to dynamically scale an HTCondor cluster, but this implementation differs in that it is very simple and has no major dependencies that need special configuration.
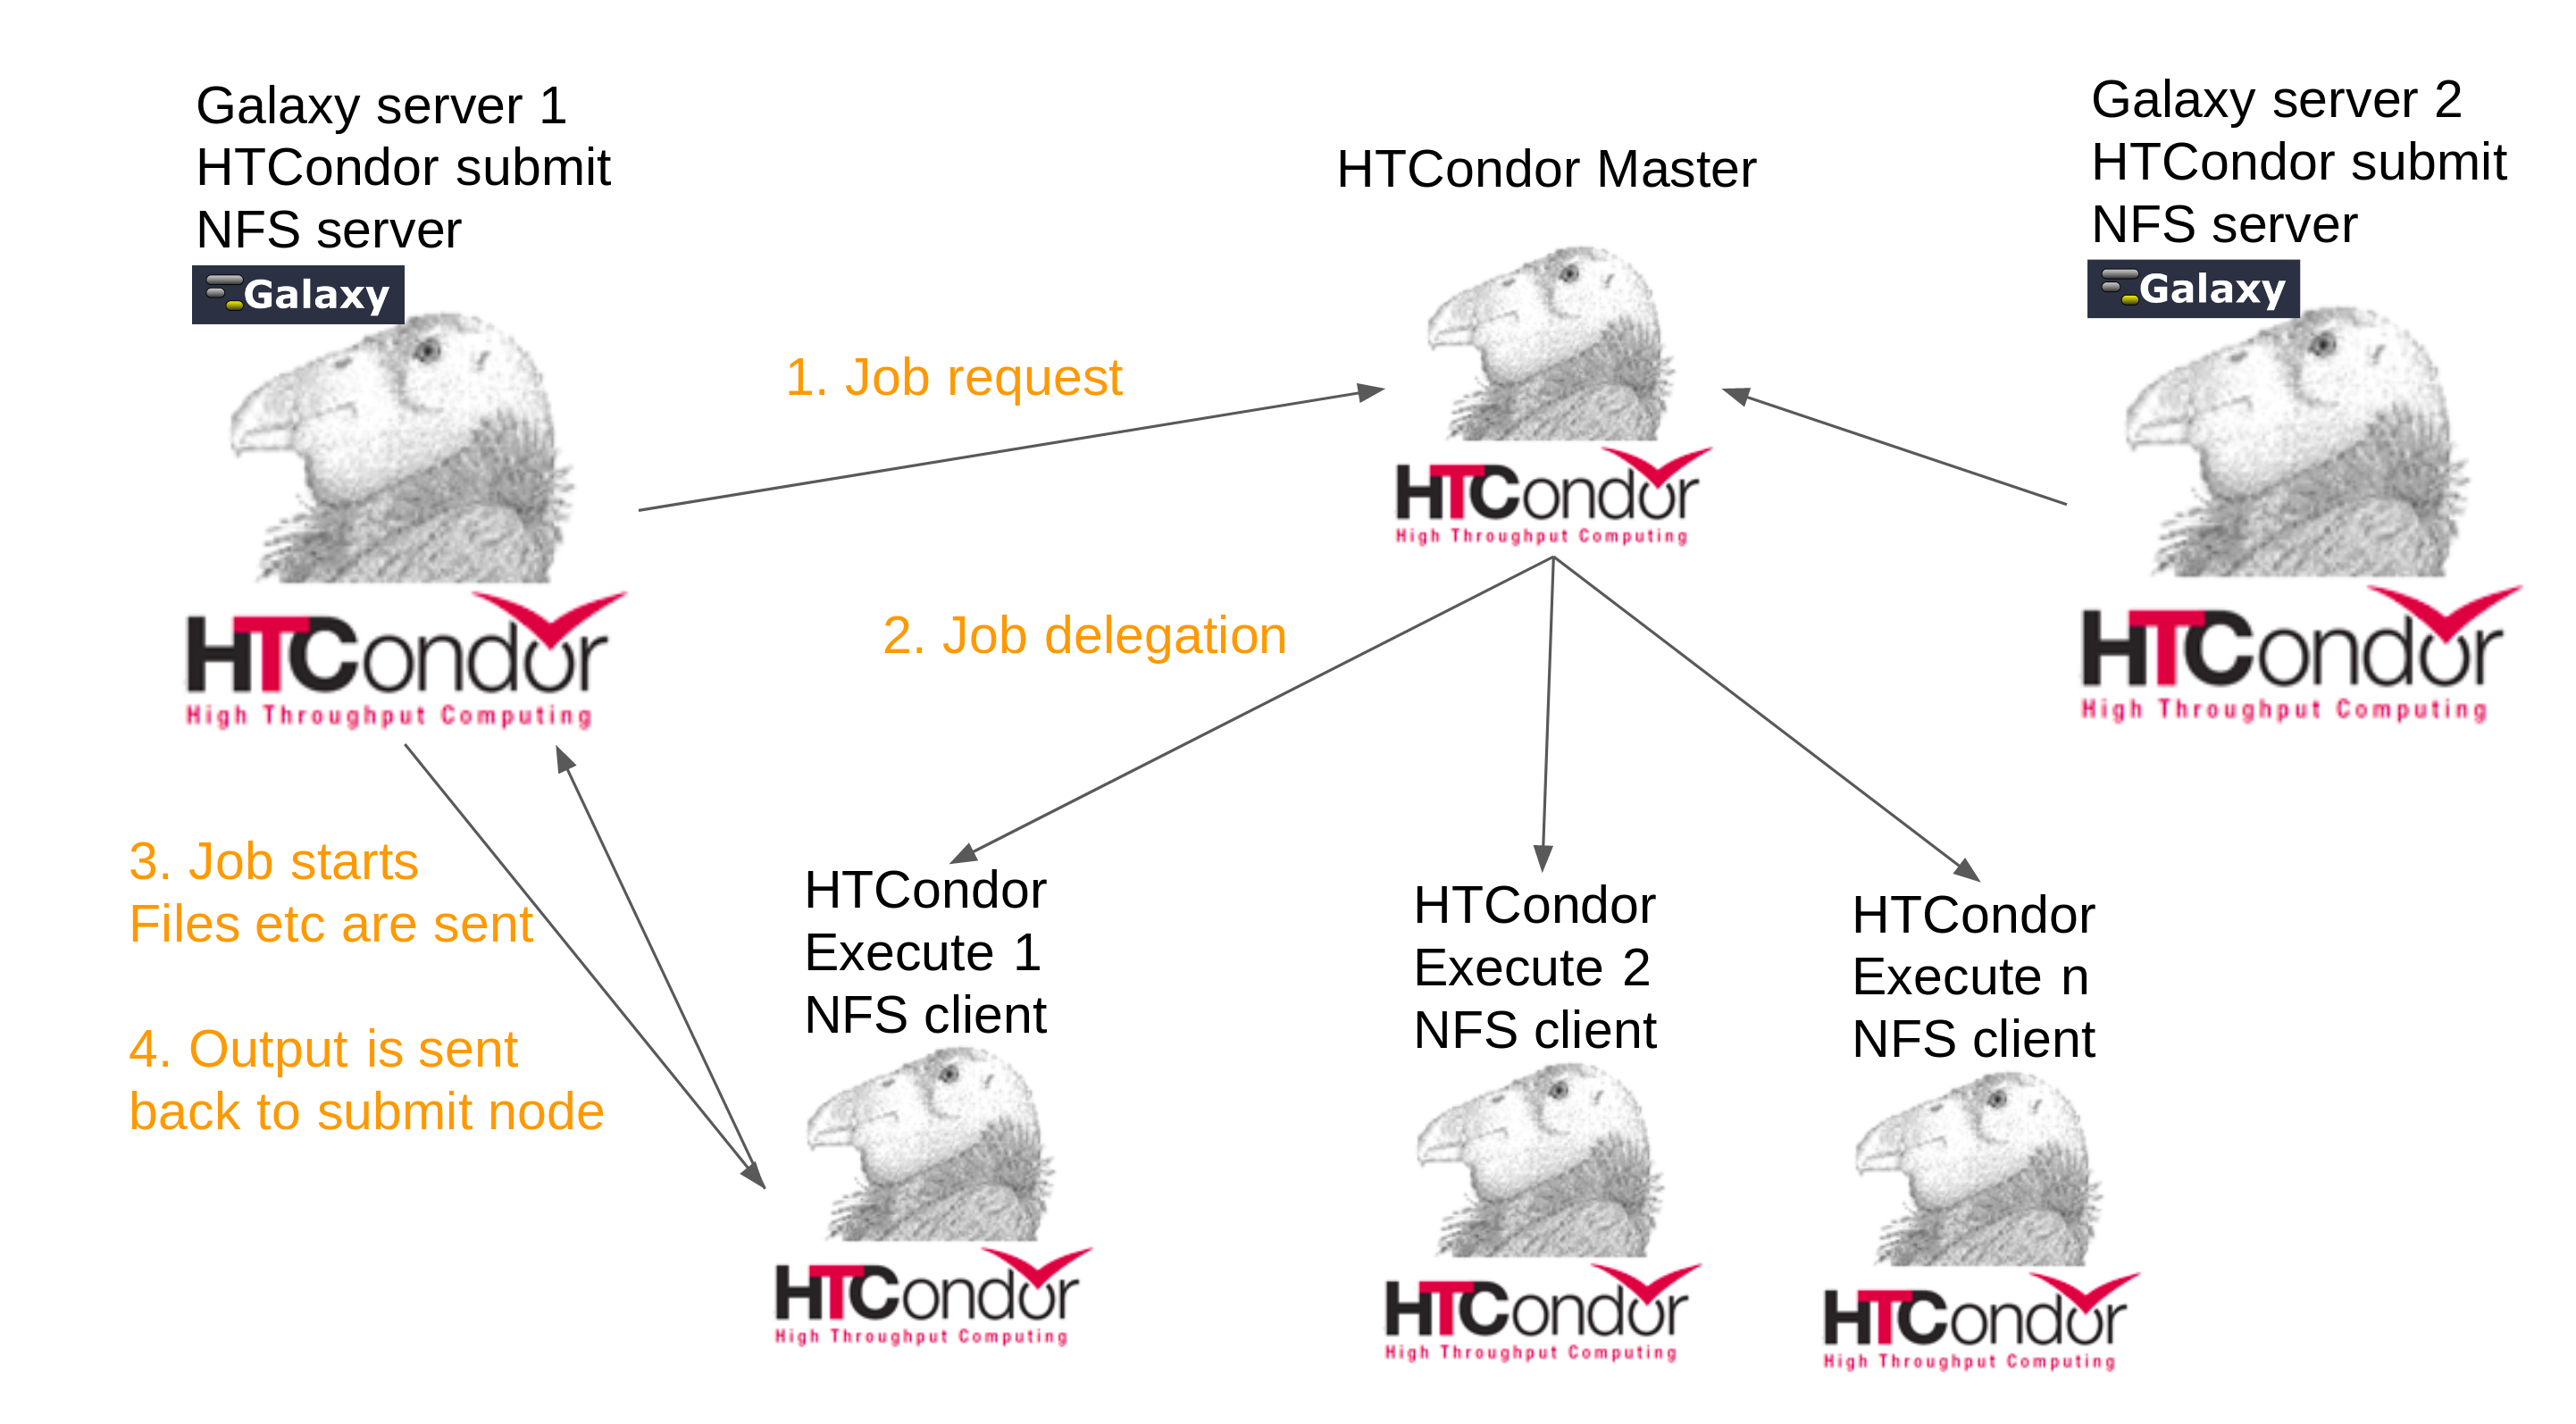
The following graphical overview represents a scenario where EHOS is integrated with two Galaxy servers. It depends on an NFS server on the Galaxy instances to be mounted on the execute nodes. This mounting is handled by the Galaxy server to keep EHOS as a standalone versatile solution that is useful for any kind of scenario, Galaxy related or not.
- Dynamic creation and deletion of execute nodes based on current number of running jobs
- Minimum and maximum number of running execute nodes
- Creation of smaller of larger execute nodes based on demands from incoming jobs
- Creation of redundant execute nodes if all current slots have been filled to allow for faster start of new jobs
- Dynamic reading of config file making on the fly configuration changes possible, no restart needed for changes to take effect
- Dynamic reading of variable creation file making on the fly variable creation changes possible, no restart needed for changes to take effect
- Vanilla base image is created with cloud init and is used for execute node creation
- Execute nodes are configured using cloud init at the time of creation
This has been developed on Centos7 with python-openstackclient version 3.15.0 and HTCondor version 8.7.8.
To use the OpenStack CLI you need to run sudo pip install python-openstackclient.
These instructions assume you're familiar with OpenStack and HTCondor, or you should be an adventurous person because there are manual steps that require basic understanding of how to use a command line. You must manually edit each command with your specific cloud details, prefered image names etc, don't just copy/paste and assume it'll work because it won't.
Doing it all on the web interface is impossible, so if you're not familiar with manual creation of virtual machines with the OpenStack CLI, this is a good time to get familiar with that. If you're a UH-IaaS user, here's a link to the documentation: http:https://docs.uh-iaas.no/en/latest/
And you might also want to keep the HTCondor documentation website open in case you want to research something: http:https://research.cs.wisc.edu/htcondor/manual/
A tip is to use the search function because the documentation can be a bit hard to navigate at times.
Now that we have that out of the way, the first thing to do is to enter your OpenStack login credentials into a keystone_rc.sh file, you can use the one in this repository as a sample file, ask your admin where to find the information for the keystone_rc.sh file. When you have filled in all details correctly, run source keystone_rc.sh and then openstack server list to verify that it works.
To build the base HTCondor image you can use the the vanilla-condor.sh script, edit it according to your base image needs, you might not want everything that gets installed, and might want to install things aren't installed. When the config file has been edited, use the following code as a template, edit it with you specific details and hit enter when you're done:
openstack server create --flavor a.flavor --image ACentOS7Image --nic net-id=aNetID --security-group ASecurityGroup --key-name your-ssh-key --user-data vanilla-condor.sh HTCondorBaseImage
Once it has been built you need to make a snapshot of it, to do that you need the image ID, to find that, run openstack server list, copy the ID for your HTCondorBaseImage and paste it into the following command: openstack image create --id A-Long-ID-With-Letters-And-Numbers NameOfBackedUpImage
Now that you have a snapshot of the base image you can use that to create an HTCondor master node and an HTCondor execute node.
The master node needs manual configuration when it has been created, but before you create it, edit the master-config.yaml and change the variables with correct IP numbers etc. In case you want to add a line, make sure to use space instead of tab to create the indentation, otherwise it won't work when you run the create command later.
Once you're done editing run the following command to create the master node:
openstack server create --flavor a.flavor --image NameOfBackedUpImage --nic net-id=ASecurityGroup --key-name your-ssh-key --user-data master-config.yaml HTCondorMaster
Once it has been created you must SSH into it and open /etc/condor/condor_config and set CONDOR_HOST = to your htcondor master node IP.
When you're done editing, save and exit and then run condor_reconfig to load the new config file.
Two files must be edited, first open the execute-config.yaml and change CONDOR_HOST = to the address of your master node, then go through each line to see what else needs to change for your setup to work. If this is completely new to you, it's time to learn on your own because you need to know this. Once you're done with the yaml file you need to edit configuration.sh and edit each line according to your local requirements and preferences. Each line should be sufficiently explained by the comments. Assuming that the configuration.sh file is correctly edited we can let the main EHOS script do the rest for us. If you have gone through each point in the configuration file and verified that every detail is correct, the EHOS.sh script will take care of creating and deleting execute nodes for you. But if you want to troubleshoot things manually, use this line to verify that you can create an execute node yourself:
openstack server create --flavor m1.large --image NameOfBackedUpImage --nic net-id=dualStack --security-group default --key-name your-ssh-key --user-data execute-config.yaml HTCondorManuallyCreatedExecuteNode
That should be it, just run ./EHOS.sh, sit back and watch it do its magic.
The configuration.sh file is read every time the loop in the main script runs again, so you can do on the fly changes to the script. The same is true for the createvm.sh script, every time it runs it reads the configuration.sh file, so you don't need to restart the main script for changes to take effect.
If you want a logfile you can run ./EHOS.sh 2>&1>>logfile to capture relevant events to the logfile. This is the preferred mode of execution since you will get information about what has happened in case you need to troubleshoot or something.
You can use the createvm.sh script to manually create a VM too, just run ./createvm.sh m1.large and make sure that the configuration.sh file has the correct settings for the VM you want to create.
-
If the minimum number of nodes isn't running, and 40+ jobs have been submitted, or a 4 core job has been submitted, it will still only start a "small" VM despite the default setting is to start a large VM when 40+ jobs or a 4 core job has been started. This is an edge case and shouldn't be a frequent problem, but it's an unexpected behavior for any user.
-
When the project quota has (almost) been exceeded, e.g the maximum allowed RAM usage may be 128GB, and 120GB has been used and EHOS is trying to start a 16GB RAM VM, it will try and fail endlessly. There is no option in the UH-Sky API to check this manually.
It's possible to create a function that calculates this manually, but it will require the user to fill in this information manually, and depending on how simple EHOS should be, this will increase the setup complexity and the question is if the gain in functionality justifies the necessary increased setup effort.
Another scenario is if there's e.g 4 cores left in the quota, and EHOS is trying to start an 8 core VM, it will fail because it would exceed the quota. But if the job could also run on a 4 core VM, EHOS cannot try to fill the remaining quota because it cannot act based on the available quota.
It would be nice if it explicitly reported that it couldn't start a new VM due to the limited resources, but it's not possible to capture the error message and act upon it.
-
When no jobs are running and there are too many redundant nodes running, EHOS kills the execute nodes "in order". That can lead to larger VMs than the specified default will remain running. To understand why this can be a problem, let's assume the following:
- Galaxy has been set to run a specific job on a 16 core execute node because it needs 100% of the resources.
- Galaxy can also run 4 core jobs. If a 4 core job is running on that VM, EHOS needs to start a new VM, if the quota is exceeded if a new 16 core VM needs to be started, the large job cannot start. But if a small VM had been running and the 4 core job ran on that, EHOS might have been able to start a new VM since 16 + 4 is 20, but 16 + 16 is 32, and 32 might break the limit.
-
A redundant node is only created if all slots in all running execute nodes are full. That means that if a job fills all but one slot, it would make sense to create a redundant node since one slot is possibly not enough for a new job that is started.
-
If EHOS is set to create two redundant nodes, it's possible that only one node is idle if the second one is occupied. Like stated above, this is because EHOS only starts a new node when all slots are filled.