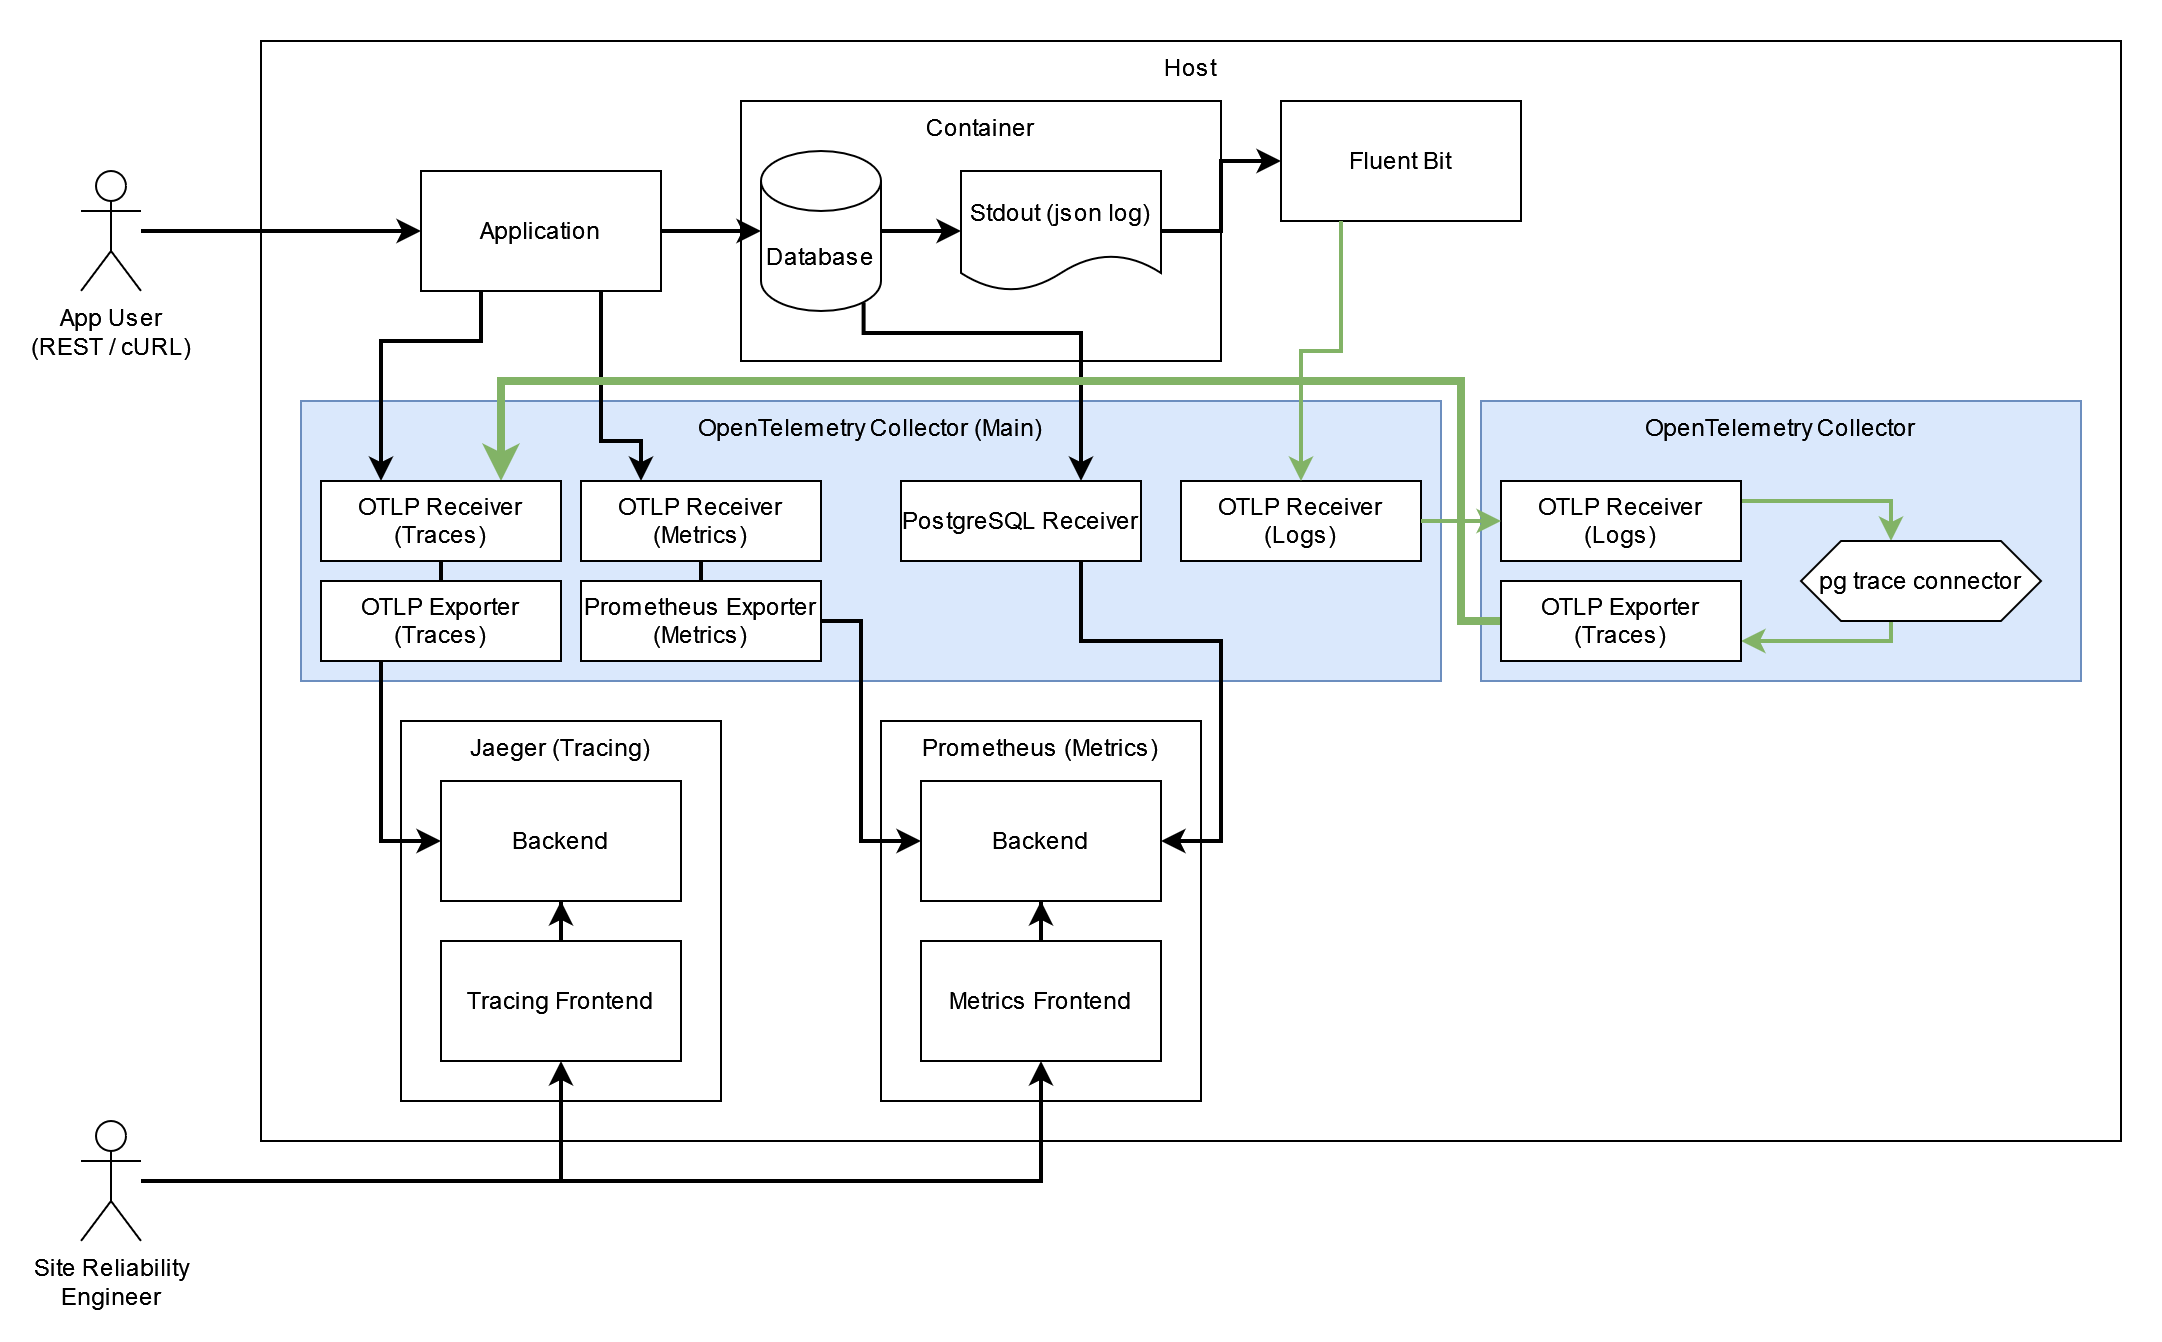
This repository contains a demonstration environment for a prototype that extracts traces from PostgreSQL logs.
The demonstration can be run using docker compose since all components are available as containers.
The following is a high-level overview over the components and flows of the environment:
To start the environment navigate to the infra directory and run
docker compose upConnect to Adminer to setup the database on Adminer UI. Enter db in the server field and use the user postgres and password example to log in.
Once connected create a database knexdb. Select the database and chose link "SQL Command" to enter any SQL command or use this link SQL Command on Adminer.
Enter the following SQL statements into the field and execute it:
On db knexdb
CREATE USER knexuser WITH PASSWORD 'knexpw';
GRANT ALL PRIVILEGES ON SCHEMA public to knexuser;

CREATE USER oteluser WITH PASSWORD 'otelpw';

GRANT pg_monitor TO oteluser;

CREATE EXTENSION pg_stat_statements
The database should now be ready and the application and OpenTelemetry Collector should be able to connect. But the schema will still need to be created and example data be loaded. Use the following commands to do it:
docker run -e POSTGRES_HOST=host.docker.internal -e DATABASE_NAME=knexdb -e POSTGRES_USER=knexuser -e POSTGRES_USER_PW=knexpw -e POSTGRES_PORT=5432 --entrypoint npm infra-node-example-app run migrate

docker run -e POSTGRES_HOST=host.docker.internal -e DATABASE_NAME=knexdb -e POSTGRES_USER=knexuser -e POSTGRES_USER_PW=knexpw -e POSTGRES_PORT=5432 --entrypoint npm infra-node-example-app run seedThe example node application is a very simple model of a web shopping backend. It has a login and authentication functionality and provides the ability to add products to a shopping cart, as well as an order action on that cart, which clears the cart and puts the items in a purchase table.
You can request an authentication token for a user using the following command:
curl -v -H "Content-Type: application/json" -X POST --data '{"email": "[email protected]", "password": "Password"}' https://localhost:3000/api/user/loginYou will receive a response of sort:
{"id":3,"token":"eyJhbGciOiJIUzI1NiIsInR5cCI6IkpXVCJ9.eyJ1c2VyIjp7ImlkIjozfSwiaWF0IjoxNzA2NjQyMjM5LCJleHAiOjE3MDY4MTUwMzl9.1daPjANrgqZPiu9S7xfGZIOZW7-EpLy-mrDuk21Bu7M"}Copy the token and set it as your AUTHTOKEN environment variable:
AUTHTOKEN=eyJhbGciOiJIUzI1NiIsInR5cCI6IkpXVCJ9.eyJ1c2VyIjp7ImlkIjozfSwiaWF0IjoxNzA2NjQyMjM5LCJleHAiOjE3MDY4MTUwMzl9.1daPjANrgqZPiu9S7xfGZIOZW7-EpLy-mrDuk21Bu7MYou can now run the following requests:
Query your cart:
curl -v -H "x-auth-token: $AUTHTOKEN" https://localhost:3000/api/cartAdd an item to your cart:
curl -v -H "x-auth-token: $AUTHTOKEN" -H "Content-Type: application/json" -X POST --data '{"productId":1,"quantity":1}' https://localhost:3000/api/cartOrder the content of your cart:
curl -v -H "x-auth-token: $AUTHTOKEN" -X POST https://localhost:3000/api/cart/orderView your past "purchases":
curl -v -H "x-auth-token: $AUTHTOKEN" https://localhost:3000/api/purchaseView the items of a specific purchase:
curl -v -H "x-auth-token: $AUTHTOKEN" https://localhost:3000/api/purchase/4/items- Traces can be viewed in Jaeger on https://localhost:16686
- Metrics can be viewed in Prometheus on https://localhost:9090/
- Logs can be viewed using the
docker logs <container name>command
The infrastructure for GCP is located in the gcp-infra folder.
You must have an account on GCP and a project called sql-trace.
Enable the following APIs:
- https://console.cloud.google.com/marketplace/product/google/iam.googleapis.com
- https://console.cloud.google.com/marketplace/product/google/compute.googleapis.com
- https://console.cloud.google.com/marketplace/product/google/sqladmin.googleapis.com
- https://console.cloud.google.com/marketplace/product/google/cloudtrace.googleapis.com
- https://console.cloud.google.com/apis/library/cloudresourcemanager.googleapis.com
Create a service account for terraform and a key with the right permissions as documented on
https://developer.hashicorp.com/terraform/tutorials/gcp-get-started/google-cloud-platform-build
The service account must have the role Project IAM Admin on the project
Download the service account credentials and store them in ./credentials/sql-trace-terraform.json.
Install Terraform on your machine.
Before provisioning the infrastructure: Change the IP for inbound traffic to the PostgreSQL instance in main.tf.
Use terraform init and terraform apply to provision the infrastructure on GCP.
Set the instance ip of your PostgreSQL db in Cloud SQL in the docker-compose.yaml (where it says <your-postgres-host>).
Now run the the command to spin up the infrastructure:
docker compose upRun the following commands to finish setting up the database. Before running, replace the <your-postgres-host> with the ip of your PostgreSQL instance in Cloud SQL.
docker run -e POSTGRES_HOST=<your-postgres-host> -e DATABASE_NAME=knexdb -e POSTGRES_USER=knexuser -e POSTGRES_USER_PW=knexpw -e POSTGRES_PORT=5432 --entrypoint npm infra-node-example-app run migrate

docker run -e POSTGRES_HOST=<your-postgres-host> -e DATABASE_NAME=knexdb -e POSTGRES_USER=knexuser -e POSTGRES_USER_PW=knexpw -e POSTGRES_PORT=5432 --entrypoint npm infra-node-example-app run seed