
This PowerShell script automates the process of generating images for your Plex media library. Leveraging information from your Plex library, such as movie or show titles, season and episode data, it fetches relevant artwork from Fanart.tv, TMDB, TVDB, Plex and IMDB. The script is able to focus on artwork with specific languages to grab. By default, textless artwork xx is retrieved and will fall back to en if textless is not found. This is a setting a user can decide on, either to focus on textless or on text posters. It also offers both automatic and manual modes for generating posters. The manual mode can accommodate custom creations that cannot be bulk retrieved.
Note
Posterizarr is cross-platform ready, meaning it can run on Linux, Docker (Alpine v3.17) and on Windows operating systems.
Supported Poster Types:
- Movie/Show Posters
- Movie/Show Backgrounds
- Season Posters
- TitleCards
Tip
Here is an installation walkthrough
Warning
- The
tempFolder gets cleared on every Script run, so do not put files into it. - Apprise integration only works in docker container, please use discord on other platforms (discord also works on docker).
- Please start the script as Admin on first run, otherwise the script is not able to install the prerequisites.
Tip
If you want to use the created assets with PMM make sure to check out the Assets doc
You can find an example config for the Assets on my PMM-Configs repo
-
Resizing: It automatically resizes every poster to 2000x3000.
-
Overlays: If you choose to, downloaded images will automatically have borders, text, and a gradient overlay applied.
- Here are some gradient overlays that you can use instead of the default one gradient-zip
-
Automatic Library Search: The script autonomously searches for libraries within your Plex server, enhancing its usability.
-
Handling Multiple Versions: It adeptly manages multiple versions of a movie/show, ensuring comprehensive coverage.
-
CSV Export: Produces an impressive CSV file containing all queried movie/show information during the script's runtime in
$ScriptRoot\logs\PlexLibexport.csv -
Logging Capabilities: Records valuable information to a file in
$ScriptRoot\logs\Scriptlog.log, facilitating troubleshooting and analysis.- It also generates a log with the output of every imagemagick command
$ScriptRoot\logs\ImageMagickCommands.log. - Additionally, an
ImageChoices.csvfile is generated to store all the selected download options and essential information. - Send notification via apprise or discord Click here for Example pictures..
- It also generates a log with the output of every imagemagick command
-
Cross-platform Compatibility: Ensures seamless operation across Linux, Docker, and Windows Plex servers, enhancing versatility.
-
Poster/Background/TitleCard Creation: It searches fanart/tmdb/tvdb/Plex for posters/backgrounds/titlecards and resizes the downloaded image to 3840x2160 (for titlecards and backgrounds) or 2000x3000 (for posters), fallback is grabbing artwork from imdb.
Note
Upon initial execution, the script may take some time to run as it compiles necessary data. Subsequent runs will look at whether a poster in the AssetPath is missing and only create missing posters, bypassing existing assets in the directory. If you are unhappy with the downloaded artwork, delete it in the AssetPath directory, rerun and the script will populate the missing artwork.
Important
Requirements:
Before utilizing the script, ensure the following prerequisites are installed and configured:
- TMDB API Read Access Token: Obtain TMDB API Token - NOTE the TMDB API Read Access Token is the really, really long one
- Fanart Personal API Key: Obtain Fanart API Key
- TVDB API Key: Obtain TVDB API Key - Do not use
"Legacy API Key", it only works with a Project Api Key.- ImageMagick: - Version 7.x is required - The script handles downloading and using a portable version of ImageMagick for all platforms. (You may need to run the Script as Admin on first run). If you prefer to reference your own installation or prefer to download and install it yourself, goto: Download ImageMagick
- Powershell Version: 5.x or higher (Docker Image uses v7.4.1).
-
Open
config.example.jsonlocated in the script directory. -
Update the following variables with your API keys and preferences:
ApiPart:
tvdbapi: Your TVDB Project API key.tmdbtoken: Your TMDB API Read Access Token.FanartTvAPIKey: Your Fanart personal API key.PlexToken: Your Plex token (Leave empty if not applicable).FavProvider: Set your preferred provider (default istmdb).- possible values are:
tmdbfanarttvdbplex
- possible values are:
PreferredLanguageOrder: Specify language preferences. Default isxx,en,de(xxis Textless). Example configurations can be found in the config file. 2-digit language codes can be found here: ISO 3166-1 Lang Codes.PreferredSeasonLanguageOrder: Specify language preferences for seasons. Default isxx,en,de(xxis Textless). Example configurations can be found in the config file. 2-digit language codes can be found here: ISO 3166-1 Lang Codes.
PlexPart:
LibstoExclude: Libraries, by name, to exclude from processing.PlexUrl: Plex server URL (i.e. "http:https://192.168.1.1:32400" or "http:https://myplexserver.com:32400").
Notification:
SendNotification: Set totrueif you want to send notifications via discord or apprise, elsefalse.AppriseUrl: Only possible on Docker -Url for apprise provider -> See Docs.Discord: Discord Webhook Url.
PrerequisitePart:
AssetPath: Path to store generated posters.show_skipped: If set totrue, verbose logging of already created assets will be displayed; otherwise, they will be silently skipped - On large libraries, this may appear as if the script is hanging.magickinstalllocation: Path to ImageMagick installation location wheremagick.exeis located (Otherwise leave value as"./magick")- The container handles this part on his own, you can leave it as it is in config.
maxLogs: Number of Log folders you want to keep inRotatedLogsFolder (Log History).logLevel: Sets the verbosity of logging. 1 logs Warning/Error messages. Default is 2 which logs Info/Warning/Error messages. 3 captures Info/Warning/Error/Debug messages and is the most verbose.font: Font file name.backgroundfont: Background font file name.overlayfile: Overlay file name.backgroundoverlayfile: Background overlay file name.titlecardoverlayfile: Title Card overlay file name.LibraryFolders: Set tofalsefor asset structure in one flat folder ortrueto split into library media folders like Plex-Meta-Manager needs it.Posters: Set totrueto create movie/show posters.SeasonPosters: Set totrueto also create season posters.BackgroundPosters: Set totrueto also create background posters.TitleCards: Set totrueto also create title cards.
OverlayPart:
ImageProcessing: Set totrueif you want the ImageMagick part; if false, it only downloads the posters.outputQuality: Image output quality, default is92%if you set it to100%the image size gets doubled.
PosterOverlayPart:
fontAllCaps: Set totruefor all caps text, elsefalse.AddBorder: Set totrueto add a border to the image.AddText: Set totrueto add text to the image.AddOverlay: Set totrueto add the defined overlay file to the image.fontcolor: Color of font text.bordercolor: Color of border.minPointSize: Minimum size of text in poster.maxPointSize: Maximum size of text in poster.borderwidth: Border width.MaxWidth: Maximum width of text box.MaxHeight: Maximum height of text box.text_offset: Text box offset from the bottom of the picture.
SeasonPosterOverlayPart:
fontAllCaps: Set totruefor all caps text, elsefalse.AddBorder: Set totrueto add a border to the image.AddText: Set totrueto add text to the image.AddOverlay: Set totrueto add the defined overlay file to the image.fontcolor: Color of font text.bordercolor: Color of border.minPointSize: Minimum size of text in poster.maxPointSize: Maximum size of text in poster.borderwidth: Border width.MaxWidth: Maximum width of text box.MaxHeight: Maximum height of text box.text_offset: Text box offset from the bottom of the picture.
BackgroundOverlayPart:
fontAllCaps: Set totruefor all caps text, elsefalse.AddBorder: Set totrueto add a border to the background image.AddText: Set totrueto add text to the background image.AddOverlay: Set totrueto add the defined background overlay file to the background image.fontcolor: Color of font text.bordercolor: Color of border.minPointSize: Minimum size of text in background image.maxPointSize: Maximum size of text in background image.borderwidth: Border width.MaxWidth: Maximum width of text box in background image.MaxHeight: Maximum height of text box in background image.text_offset: Text box offset from the bottom of the background image.
TitleCardOverlayPart:
UseBackgroundAsTitleCard: Set totrueif you prefer show background as TitleCard, default isfalsewhere it uses episode image as TitleCard.AddOverlay: Set totrueto add the defined TitleCard overlay file to the TitleCard image.AddBorder: Set totrueto add a border to the TitleCard image.borderwidth: Border width.bordercolor: Color of border.
TitleCardTitleTextPart:
AddEPTitleText: Set totrueto add episode title text to the TitleCard image.fontAllCaps: Set totruefor all caps text, elsefalse.fontcolor: Color of font text.minPointSize: Minimum size of text in TitleCard image.maxPointSize: Maximum size of text in TitleCard image.MaxWidth: Maximum width of text box in TitleCard image.MaxHeight: Maximum height of text box in TitleCard image.text_offset: Text box offset from the bottom of the TitleCard image.
TitleCardEpisodeTextPart:
SeasonTCText: You can Specify the default text forSeasonthat appears on TitleCard.- Example:
STAFFEL 1 • EPISODE 5or"SÄSONG 1 • EPISODE 1"
- Example:
EpisodeTCText: You can Specify the default text forEpisodethat appears on TitleCard.- Example:
SEASON 1 • EPISODE 5or"SEASON 1 • AVSNITT 1"
- Example:
fontAllCaps: Set totruefor all caps text, elsefalse.AddEPText: Set totrueto add episode text to the TitleCard image.fontcolor: Color of font text.minPointSize: Minimum size of text in TitleCard image.maxPointSize: Maximum size of text in TitleCard image.MaxWidth: Maximum width of text box in TitleCard image.MaxHeight: Maximum height of text box in TitleCard image.text_offset: Text box offset from the bottom of the TitleCard image.
-
Rename the config file to
config.json. -
Place the
overlay.png, or whatever file you defined earlier inoverlayfile, andRocky.ttffont, or whatever font you defined earlier infontfiles in the same directory as Posterizarr.ps1 which is$ScriptRoot.
Usage:
- Automatic Mode: Execute the script without any parameters to generate posters for your entire Plex library.
- Testing Mode: Run the script with the
-Testingswitch to create Test posters before you start using it. - Manual Mode: Run the script with the
-Manualswitch to create custom posters manually.
Note
- Ensure PowerShell execution policy allows script execution.
- Bugs or issues encountered during usage can be reported for resolution.
Run the script without any parameters:
.\Posterizarr.ps1This will generate posters for your entire Plex library based on the configured settings.
The posters are all placed in AssetPath\.... This can then be mounted in Plex-Meta-Manager to use as the assets folder.
Important
Tautulli and Posterizarr must run as a container in Docker
Note
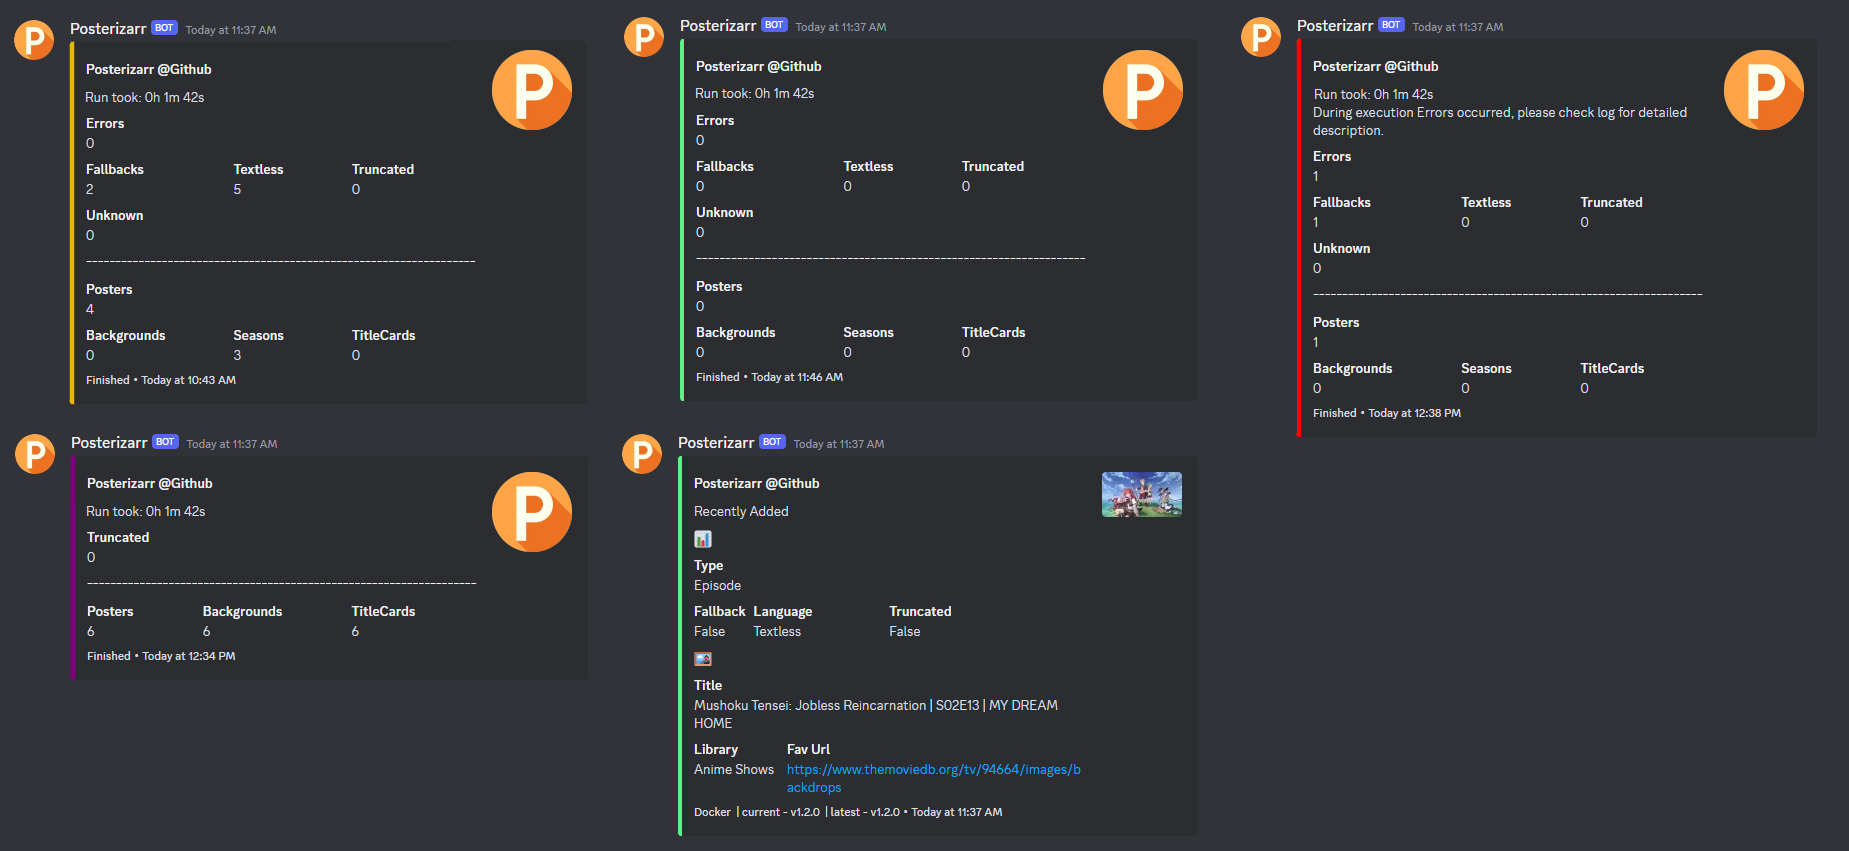
If Discord is configured it will send a Notification on each trigger.
In this mode we use Tautulli to trigger Posterizarr for an specific item in Plex, like a new show, movie or episode got added.
To use it we need to configure a script in Tautulli, please follow these instructions.
- Make sure that you mount the
Posterizarrdirectory to tautulli, cause the script needs the Path/posterizarrvolumes: - "/opt/appdata/posterizarr:/posterizarr:rw"
- Download the trigger.py from the GH and place it in the Tautulli Script dir -> Tautulli-Wiki
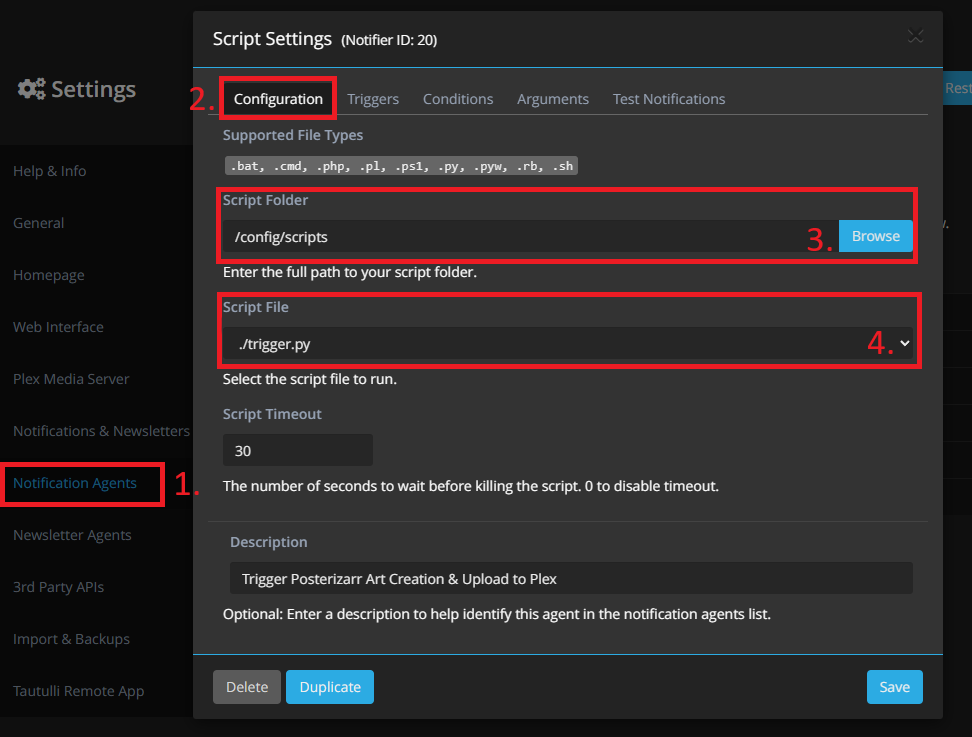
- Open Tautulli and go to Settings ->
NOTIFICATION AGENTS - Click on
Add a new notification agentand selectScript - Specify the script folder where you placed the script and select the script file.
- You can specify a
Descriptionat the bottom like i did.
🖼️Example
- You can specify a
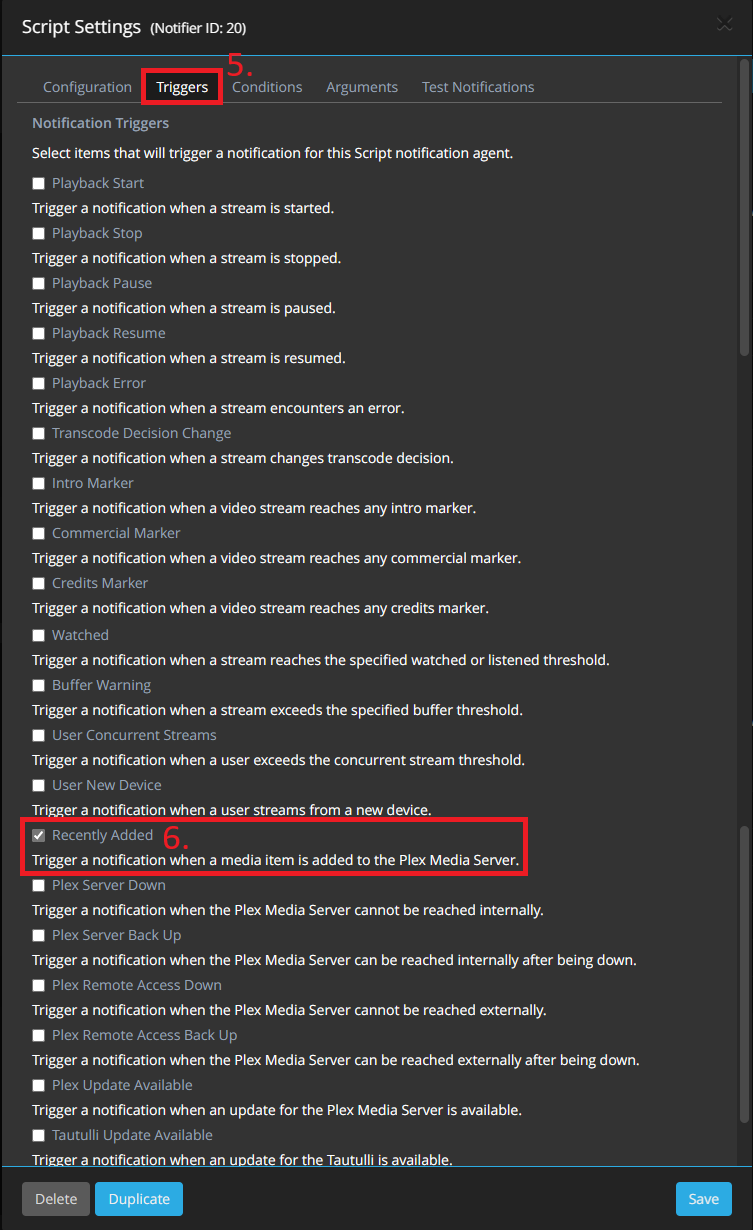
- Go to
Triggers, scroll down and selectRecently Added.🖼️Example
- Go to
Conditions, you can now specify when the script should get called.- In my case i specified the Media Type:
episode, movie, show and season - I also excluded the Youtube Lib cause the videos i have there - do not have an
tmdb,tvdb or fanart ID.- This is an recommended setting, either exclude such libs or include only those libs where Posterizarr should create art for.
🖼️Example
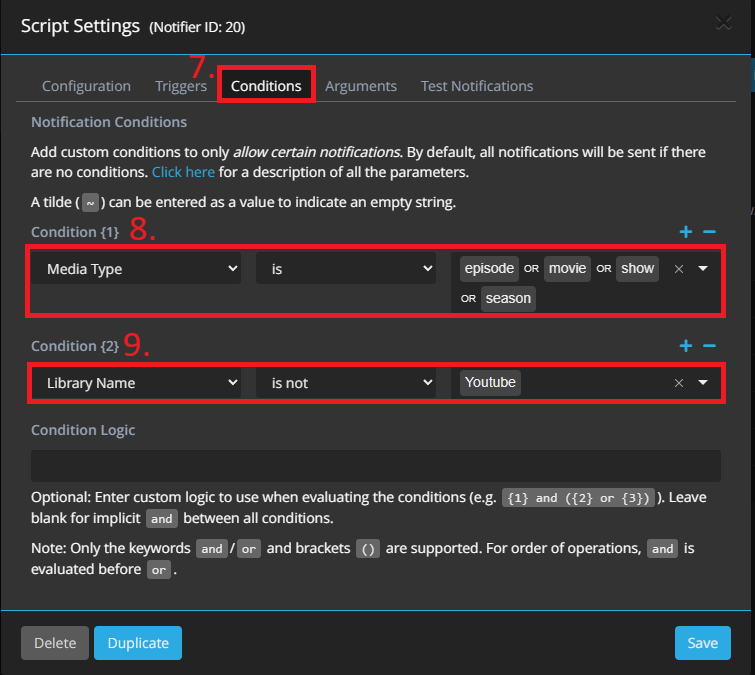
- In my case i specified the Media Type:
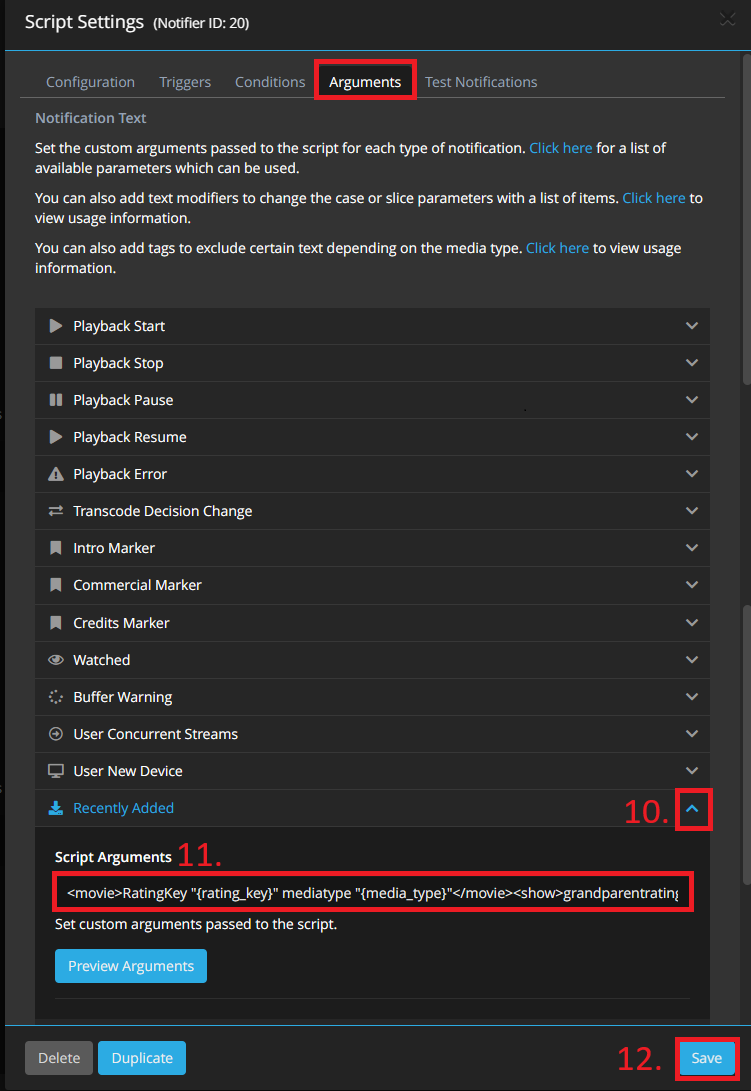
- Next go to Arguments -> Unfold
Recently AddedMenu and paste the following Argument, after that you can save it.- Please do not change the Argument otherwise the script could fail.
<movie>RatingKey "{rating_key}" mediatype "{media_type}"</movie><show>grandparentratingkey "{grandparent_rating_key}" mediatype "{media_type}"</show><season>parentratingkey "{parent_rating_key}" grandparentratingkey "{grandparent_rating_key}" mediatype "{media_type}"</season><episode>RatingKey "{rating_key}" parentratingkey "{parent_rating_key}" grandparentratingkey "{grandparent_rating_key}" mediatype "{media_type}"</episode>
🖼️Example
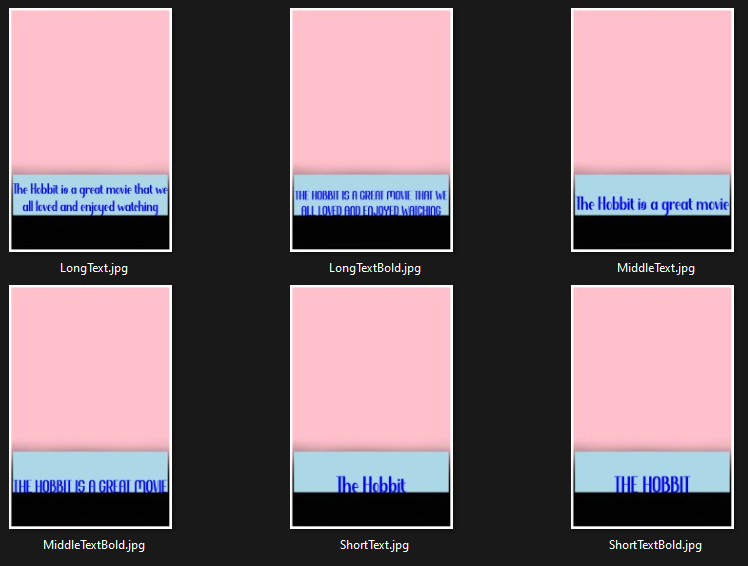
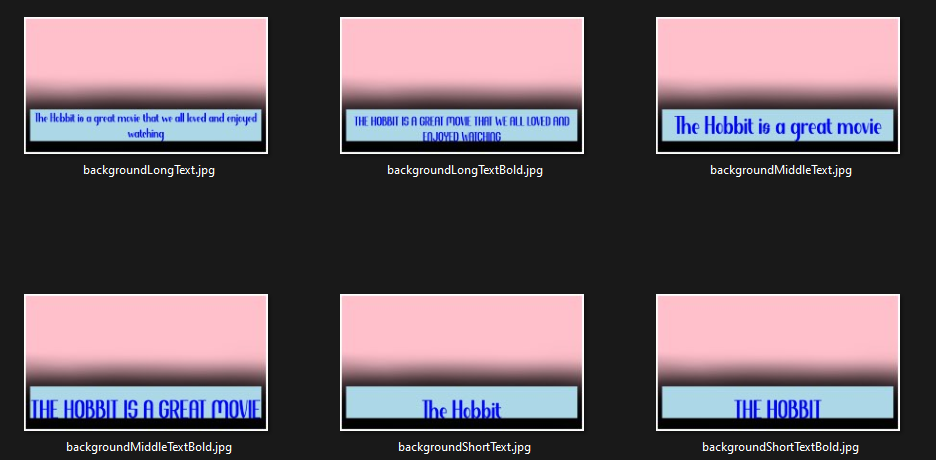
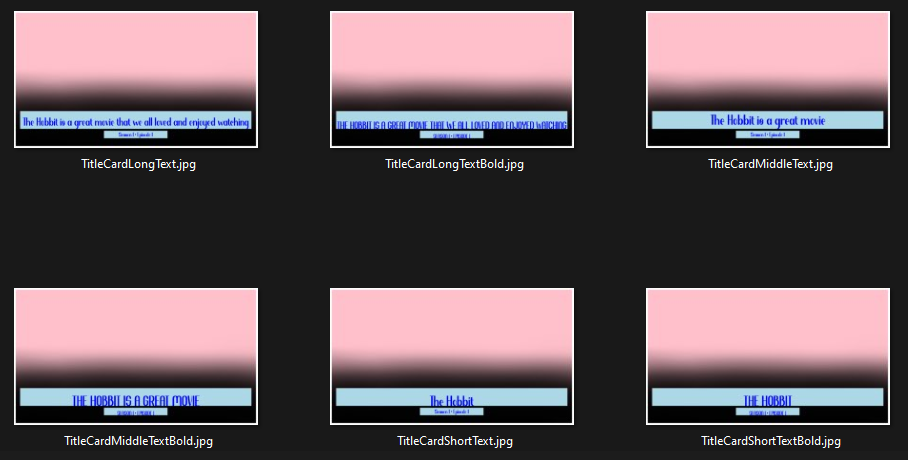
Run the script with the -Testing flag. In this mode, the script will create pink posters/backgrounds with short, medium, and long texts (also in CAPS), using the values specified in the config.json file.
Tip
This is handy for testing your configuration before applying it en masse to the actual posters. You can see how and where the text would be applied, as well as the size of the textbox.
.\Posterizarr.ps1 -Testing- Docker-Compose Example File
- Change
RUN_TIMEin yaml to your needs - You need to use 24H Time Format- The Script gets executed on the Times you specified
- Before starting the scheduled run it checks if another Posterizarr process is running, if yes - the scheduled run will be skipped.
- Change
volumeandnetworkto fit your environment (Make sure you have the same network as your plex container when you use local IP of plex) - Change
TimeZoneto yours, otherwise it will get scheduled to a different time you may want it to. - You may also have to change
PUID/PGID
- Change
Tip
If you are an unRAID user, install the Docker Compose Manager plugin from the Community Apps store so that you can leverage the compose file
If you manually want to run the Script you can do it this way:
Automatic Mode:
docker exec -it posterizarr pwsh Posterizarr.ps1Testing Mode:
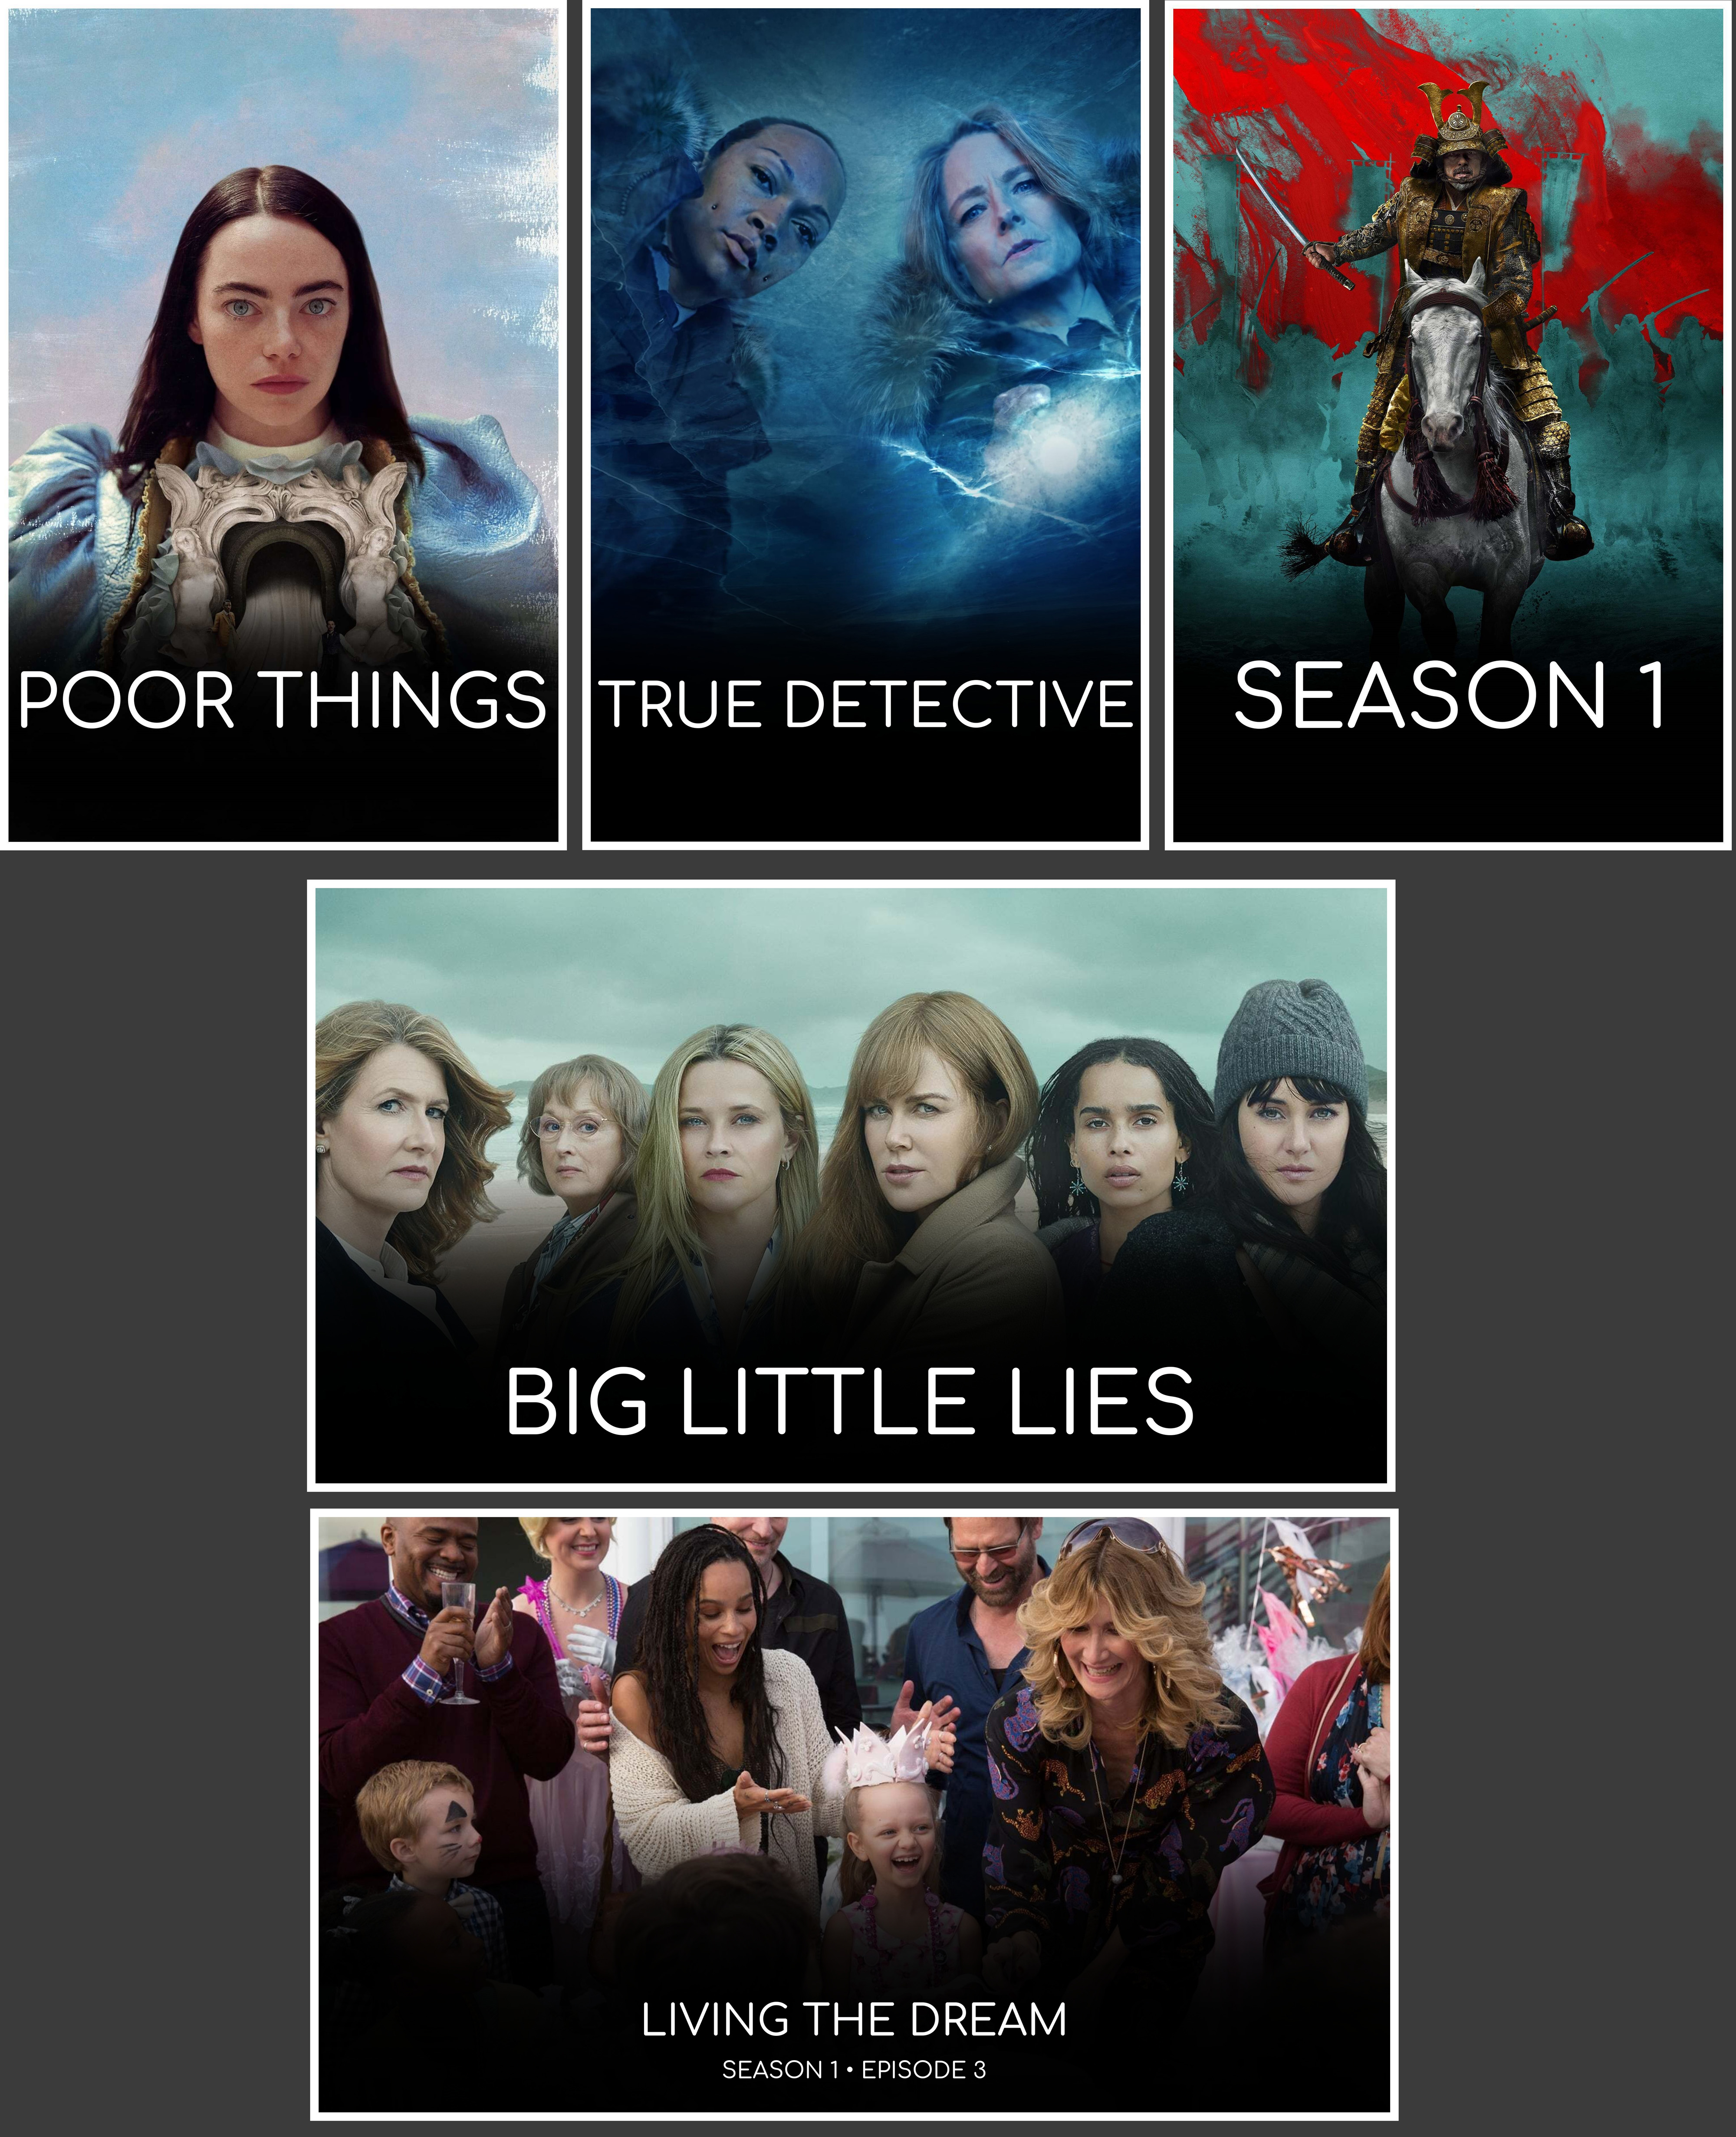
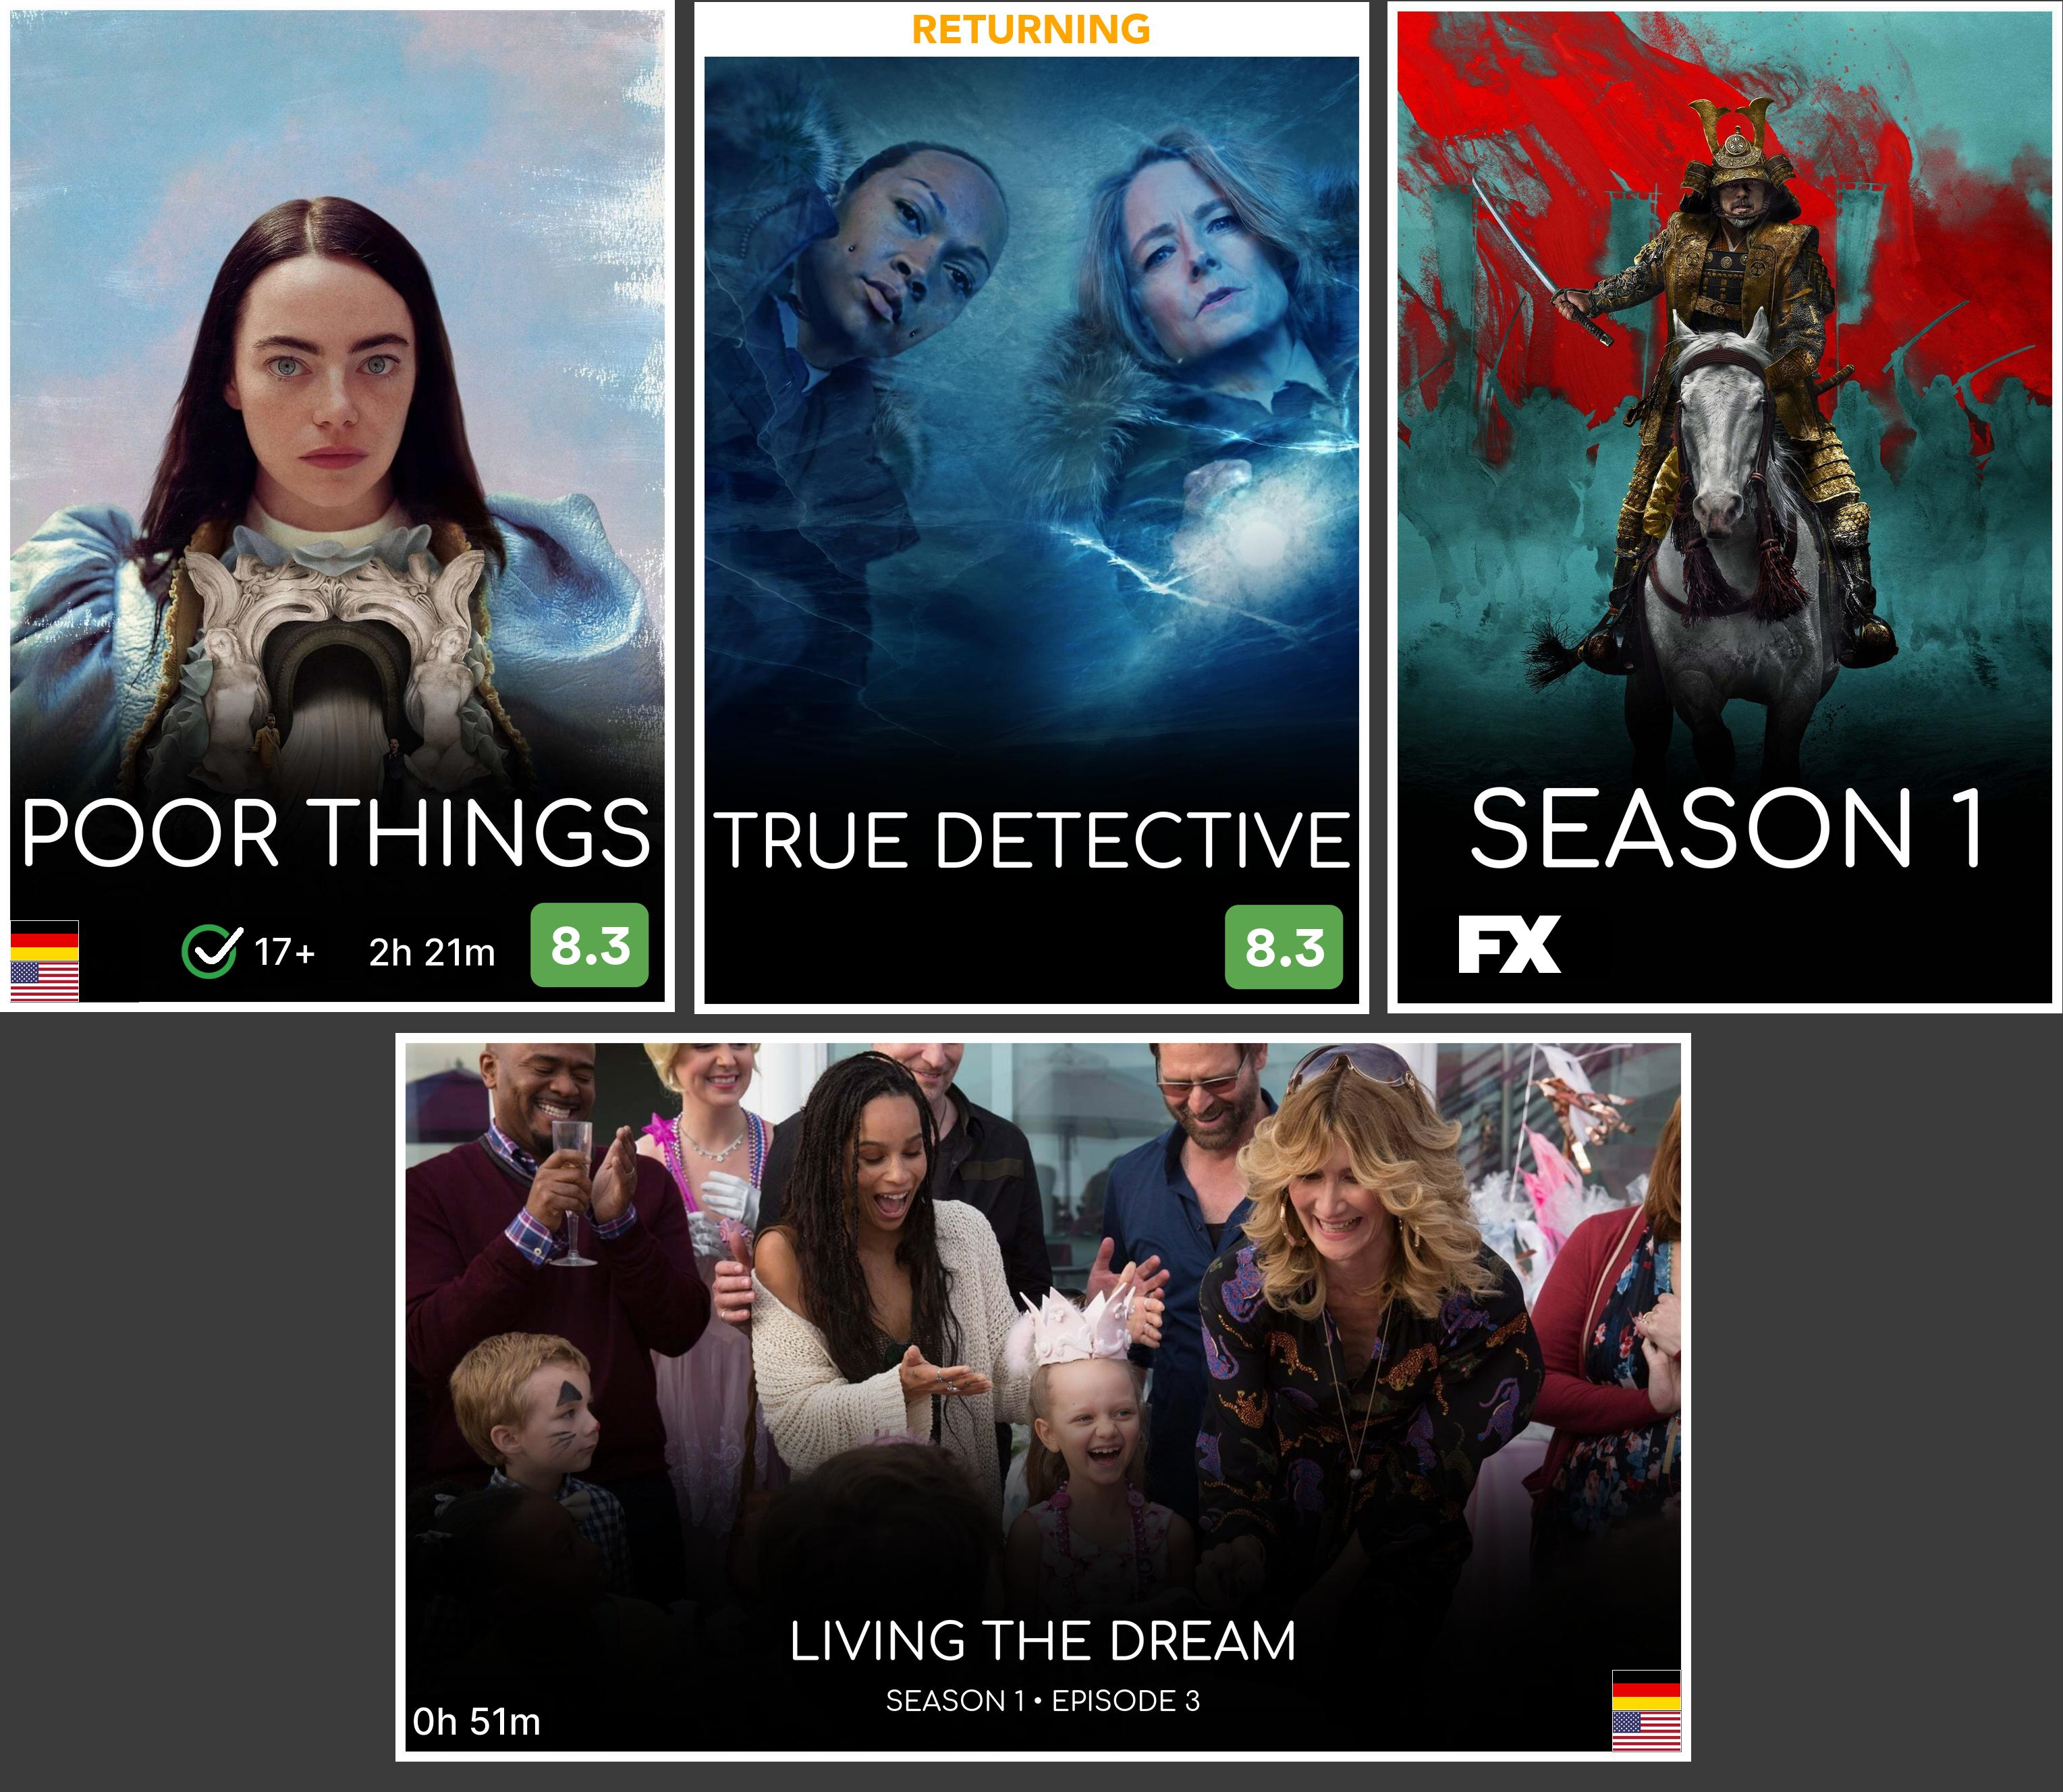
docker exec -it posterizarr pwsh Posterizarr.ps1 -Testing🖼️Posters
🖼️Backgrounds
🖼️TitleCards
Important
Alpha and only tested on Windows.
Currently only movie/show/season poster creation integrated
Run the script with the -Manual switch:
.\Posterizarr.ps1 -ManualFollow the prompts to enter the source picture path, media folder name, and movie/show title to manually create a custom poster.
📝Posterizarr Excel Creation using Module1.bas:
-
Open Excel: First, open Microsoft Excel on your computer. You can do this by clicking on the Excel icon in your applications menu or by searching for "Excel" in your computer's search bar and selecting it from the results.
-
Access the Visual Basic for Applications (VBA) Editor:
- While in Excel, press
Alt + F11on your keyboard. This keyboard shortcut will open the VBA editor window.
- While in Excel, press
-
Import Module:
- In the VBA editor window, you'll see a menu bar at the top.
- Right-click on any existing module or in the project explorer (usually located on the left-hand side).
- From the dropdown menu, select
Import File.... - A file explorer window will open. Navigate to the location where you saved the
Module1.basfile. - Select the
Module1.basfile and clickOpen.
-
Run the Macro:
- Now, go back to the Excel window.
- Look for the
Viewtab at the top of the Excel window. - Click on the
Viewtab. - Within the
Macrosgroup, you'll find a button labeledMacros. Click on it. - In the dropdown menu, select
View Macros. - A Macros dialog box will appear, listing all available macros.
- In the list, you should see the
PromptUsermacro. - Select
PromptUserfrom the list. - Finally, click the
Runbutton.
Following these steps will allow you to import the Module1.bas file containing the VBA code into Excel and then run the PromptUser macro.
🎥Posterizarr Excel:
🖼️Discord Webhook:
🖼️ImageChoices.csv:

🖼️Assets after Posterizarr run:
🖼️Assets after PMM run:
Feel free to customize the script further to meet your specific preferences or automation requirements.
Important
- Adjust on each PR the version number in script on Line 11
$CurrentScriptVersion = "1.0.55" - Adjust the version number in Release.txt to match the one in script.
- this is required because the script checks against this file if a newer version is available.
- Do not include images on a PR.
