Adapated from and thank you to Scott Collis, ARM precipitation radar instrument translator (see here) and the original tutorial by Valliappa Lakshmanan, formerly at Climate Corp now at Google. This version is updated to use Ubuntu20 and Python 3.8.
Please follow the instructions here: https://docs.aws.amazon.com/AWSEC2/latest/UserGuide/get-set-up-for-amazon-ec2.html Note: Not all steps are compulsory, but at the very minimum the first step needs to be completed and Amazon needs to verify your account.
This course will be taught using Jupyter [1] notebooks hosted on an Amazon Web Services (AWS) Elastic Cloud Compute (EC2) instance. The aim of these instructions is to: Start an EC2 instance with the correct access permissions and use the key provided to log in, run some pre-defined scripts to provision the EC2 instance with Anaconda Python [2] and the tools required for the course and, finally, to start the Jupyer notebook server and connect to it using a web browser.
-
Point your browser at https://aws.amazon.com/ and click "sign into the console" in the top right hand corner.
-
Log in with the credentials you generated using the pre-course instructions, once authenticated this will take you to the console which will look similar to this:

-
Type "ec2" into the text box under "AWS services" and click the first option in the drop down box. This will land you on a page that looks similar to this (of course you will not have existing snapshots etc...):

-
If it is not expanded out already, expand Instances:
 ... and click on "Instances" and in the menu below it, and you will be greeted by this screen:
 You can now click on "Launch Instance"
 -
You will be greeted by a page that looks like this:

click select next to the "Ubuntu Server 20.04 LTS (HVM), SSD Volume Type" option. The next page asks you to click a radio button next to the "size" of the machine you want to start. While you are experimenting use "t2.micro" which gives you a 1GB 1CPU EC2 instance. For the course 1GB will not cut it, *select "m4.large". *

-
Once your selection has been made click the gray button "Next: Configure Instance Details".
-
This page can be left as all defaults... Click the gray button "Next: Add Storage"
-
Change the Size (GiB) to 100.
 Click the gray button "Next: Add Tags"
 -
No need to add tags for the purposes of this course... Once more click the gray button "Next: configure Security Group"
-
Now we have work to do! We need to configure our instance to be able to serve the Jupyter notebook via HTTPS on port 8888. You will see a page similar to that below. Make sure "Create a new security group" is checked, later you can select "select and existing group" to save you time! Enter a simple name for the Security group name like "j_sever". Enter something descriptive for the Description.
 We need to configure to allow connections from any IP to ports 443 (HTTPS) and 8888 (where Jupyter listens). Click "Add Rule". This will create a new row. On the new row the drop down box on the left will default to "Custom TCP Rule". Click it and select "HTTPS". Then click "Add Rule" again but this time, in the new row leave the drop down on "Custom TCP Rule". In that same, third, row enter "8888" into "Port Range" column and "0.0.0.0/0" in the source column. Once done it should look like this:

-
Now we can click the blue button "Review and Launch". You will be presented with a page like this for one final check.

-
click Launch and a dialog pops up like this:

The top drop down can be either "use existing pair", "create new pair" or "proceed without pair". Select "Create new pair", in the text entry below think of a good name (eg "jupyter") and click on download key pair. A save dialog will pop up REMEBER WHERE YOU SAVED IT! we will call this "/path/to/key/" in future reference so the key is at "/path/to/key/key_name.pem". Once you have downloaded the key the blue "Launch Instance" button will be un-grayed and you can click it!
- You will now have a screen like this (after a spinning wheel screen):

Click on the hyperlink starting with "i". You will get a window like the one below. Some entries may be blank until the instance comes up.

- You will need an SSH client. These instructions will vary from client to client. Initially this tutorial will have instructions for a terminal based client available on Linux and MacOS/OSX.
select your instance in the list of instances and click “Connect”. You will see this window:

Click on the copy button near chmod 400:

Go to a terminal and paste the command to ensure your key is not publicly viewable.
- Then Click on the copy button near
ssh-i:
Paste this command into your terminal. Hit enter and answer "yes" when it asks if you want to continue connecting. Congrats! You are now logged into your instance!
You should see something like this:

- We now need to load on software we use for the course. This will involve executing a shell script located at ~/setup.sh.
In the shell, type the following and hit enter:
chmod +x ~/.setup.sh
Then, type the following and hit enter:
~/.setup.sh
- After some time the script will prompt you for a password. Enter something, enter it again.. remember it!
- After the script finishes it should finish with a set of lines like this:
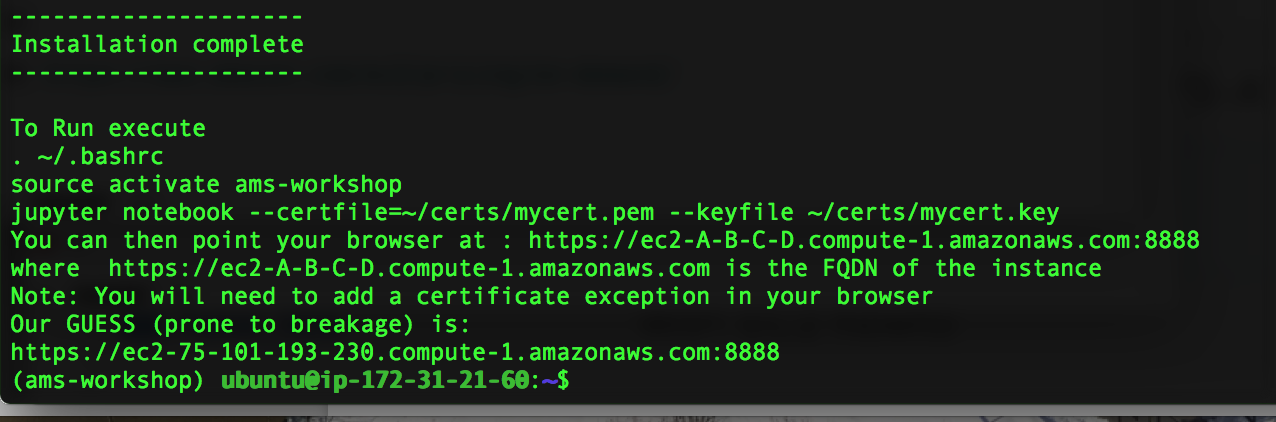
- In the command line run the lines (By copy pasting if you choose):
. ~/.bashrc
jupyter notebook —certfile=~/certs/mycert.pem —keyfile ~/certs/mycert.key
- The Jupyter notebook has now started! Huzzah! Your terminal should look like this:

One last step.. You can see a line after "Our GUESS (prone to breakage) is:". This is the expected location of your Jupyter notebook server.. Copy that line to the clipboard and open a browser window.. Our example here uses Firefox. Paste the address in the "Search or enter address" text entry box and press enter. You should get a screen like this:

ONLY EVER DO THIS FOR SITES YOU COMPLETELY TRUST. Click "Advanced" and then click "Add Exception". A window will drop down, click "Confirm security exception". Bingo you should now be presented with a page asking for your password.. enter it and you are good to go!
NOTE FOR SAFARI USERS: Do not just hit "continue".. This will allow you to get into the notebook server but the kernel will not be able to connect.. Click "Show Certificate" and click the upper left hand radio button to accept the generate certificate.
[1] https://jupyter.org/
[2] https://www.continuum.io/downloads