-
MVC:(VIew-Model-Controller)
早期将VIew、Model、Controller代码块进行划分,使得程序大部分分离,降低耦合。
-
MVP:(VIew-Model-Presenter)
由于MVC中View和Model之间的依赖太强,导致Activity中的代码过于臃肿。为了他们可以绝对独立的存在,慢慢演化出了MVP。在MVP中View并不直接使用Model,它们之间的通信是通过 Presenter (MVC中的Controller)来进行的。
-
MVVM:(Model–View–ViewModel)
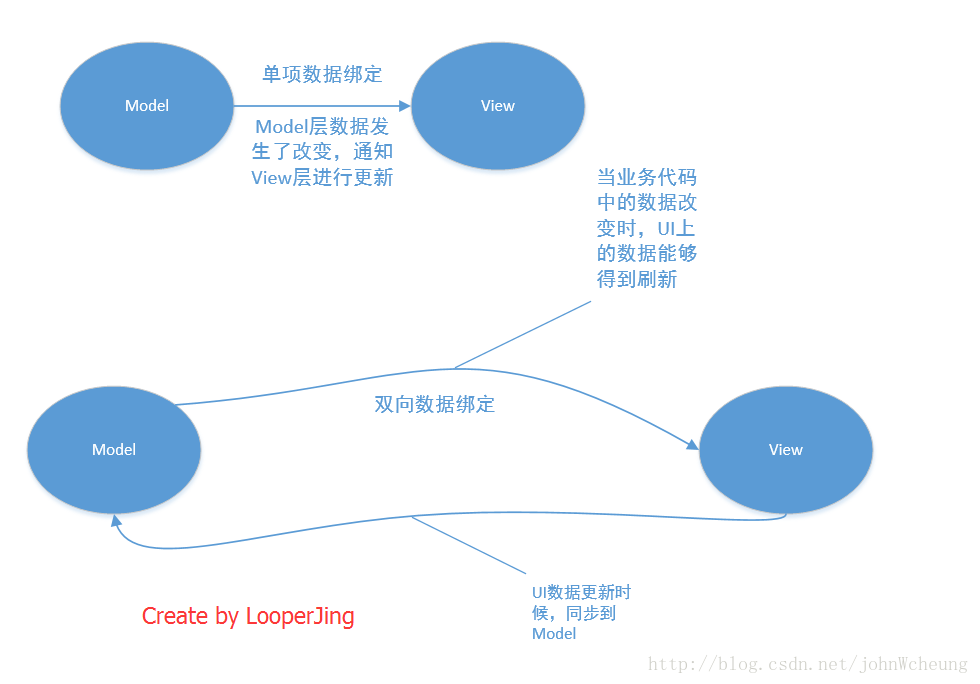
MVVM可以算是MVP的升级版,将 Presenter 改名为 ViewModel。关键在于View和Model的双向绑定,当View有用户输入后,ViewModel通知Model更新数据,同理Model数据更新后,ViewModel通知View更新。通过双向绑定(松耦合)解决了MVP中Presenter与View联系比较紧密的问题。
MVVM的三层模型如下:
-
Model :负责数据实现和逻辑处理,类似MVP。
-
View : 对应于Activity和XML,负责View的绘制以及与用户交互,类似MVP。
-
ViewModel : 创建关联,将model和view绑定起来。当我们model更改后,会通过viewmodel反馈给view。
可以看到,MVVM模式的最大亮点是双向绑定。
-
-
Data Binding
DataBinding是一个实现数据和UI绑定的框架,是构建MVVM模式的一个关键的工具。自动生成的DataBinding代码会检查null,避免出现NullPointerException。

android {
    ...
    ...
    ...
    dataBinding{
        enabled true
    }
} 使用DataBinding提供的ObservableFields来创建实体类,实现双向绑定。ObservableField的作用是,当我们实体类中的值发生改变时会自动通知View刷新。用 name.get()获取属性值,用name.set()设置属性值。
UserBean
/**
 * User 实体类
 * Created by ZhangJun on 2017/6/24.
 */

public class UserBean {

    public final ObservableField<String> userName = new ObservableField<>();
    public final ObservableField<String> nickName = new ObservableField<>();
    public final ObservableInt age = new ObservableInt();
    public final ObservableBoolean isStudent = new ObservableBoolean();
    public final ObservableField<String> avatar = new ObservableField<>();

}
FoodBean
/**
 * Food 实体类
 * Created by ZhangJun on 2017/6/24.
 */

public class FoodBean {

    public final ObservableField<String> description = new ObservableField<>();
    public final ObservableField<String> image = new ObservableField<>();
    public final ObservableField<String> keywords = new ObservableField<>();
    public final ObservableField<String> summary = new ObservableField<>();

}Model层就是职责数据获取的,网络请求、数据操作和中间件调用的逻辑在这里面写,类似于MVP。所以我觉得ViewModel层可以持有一个Model的引用,通知Model获取数据,同时Model在获取到数据之后,回调通知ViewModel进行数据更改,进而使UI得到更新。
UserModel
/**
 * User 数据增删改查
 * Created by ZhangJun on 2017/6/24.
 */

public class UserModel {

    private static UserModel sUserModel; // 防止创建多次,设置为单例

    private UserModel() {
        // 通过getInstance()方法获取实例
    }

    /**
     * 获取当前类示例
     */
    public synchronized static UserModel getInstance() {
        if (sUserModel == null) {
            sUserModel = new UserModel();
        }
        return sUserModel;
    }

    public UserBean getUserInfo() {
        UserBean user = new UserBean();
        user.userName.set("ZhangSan");
        user.nickName.set("XiaoZhang");
        user.age.set(26);
        user.avatar.set("http:https://img2.cache.netease.com/auto/2016/7/28/201607282215432cd8a.jpg");
        user.isStudent.set(false);

        return user;
    }

}
FoodModel
/**
 * Food 数据增删改查,一些网路请求和中间件调用都在这里完成
 * Created by ZhangJun on 2017/6/24.
 */

public class FoodModel {

    private static FoodModel sFoodModel;

    private OnUpdateFoodInfoCallBack mOnUpdateFoodInfoCallBack;

    private FoodModel() {

    }

    public synchronized static FoodModel getInstance() {
        if (sFoodModel == null) {
            sFoodModel = new FoodModel();
        }
        return sFoodModel;
    }

    public void requestFoodInfo() {
        OkHttpClient client = new OkHttpClient.Builder().build();
        Request request = new Request.Builder().url("http:https://www.tngou.net/api/food/list?id=1").build();
        client.newCall(request).enqueue(new Callback() {
            @Override
            public void onFailure(Call call, IOException e) {

            }

            @Override
            public void onResponse(Call call, Response response) throws IOException {
                if (response.isSuccessful()) {
                    parseJson(response.body().string());
                }
            }
        });

    }

    private void parseJson(String jsonStr) {
        List<FoodBean> foodList = new ArrayList<>();
        try {
            JSONObject jo = new JSONObject(jsonStr);
            JSONArray tngou = jo.getJSONArray("tngou");
            for (int i = 0; i < tngou.length(); i++) {
                JSONObject item = tngou.getJSONObject(i);
                String description = item.getString("description");
                String img = "http:https://tnfs.tngou.net/image"+item.getString("img");
                String keywords = "【关键词】 "+item.getString("keywords");
                String summary = item.getString("summary");

                FoodBean food = new FoodBean();
                food.description.set(description);
                food.image.set(img);
                food.keywords.set(keywords);
                food.summary.set(summary);
                foodList.add(food);
            }
        } catch (JSONException e) {
            e.printStackTrace();
        }
        if (mOnUpdateFoodInfoCallBack != null) {
            mOnUpdateFoodInfoCallBack.updateFoodList(foodList);
        }
    }

    public interface OnUpdateFoodInfoCallBack {
        void updateFoodList(List<FoodBean> foodList);
    }

    public void setOnUpdateFoodInfoCallBack (OnUpdateFoodInfoCallBack onUpdateFoodInfoCallBack) {
        mOnUpdateFoodInfoCallBack = onUpdateFoodInfoCallBack;
    }
}一个ViewModel接口提供了两个东西:动作和数据。动作改变Model的下层(click listener,监听文字改变的listener等等),而数据则是Model的内容。
ViewModel仅仅专注于业务的逻辑处理,只做和业务逻辑和业务数据相关的事,UI相关的事情不要写在这里面,ViewModel 层不会持有任何控件的引用,更不会在ViewModel中通过UI控件的引用去做更新UI的事情。但是ViewModel可能会改变数据,由于数据和UI已经绑定到一起了,所以相应的控件上会自动去更新UI。
UserViewModel
/**
 * User 的ViewModel
 * Created by ZhangJun on 2017/6/27.
 */

public class UserViewModel {

    public UserBean user;

    private Context mContext;

    public UserViewModel(Context context) {
        mContext = context;
        initUserInfo();
    }

    @BindingAdapter("avatar")
    public static void getInternetImage(ImageView iv, String avatar) {
        Picasso.with(iv.getContext()).load(avatar).into(iv);
    }

    /**
     * 初始化数据
     */
    private void initUserInfo() {
        UserModel userModel = UserModel.getInstance();
        user = userModel.getUserInfo();
    }

    public void onClick() {
        FoodActivity.navigateTo(mContext);
    }
}
FoodListViewModel
/**
 * FoodList 的ViewModel
 * Created by ZhangJun on 2017/6/27.
 */

public class FoodListViewModel implements FoodModel.OnUpdateFoodInfoCallBack {

    private OnShowFoodListCallBack mOnShowFoodListCallBack;

    public FoodListViewModel() {
        initFoodList();
    }

    /**
     * 初始化数据
     */
    private void initFoodList() {
        FoodModel foodModel = FoodModel.getInstance();
        foodModel.setOnUpdateFoodInfoCallBack(this);
        foodModel.requestFoodInfo();
    }

    @Override
    public void updateFoodList(List<FoodBean> foodList) {
        if (mOnShowFoodListCallBack != null) {
            mOnShowFoodListCallBack.showFoodList(foodList);
        }
    }

    public interface OnShowFoodListCallBack {
        void showFoodList(List<FoodBean> foodList);
    }

    public void setOnShowFoodListCallBack (OnShowFoodListCallBack onShowFoodListCallBack) {
        mOnShowFoodListCallBack = onShowFoodListCallBack;
    }
}
FoodItemViewModel
/**
 * Food 的ViewModel
 * 一个ViewModel接口提供了两个东西:动作和数据。
 * 动作改变Model的下层(click listener,监听文字改变的listener等等),而数据则是Model的内容。
 * Created by ZhangJun on 2017/6/27.
 */

public class FoodItemViewModel {

    public FoodBean food;

    public FoodItemViewModel(FoodBean food) {
        this.food = food;
    }

    @BindingAdapter("image")
    public static void getInternetImage(ImageView iv, String image) {
        Picasso.with(iv.getContext()).load(image).into(iv);
    }

    public void onItemClick(View view) {
        Toast.makeText(view.getContext(), food.description.get(), Toast.LENGTH_SHORT).show();
    }
}view层就是xml和Activity
首先布局文件不再是以传统的某一个容器作为根节点,而是使用<layout></layout>作为根节点,在<layout>节点中我们可以通过<data>节点来引入我们要使用的数据源。
在data中定义的variable节点,name属性表示变量的名称,type表示这个变量的类型,实例就是我们实体类对应的ViewModel的位置。
你可以直接在layout文件里面使用常见的表达式:
-
数学表达式 + – / * %
-
字符串链接 +
-
逻辑操作符 && ||
-
二元操作符 & | ^
-
一元操作符 + – ! ~
-
Shift >> >>> <<
-
比较 == > < >= <=< p="">
-
instanceof
-
Grouping ()
-
Literals – character, String, numeric, null
-
值域引用(Field access)
-
通过[]访问数组里面的对象
-
三元操作符 ?:
activity_main.xml
<?xml version="1.0" encoding="utf-8"?>
<layout xmlns:tools="http:https://schemas.android.com/tools"
xmlns:android="http:https://schemas.android.com/apk/res/android"
xmlns:app="http:https://schemas.android.com/apk/res-auto" >
<data>
<variable
name="model"
type="com.tcl.john.studymvvm.viewmodel.UserViewModel"/>
</data>
<LinearLayout
android:layout_width="match_parent"
android:layout_height="match_parent"
android:orientation="vertical"
tools:context="com.tcl.john.studymvvm.view.MainActivity">
<TextView
android:layout_width="wrap_content"
android:layout_height="wrap_content"
android:text="@{model.user.userName}" />
<TextView
android:layout_width="wrap_content"
android:layout_height="wrap_content"
android:text="@{model.user.nickName}" />
<TextView
android:layout_width="wrap_content"
android:layout_height="wrap_content"
android:text="@{String.valueOf(model.user.age)}" />
<!--三目运算-->
<TextView
android:layout_width="wrap_content"
android:layout_height="wrap_content"
android:text="@{model.user.userName??model.user.nickName}" />
<!--字符拼接-->
<TextView
android:layout_width="wrap_content"
android:layout_height="wrap_content"
android:text="@{`userName is :`+model.user.userName}" />
<!--根据数据来决定显示样式-->
<TextView
android:layout_width="wrap_content"
android:layout_height="wrap_content"
android:background="@{model.user.age < 30 ? 0xFF0000FF:0xFFFF0000}"
android:text="@{String.valueOf(model.user.age)}" />
<!--绑定图片-->
<ImageView
android:id="@+id/user_iv"
android:layout_width="wrap_content"
android:layout_height="wrap_content"
app:avatar="@{model.user.avatar}" />
<Button
android:id="@+id/food_button"
android:layout_width="wrap_content"
android:layout_gravity="center_horizontal"
android:layout_height="wrap_content"
android:text="跳转到食物列表"/>
</LinearLayout>
</layout>Activity绑定数据
View层做的就是和UI相关的工作,我们只在XML、Activity和Fragment写View层的代码,View层不做和业务相关的事,也就是我们在Activity不写业务逻辑和业务数据相关的代码,更新UI通过数据绑定实现,尽量在ViewModel里面做。
/**
 * View层中的Activity
 * View层负责View的绘制以及与用户交互
 * Created by ZhangJun on 2017/6/27.
 */

public class MainActivity extends AppCompatActivity {

    @Override
    protected void onCreate(Bundle savedInstanceState) {
        super.onCreate(savedInstanceState);
        ActivityMainBinding activityMainBinding = DataBindingUtil.setContentView(this, R.layout.activity_main);

        initUserInfo(activityMainBinding);
    }

    private void initUserInfo(ActivityMainBinding activityMainBinding) {
        final UserViewModel userViewModel = new UserViewModel(this);
        activityMainBinding.setModel(userViewModel);
        activityMainBinding.foodButton.setOnClickListener(new View.OnClickListener() {
            @Override
            public void onClick(View view) {
                userViewModel.onClick();
            }
        });
    }

}FoodActivity
/**
 * 食物列表界面
 * Created by ZhangJun on 2017/6/29.
 */

public class FoodActivity extends AppCompatActivity implements FoodListViewModel.OnShowFoodListCallBack {

    private RecyclerView mFoodsRv;

    public static void navigateTo(Context mContext) {
        Intent intent = new Intent(mContext , FoodActivity.class);
        mContext.startActivity(intent);
    }

    @Override
    protected void onCreate(@Nullable Bundle savedInstanceState) {
        super.onCreate(savedInstanceState);
        ActivityFoodBinding activityFoodBinding = DataBindingUtil.setContentView(this, R.layout.activity_food);

        initFoodList(activityFoodBinding);
    }

    private void initFoodList(ActivityFoodBinding activityFoodBinding) {
        FoodListViewModel foodListViewModel = new FoodListViewModel();
        activityFoodBinding.setModel(foodListViewModel);
        foodListViewModel.setOnShowFoodListCallBack(this);
        LinearLayoutManager layoutManager = new LinearLayoutManager(this, LinearLayoutManager.VERTICAL, false);
        mFoodsRv = activityFoodBinding.foodRv;
        mFoodsRv.setLayoutManager(layoutManager);
    }

    @Override
    public void showFoodList(final List<FoodBean> foodList) {
        runOnUiThread(new Runnable() {
            @Override
            public void run() {
                mFoodsRv.setAdapter(new FoodDetailAdapter(foodList));
            }
        });
    }

}
activity_food.xml
<?xml version="1.0" encoding="utf-8"?>
<layout xmlns:android="http:https://schemas.android.com/apk/res/android">

    <data>
        <variable
            name="model"
            type="com.tcl.john.studymvvm.viewmodel.food.FoodListViewModel"/>
    </data>

    <!--绑定RecyclerView-->
    <android.support.v7.widget.RecyclerView
        android:id="@+id/food_rv"
        android:layout_width="match_parent"
        android:layout_height="match_parent" />

</layout>
food_item.xml
<?xml version="1.0" encoding="utf-8"?>
<layout
    xmlns:android="http:https://schemas.android.com/apk/res/android"
    xmlns:app="http:https://schemas.android.com/apk/res-auto">

    <data>
        <variable
            name="model"
            type="com.tcl.john.studymvvm.viewmodel.food.FoodItemViewModel"/>
    </data>

    <RelativeLayout
        android:layout_width="match_parent"
        android:layout_height="96dp"
        android:orientation="vertical"
        android:onClick="@{model.onItemClick}" >

        <ImageView
            android:id="@+id/iv"
            android:layout_width="96dp"
            android:layout_height="96dp"
            android:padding="6dp"
            app:image="@{model.food.image}"/>

        <TextView
            android:id="@+id/description"
            android:layout_width="match_parent"
            android:layout_height="wrap_content"
            android:layout_marginLeft="8dp"
            android:layout_toRightOf="@id/iv"
            android:ellipsize="end"
            android:maxLines="3"
            android:text="@{model.food.description}"/>

        <TextView
            android:layout_width="wrap_content"
            android:layout_height="wrap_content"
            android:layout_marginLeft="8dp"
            android:layout_toRightOf="@id/iv"
            android:layout_alignParentBottom="true"
            android:layout_marginBottom="2dp"
            android:text="@{model.food.keywords}"
            android:textStyle="bold"/>

    </RelativeLayout>

</layout>
定义适配器
/**
 * Food 列表适配器
 * Created by ZhangJun on 2017/6/24.
 */

public class FoodDetailAdapter extends RecyclerView.Adapter<FoodDetailAdapter.FoodHolder> {

    private List<FoodBean> mFoods = new ArrayList<>();

    public FoodDetailAdapter(List<FoodBean> data) {
        this.mFoods = data;
    }

    @Override
    public FoodHolder onCreateViewHolder(ViewGroup parent, int viewType) {
        return FoodHolder.create(LayoutInflater.from(parent.getContext()), parent);
    }

    @Override
    public void onBindViewHolder(FoodHolder holder, int position) {
        holder.bindTo(mFoods.get(position));
    }

    @Override
    public int getItemCount() {
        if (mFoods == null)
            return 0;
        return mFoods.size();
    }

    static class FoodHolder extends RecyclerView.ViewHolder {
        private FoodItemBinding mFoodItemBinding;

        static FoodHolder create(LayoutInflater inflater, ViewGroup parent) {
            FoodItemBinding binding = FoodItemBinding.inflate(inflater, parent, false);
            return new FoodHolder(binding);
        }

        private FoodHolder(FoodItemBinding binding) {
            super(binding.getRoot());
            this.mFoodItemBinding = binding;
        }

        void bindTo(FoodBean food) {
            FoodItemViewModel foodItemViewModel = new FoodItemViewModel(food);
            mFoodItemBinding.setModel(foodItemViewModel);
            mFoodItemBinding.executePendingBindings();
        }

    }
}
View层的Activity通过DataBinding生成Binding实例,把这个实例传递给ViewModel,ViewModel层通过把自身与Binding实例绑定,从而实现View中layout与ViewModel的双向绑定。
如果不引入ViewModel这一层,还会有一个缺点:一个xml中可能会涉及到多个数据对象,那么我们只有把这个多个数据对象都引入进来,xml布局的清晰程度胡下降,通过这种方法,我们的layout文件中data标签中只需要引入ViewModel就可以了,其它的数据对象统一在ViewModel中一并处理。
关于三者的协作关系可以如下图表示:

MVVM的问题
-
数据绑定使得 Bug 很难被调试。你看到界面异常了,有可能是你 View 的代码有 Bug,也可能是 Model 的代码有问题。数据绑定使得一个位置的 Bug 被快速传递到别的位置,要定位原始出问题的地方就变得不那么容易了。
-
对于过大的项目,数据绑定需要花费更多的内存。