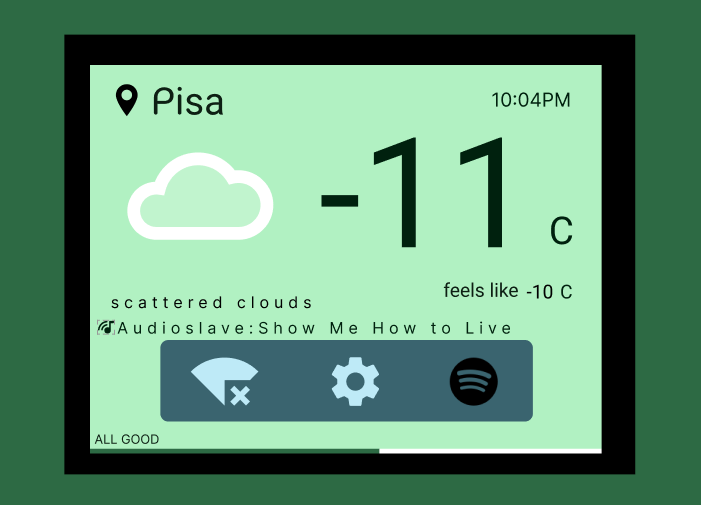
It's a tiny monitor for local weather and music player, meaning, it shows the current temperature, the feeling like temperature, the temperature description and the time of request, as for the music, the artist and track that are currently being played on your Spotify player (disclaimer: it does not play or pause the track). The weather information is fetched from OpenWeatherMap.org using location from IP-API.com. In case of Spotify, it fetches the code for the app and token (with refreshment once it's expired, 3600 s).
Two web servers were built as well, (1) the WiFi supplicant that allows the user to connect to any Access Point and (2) the Spotify Authenticator to link a Spotify account. These servers run in different modes of the WiFi module, when as a supplicant, the module works as SoftAP and station so, the user can join the WiFi network Erika Weather, browse to http:https://192.168.4.1/ and set the SSID and password of the desired network and wait for connection. As Spotify Authenticator, recommended to use only when there's an internet connection, browse to http:https://the-esp8266-ip/spotify, and this this provides the link that will authenticate the user's Spotify account and later it will automatically fetch the token.
You can skip this documentation and jump straight to the compilation section.
The main board is a STM32f407-discovery using std library mounted over a discover-more extension with an LCD LCD35RT. The secondary board is an ESP8266 that interfaces through UART in the COM1 (USART6 on the discovery PC6-PC7 pins) on the std library. ESP8266's reset/GPIO0/GIPO2/Enable pin are fixed voltage, meaning they are not connected to any STM32's GPIOS.
On the secondary board, ESP8266, the ESP8266-IDF-ATV2.2.1.0 is running, provided by Espressif, you can find in this link how to install this firmware on the ESP8266. This firmware version is important in order to establish SSL connections, the ATv1.6.x supports SSL, but from tests, it's seen that *.spotify.com:443 is virtually hosted on Google, so the SSL uses SNI and the ATv1.6.x does not support SNI.
In the main board, the app was built based on ErikaRTOSv2, which is divided in 6 periodic tasks (code: inc/erika_task_conf.h): Weather Update, Spotify Update, ESP8266 Poll, LCD In and Network.
-
Weather Update
Based on the OpenWeatherMap's API doc the data is updated every 10 minutes , so this task has a 10 minutes period that triggers an internal event invoking a change in the client of the task Network to update the weather information, this closes the SSL connection (if open) for Spotify.
code: src/app.c
-
Spotify Update
Triggered each 2s, it triggers an internal event that invokes a change in the client of the task Network in order to fetch the Spotify player information. Once the token is acquired, the automaton of the network on the STM32 requests a SSL connection to api.spotify.com:443 and it does not close it until a weather update event asks for weather information. This link remains open due to establishing a SSL connection takes ~5 seconds on the ESP8266. Keep in mind that Spotify sends minimum 7Kbytes of HTTP data (1Kbyte: HTTP header + 6Kbyte: JSON) when a track is being played, note as well that there are songs that can reach 13Kbytes, transmitting these data and parsing it takes ~2 seconds. So, if the goal is to fetch the most recent information from the player open and closing the SSL connection is not the most suitable option, moreover, open and closing creates an overhead in the ESP8266 and in the Spotify's servers (which I don't think it's a big deal but if it were a smaller server, it would be a different story).
In order to reduce the amount of data coming from Spotify, the query request has being modified, so instead of being only:
GET api.spotify.com/v1/me/player/currently-playing
the available market was placed
GET api.spotify.com/v1/me/player/currently-playing?market=IT # IT stands for Italy
This request decreased the data size down to ~4Kbytes (1KByte: HTTP Header + 3Kbyte: JSON).
code: src/app.c
-
ESP8266 Poll
Triggered each 40 ms, parses the incoming data of the ESP8266. 40ms has being chosen because initially the circular buffer where the DMA is placing the incoming UART data was 1024 bytes size, and at 115200 bauds with 1 start bit and 1 end bit of the UART, 10240 bits will fill the buffer in 88ms, to avoid overlapping data, it's better to empty the buffer as soon as possible, so (by Nyquist) 40ms will do the job. that buffer dimension works perfect when fetching weather information because the data barely reaches 1Kbytes. It's a different story for Spotify where sometimes it throws 13Kbytes for a song. So, the initial buffer dimension isn't enough. But choosing a larger period will make other procedures slower, like when setting up the ESP8266, the used commands are averagely 14 bytes size (~1.2ms to transmit). So, the current mechanism does not try to empty the buffer but just wait for the content of the HTTP, the header is almost discarded, the only fields of interest are the HTTP Method, the HTTP Status Code and the Content-Length. Right now the buffer size is 8Kbytes and 40ms works perfectly.
code: src/esp8266_driver.c
-
LCD In
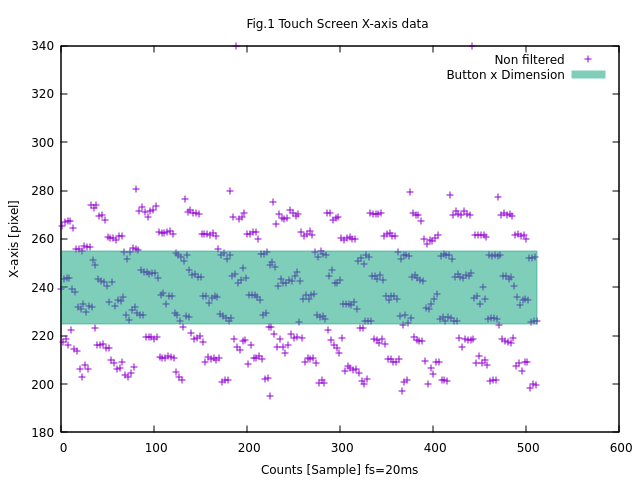
Triggered each 20 ms, it checks if the LCD has being touched. An event-triggered filter was implemented in order to reduce the noise of the coordinates when the panel gets touched. The figure Fig.1 shows the x axis pixels upon touching the Spotify Icon button for 10.24 seconds (512 samples). As seen the x-axis data ranges from 200px to 280px, falling only 211 samples within the icon's dimension out of the 512 samples.

Some noise can be allowed whilst the double of standard deviation is as smaller as the button's dimension, in this case a button covers 30x30 pixels and the standard deviations of the touchscreen are the followings for each axis:
Y-axis doesn't need a filter as long as the touched coordinate is close to centre of the button, while the x-axis does need to be filtered.
There's an application report by W. Fang where 4 non linear filters are suggested for resistive touchscreens:
-
Average with N = 4 samples.
-
Weighted Average with N = 4 samples and M = 2 (meaning drop 2 samples).
-
Middle Value with N = 3 samples.
-
Average the closest with N = 3 samples.
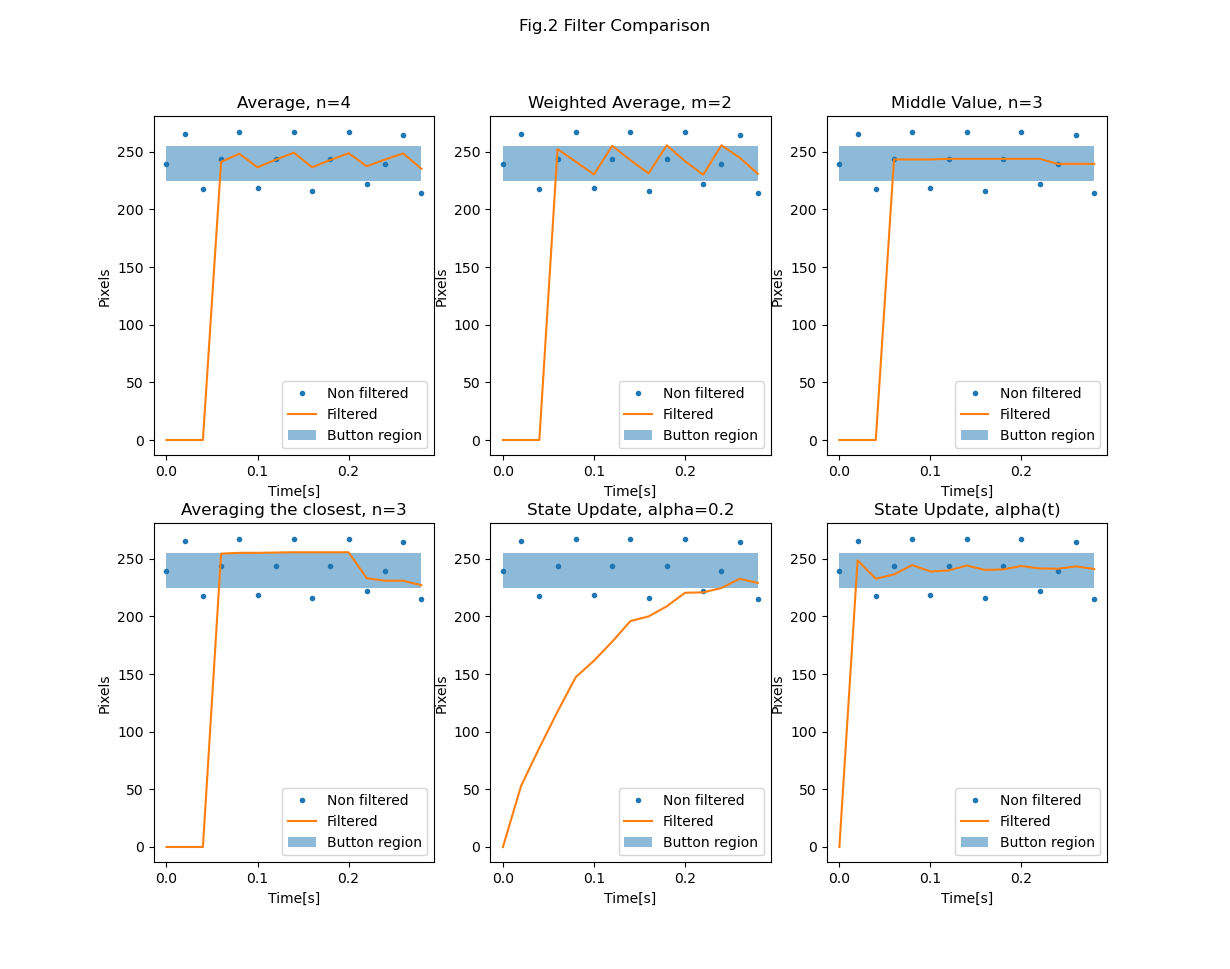
They were all tested using the raw data from Fig.1 and the results are shown in Fig.2. Two additional filters were explored, the State Update Equation (1) with a fixed
and
In Fig.2, only a small window frame of 250ms is shown because pushing a button takes less than 1 second, so the purpose is to see which filter is the fastest one; since all filters kept the signal within the range of the button. Filters such as Weighted Average and Averaging the Closest are operating on the boundaries, discarded. On the other hand State Update is the slowest among all, discarded as well, however State Update with
This State Update Equation (2) with a variable
  1 #define ALPHA10_X   5.799 // alpha1 - alpha0
  2 #define ALPHA1_X    0.001
  3 #define SIGMA_X     260.0
  4 #define DELTA_T     0.02
  5
  6 static void state_update_extended(int *x, uint8_t *trigger) {
  7     static int16_t x_estimated = 0;
  8     static float t = 0.0;
  9     float alpha_x;
 10
 11     if (*trigger) {
 12         t = t + DELTA_T;
 13     } else {
 14         t = 0.0;
 15         x_estimated = 0;
 16     }
 17
 18     *trigger = 1;
 19
 20     alpha_x = ALPHA1_X + ALPHA10_X / (SIGMA_X * t + 1.0);
 21     x_estimated = x_estimated + alpha_x * (*x - x_estimated);
 22     *x = (int) x_estimated;
23 } -
Network
Triggered each 80ms, runs the web client or the web servers upon request of the previous tasks or external events as seen in the flow diagram on Fig.3. the external events are spotify_setup and wifi_setup, they are button in the touchscreen and are used to link a spotify account and to join to an Access Point respectively. On the other hand the internal events are generated by the tasks Weather Update and Spotify Update.
Loading--- title: 'Fig.3 Flow diagram of task Network' --- flowchart TD Start --> settings settings --> fetch_location fetch_location --> fetch_weather fetch_weather --> token{spotify_token?} ERROR --> settings token -- no --> code{spotify_code?} token -- yes --> fetch_spotify_player code -- yes --> fetch_spotify_token code -- no --> Ready fetch_spotify_token --> fetch_spotify_player fetch_spotify_player --> http_code{HTTP200? HTTP401?} http_code -- HTTP200 --> fetch_spotify_player http_code -- HTTP401 --> fetch_spotify_token http_code -- else --> ERROR Ready --> Ready update_weather --> ready{ready?} ready -- yes & update_weather --> fetch_location ready -- yes & update_spotify --> fetch_spotify_player update_spotify --> ready spotify_setup --> ready ready -- yes & spotify_setup --> spoty_server wifi_setup --> ready ready -- yes & wifi_setup --> enable_AP enable_AP --> wifi_supplicantEven though Fig.3 shows the flow diagram of the app within network, the network task itself is set of 9 states that are sketched in Fig. 4. These states are in charge of setting up the device, connecting to the web clients and serving the interfaces for spotify set up and wifi supplicant. These series of steps are executed by sending AT commands to the ESP8266 and wait and based on that response, move over the states. These states are:
- Superstate INITIAL_SETUP, it has 5 substates: RESTART, CHECK_DEV, STATION_MODE, and MULTI_CON.
- Superstate NETSTATUS, it has 3 substates: IFCONFIG, NETSTAT, and NETKILL
- Superstate CLIENT, it has 7 substates: CONNECT_SSL, CONNECT_TCP, RMALLOC, CWRITE, CREAD, CLOSE, and DONE
- Superstate AP, it has 3 substates: RESTART_4AP, ENABLE_AP, and SET_AP_CREDENTIALS. AP stands for Access Point.
- Superstate SERVER, it has 8 substates: MULTI_CONN_AP, SERVER_ON, LISTENING, SREAD, _RMALLOC_S, SWRITE, PURGE_BUFF, and SERVER_OFF.
- ON_HOLD, fetches esp8_status and moves the state according to a LUT of the previous state.
- READY, idle state, waits for a connection request.
- ERROR, moves the state according to a LUT of the previous state.
- SET_STA_CREDENTIALS, dummy state to set the credentials of an Access Point to be joined.
Upon implementation, the state is represented by a single uint16_t (linux-dev inspired):
  1 #define SUBSTATEBITS        6
  2 #define SUBSTATEMASK        ((1u << SUBSTATEBITS) - 1)
  3 #define MKSTATE(super, sub) ((sub << SUBSTATEBITS) | (super & SUBSTATEMASK))
  4 #define SUBSTATE(state)     (state >> SUBSTATEBITS)
  5 #define SUPERSTATE(state)   (state & SUBSTATEMASK)
So, in order to address a state:
state->nx_state = MKSTATE(ESP8SS_CLIENT, ESP8S_CONNECT_SSL);
state->nx_state = MKSTATE(ESP8SS_ON_HOLD, 0);
As said, knowing the previous state is important in order to move the process, that's why a structure holds the states:
  1 struct StateS {
  2     uint16_t *nx_state;   // Next State
  3     uint16_t *state;      // Previous State
  4     uint8_t *timeout;     // Loop count spent in a single state
  5     int8_t *wifi_mode;
  6 };
This structure then is passed to all states that can change the state.
---
title: Fig.4 Network Overall FSM
---
stateDiagram-v2

[*] --> SuperState
SuperState --> ON_HOLD
ON_HOLD --> SuperState : esp8_status == OK
ON_HOLD --> ERROR : esp8_status == ERROR
ERROR --> SuperState : f(prev_state)
SuperState --> READY :
READY --> SuperState : x_update | wifi_supplicant | spotify
note left of SuperState : = INITIAL_SETUP, NETSTATUS, CLIENT, SERVER, AP
Unlike other superstates, Client and Server state have a client_function and Server_function that allows choosing the client and/or the server based either on internal or external events. The spotify button creates a TCP server in station mode inside the ESP8266 and serves a link in a browser to allow the user connect a spotify account. the setting button switches the ESP8266 to a SoftAP + station mode and serves a minimal UI that allows the user to insert a SSID and password of Access Point to join. As for the web clients, there are 4 clients:
- Location, fetches from IP-API the latitude and longitude.
- Weather, fetches from OpenWeatherMap the current weather.
- Spotify Auth, fetches a token or a renewal of it.
- Spotify Player, fetches the current player state.
The relationship between theses clients and when or how the servers are enabled are shown in Fig.3.
if the hardware is ready, The file c_mX.bin can be flashed as follows:
$ st-flash write c_mX.bin 0x8000000In order to recompile you need to download ERIKA2.x-OS from https://www.erika-enterprise.com/index.php/download/erika-v2.x.html Once Erika is install, you only need the Erika-CLI not the whole Eclipse to work. So, everything useful executable you need is under the evidence folder.
Generate files from configuration file conf.oil
$ erika-gen /path/where/Erika-CLI/is/installed/Erika-CLI/ conf.oil .add usr.mk inside makefile
$ nano makefilein the first line write:
$ include usr.mkYou also need to install gcc-arm-none-eabi. Edit usr.mk, to address where the gcc-arm-none-eabi compiler is installed
$ nano usr.mkLocate the line that starts with GNU_ARM_ROOT and change it by the path where your compiler is installed.
- ESP8266-IDF-ATV2.2.1 firmware
- Erika2.x OS (the operating system of the board)
- gcc-arm-none-eabi (to compile the project)
- stlink (to flash the board)

