🔥 Looking for Objective-C? Check out macdown-gistit.
So you want to create your own Swift MacDown plug-in? Let's jump right in.
-
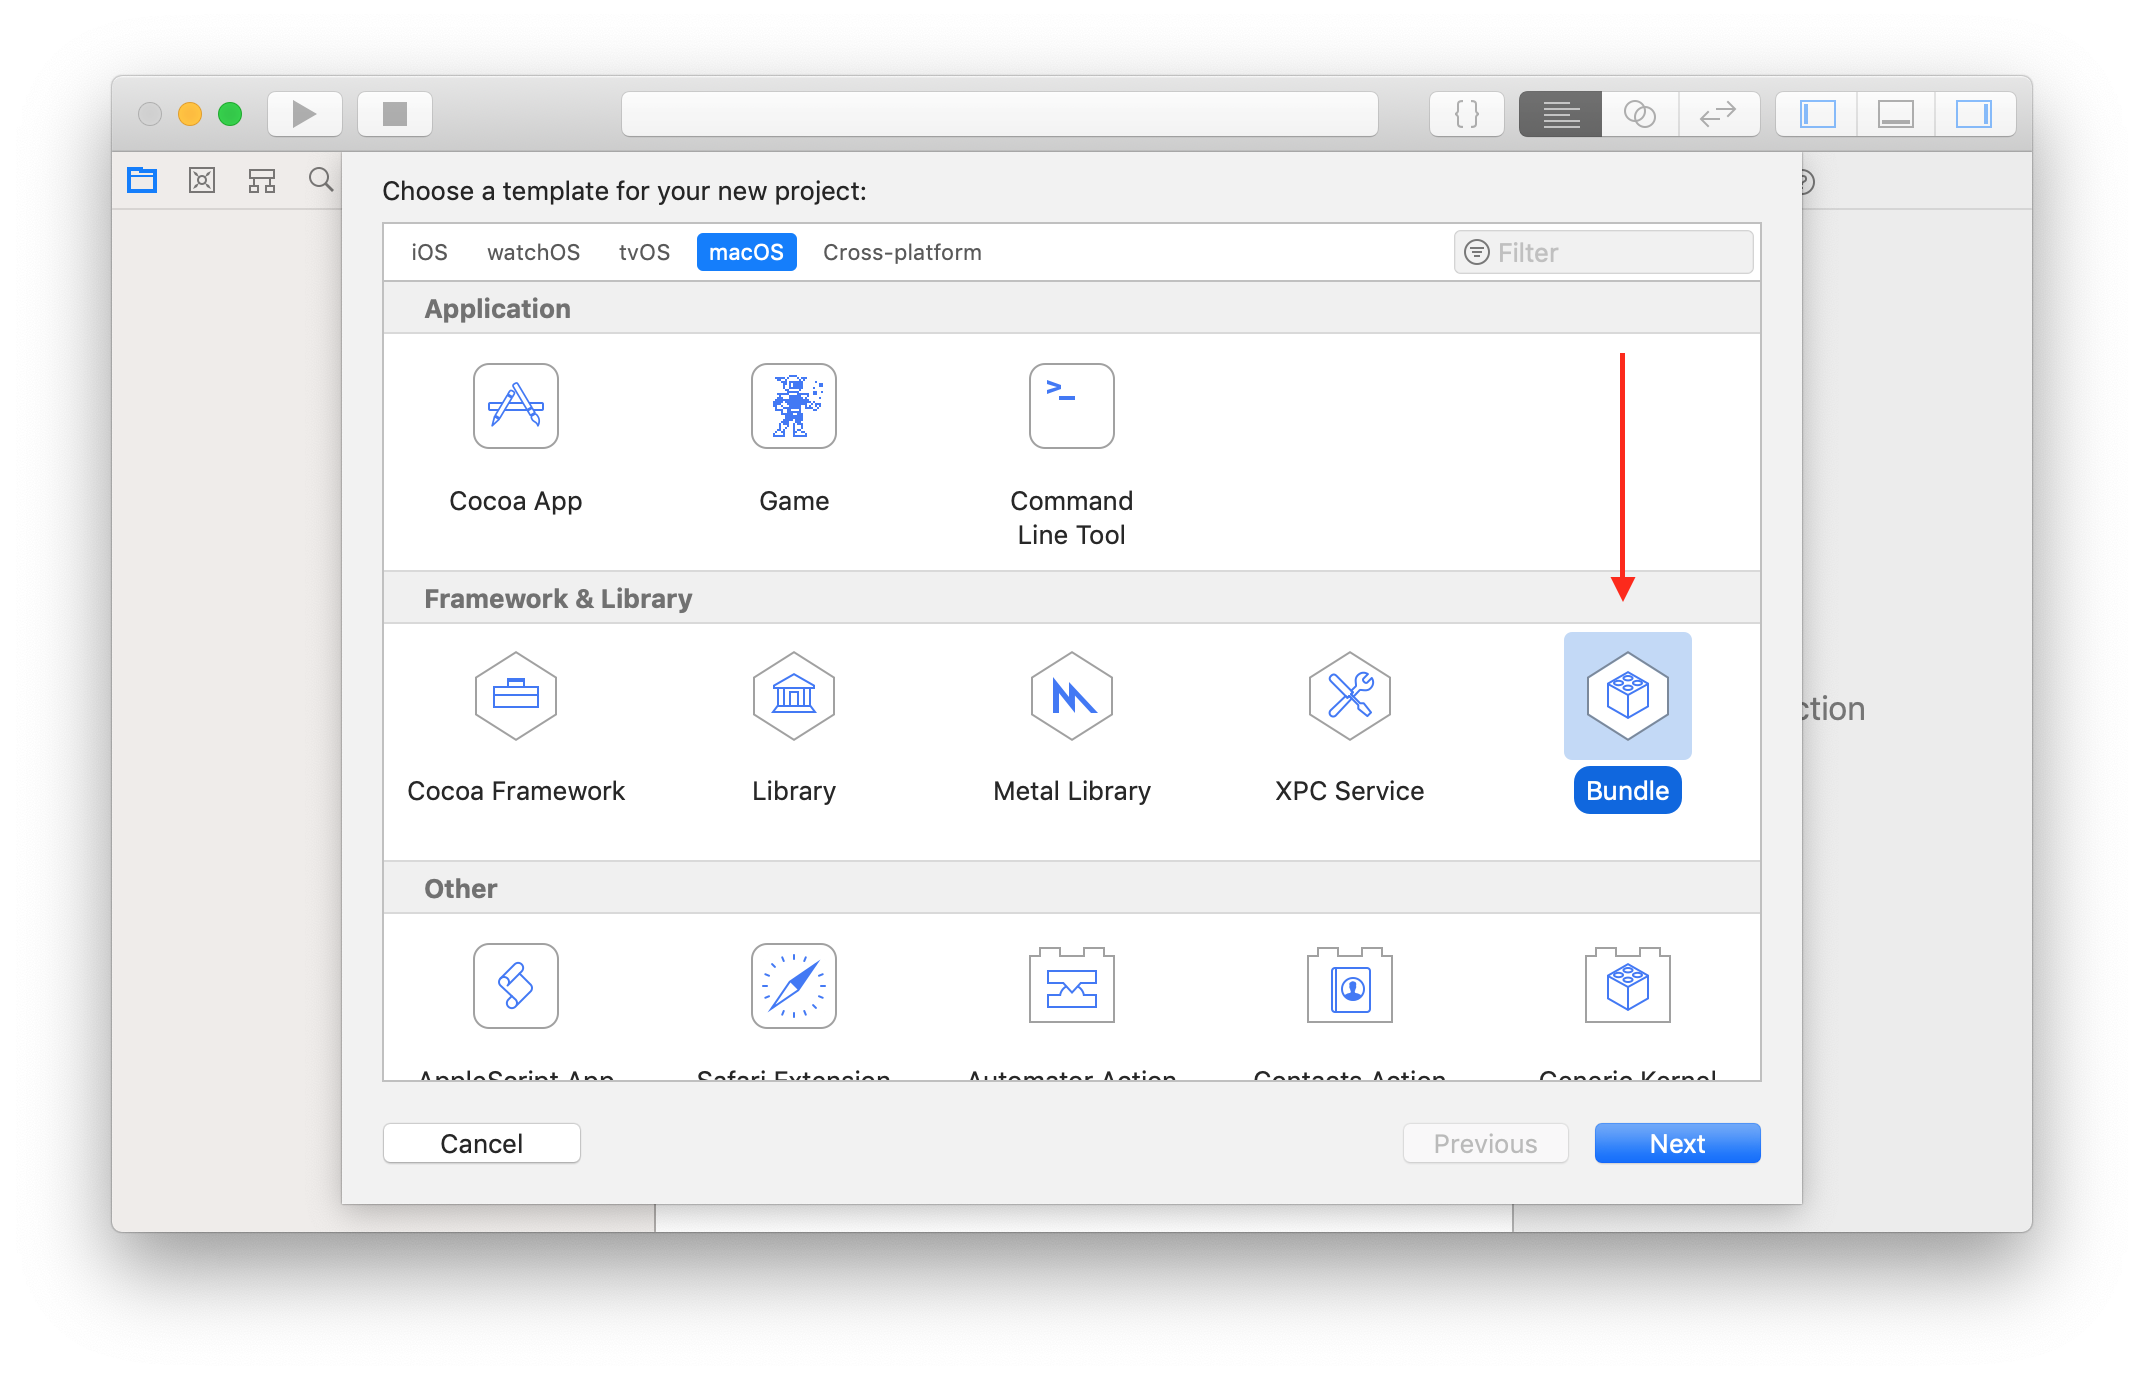
Create a new Xcode Project using the Bundle macOS template.
-
Go ahead and fill out the project options to your liking.
📌 Note: Make sure the Bundle Extension is set to
plugin.
-
Next step is to modify the build settings, so go ahead and find your way there. The only things we're interested in are:
- Setting the
ALWAYS_EMBED_SWIFT_STANDARD_LIBRARIEStoYes. - Setting the
INSTALL_PATHto$(USER_LIBRARY_DIR)/Application Support/MacDown/PlugIns/, which is where the MacDown plug-ins are located.
🤔 Why: The
ALWAYS_EMBED_SWIFT_STANDARD_LIBRARIESproperty ensures the required Swift standard libraries are embedded in our Swift plug-in, and we'll use theINSTALL_PATHin a post-action build script.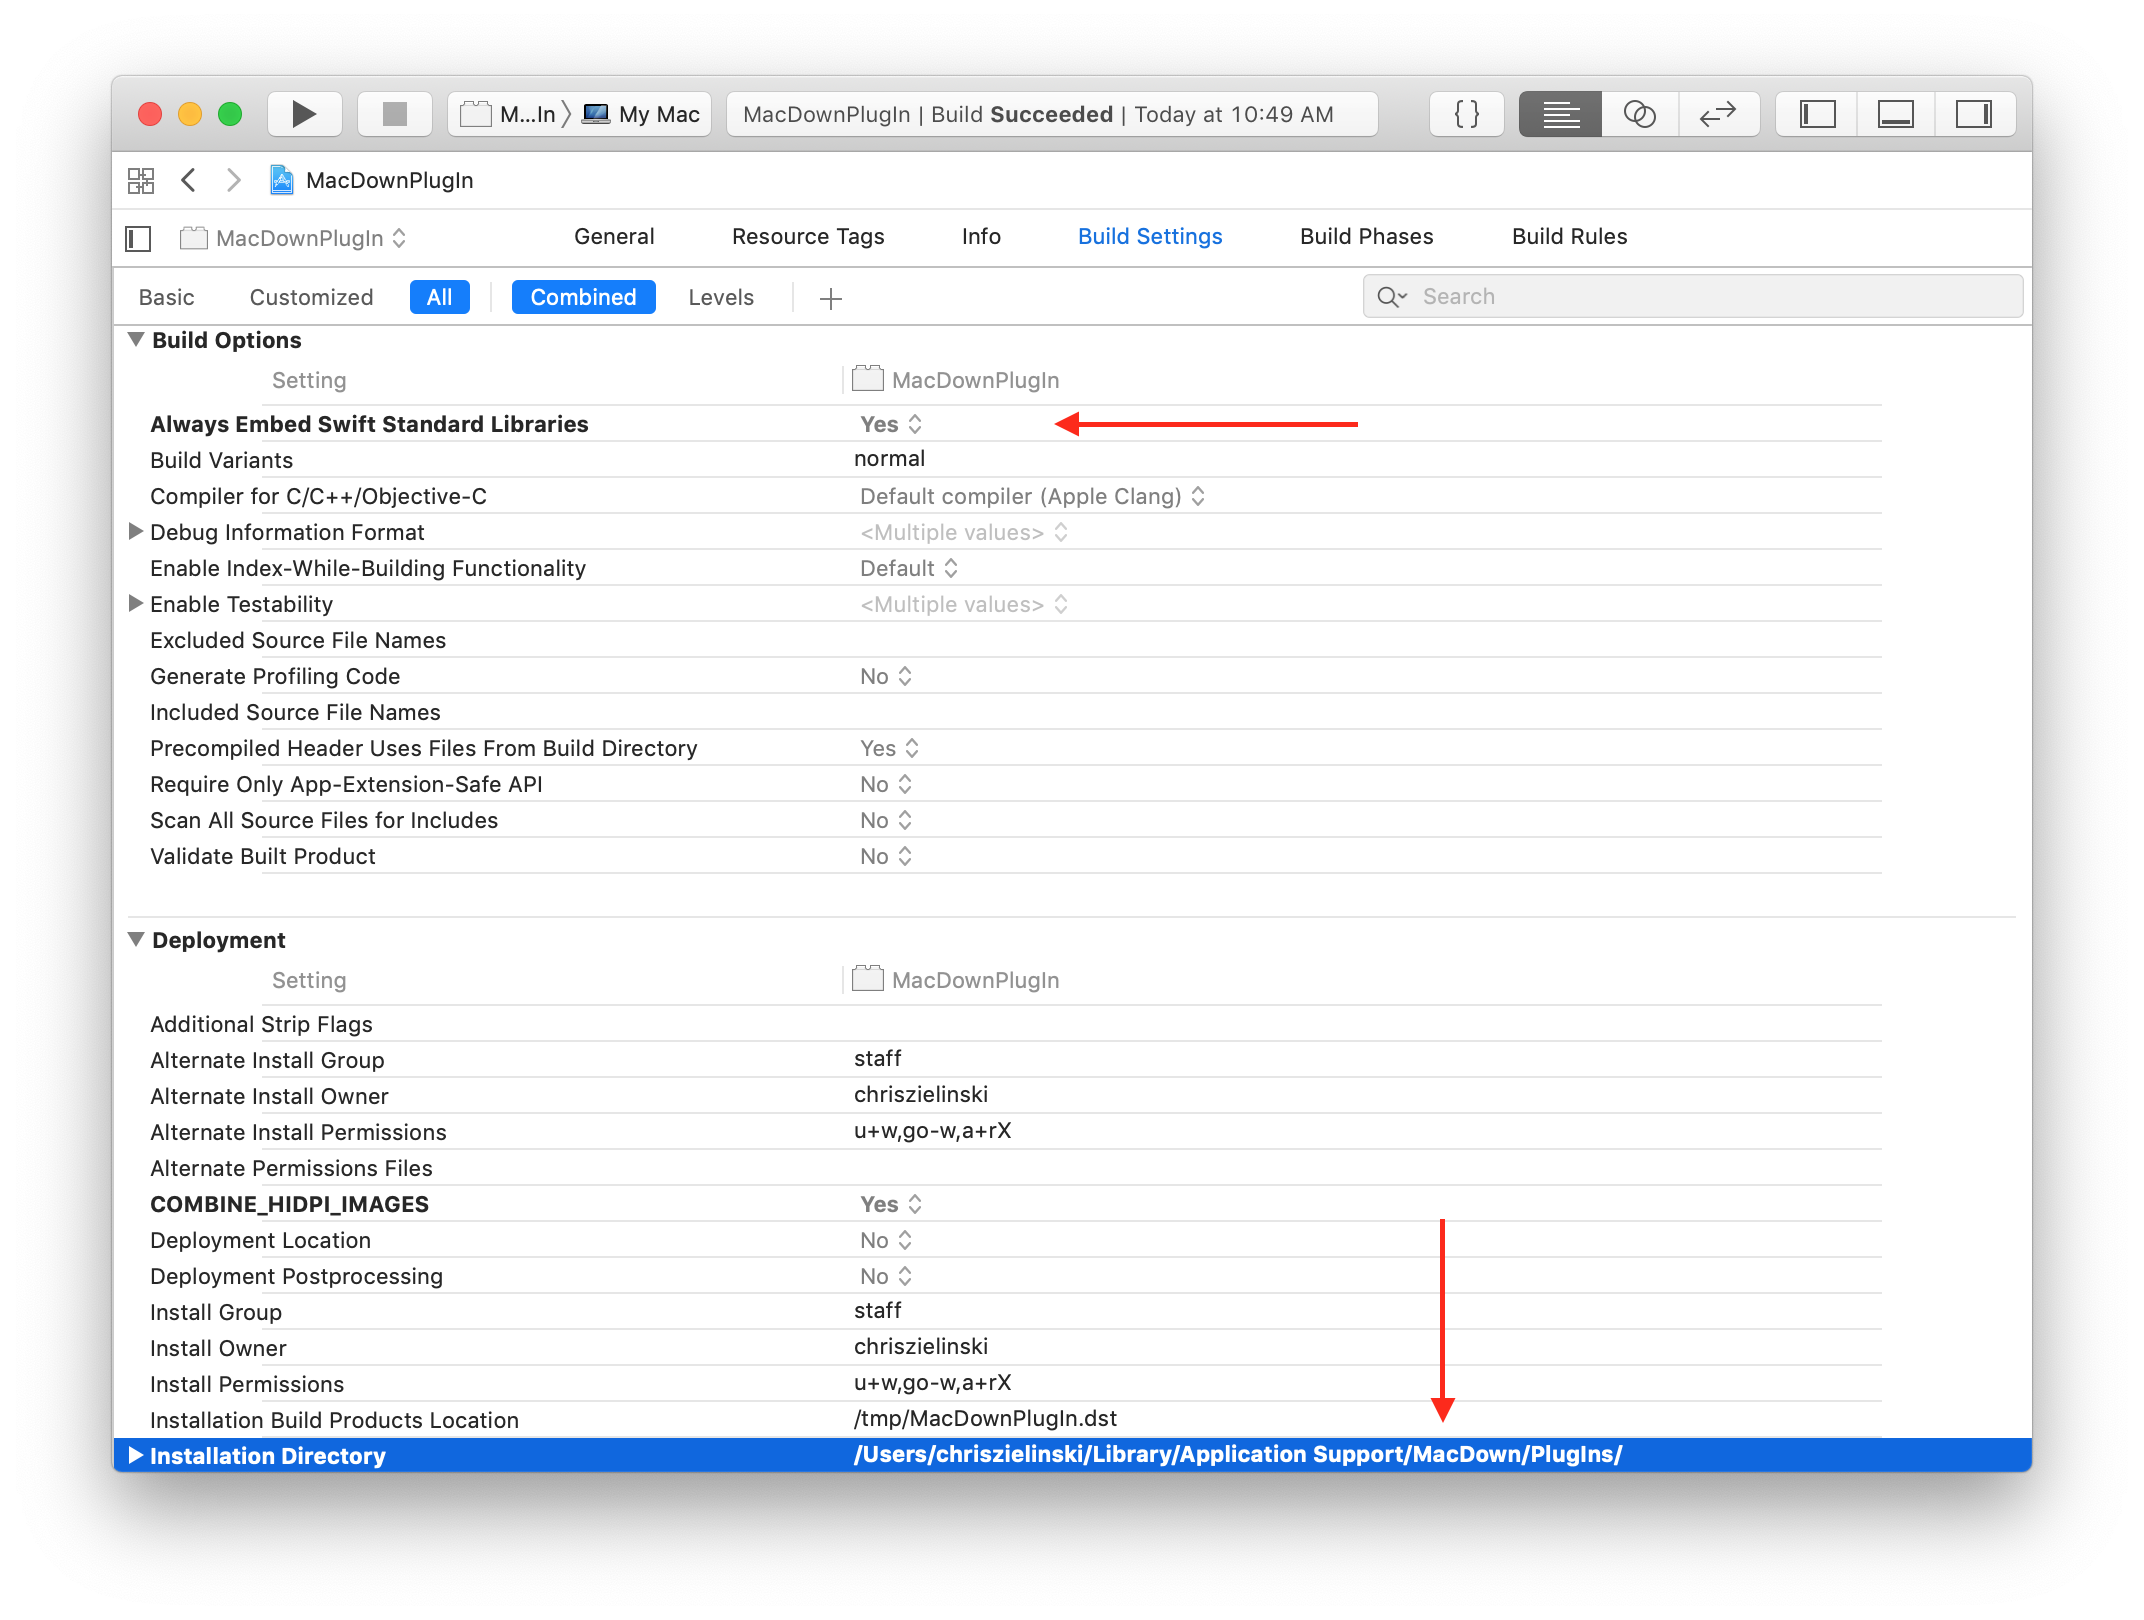
- Setting the
-
Now we'll modify our main scheme. Hold ⌥ option + click on the scheme, select the Run action, and set the executable to your local
MacDown.app(in the Executable pop-up button's menu, select Other... and navigate to and select the app).🔥 This will allow us to debug the plug-in using Xcode's Debugger.

-
Now reveal the Build action's sub-menu, select Post-actions, click the + in the lower left corner of the right panel, and add a New Run Script Action. Provide the build settings from the plug-in's target, and paste the following script:
🤔 Why: This step will copy our built plug-in to the MacDown's plug-in directory.
📣 Important: Make sure you set the
INSTALL_PATHbuild setting in step 3.# Allows us to see any script errors by running 'cat /tmp/xcode_build.log'. exec > /tmp/xcode_build.log 2>&1 # Change the directory to the project root. Necessary because some of the build setting paths are relative. cd "$SRCROOT" # Create the plug-in directory, if it doesn't exist. mkdir -p "$INSTALL_PATH" # Copy the plug-in to MacDown's plug-in directory. cp -rf "$BUILT_PRODUCTS_DIR/$FULL_PRODUCT_NAME" "$INSTALL_PATH"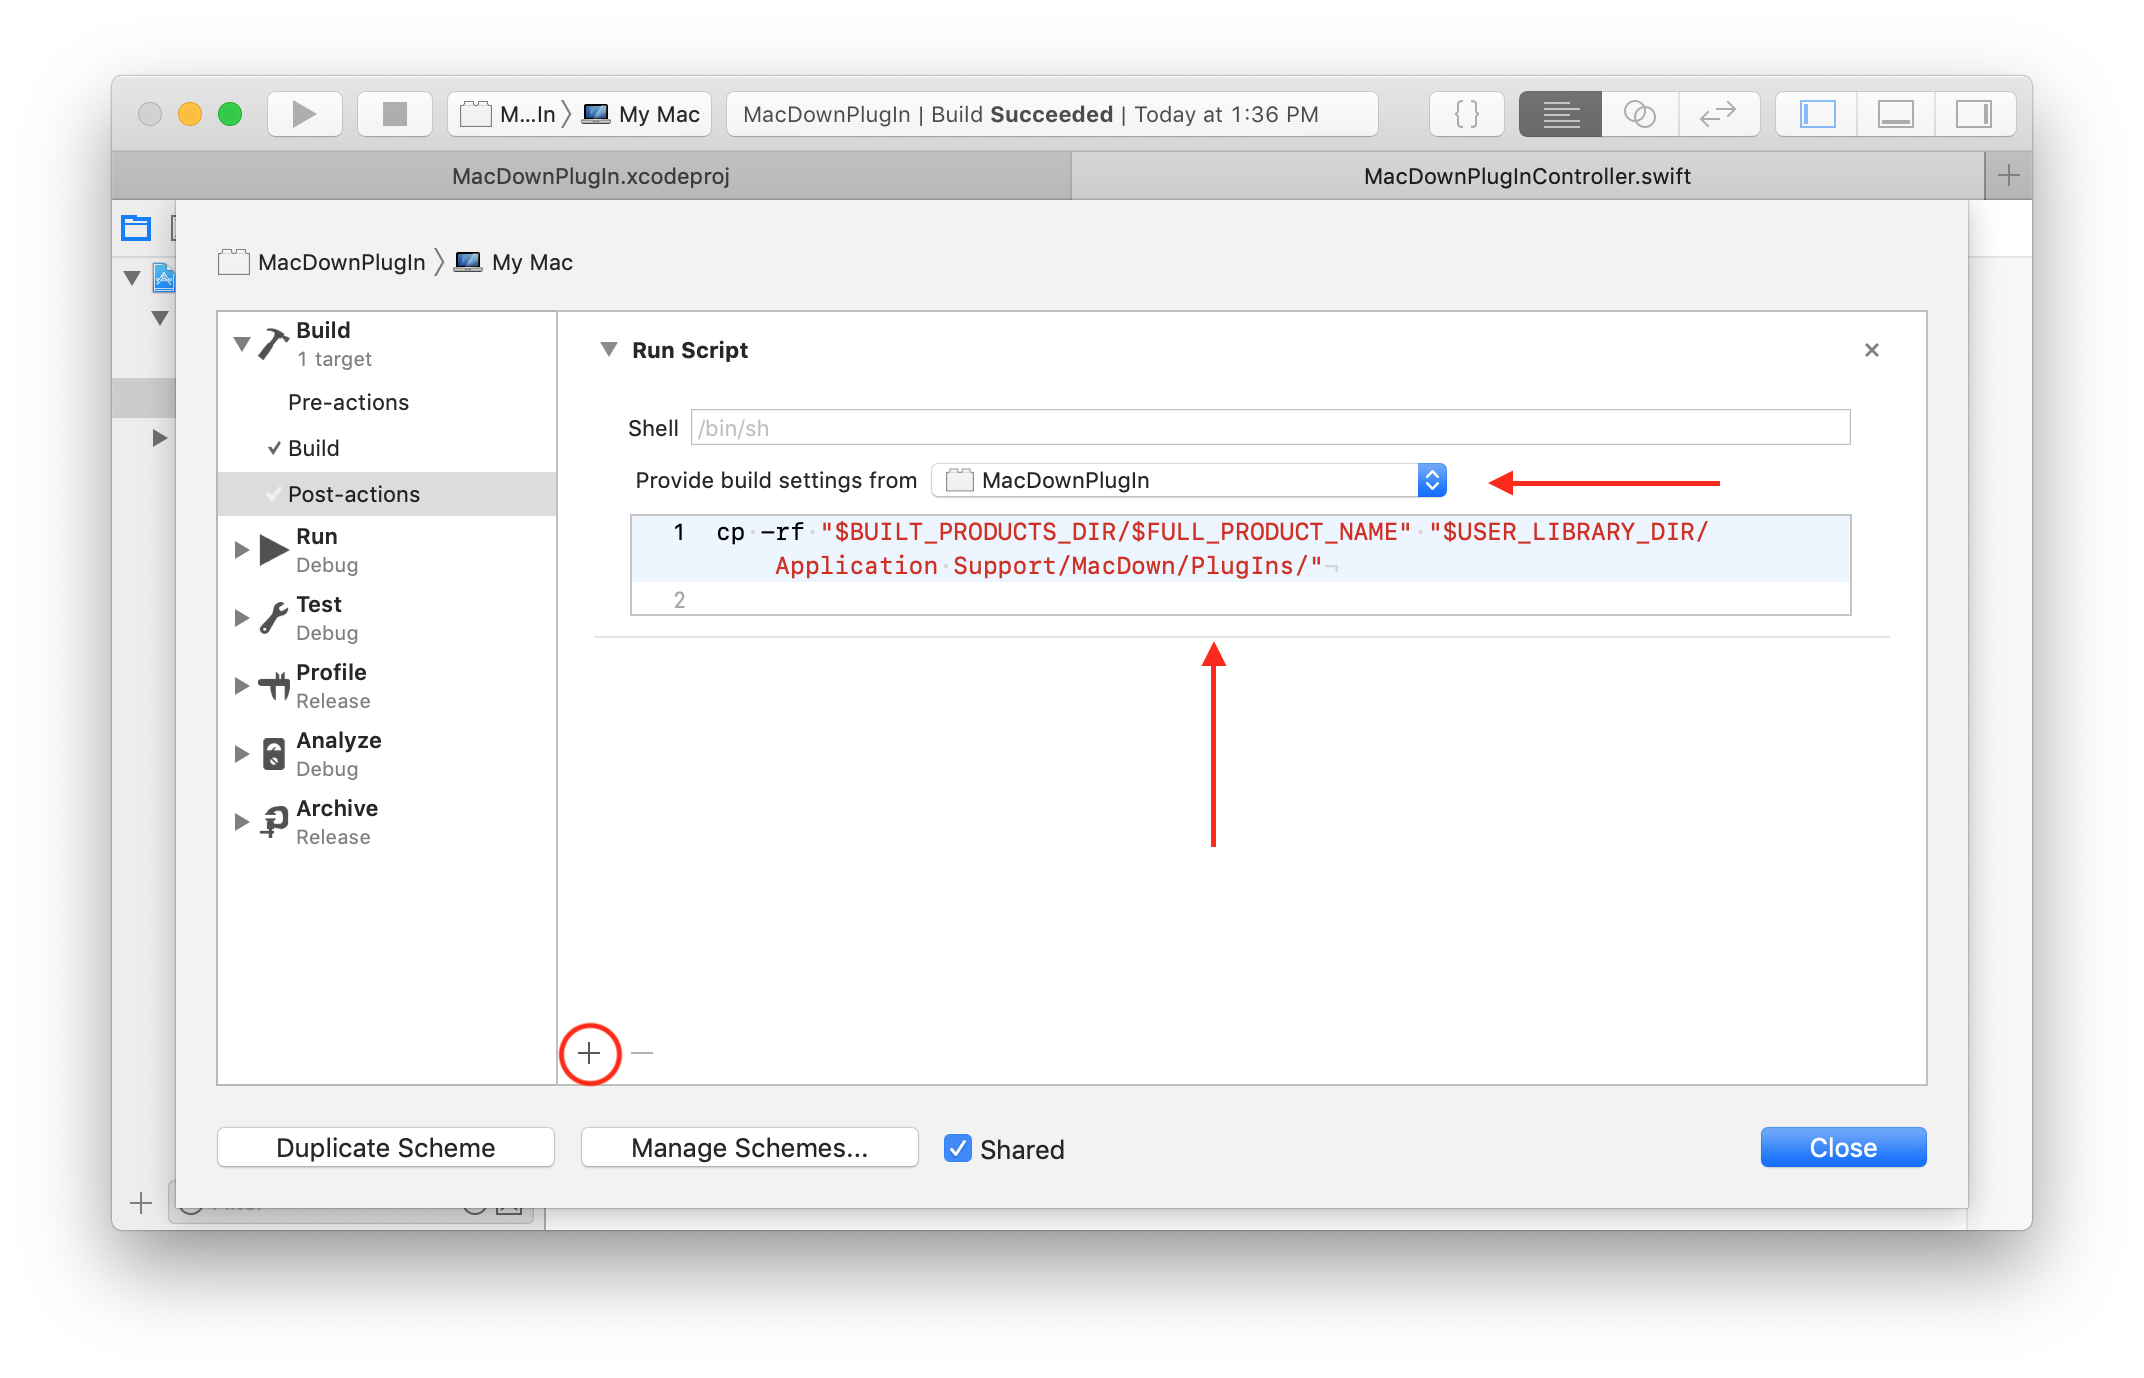
-
Create a new Swift file, we'll name it MacDownPlugInController.swift.
📌 Note: Upon creating the file, you should be prompted with the option to create an Objective-C Bridging Header. It's not necessary for the plug-in, so unless you plan on using it, you can select no.
This file/class will be the entry point to your plug-in, so must have the prescribed interface.
import AppKit

 // Subclassing a `NSObject` inherently exposes the class to the objective-c runtime, but it's better to be explicit.
 @objc(MacDownPlugInController)
 public class MacDownPlugInController: NSObject {

     /// The display name of the plug-in.
     ///
     /// MacDown will use the value returned by this method as the menu item’s title for your plug-in.
     @objc
     public var name: String {
         return "Cool 🔥"
     }

     /// This method will be invoked when your plug-in is run.
     ///
     /// This method may be invoked in the UI thread. Therefore, it is strongly recommended you push long operations into background threads, and/or run them asynchronously.
     ///
     /// - Parameter sender: The UI item that triggers the invocation—usually the `NSMenuItem` object the user clicked on, but could also be nil if the plug-in is triggered programmatically.
     /// - Returns: Whether the plug-in invocation succeeded.
     @objc(run:)
     public func run(sender: Any) -> Bool {
         guard let currentDocument = NSDocumentController.shared.currentDocument
             else { return false }

         let mpDocument = MPDocumentWrapper(mpDocument: currentDocument)
         mpDocument.updateEditorMarkdown(to: "Hello. 👋\n" + mpDocument.markdown)
         return true
     }

 }
But what is this
MPDocumentWrappernonsense? Great question. It's a Swift wrapper around MacDown'sMPDocumentclass that provides us with some incomplete interoperability. You can find theMPDocumentWrappersource file here. -
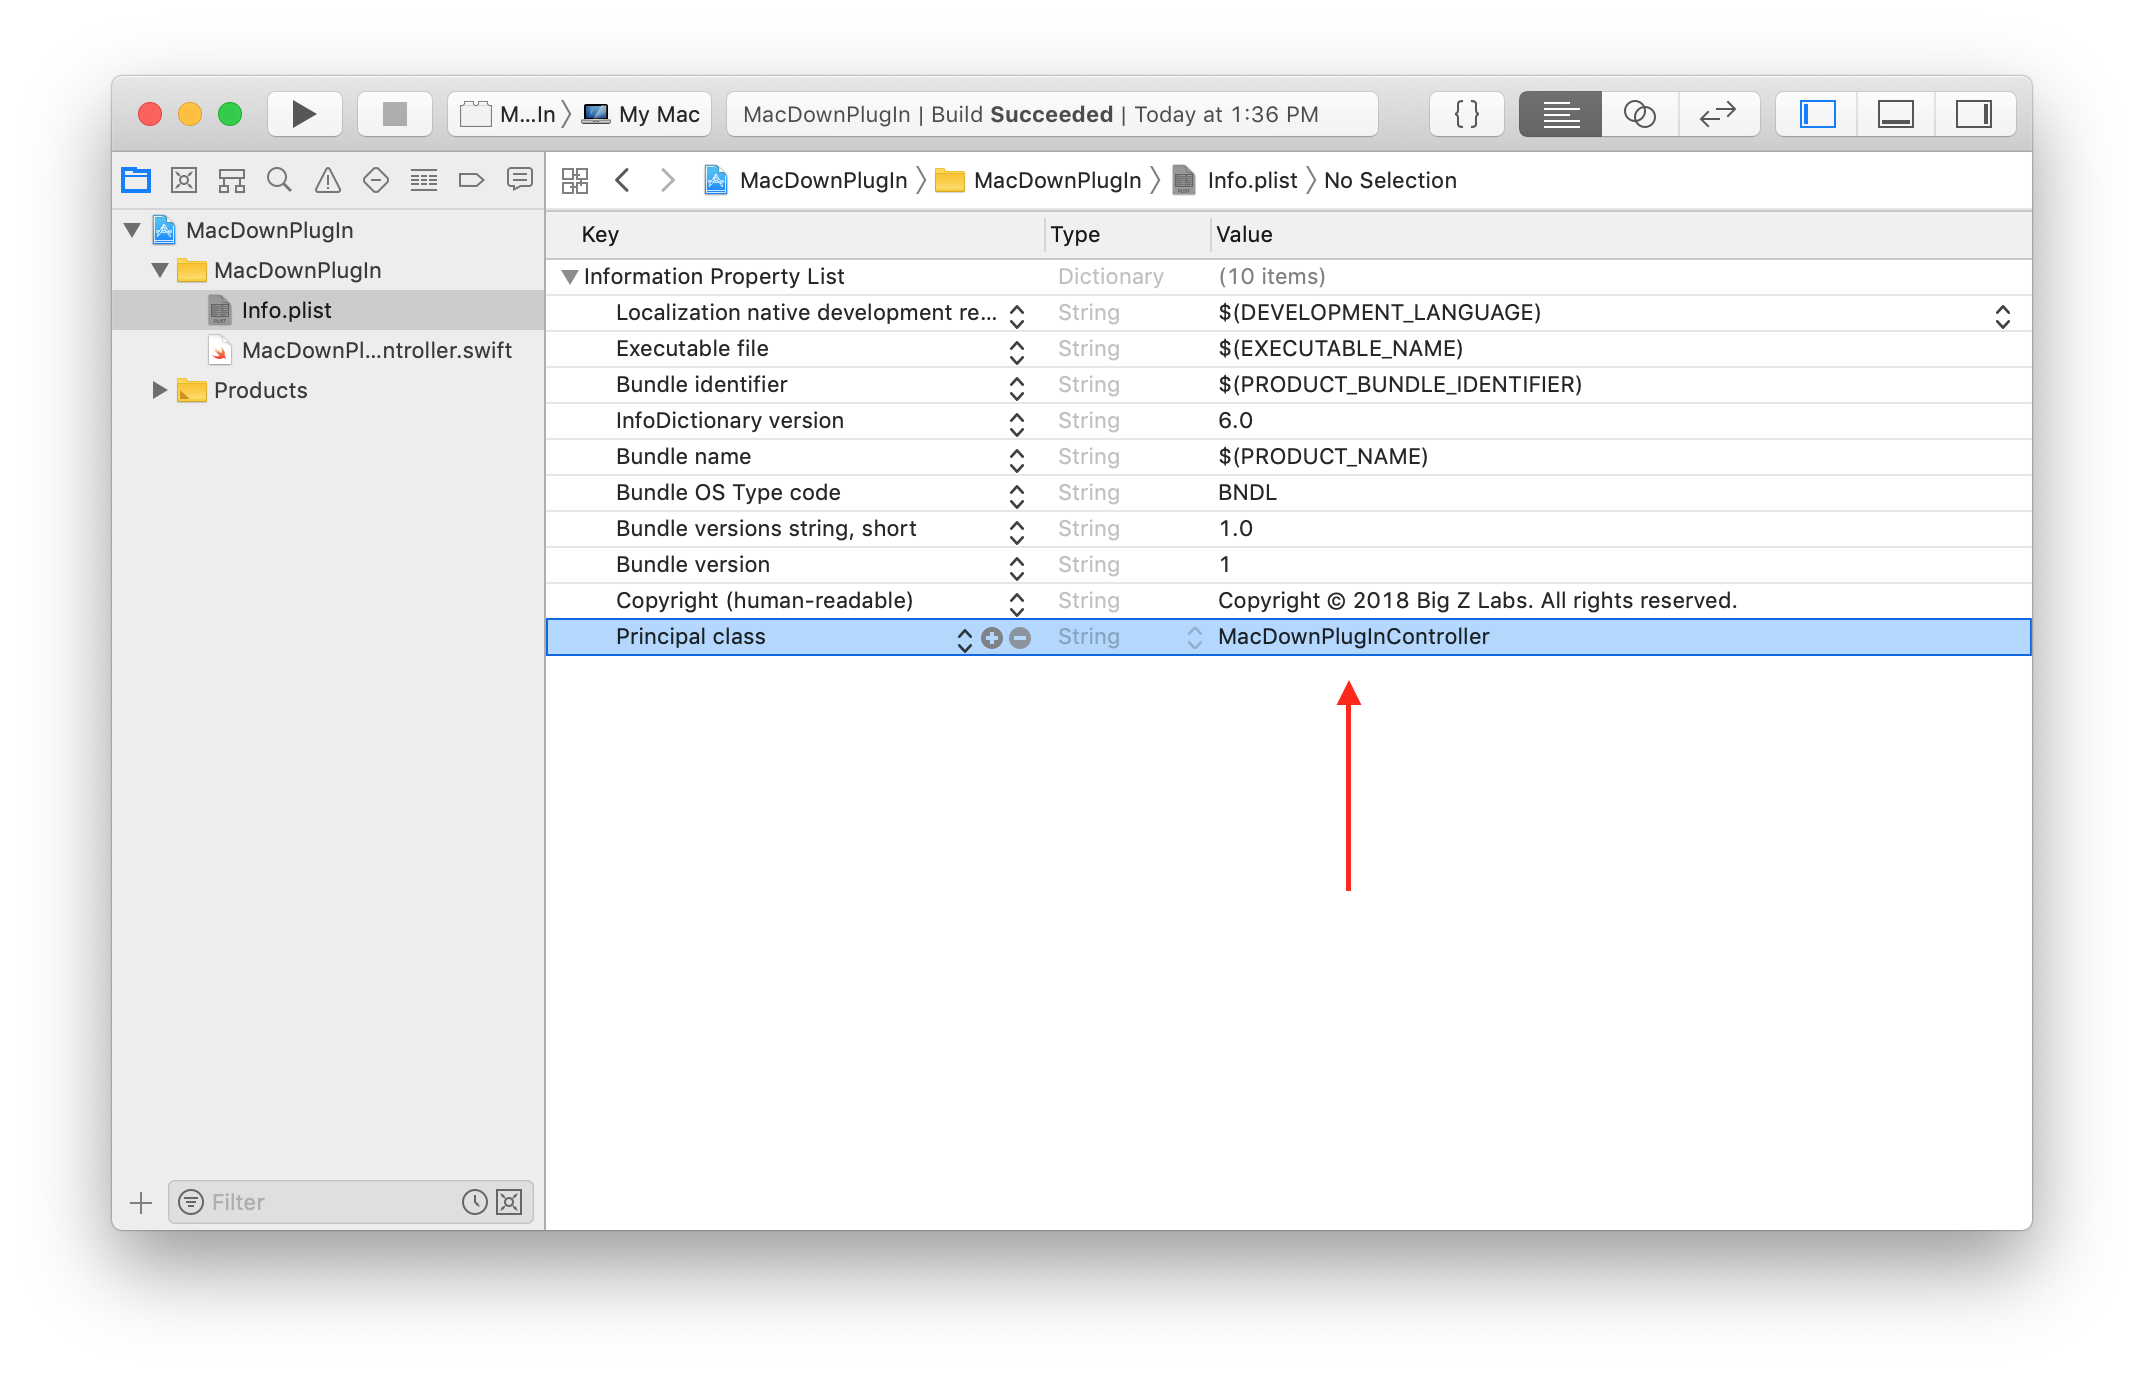
The final and most important step is to set the plug-in's principal class. Select the info.plist file, and set the Principal class field to the name of the class we created in the previous step.
Hit that beautiful play (run) button or ⌘ command + R, and you should be good to go.


