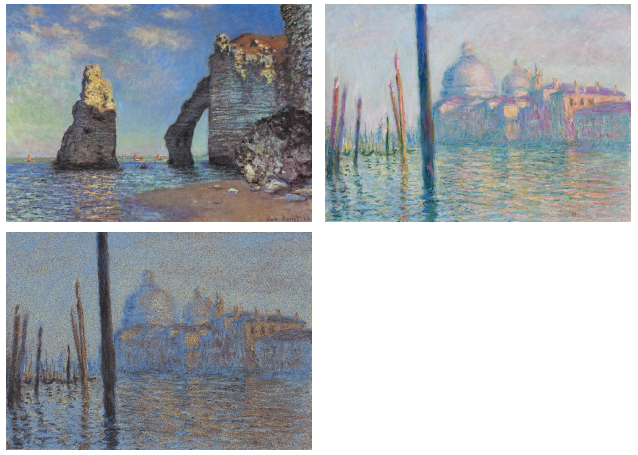
This program takes the pixels of one image and rearranges them to look like a 2nd image. This is done through a clever use of the process of annealing seen in Statistical Physics by modeling the difference in the color of the pixels in each image as a sort of Ising model. For accurate results on larger images, this program needs to run for several hours, because annealing is a slow process and typically the slower it is the more accurate results are achieved. For this reason, my final results were calculated using slurm on the Rivanna supercluster.
This program requires ROOT framework to be installed. On Ubuntu systems, ROOT can be installed by typing sudo snap install root-framework on the command line. For other systems, I recommend following the instructions at https://root.cern/install/.
This program uses a Makefile to compile. The program should be run by typing the following on the command line:
./simpix Images/SourceFileName.png Images/TargetFileName.png Output/OutputFileName.png
Although it can also be run by typing the following on the command line:
./simpix Images/SourceFileName.png Images/TargetFileName.png
Where the default output file name is "out.png" If you are using images with a resolution higher than 640x480 and have access to a supercluster, then I would suggest running it using a slurm file to run it. It is also important that both the source image and the target image have similar colored pixels so that the product will look nice.
I have included a few pairs of images that work well for this program. I have listed the pairs below:
frisbee_scott_stadium.png & rotunda_north_facade.png,
Claude_Monet_Le_Grand_Canal.png & Claude_Monet_The_Cliffs_at_Etretat.png,
remarkable_volcanic_eruption-wallpaper-640x480.png & amazing_asiatic_landscape_art-wallpaper-640x480.png
To use your own pair of images, simply place both into the "Images" directory and run the code using one as the source and the other as the target.
The current setup of the program is best for smaller images around 640x480, although the values of nt, ntherm, and nsweep on L201-L203 can be changed to produce better results for larger images if the output is not as good as for smaller images.
Because this program takes these images and moves the pixels around by modeling a physical process in statistical physics, the color difference between the output image and the target image is recorded as the "energy" of the system. For each step in the annealing process, the "energy" or color difference and the "temperature" or the probability of pixel fluctuations are recorded in this file. The data from this file can be plotted to see that the "energy" does indeed minimize.
The output of the program will be a file named "xcollage.png". This file will include the source image in the top left, the target image in the top right, and the output image in the bottom left. The output image will also be created as "out.png" unless otherwise specified in the command line. Both of these png files will be placed in the "Output" directory.
Both final_out1.png and final_out2.png are both the final results of running this program on the two input images Claude_Monet_Le_Grand_Canal.png and Claude_Monet_The_Cliffs_at_Etretat.png, each with one as the "source" image and the other as the "target" image. Both final_collage1.png and final_collage2.png contain three images each. The top left is the "source" image, the top right is the "target" image, and the bottom left is the output image i.e. the "source" image's pixels rearranged to look like the "target" image. This is the result of running a job on the Rivanna supercluster.
In the future, I plan on adding a dynamic canvas that pops up and shows the thermalization in real-time. This would make it more apparent what is exactly happening and how the product is being created.
