This project aims to provide the information needed to build an ARGUS-like coastal monitoring system based on the Raspberry Pi computer board. Both the Raspberry Pi High Quality Camera and FLIR machine vision cameras are supported.
This a continuation and update to the system deployed at the Figure 8 pools site, which was detailed in this paper and was operational for over an year.
The image below was captured at Boomerang Beach (New South Wales) in early 2019 year with a very similar similar set-up to the one described in this repository.

- Introduction
- Table of Contents
- 1. Hardware
- 2. Software
- 3. Image Capture Configuration File
- 4. Capturing Frames
- 5. Camera Calibration
- 6. Post-processing
- 7. Experimental Features
- 8. Known issues
- 8. Future improvements
- 9. Disclaimer
This tutorial assumes that you have some familiarity with the Linux command line and at least some basic understanding of python programming.
This project has been developed using a Raspberry Pi Model 4 B with 4Gb of memory. Better results may be achieved using the new Raspberry Pi 4 with 8Gb.
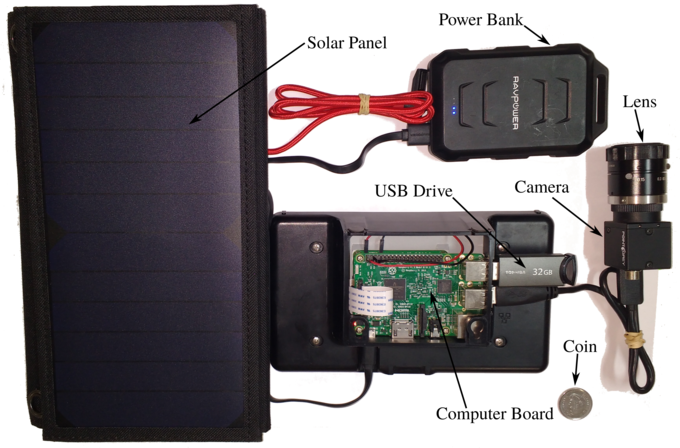
The components of the system are:
- Raspberry Pi board
- Raspberry Pi 7in display
- Raspberry Pi display case
- 16Gb+ SD card
- Keyboard
- Mouse
- External storage. In this case a 32Gb USB stick.
- [Optional] 4G modem for email notifications.
- [Optional] Battery bank
- [Optional] Solar panel
Assembly should be straight forward but if in doubt, follow the tutorials from the Raspberry Pi Foundation:
Our camera of choice is the Flea 3 USB3 3.2 MP model. The implementation provided here should also work with any FLIR machine vision USB3 camera.
For this project, we used a Tamron 8mm lens. Note that you will need a C to CS mount adaptor if your camera has a CS mount and your lens has a C mount.
After assembly, you should have something similar to the system below.
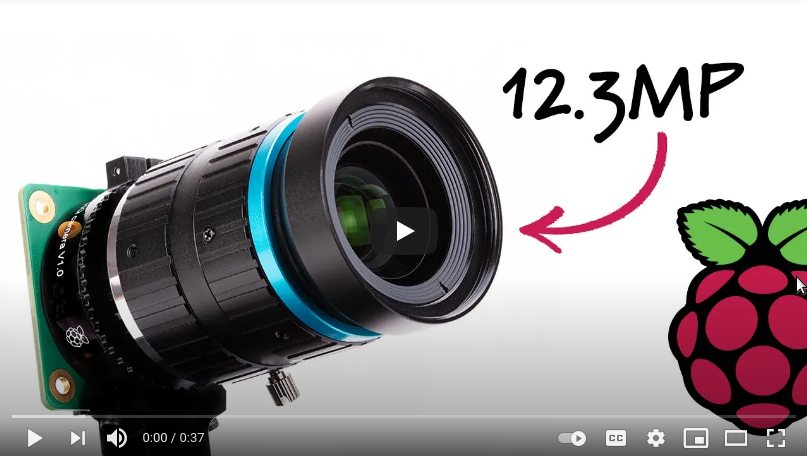
In 2020, the Raspberry Pi foundation released the High Quality Camera for the Pi. This camera allows to use any type of lens which is perfect for our project. This camera costs around 75 USD and is much easier to use and program than the FLIR cameras. Everything is also open-source. Because the hardware only costs a fraction of the FLIR's camera, do not expect the same quality.
FLIR recommends Ubuntu for working with their cameras. Unfortunately, the full version of Ubuntu is too demanding to run on the Raspberry Pi 4. Therefore, we recommend Ubuntu Mate 20.04.
If you are interest in using only Raspberry Pi's HQ camera, Raspberry Pi OS is a much lighter option and usually comes pre-installed with the board. Note that FLIR's cameras won't play well with Raspberry Pi OS (at least in our experience).
On a separate computer,
- Download the appropriate Ubuntu Mate image from here.
- Use Fletcher to flash the image to the SD card.
Insert the SD card in the Raspberry Pi and connect to mains power.
If everything worked, you will be greeted by Ubuntu Mate's installer. Simply follow the installer's instructions and finish the install. If everything goes correctly, the system will reboot and you will be greeted by the welcome screen.
For this tutorial, we only created one user named pi.

Before installing FLIR's software, there are several package dependencies that need to be installed.
First update your Ubuntu install:
sudo apt update
sudo apt dist-upgrade
This will take a while to finish. Go grab a coffee or a tea.
Next, install the build-essentials package:
sudo apt install build-essentialNow install the required dependencies:
sudo apt install libusb-1.0-0 libpcre3-devFinally, install GIT in order to be able to clone this repository.
sudo apt install gitSpinnaker is the software responsible for interfacing the camera and the computer. Download Spinnaker from here. Make sure to download the correct version (Ubuntu 20.04, armhf)
Open the folder where you downloaded Spinnaker and decompress the file.
Now, open a terminal in the location of the extracted files and do:
sudo sh install_spinnaker_arm.shFollow the instructions in the prompt until the installation is complete.
Note: You may fall into a dependency loop here. Pay close attention to
the outputs in the prompt after running the installer. If in trouble, apt
can help you:
sudo apt install -f --fix-missingFrom FLIR's README file, it is also recommend to increase the size of USB stream from 2Mb to 1000Mb. To do this, do not follow their instructions as they will not work for Raspberry Pi Based systems. Instead do:
sudo nano /boot/firmware/cmdline.txtAdd to the end of the file:
usbcore.usbfs_memory_mb=1000
Set the FLIR_GENTL32_CTI environment variable:
cd ~
nano .bashrc
Add to the end of the file:
export FLIR_GENTL32_CTI=/opt/spinnaker/lib/flir-gentl/FLIR_GenTL.cti
Reboot your Raspberry Pi and check if it worked with:
cat /sys/module/usbcore/parameters/usbfs_memory_mb
Should display 1000.
echo $FLIR_GENTL32_CTI
Should display /opt/spinnaker/lib/flir-gentl/FLIR_GenTL.cti.
Connect your camera, open a new terminal and launch Spinnaker GUI:
spinviewI everything went well, you should see your camera in the USB Interface panel on the left.

We will not use Spinview too much in this project but it is a useful tool to debug your camera. Please check Spinnaker documentation regarding Spinview usage.
It is recommend to use python 3.8 with PySpin. Fortunately, it comes pre-installed with Ubuntu Mate.
Before installing FLIR's python interface, make sure the following dependencies are met:
sudo apt install python3-pipsudo python3 -m pip install --upgrade pip numpy matplotlib Pillow==7.0.0 natsortInstall OpenCV.
sudo apt install python3-opencvFinally, download FLIR's python wheel from here and install it.
sudo python3.8 -m pip install spinnaker_python-2.3.0.77-cp38-cp38-linux_armv7l.whlYou probably already have everything you need if you installed FLIR's dependencies. If not, just make sure to install everything you need:
sudo python3 -m pip install numpy matplotlib natsort "picamera[array]"OpenCV:
sudo apt install python3-opencvWith this camera, we can actually encode video, so make sure to have the latest versions of h.264 and ffmpeg.
sudo apt install x264 ffmpeg
Much easier!
The configuration file to drive a capture cycle is in JSON format:
It's very hard to program FLIR's cameras, so I will only provide basic options here. You will need to manually add code to capture.py in order to expand the options.
{
    "data": {
        "output": "/mnt/data/",
        "format": "jpeg",
        "hours": [5, 6, 7, 8, 9, 10, 11, 12, 13, 14, 15, 16, 17, 18]
    },
    "capture": {
        "duration": 20,
        "framerate": 2,
        "resolution": [1920, 1080],
        "offset": [80, 236]
    },
    "stream": {
        "framerate": 30,
        "resolution": [640, 480]
    },
    "post_processing": {
        "notify": true,
    }
}
This file can be saved anywhere in the system and will be read any time a camera operation takes place.
This camera provides a lot more options, such as ISO and a handy beach exposure mode.
{
    "data": {
        "output": "/mnt/data/",
        "format": "jpeg",
        "hours": [5, 6, 7, 8, 9, 10, 11, 12, 13, 14, 15, 16, 17, 18]
    },
    "capture": {
        "duration": 20,
        "framerate": 10,
        "resolution": [1920, 1080]
    },
    "stream": {
        "framerate": 30,
        "resolution": [640, 480]
    },
    "exposure": {
        "mode": "beach",
        "set_iso": false,
        "iso": 300
    },
    "h264": {
        "quality": 25,
        "sei": true,
        "sps_timing": true

    },
    "post_processing": {
        "extract_frames": true,
        "only_last_frame": false,
        "notify": true,
    }
}
JSON Options:
Explanation of the configuration parameters above:
Streaming and Capturing:
output: The location to where to write the frames. Sub-folders will be created based on the hour of the capture cycle.framerate: The capture frequency rate in frames per second.duration: Capture cycle duration in seconds.resolution: Image size for capturing or streaming.offset_x: Offset in the x-direction from the sensor start [FLIR only].offset_y: Offset in the y-direction from the sensor start [FLIR only].capture_hours: Capture hours. If outside these hours, the camera does not grab any frames.image_format: Which format to write the frames.
Exposure and ISO:
exposure: Exposure mode for the HQ camera. Defaults tobeach.set_iso: Set ISO mode for the HQ camera. Defaults tofalse.iso: Set a manual ISO value for the HQ camera.
H.264 options:
quality: Set stream quality level. Defaults to 25 (high).sei: Enhanced information forh.264encoding.sps_timing: Frame timings forh.264encoding.
Post-processing:
notify: will send an e-mail (see below).average: will create an average image.deviation: will create the deviation image.
Warning: This will require that you store a gmail user name and password in
plain text in your system. I strongly recommend to use an accounted that you
create exclusively for using the cameras.
After creating the account, create a hidden file named ".gmail" in your home folder with the login and password.
cd ~
nano .gmail
Add the following contents:
{
    "credentials": {
      "login": "[email protected]",
      "destination": "[email protected]",
      "password": "somepassword"
    },
    "options": {
      "send_log": true,
      "send_last_frame": true,
      "send_average": false,
      "send_deviation:": false
    }
}
To save and exit use ctrl+o + ctrl+x.
Make sure to change gmail's security settings to allow you to send emails using python.
First, make sure you have the appropriate code. Clone this repository with:
cd ~
git clone https://github.com/caiostringari/PiCoastal.git picoastalThis is useful to point the camera in the right direction, to set the focus, and aperture.
To launch the stream do:
cd ~/picoastal
python3 src/flir/stream.py -i src/flir/config_flir.json > stream.log &cd ~/picoastal
python3 src/rpi/stream.py -i src/rpi/config_rpi.json > stream.log &It is also useful to create a desktop shortcut to this script so that you don't need to use the terminal every time.
cd ~/Desktop
nano stream_flir.desktop
[Desktop Entry]
Version=1.0
Type=Application
Terminal=true
Exec=python3 /home/pi/picoastal/src/flir/stream.py -i /home/pi/picoastal/src/flir/config_flir.json
Name=PiCoastal Stream
Comment=PiCoastal Stream
Icon=/home/pi/picoastal/doc/camera.png
To save and exit use ctrl+o + ctrl+x.
To use the HQ Camera, just change flir to rpi in the commands above.
The main capture program is capture.py. To run a single capture cycle, do:
cd ~/picoastal/
python3 src/flir/capture.py -i capture.json > capture.log &
Similarly, it's useful to create a Desktop shortcut. For example:
[Desktop Entry]
Version=1.0
Type=Application
Terminal=true
Exec=python3 /home/pi/picoastal/src/flir/capture.py -i /home/pi/picoastal/src/flir/config_flir.json
Name=PiCoastal Capture
Comment=PiCoastal Capture
Icon=/home/pi/picoastal/doc/camera.png
The recommend way to schedule jobs is using cron.
First we need to create a bash script that will call all the commands we
need need within a single capture cycle. One example would be:
#/bin/bash
# This is the main capture script controler

# create log dir
mkdir -p "/home/pi/logs/"

# Export this variable
export FLIR_GENTL32_CTI=/opt/spinnaker/lib/flir-gentl/FLIR_GenTL.cti

# Define where your code is located
workdir="/home/pi/picoastal/src/"
echo "Current work dir is : "$workdir

# Get the current date
date=$(date)
datestr=$(date +'%Y%m%d_%H%M')
echo "Current date is : "$date

# Your configuration file
cfg="/home/pi/picoastal/src/flir/config_flir.json"
echo "Capture config file is : "$cfg

# Your email configuration
email="/home/pi/.gmail"
echo "Email config file is : "$email

# Change to current work directory
cd $workdir

# Current cycle log file
log="/home/pi/logs/picoastal_"$datestr".log"
echo "Log file is : "$log

# Call the capture script
script=capture.py
echo "Calling script : "$script
python3 $workdir/flir/$script -cfg $cfg > $log 2>&1
echo $(<$log)

# Optional Post-processing

# statistical images
capdate=$(date +'%Y%m%d_%H%00')
python3 $workdir/post/average.py -i "/mnt/data/$capdate/" -o "average_$datestr.png"
python3 $workdir/post/variance.py -i "/mnt/data/$capdate/" -o "variance_$datestr.png"
python3 $workdir/post/brightest_and_darkest.py -i "/mnt/data/$capdate/" -b "brightest_$datestr.png" -d "darkest_$datestr.png"

# rectified images
python3 $workdir/post/rectify.py -i "average_$datestr.png" -o "average_rect_$datestr.tif" -gcps "xyzuv.csv" --camera_matrix "camera_matrix.json" --epsg "12345" --bbox "xmin,ymin,dx,dy"
python3 $workdir/post/rectify.py -i "variance_$datestr.png" -o "variance_$datestr.png" -gcps "xyzuv.csv" --camera_matrix "camera_matrix.json" --epsg "12345" --bbox "xmin,ymin,dx,dy"
python3 $workdir/post/rectify.py -i "brightest_$datestr.png" -o "brightest_rect_$datestr.tif" -gcps "xyzuv.csv" --camera_matrix "camera_matrix.json" --epsg "12345" --bbox "xmin,ymin,dx,dy"
python3 $workdir/post/rectify.py -i "brightest_$datestr.png" -o "brightest_rect_$datestr.png" -gcps "xyzuv.csv" --camera_matrix "camera_matrix.json" --epsg "12345" --bbox "xmin,ymin,dx,dy"

# timestack
python3 src/post/timestack.py -i "/mnt/data/$capdate/" -o "timestack_$datestr.nc" -gcps "xyzuv.csv" --camera_matrix "camera_matrix.json" --stackline "x1,y1,x2,y2"

# Call the notification
script=notify.py
attachment=$(tail -n 1 $log)
echo $attachment
echo "Calling script : "$script
python3 $workdir$script -cfg $email -log $log -a $attachment
To add a new job to cron, do:
crontab -eIf this is your first time using crontab, you will be asked to chose a
text editor. I recommend using nano. Add this line to the end of the file:
0 * * * * bash /home/pi/picoastal/src/cycle_flir.sh
To save and exit use ctrl+o + ctrl+x.
Controlling the cameras remotely is quite easy. All you need to do is to make sure you have RealVNC installed both in the Raspberry Pi and in your phone. By default, Raspberry Pi Os has VNC installed, on Ubuntu you will need to install it by yourself. Tip: Create a hot spot using a second phone and connect both your main phone and the raspberry to the network to control it in the field.
Properly calibrating a camera is hard! To try to make it easier, the ChArUco calibration model is recommended here. This method is advantageous over the traditional chessboard method because each marker on the calibration board can be tracked individually.
Each ChArUco board is unique. To create one with the default configuration, do:
python src/calibration/create_ChArUco_board.pyThe result is is as follows:

There are several parameters that can be set. Use create_ChArUco_board.py --help for details. Make sure to take note of which parameters were used to create the board because you will need to know then later!
To calibrate the camera from a series of images, do:
python src/calibration/calib_ChArUco_offline.py - i "input_images/" -o "camera_parameters.pkl|json"Again, there are several parameters that can be set. Use calib_ChArUco_offline.py --help for details.
To calibrate the FLIR camera on-the-fly, do:
python src/calibration/ChArUco_online_calibration_flir.py - i "config.json" -o "camera_parameters.pkl|json"To calibrate the Raspberry Pi camera on-the-fly, do:
python src/calibration/ChArUco_online_calibration_rpi.py - i "config.json" -o "camera_parameters.pkl|json"As usual, there are several parameters that can be set. Use ChArUco_online_calibration_flir|rpi.py --help for details. The most import thing for camera calibration is to use the same board parameters as used for create_ChArUco_board.py
To investigate the results of a camera calibration do:
python src/calibration/show_calib_results.py -i "calibration.pkl" -o "result.png"Post processing is usually too computationally expensive to run on the Raspberry Pi. However, some tools will be available here.
To compute an average (or time exposure) image you need to install some extra packages:
sudo apt install python3-scipy
sudo python3 -m pip install scikit-image tqdm
To compute the average, we use the average.py script. Using the sample data provided in data/boomerang/:
cd ~/picoastal/
python3 src/post/average.py -i "data/boomerang" -o "average.png"
To compute an variance image you need to install another extra packages:
sudo python3 -m pip install welfordThis package allows us to use Welford's method and save memory. To compute the variance, we use the variance.py script. Using the sample data provided in data/boomerang/:
cd ~/picoastal/
python3 src/post/variance.py -i "data/boomerang" -o "variance.png"
The results should look like this:
| Average | Variance |
|---|---|
 |
 |
To find the brightest and darkest images, use the variance.py script:
cd ~/picoastal/
python3 src/post/brightest_and_darkest.py -i "data/boomerang" -b "brightest.png" -d "darkest.png"
The result should look like this:
| Brightest | Darkest |
|---|---|
 |
 |
This scripts converts the images to the HSV colour space and looks for the images with summed highest and lowest brightness (i.e., the V in the HSV).
Warning: I do not recommend running this program on the Raspberry pi. It's possible to do so, but everything will take forever and, unless you have a pi with 4Gb+ of RAM, you will run into memory issues very quickly.
First, we will need GDAL to support exporting files to geotiff. On Ubuntu do:
sudo add-apt-repository ppa:ubuntugis/ppa
sudo apt update
sudo apt install gdal-bin libgdal-dev python3-gdal
Example:
cd ~/picoastal/
python3 src/post/rectify.py -i "input.png" -o "rectified.tiff" -gcps "xyzuv.csv" --camera_matrix "camera_matrix.json" --epsg "12345" --bbox "xmin,ymin,dx,dy"
Applying this code to the four statistical images calculated above, we get:
| Average | Variance |
|---|---|
 |
 |
| Brightest | Darkest |
|---|---|
 |
 |
To see all command line the options, do python3 rectify.py --help.
To extract a timestack, do:
cd ~/picoastal/
python3 src/post/timestack.py -i "path/to/images" -o "timestack.pkl" -gcps "xyzuv.csv" --camera_matrix "camera_matrix.json" --stackline "457315.2,6422161.5,457599.4,6422063.6"
To see all command line the options, do python3 timestack.py --help.
The resulting stack (using plot_timestack.py) looks something like this:

It may not the he most beautiful timestack ever but our code can now provide all the main functionalities as the most powerful commercial options available.
A experimental script to compute surf zone currents based on Farneback optical flow is also available. This script will loop over all images and compute the u and v velocity components of the flow. The code will first rectify the images and then calculate the flow in the planar view so that the vectors are correctly oriented. This script is extremely slow and uses a lot of memory, hence not recommended to run on the Raspberry Pi. The output is a netCDF file, so you will need to install xarray with pip install xarray netcdf4. A mask in geojson format is required to mask regions of the image where it does not make sense to compute the flow.
Example:
cd ~/picoastal/
python3 src/exp/optical_flow.py -i "path/to/images" -o "flow.nc" -gcps "xyzuv.csv" --camera_matrix "camera_matrix.json" --bbox "xmin,ymin,dx,dy" --mask "mask.geojson"
Use python3 optical_flow.py --help to list all CLI options or call the script with no arguments to start the GUI. The results can be displayed with plot_averaged_flow.py and for the Boomerang dataset they look like this:

Two machine learning models are provided here. The first model is a simple people detector. The second model is an active wave breaking segmentation model. Neither model can be run in real time on the Raspberry Pi without sacrificing too much FPS. Running these models in real-time resulted in less than 1 FPS which is unusable for coastal monitoring applications.
This model is based on Tensorflow's implementation. To run the script, you will need to manually download one the latest versions of EfficientDetect models:
- EfficientNet-Lite0 | EfficientNet-Lite1 | EfficientNet-Lite2 | EfficientNet-Lite3 | EfficientNet-Lite4
Make sure to install tensorflow-lite before running this scripts with sudo python3 -m pip install --index-url https://google-coral.github.io/py-repo/ tflite_runtime
These models can detect people with reasonable accuracy but do not expect great results out-of-the-box. In my experience, even the best model (Lite4) misses about 50% of the visible people in the image.
To run the script, do:
cd ~/picoastal/
python3 src/exp/offline_people_detector.py --model "lite-model_efficientdet_lite4_detection_default_2.tflite" --model_labels "coco_labels.txt" -i "path/to/images" -o "detections.csv" -threshold 0.3 --display --save_images "path/to/images_with_detections/"
Using data collected with a very early version of the system equipped the FLIR camera, the results look like this:
![]()
This model aims to classify each pixel of the image in which waves that are actively breaking are happening. It was developed during my post-doc at France Energies Marines and is available from deepwaves. It was trained with deep-water data so the performance with surf zone data is not expected to be very good.
cd ~/picoastal/ml
python3 src/exp/offline_wave_breaking_segmention.py --model "seg_xception.h5" -i "path/to/images/" -o "pixels.csv" --save-plots -roi 1250 350 400 150 -N 500 --plot-path "path/to/results"
Some scripts have a handy GUI that makes setting parameters much easier. To use it, you need to install Gooey. On a x86_64 machine you can simply do:
sudo python3 -m pip install https://extras.wxpython.org/wxPython4/extras/linux/gtk3/ubuntu-20.04/wxPython-4.1.1-cp38-cp38-linux_x86_64.whl
sudo python3 -m pip install Gooey
On the Raspberry Pi, you will need to compile Wx from the source, clone Gooey and install using python3 setup.py install. To activate the GUI, call the script without arguments python3 script.py. You will be greeted by something like this:

The scripts that support the GUI are:
- rectify.py
- timestack.py
- ChArUco_online_calibration_rpi.py
- ChArUco_online_calibration_flir.py
- calib_ChArUco_offline.py
More often then not, the FLIR camera does not start properly and you get a weird black and white image. The only way I found to fix this was to open spinview and set the parameter below to Auto:

You will need to do this every time the camera is disconnected.
For some reason, the python wrapper for the HQ camera does not link properly to libmmal.so. The easiest way to solve this is to download the .so file from this repository and replace the bad on on Ubuntu.
Make a backup just in case.
sudo cp /usr/lib/arm-linux-gnueabihf/libmmal.so /usr/lib/arm-linux-gnueabihf/libmmal.so.bkDownload this file and replace.
sudo mv libmmal.so /usr/lib/arm-linux-gnueabihf/libmmal.soThis issue does not happen in Raspberry Pi OS.
The 7' display is upside-down out of the box. To fix this on Ubuntu Mate do:
xrand --output DSI-1 --rotate invertedTo make it permanent, open the system configuration panel and search for display, and apply system-wide.

I am open to suggestions. Keep in mind that I work in this project during my spare time and do no have access to much hardware, specially surveying gear.
There is no warranty for the program, to the extent permitted by applicable law except when otherwise stated in writing the copyright holders and/or other parties provide the program “as is” without warranty of any kind, either expressed or implied, including, but not limited to, the implied warranties of merchantability and fitness for a particular purpose. the entire risk as to the quality and performance of the program is with you. should the program prove defective, you assume the cost of all necessary servicing, repair or correction.