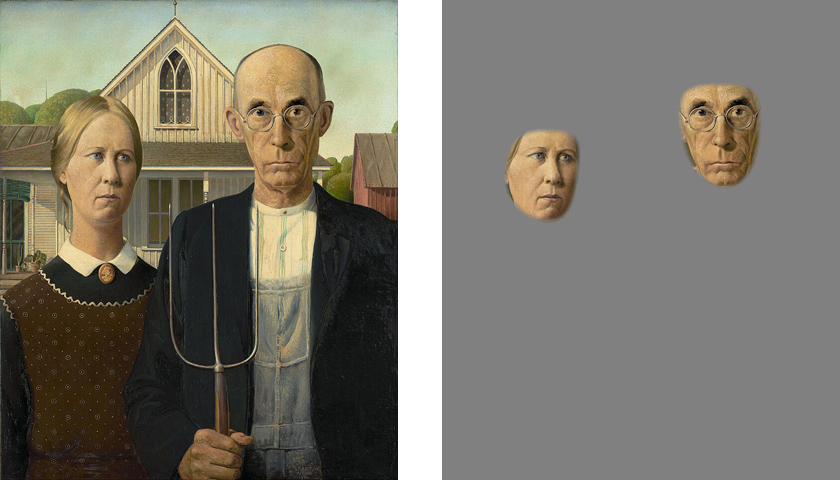
Me2net, based on MediaPipe and U²-Net, is an automatic foreground detection and background removal and replacement tool written in Python.
- automatically detect foregound (salient object) and background in images, or
- automatically detect face (forehead to chin) as foreground
- replace image background with a solid color or another image
- process one image file, a directory of files, or RGB24 image data piped to standard input
- fast enough to run on CPU only, GPU automatically supported via PyTorch
- support multi-threaded processing, most useful when running in CPU mode
Face detection mode (the "-model face" option):
Run "python me2net.py" will print an overview of the usage:
Usage: me2net.py [OPTIONS] COMMAND [ARGS]...

Options:
--version             Show the version and exit.
-model model          select model: 'u2net', 'u2netp', or 'face'  [default: u2net]
-mu [0|1|2]           mask usage  [default: 0]
-im                   invert detected foreground mask
-t INTEGER RANGE      number of worker threads  [default: 1; x>=1]
-bc INTEGER RANGE...  set background RGB color values, default: 128 128 128
					  [0<=x<=255]
-bi FILE              specify a background image
--help                Show this message and exit.

Commands:
dir    process image files in input directory
file   process one image file
stdin  read RGB24 images (piped in by another program) from stdin

The mask usage option (-mu, --mask-usage):

	0  This is the default. Detect foreground of input image, then using the detected
	   foreground mask, blend input image with neutral gray color, and save the result.
	   You can specify another background color with the -bc option,
	   or use an image file as the new background with the -bi option.
	1  Save input image plus foreground mask in alpha channel.
	2  Save foregound mask only. Masks are saved in grayscale PNG files.
Me2net uses Python Click package for parsing command line options. Options should be placed before COMMAND or after [ARGS]. You can intermix options with [ARGS], but they may not be parsed properly by the Click package.
The following examples do not specify the -model option, so by default, they all use the u2net model to detect foregrounds. You can add the "-model u2netp" option to select a smaller and much faster model, but with lower detection quality.
If you want to detect face outlines only, add the "-model face" option.
This is the simplest use case. Read input_file, remove background, and save to output_file:
python me2net.py file input_file output_file
This will find all image files in from_dir, process them, and save to to_dir:
python me2net.py dir from_dir to_dir
In this mode, you can use the -t option to specify number of threads.
This method reads a sequence of RGB24 images from system's stdin. This is intended to be used in conjunction with another program, such as FFMPEG, that outputs RGB24 pixel data to stdout, which is piped into the stdin of this program.
python me2net.py stdin image_width image_height output_specifier
Arguments:
- image_width : width of input image(s)
- image_height : height of input image(s)
- output_specifier: C printf-style specifier for output filenames, for example if it's
abc%03u.png, then output files will be namedabc000.png,abc001.png,abc002.png, etc. Output files will be saved in PNG format regardless of the extension specified.
Example usage with FFMPEG:
ffmpeg -i input.mp4 -ss 10 -an -f rawvideo -pix_fmt rgb24 pipe:1 | python me2net.py stdin 1280 720 out%03u.png
Of course, the specified image width and height must match the dimension of output images from FFMPEG. Note for FFMPEG, the "-an -f rawvideo -pix_fmt rgb24 pipe:1" part is required for the whole thing to work.
In this mode, you can use the -t option to specify number of threads.
The most important option is probably the mask usage option (-mu, --mask-usage). Currently, there're 3 choices:
python me2net.py -mu [0|1|2] file input_file output_file
- 0: This is the default. Alpha blend input image with a solid color using foreground mask. By default, the color is neutral gray (RGB(128,128,128)), you can change it with the -bc option, or use the -bi option to set an image as the new background.
- 1: Save input image plus mask in alpha channel. If your image viewer doesn't support alpha channels in PNG files, or this feature is disabled, you'll see output files exactly the same as input files. Rest assured, masks are saved in the alpha channel of output files.
- 2: Save detected mask only.
-
Python version 3.9 or later. Create a virtual environment if you want to.
-
Clone this repository.
-
Run "pip install -r requirements.txt".
-
Go to https://pytorch.org/ and install the appropriate build of PyTorch for your system.
-
Download these two model files and save them to pretrained_models directory:


