This repository contains the code for a full-stack web application designed to help users manage their personal task lists. The application supports task creation, editing, deletion, and marking tasks as completed. It features a Django-powered RESTful API backend and a ReactJS frontend, with deployment configured for AWS.
Before you begin, ensure you have the following installed:
- Python (3.10 or higher)
- Node.js(16 or higher) and npm
- AWS CLI (configured with your AWS account)
- Clone the repository:
git clone [repository_url] - Navigate to the backend(taskmanager) directory and install the dependencies:
cd taskmanager pip install -r requirements.txt - Navigate to the frontend directory and install the dependencies:
cd ../frontend
npm install
-
Clone the repository
git clone <repository-url> cd backend -
Install dependencies
pip install -r requirements.txt -
Set Environment Variable
Make
.envfile referencing the.env.examplefile -
Migrate the database
python manage.py migrate -
Run the server
python manage.py runserver
- RESTful API for task management (CRUD operations).
- Authentication and authorization with Django's built-in system and JWT.
- Filtering, sorting, and searching tasks using DjangoFilterBackend, OrderingFilter, and SearchFilter.
- Unit tests for reliability.
- Integrate React compiled bundle on
render_reactview
Our RESTful API supports the following operations for managing tasks:
- Create Task:
POST /api/tasks/ - Read Tasks:
GET /api/tasks/ - Update Task:
PUT /api/tasks/{task_id}/ - Delete Task:
DELETE /api/tasks/{task_id}/ - Mark Task as Completed:
PATCH /api/tasks/{task_id}/
- Use JWT for secure authentication. Obtain tokens at
/api/token/and refresh tokens at/api/token/refresh/.
To ensure code quality and reliability, run the following command:
pytest
-
Navigate to the frontend directory
cd frontend -
Install dependencies
npm install -
Start the development server
npm start
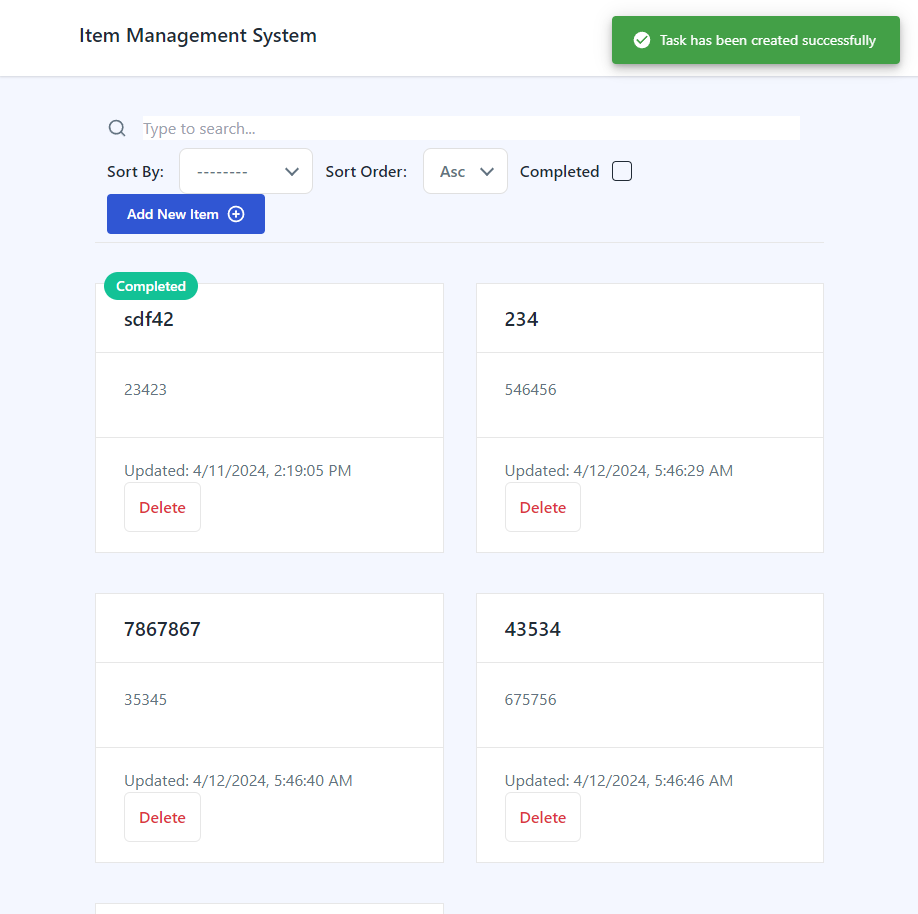
- User-friendly task management interface.
- Responsive design for various devices.
- State management with React Hooks ('@reduxjs/toolkit).
- Use Axios for Rest API call. Intercept the request and do automatic authentication. Retry with refresh token if access token is not working
- Integration with backend API for real-time data manipulation.
- Used
TailwindCSSfor mobile responsive design andnotistackfor notification - Created Reusable Core components
Form,Input,InputCheckbox,Textarea, components withreact-hook-formPaginationButton,SearchInput,Loading, withtailwindcss
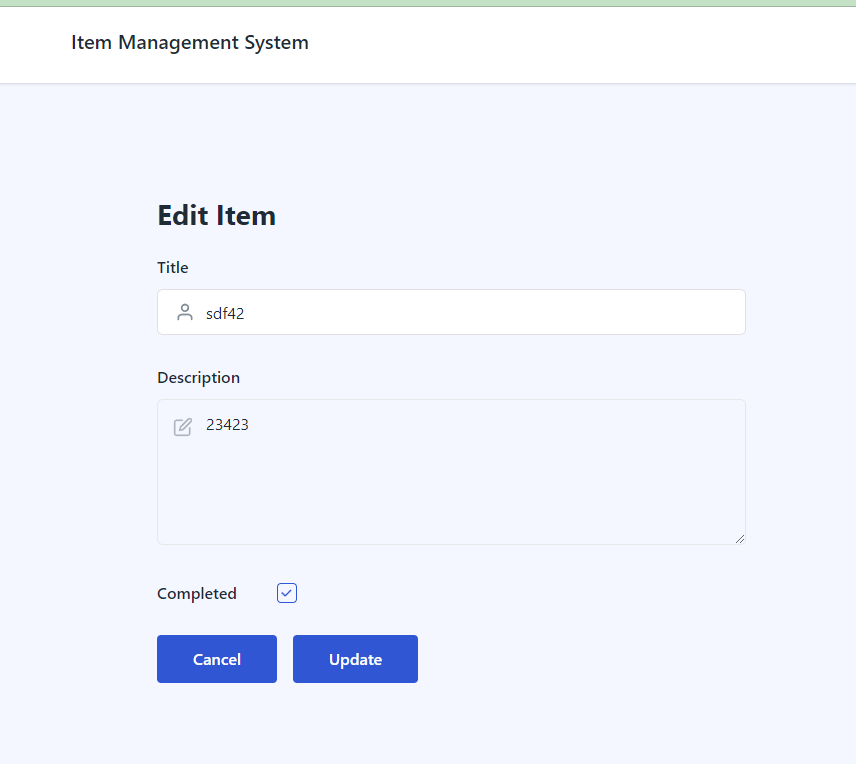
TaskGrid- Display all tasks.TaskDetail- Form for adding/editing tasks.
- Amazon RDS for PostgreSQL database.
- Amazon S3 for storing static files.
- AWS ECS for application deployment.
- IAM roles and VPC for security.
-
Containerize the application using Docker.
docker build -t taskmanager . -
Push the Docker image to Amazon ECR.
aws ecr get-login-password --region `your-region` | docker login --username AWS --password-stdin `account-id`.dkr.ecr.`your-region`.amazonaws.com docker tag taskmanager:latest 548925211719.dkr.ecr.ca-central-1.amazonaws.com/django-app:latest docker push 548925211719.dkr.ecr.ca-central-1.amazonaws.com/django-app:latest -
Create an ECS cluster
this time, created the
AWS Fargate (serverless) -
Create an Task Definitions
Created 3 task definitions. django-app-task, django-app-task-create-superuser, django-app-task-migrate
Those three definitions are all same except the command part of the containerDefinitions.On Infrastructure requirements section,
-
choose AWS Fargate.
-
create a new role for Task role and Task execution Role. Used both same role. When create a role, defined own new policy that can be added to a new role. Here is sample json of it.
```json
{
  "Version": "2012-10-17",
  "Statement": [
      {
          "Sid": "VisualEditor0",
          "Effect": "Allow",
          "Action": [
              "ecr:GetDownloadUrlForLayer",
              "ecr:BatchGetImage",
              "ecr:CompleteLayerUpload",
              "ecr:DescribeImages",
              "ecr:GetAuthorizationToken",
              "ecr:DescribeRepositories",
              "ecr:UploadLayerPart",
              "ecr:ListImages",
              "ecr:InitiateLayerUpload",
              "ecr:BatchCheckLayerAvailability",
              "ecr:PutImage"
          ],
          "Resource": [
              "*",
              "arn:aws:ecr:ca-central-1:548925211719:repository/django-app"
          ]
      }
  ]
}
```
-
-
Use a static or Elastic IP address for an Amazon ECS task on Fargate
Create a network load balancer, and then configure routing of your target group
-
Go to
Amazon EC2 Consoleand choose Create for Network Load Balancer. -
On the Create Network Load Balancer page
-
for Load balancer name, enter a name for your load balancer.
-
For Scheme, select either Internet-facing.
-
For IP address type, select IPv4.
-
Set other information like Protocol, Port on Listners and Routing and VPC, and Security groups of Network Mapping properly.
-
For Mappings, select at least one Availability Zone and one subnet for each Availability Zone. After you tick one of your zone, you should choose Subnet and Ipv4 address. And Choose Use an Elastic IP address for Ipv4 address.
-
on Listeners and Routing section, create a target group
-
on Specify grup details page, select IP addresses.
Note: The target type Instances isn't supported on Fargate.
-
Choose Next
-
on Register targets page, You don't have to add item on Specify IPs and define ports
Reason: Load balancers distribute traffic between targets within the target group. When a target group is associated with an Amazon ECS service, Amazon ECS automatically registers and deregisters containers with the target group. Because Amazon ECS handles target registration, you don't need to register targets to your target group.
-
Choose Create target group. Finally target group is created.
-
-
In the Listeners and routing section, for Forward to, select the target group that you created.
-
Choose Create load balancer. Finally Network Load Balancer is created.
-
-
-
Create an Amazon ECS service.
Notes:
- Choose Turned on of Public IP on Networking section. If not, pulling ECR image may somtimes fail.
- Be sure to specify the target group in the Load Balancing section of service definition when you create your service. When each task for your service is started, the container and port combination specified in the service definition is registered with your target group. Then, traffic is routed from the load balancer to that container.
-
Set up RDS for the database and S3 for static files.
-
Configure security groups and IAM roles for secure access.
-
Create S3 bucket with ACL enabled and disable Block public acccess
-
install django-storages, to use S3 as the main Django storage backend, and boto3, to interact with the AWS API.
-
Add
storagesto theINSTALLED_APPSin settings.py -
update the handling of static files in settings.py like following.
USE_S3 = os.getenv('USE_S3') == 'TRUE' if USE_S3: # aws settings AWS_ACCESS_KEY_ID = os.getenv('AWS_ACCESS_KEY_ID') AWS_SECRET_ACCESS_KEY = os.getenv('AWS_SECRET_ACCESS_KEY') AWS_STORAGE_BUCKET_NAME = os.getenv('AWS_STORAGE_BUCKET_NAME') AWS_DEFAULT_ACL = 'public-read' AWS_S3_CUSTOM_DOMAIN = f'{AWS_STORAGE_BUCKET_NAME}.s3.amazonaws.com' AWS_S3_OBJECT_PARAMETERS = {'CacheControl': 'max-age=86400'} # s3 static settings AWS_LOCATION = 'static' STATIC_URL = f'https://{AWS_S3_CUSTOM_DOMAIN}/{AWS_LOCATION}/' STATICFILES_STORAGE = 'storages.backends.s3boto3.S3Boto3Storage' else: STATIC_URL = '/staticfiles/' STATIC_ROOT = os.path.join(BASE_DIR, 'staticfiles') STATICFILES_DIRS = (os.path.join(BASE_DIR, 'static'),) MEDIA_URL = '/mediafiles/' MEDIA_ROOT = os.path.join(BASE_DIR, 'mediafiles') -
Run
python manaage.py collectstatic.Static files are being uploaded to the S3 bucket.
-
Generate own ssl crt and key file with openssl.
openssl req -x509 -nodes -days 365 -newkey rsa:2048 -keyout selfsigned.key -out selfsigned.crt -
run gunicorn with generated SSL
gunicorn --certfile selfsigned.crt --keyfile selfsigned.key --bind 0.0.0.0:443 taskmanager.wsgi:application
- Use AWS CloudWatch for monitoring application performance and logs.
- Ensure HTTPS encryption for all communications.
- Use Django's security features and AWS IAM roles to protect against unauthorized access.