English | 简体中文

Chatbot Portal with Agent offers a streamlined workflow for developing scalable, production-grade agent-based applications, such as conversational chatbots. Key features include:
-
Enterprise Knowledge Base Creation: Users can upload private documents in various formats (PDF, DOCX, HTML, CSV, TXT, MD, JSON, JSONL, PNG, JPG, JPEG, WEBP) to construct a personalized knowledge base.
-
Flexible Mode Options: Choose from multiple modes (Agent, Chat, RAG) to suit diverse requirements. For instance, the Agent model can interpret user intent, select appropriate tools, and act on iterative results.
-
Configurable Chat-Based UI: Our React/Next.js chat interface is user-friendly, making it easy to configure, explore, and customize to meet your specific needs.
-
Comprehensive RESTful API: Our full-featured API facilitates easy integration with existing applications, enhancing functionality and user experience.
Chatbot Portal with Agent is designed to empower developers to rapidly deploy intelligent, context-aware applications with minimal overhead and maximum efficiency.
Deploying this solution using the default parameters will build the following environment in Amazon Web Services:

The execution process is as follows:
- The solution's front-end website is hosted in an Amazon S3 bucket and distributed via Amazon CloudFront. Authentication is provided by an Amazon Cognito user pool.
- When users upload documents to the knowledge base through the solution's website, the documents are first uploaded to the Amazon S3 bucket.
- An Amazon Lambda function is then triggered, which in turn triggers an Amazon Step Functions workflow to process the file. Within Amazon Step Functions, the document is parsed and segmented using an Amazon Glue Job, with intermediate states stored in Amazon DynamoDB and Amazon S3.
- The Amazon Glue Job vectorizes the segmented text blocks using an Embedding model deployed in an Amazon SageMaker Endpoint and injects them into the vector database Amazon OpenSearch. If the document is in image format (e.g., png, webp) or a pdf with images, the Amazon Glue Job uses Amazon Bedrock to interpret the images and convert them to text. Finally, Amazon SNS sends the execution result to the user via email.
- When users send chat messages through the solution's website, the online module's Amazon API Gateway is triggered. Front-end and back-end communication is achieved via WebSocket API. An Amazon Lambda function integrated with Amazon API Gateway sends the request message to Amazon SQS to prevent message timeout.
- Messages in Amazon SQS are consumed by the online module's Amazon Lambda, which executes Agent/RAG/Chat logic based on the request parameters and records the chat messages in Amazon DynamoDB. The Amazon Lambda function uses intent recognition to determine the necessary tools and perform the corresponding operations.
- If the RAG model is selected, the Amazon Lambda function vectorizes the query message using the Embedding model deployed in the Amazon SageMaker Endpoint, retrieves matching knowledge from Amazon OpenSearch, reorders the results, and sends the knowledge to the large language model, which then returns the answer to the front end.
- During the chat, messages between the user and AI are stored in Amazon DynamoDB. The solution's website retrieves a specific chat record through Amazon API Gateway and Amazon Lambda, allowing the user to continue the conversation based on the content of that chat record.
Its data preprocessing module includes format recognition, content extraction, metadata conversion, and semantic segmentation, seamlessly in the background.

When a large number of content injection requests are received, it can automatically scale out by running multiple Amazon Glue jobs concurrently, ensuring these requests are processed in time.
Chunk metadata is defined as below shown:
| Name | Description |
|---|---|
| file_path | S3 path to store the file |
| file_type | File type, eg. pdf, html |
| content_type | paragraph: paragraph content |
| current_heading | The heading which the chunk belongs to |
| chunk_id | Unique chunk id |
| heading_hierarchy | Heading hierarchy which is used to locate the chunk in the whole file content |
| title | The heading of current section |
| level | Heading level, eg. H1 is #, H2 is ## in markdown |
| parent | The chunk id of parent section, eg. H2's parent is its H1, H3's parent is its H2 |
| previous | The chunk id of previous paragraph at the same Level |
| child | The chunk ids of sub sections |
| next | The chunk id of next paragraph at the same Level |
| size | The number of the chunks when the paragraph is splitted by a fixed chunk size |
Here is an example
{
	"file_path": "s3:https://example/intelli-agent-user-guide.pdf",
	"file_type": "pdf",
	"content_type": "paragragh",
	"current_heading": "# Intelli-Agent User Guide WebApp",
	"chunk_id": "$1-4659f607-1",
	"heading_hierarchy": {
		"title": "Intelli-Agent User Guide",
		"level": 1,
		"parent": null,
		"previous": null,
		"child": [
			"$2-038759db",
			"$4-68d6e6ca",
			"$6-e9cdcf68"
		],
		"next": null,
		"size": 2
	}
}
The following graph is generated by online logic which is built based on LangGraph. The first node is query_preprocess_lambda which handles the chat history. Then the user can choose from three modes: chat, rag and agent. The chat mode lets you interact directly with different LLMs, such as Anthropic Claude 3. The rag mode will retrieve the relevant contents relating to the current query and let LLM answer it. The agent mode is the most complex mode which gives you the possibility to handle complex business scenarios. Given the most relevant intention from intention_detection_lambda and chat history from query_preprocess_lambda, agent_lambda will decide which tools to use and whether the information is enough to answer the query. The parse_tool_calling node will parse the output of agent_lambda:
- agent_lambda chooses the wrong tool from the perspective of tool format, it will be forced to think again through invalid_tool_calling edge.
- agent_lambda chooses the valid tool, the tool will be executed through tool_exectue_lambda. Then, agent_lambda will decide whether the running results are enough to answer the query.
- There are some cases that agent_lambda decides to give the final response. For cases needing RAG, the rag_retrieve_lambda and rag_llm_lambda will be called. For cases that agent_lambda needs more information, the give_rhetorical_question node will be executed. For cases where a constant reply needs to be given, the transfer_reply and comfort_reply will be executed. The give_final_response means the current results of tool calling is enough to answer the query.
flowchart TD
 subgraph ReAct["ReAct"]
    direction TB
        tools_choose_and_results_generation["tools_choose_and_results_generation"]
        results_evaluation{{"results_evaluation"}}
        tools_execution["tools_execution"]
  end
    _start_["_start_"] --> query_preprocess["query_preprocess"]
    query_preprocess == chat mode ==> llm_direct_results_generation["llm_direct_results_generation"]
    query_preprocess == rag mode ==> all_knowledge_retrieve["all_knowledge_retrieve"]
    query_preprocess == agent mode ==> intention_detection["intention_detection"]
    all_knowledge_retrieve --> llm_rag_results_generation["llm_rag_results_generation"]
    intention_detection -- similar query found --> matched_query_return["matched_query_return"]
    intention_detection -- intention detected --> tools_choose_and_results_generation
    tools_choose_and_results_generation --> results_evaluation
    results_evaluation -. invalid tool calling .-> tools_choose_and_results_generation
    results_evaluation -. valid tool calling .-> tools_execution
    results_evaluation -. no need tool calling .-> final_results_preparation["final_results_preparation"]
    tools_execution --> tools_choose_and_results_generation
    llm_direct_results_generation --> _end_["_end_"]
    llm_rag_results_generation --> _end_
    matched_query_return --> final_results_preparation
    final_results_preparation --> _end_
     tools_choose_and_results_generation:::process
     results_evaluation:::process
     tools_execution:::process
     query_preprocess:::process
     llm_direct_results_generation:::process
     all_knowledge_retrieve:::process
     intention_detection:::process
     llm_rag_results_generation:::process
     matched_query_return:::process
     final_results_preparation:::process
    style query_preprocess fill:#FF6D00,color:#FFFFFF
    style ReAct fill:#FFCDD2,color:#D50000
Follow these steps to get started:
Execute following commands to install dependencies such as Python, Git, npm, docker and create a service linked role for Amazon OpenSearch service. You can skip this step if they are already installed.
The setup_env.sh script is adapted for Amazon Linux 2023. If you are using other operating systems, please manually install these dependencies.
wget https://raw.githubusercontent.com/aws-samples/Intelli-Agent/dev/source/script/setup_env.sh
sh setup_env.sh
Executing the following command to clone the GitHub repo:
git clone [email protected]:aws-samples/Intelli-Agent.git
cd Intelli-Agent
Execute the following command to configure your AWS account (please skip this step if you have already configured your AWS account). Refer to the AWS CLI command for more usage instructions.
aws configureNavigate to the script directory and run the build.sh script. This script requires an S3 bucket name as an argument, which will be used to upload the model. Please make sure the bucket name is located in the same region as the CDK deployment. For example: If the S3 bucket is in us-west-2, then you can only deploy CDK in us-west-2. It also requires ETL image name, ETL image tag, and AWS region as arguments. The ETL image will be pushed to your ECR repo with the image name you specified.
cd source/script
sh build.sh -b <S3 bucket name> -i <ETL model name> -t <ETL tag name> -r <AWS region>
Example:
sh build.sh -b intelli-agent-model-bucket -i intelli-agent-etl -t latest -r us-east-1If this is the first time that your account is using CDK to deploy resources, please refer to this document for CDK bootstrap.
cdk bootstrap aws:https://<Your AWS account ID>/<AWS region>There are two deployment options for this solution:
- Deploy
all modules, which enables full functionality from knowledge base construction to online interactive Q&A. - Deploy only the
knowledge base construction (offline processing)module.
Execute the following command to deploy. Please use the parameters S3ModelAssets, EtlImageName, and ETLTag that you have set in the Prerequisites section. (Default deployment mode)
cd source
aws ecr-public get-login-password --region us-east-1 | docker login --username AWS --password-stdin public.ecr.aws
cd infrastructure
npx cdk deploy --parameters S3ModelAssets=<Your S3 Bucket Name> --parameters SubEmail=<Your email address> --parameters EtlImageName=<Your ETL model name> --parameters ETLTag=<Your ETL tag name> --require-approval never
Example:
npx cdk deploy --rollback true --parameters S3ModelAssets=intelli-agent-model-bucket --parameters [email protected] --parameters EtlImageName=intelli-agent-etl --parameters ETLTag=latest --require-approval never| Parameter | Type | Description |
|---|---|---|
| S3ModelAssets | Required | The name of your S3 bucket where models are stored. |
| SubEmail | Required | Your email address for receiving notifications. |
| EtlImageName | Required | The name of the ETL image (e.g., etl-model) used when executing the source/model/etl/code/model.sh script. |
| EtlTag | Required | The ETL tag (e.g., latest, v1.0, v2.0); default is latest. Set when executing the source/model/etl/code/model.sh script. |
| DeploymentMode | Optional | Leave it blank or set it to ALL |
If you only need to parse and slice documents and upload the chunk to the S3 bucket without injecting them into the vector database, execute the following command to deploy. Please use the parameters S3ModelAssets, EtlImageName, and ETLTag that you have set in the Prerequisites section.
cd source
aws ecr-public get-login-password --region us-east-1 | docker login --username AWS --password-stdin public.ecr.aws
cd infrastructure
npx cdk deploy --parameters S3ModelAssets=<Your S3 Bucket Name> --parameters SubEmail=<Your email address> --parameters EtlImageName=<Your ETL model name> --parameters ETLTag=<Your ETL tag name> --context DeploymentMode="OFFLINE_EXTRACT" --require-approval never| Parameter | Type | Description |
|---|---|---|
| S3ModelAssets | Required | The name of your S3 bucket where models are stored. |
| SubEmail | Required | Your email address for receiving notifications. |
| EtlImageName | Required | The name of the ETL image (e.g., etl-model) used when executing the source/model/etl/code/model.sh script. |
| EtlTag | Required | The ETL tag (e.g., latest, v1.0, v2.0); default is latest. Set when executing the source/model/etl/code/model.sh script. |
| DeploymentMode | Required | OFFLINE_EXTRACT |
After deployment, you can find a stack containing intelli-agent in the CloudFormation console. On the Output tab of the stack, you can find key solution information, commonly explained as follows:
| Name | Description |
|---|---|
| WebPortalURL | Link to the Intelli-Agent frontend website. |
| APIEndpointAddress | RESTful API endpoint address primarily used for data preprocessing, chat history, etc. |
| WebSocketEndpointAddress | WebSocket API endpoint address primarily used for chat functionality. |
| ChunkBucket | Intermediate storage in this S3 bucket for processed document chunks. |
You can update an existing deployment using CDK with the following command:
cd source
aws ecr-public get-login-password --region us-east-1 | docker login --username AWS --password-stdin public.ecr.aws
cd infrastructure
npx cdk deploy --rollback true --parameters S3ModelAssets=<Your S3 Bucket Name> --parameters SubEmail=<Your email address> --parameters EtlImageName=<Your ETL model name> --parameters ETLTag=<Your ETL tag name> --require-approval never
For example:
npx cdk deploy --rollback true --parameters S3ModelAssets=intelli-agent-model-bucket --parameters [email protected] --parameters EtlImageName=intelli-agent-etl --parameters ETLTag=latest --require-approval neverTo uninstall the solution, follow these steps:
- Log in to the AWS Management Console and navigate to the CloudFormation page.
- Select the stack that contains the keyword
intelli-agent. - Click on the Delete button to initiate the deletion process.

Currently supports 3 conversation modes: Agent, RAG, and Chat.
- Agent: Suitable for scenarios where decisions on next steps are made by a large model based on the conversation and available tools (existing or custom).
- RAG: Ideal for dialogue capabilities based on a knowledge base. Note: Documents need to be uploaded to the "Document Library" in advance.
- Chat: Ideal for casual conversation, directly experiencing the conversation capabilities of a large language model.
Currently supports the following LLMs:
- Claude3 Haiku
- Claude3 Sonnet
- Claude3.5 Sonnet
The chat area consists of two main functionalities: Chatbot and History. The Chatbot can initiate a new conversation based on supported LLM models. History -> The chat history ID that needs to be restarted will display past chat records on the page. Users can continue their conversation based on it.

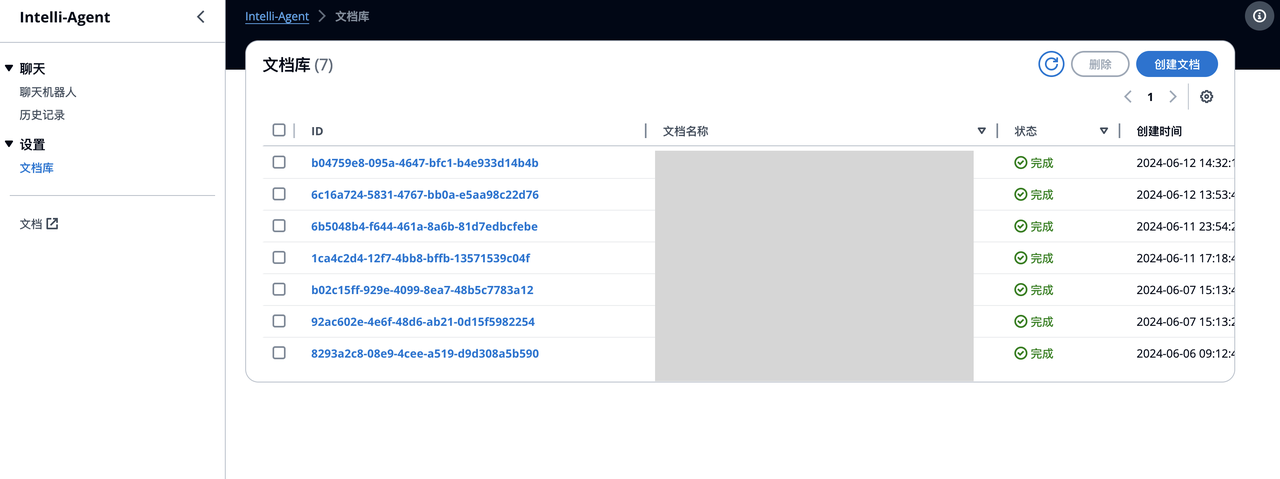
The Document Library (required for RAG) currently supports document creation (one upload at a time) and deletion (multiple deletions at a time).
- Supports 12 document formats: pdf, docx, txt, csv, jsonl, json, html, md, png, jpg, jpeg, webp
- UI upload document size limit: 10MB
Tips:
- If users repeatedly upload the same document name, the backend will overwrite it with the latest document.
- Create Document -> After selecting the file and clicking upload, the backend operation is divided into two parts: document upload and offline processing. Only when both are completed will the status bar display "Completed".
- Example:

The current username is displayed in the upper right corner. Click "Logout" to log out.
Currently supports Simplified Chinese and English.
After CDK deployment, you can use a HTTP client such as Postman/cURL to invoke the API by following below API schema.
- LLM API Schema: send question to LLM and get a response.
- ETL API Schema: upload knowledge to the vector database.
- AOS API Schema: search data in the vector database.
The current models used in each stage are as follows, selected based on internal team testing and current effectiveness. Customers can customize and replace these models. Detailed model replacement is available.
| Function | Model |
|---|---|
| Rerank | BGE-reranker-large |
| Embedding | BCE |
| LLM | Claude3/Claude3.5 |
Get support by creating an issue on GitHub.
During CDK deployment, you specified the SubEmail parameter, which is the email address used for receiving notifications. After a successful CDK deployment, the initial username and password will be sent to this email.
Documents of various types are first converted to Markdown format and then split based on paragraphs. If the split paragraphs exceed the maximum token limit (default is 500, customizable in glue-job-script.py), they are split again. The split text blocks and metadata are recorded in an S3 bucket and injected into the vector database after vectorization.
To inject intent data into your system, follow these steps:
-
Obtain JWT Token:
- Refer to the documentation at docs/auth.md to understand how to obtain a JWT token.
- Use Postman or a similar tool for this process.
-
Injection Using ETL API:
- Use the schema specified in docs/ETL_API_SCHEMA.md for intent data injection.
- Below is a sample JSON structure that you can use to inject intent data. Replace the placeholders with your specific S3 bucket and file details:
{ "s3Bucket": "your-bucket-name", "s3Prefix": "s3path/default-intent.jsonl", "offline": "true", "qaEnhance": "false", "workspaceId": "default-intent", "operationType": "create", "documentLanguage": "zh", "indexType": "qq" } -
Data Injection Format:
- Use the following JSON format for injecting individual intent data:
{"question": "Hello", "answer": {"intent": "chat"}}
- Replace `"Hello"` with the actual question text.


### How to Update Resources Used by ETL

The current solution is undergoing continuous updates, requiring manual updates for the document parsing component.

1. [Optional] Update Document Parsing Model Endpoint

```bash
# Input a new ETL tag when executing sh build.sh
cd source/script
sh build.sh -b <S3 bucket name> -i <ETL model name> -t <new ETL tag name> -r <AWS region>

# Input a new ETL tag when executing cdk deploy to trigger ETL endpoint update
npx cdk deploy --rollback true --parameters S3ModelAssets=<Your S3 Bucket Name> --parameters SubEmail=<Your email address> --parameters EtlImageName=<Your ETL model name> --parameters ETLTag=<Your new ETL tag name> --require-approval never
- Manually Update ETL Dependencies' whl Package
First, confirm the path corresponding to --extra-py-files in your ETL Job.

Next, upload source/lambda/job/dep/dist/llm_bot_dep-0.1.0-py3-none-any.whl to the location where Glue dependencies are stored.
aws s3 cp source/lambda/job/dep/dist/llm_bot_dep-0.1.0-py3-none-any.whl s3:https://<Your Glue job bucket>/llm_bot_dep-0.1.0-py3-none-any.whlFor detailed test information, please refer to the Test Doc
See CONTRIBUTING for more information.
This project is licensed under the Apache-2.0 License.