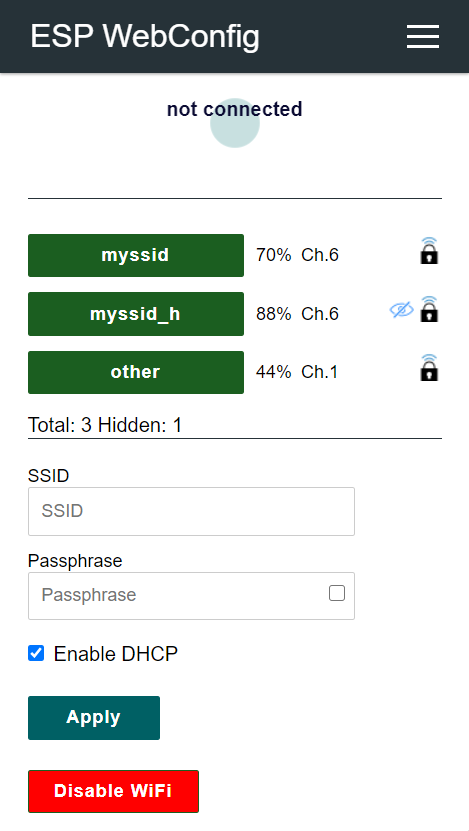
Yet another library web configuration library for ESP8266.
There are already many cool web-based configuration libraries out there, but I haven't found one that suits all my needs. Some of these libraries are AutoConnect, ESPAsyncWiFiManager, Homie, IoTWebConf, JeeUI, JeeUI2, WiFiManager or ESPUI. The restrictions caused by blocking the startup process, the number of user-defined parameters, customizing websites or heap hunger are reasons for the development of this library.
- Modern web design // based on AutoConnect
- Simple integration into your sketch
- No blocking, even if not yet connected
- Increased stability by avoiding AsyncWebServer
- Pages are filled on the client site by JavaScript
- Logging using <<-operator // based on Homie
- Reset configuration by triple press on reset button // based on https://github.com/datacute/DoubleResetDetector, but with LittleFS
- Option to add own languages.
- Extensions for OTA Update, MQTT, Time or E-Mail setup pages.
- Optional: MQTT Homie integration for simple setup of property discovery.
- Optional: MQTT Homeassistant integration for simple setup of property discovery.
- Create you own pages and test the functionality with a webServer of your choice. Include the HTML, CSS, JS or SVG files as auto generated header files // based on ESPUI
This library was written using PlatfromIO in Visual Studio Code.
Extend your platromio.ini with:
[env:d1_mini]
platform = espressif8266
board = d1_mini
framework = arduino
upload_speed = 115200
monitor_speed = 115200
build_flags = -D PIO_FRAMEWORK_ARDUINO_LWIP2_LOW_MEMORY
board_build.filesystem = littlefs
lib_deps =
    ArduinoJson
    AsyncMqttClient
    ESPWebConfig=https://github.com/atiderko/espwebconfig.git
To add your own pages you need to put the html file into web folder. For header generation while build extend your platromio.ini with:
extra_scripts = pre:pre_build.pyand add the script file pre_build.py with (for header generation from HTML, JS, JSON or SVG files we use python with htmlmin, jsmin and csscompressor; we check and install they if needed):
Import("env")
try:
    import jsmin
    import htmlmin
    import csscompressor
except ImportError:
    env.Execute("$PYTHONEXE -m pip install htmlmin jsmin csscompressor")
env.Execute("$PYTHONEXE $PROJECT_DIR/.pio/libdeps/d1_mini/espwebconfig/scripts/generate_headers.py -p $PROJECT_DIR -n")
See PVZero or BBS project for example integration.
Below you see the simplest sketch with full functionality.
#include <Arduino.h>
#include <ewcConfigServer.h>

EWC::ConfigServer server;

void setup() {
    EWC::I::get().logger().setBaudRate(115200);
    EWC::I::get().logger().setLogging(true);

    // start webServer
    server.setup();
}


void loop() {
    // process dns requests and connection state AP/STA
    server.loop();
    if (WiFi.status() == WL_CONNECTED) {
        // do your stuff if connected
    } else {
        // or if not yet connected
    }
    delay(1);
}
On first start it creates a captive portal where you can enter your credentials to connect to your WiFi. The credentials are stored by Arduino WiFi library. WiFi setup URI: /wifi/setup
Default Info (/ewc/info) and Access-Configuration (/access/setup) pages:
Copy web/languages.json to web folder of your project. Extend/replace the content of the JSON file with your language. Add following code to your code.
#include "generated/webLanguagesJSON.h"

void setup()
    // ... other content
    EWC::I::get().config().paramLanguage = "de";
    EWC::I::get().server().webServer().on("/languages.json", std::bind(&ConfigServer::sendContentG, &EWC::I::get().server(), ws, FPSTR(PROGMEM_CONFIG_APPLICATION_JSON), JSON_WEB_LANGUAGES_GZIP, sizeof(JSON_WEB_LANGUAGES_GZIP)));
// ... other contentUpload a favicon.ico with pio run --target uploadfs
An easy way to test the HTLM files is to use TinyWeb: https://www.ritlabs.com/en/products/tinyweb/download.php
Copy the web/xyz/setup file to web/index.html and run tiny.exe C:\ESPWebConfig\web 80


