

Docker Image for AWS IOT connected Mosquitto broker.
Navigate to AWS and setup the account.
Navigate to User -> My Security Credentials, and obtain Access Key ID and Access Key.
Clone this repository to a location in your drive.
Install AWS CLI from here.
Run aws configure in terminal and type in your Region, your Access ID and Keys, as followed:
aws configure
AWS Access Key ID [None]: AKIAIOSFODNN7EXAMPLE
AWS Secret Access Key [None]: wJalrXUtnFEMI/K7MDENG/bPxRfiCYEXAMPLEKEY
Default region name [None]: eu-central-1
Default output format [None]: jsonRun the following command to create policy for the bridge:
aws iot create-policy --policy-name bridge --policy-document '{"Version": "2012-10-17","Statement": [{"Effect": "Allow","Action": "iot:*","Resource": "*"}]}'Go into the aws_mosquitto_broker/config/certs directory and run the following to create certificates:
cd aws_mosquitto_broker/config/certs

sudo aws iot create-keys-and-certificate --set-as-active --certificate-pem-outfile cert.crt --private-key-outfile private.key --public-key-outfile public.key --region eu-central-1
Then you can run the aws iot list-certificates to check the created certificates. Copy the ARN in the form of arn:aws:iot:eu-central-1:0123456789:cert/xyzxyz:
aws iot list-certificatesAttach the policy to your certificate. Replace the {REPLACE_ARN_CERT} with your copied ARN arn:aws:iot:eu-central-1:0123456789:cert/xyzxyz:
aws iot attach-principal-policy --policy-name bridge --principal {REPLACE_ARN_CERT}Add read permissions to private key, public key and client cert (inside certs folder):
sudo chmod 644 private.key && sudo chmod 644 public.key && sudo chmod 644 cert.crtDownload the root Amazon CA certificate also in the certs directory:
sudo curl https://www.websecurity.digicert.com/content/dam/websitesecurity/digitalassets/desktop/pdfs/roots/VeriSign-Class%203-Public-Primary-Certification-Authority-G5.pem -o rootCA.pemRename awsbridge.conf.sample to awsbridge.conf:
mv awsbridge.conf.sample awsbridge.confEdit config/conf.d/awsbridge.conf and follow the awsbridge.conf instructions:
nano config/conf.d/awsbridge.confNote: Run aws iot describe-endpoint to get the AWS IoT endpoint.
Go back to the root location aws_mosquitto_broker and run the following:
docker build -t aws_mqtt_broker .Note: Make sure you have installed docker on your PC first.
docker run -ti -p 1883:1883 -p 9001:9001 --name mqtt aws_mqtt_brokerConsole / Log output:
1592301141: mosquitto version 1.4.15 (build date 2018-03-04 15:19:39+0000) starting
1592301141: Config loaded from /mosquitto/config/mosquitto.conf.
1592301141: Opening ipv4 listen socket on port 1883.
1592301141: Opening ipv6 listen socket on port 1883.
1592301141: Bridge local.bridgeawsiot doing local SUBSCRIBE on topic localgateway_to_awsiot
1592301141: Bridge local.bridgeawsiot doing local SUBSCRIBE on topic both_directions
1592301141: Connecting bridge awsiot (aq53tian3vbby.iot.eu-central-1.amazonaws.com:8883)
1592301141: Bridge bridgeawsiot sending CONNECT
1592301144: Received CONNACK on connection local.bridgeawsiot.
1592301144: Bridge local.bridgeawsiot sending SUBSCRIBE (Mid: 1, Topic: awsiot_to_localgateway, QoS: 1)
1592301144: Bridge local.bridgeawsiot sending UNSUBSCRIBE (Mid: 2, Topic: localgateway_to_awsiot)
1592301144: Bridge local.bridgeawsiot sending SUBSCRIBE (Mid: 3, Topic: both_directions, QoS: 1)
1592301144: Received SUBACK from local.bridgeawsiot
1592301144: Received UNSUBACK from local.bridgeawsiot
1592301145: Received SUBACK from local.bridgeawsiot1.- From AWS Management Console go to AWS IoT Services -> Test
2.- Subscribe to topics mentioned in our config file awsiot_to_localgateway, localgateway_to_awsiot and both_directions.
3.- Publish to awsiot_to_localgateway topic (hello world).
4.- Review log or console output in our local broker for something like this:
1493564128: Received PUBLISH from local.bridgeawsiot (d0, q0, r0, m0, 'awsiot_to_localgateway', ... (45 bytes))
Note: Make sure that it is selected the eu-central-1 as the region.
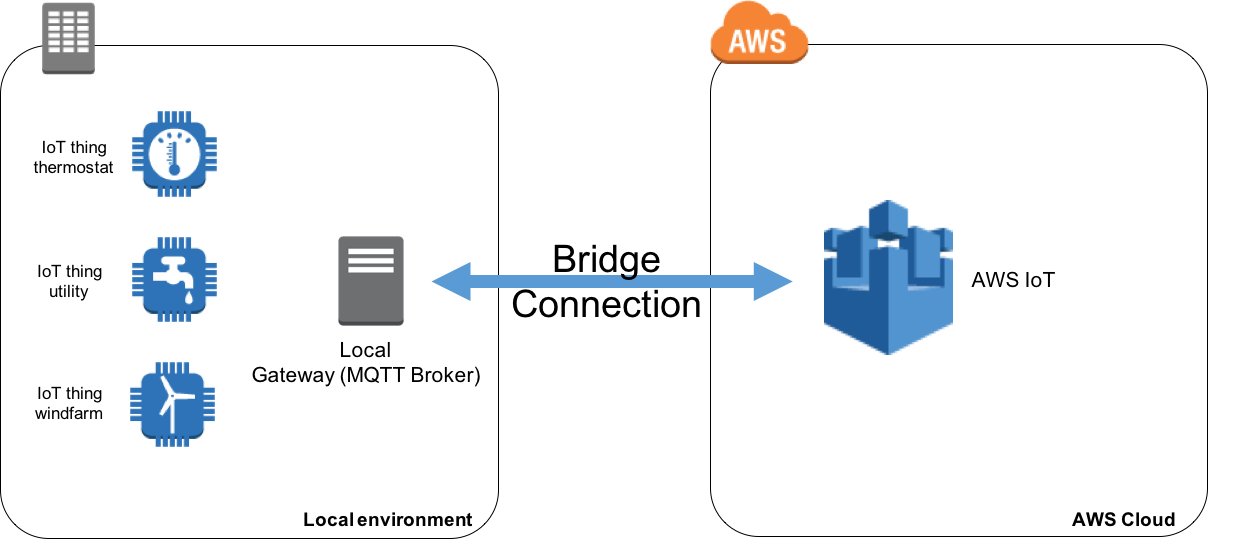
Workflow: Local Broker(Host PC) -> Docker Gateway -> AWS IoT.
Run the following in terminal to publish from host to AWS IoT:
mosquitto_pub -h localhost -p 1883 -q 1 -d -t localgateway_to_awsiot -i clientid1 -m "{\"key\": \"helloFromLocalGateway\"}"
Note: Make sure that you have mosquitto installed on your PC.