title: "LaTeX, GitLab and Continuous Delivery" author: [Alex Povel] date: "2020" subject: "Presenting the advantages and a workflow using LaTeX and GitLab" keywords: [LaTeX, GitLab, CI, CD, Markdown] lang: "en" titlepage: true toc: true colorlinks: true ...
This repository contains two documents:
-
This README in Markdown format. Using
pandocwith the Eisvogel template (more on that later), it is converted into a PDF and made available for download.The README covers git and Continuous Delivery.
-
A LaTeX document, usable as a cookbook (different "recipes" to achieve various things in LaTeX) and also as a template.
The LaTeX Cookbook PDF covers LaTeX-specific topics.
That being said, onto git. Eventually, following all the steps, a number of advantages will come to light:
-
SSOT: a Single Source Of Truth for data. No more file trees looking like this:
directory
│   a.txt
│   help.me.please
│   Important-Document_2018_version1.pdf
│   Important-Document_2018_version2.pdf
│   Important-Document_2018_version3_final.pdf
│   Important-Document_2018_version3_final_really.pdf
│   Important-Document_2018_version3_final_really_I-promise.pdf
│   Important-Document_2018_versionA.pdf
│   Important-Document_2019-03-56.pdf
│   Important-Document_2019-03-56_corrections_John-Doe.pdf
│   Important-Document_2019-03-56_corrections_John-Doe_v2.pdf
│   invoice.docx
│   test - Copy (2).tex
│   test - Copy.tex
│   test.tex
│
└───old_stuff
        Screenshot 1999-09-03-15-23-15(1).bmp
        Screenshot 1999-09-03-15-23-15(2).bmp
        Screenshot 1999-09-03-15-23-15(3).bmp
        Screenshot 1999-09-03-15-23-15(3)_edited.bmp
        Screenshot 1999-09-03-15-23-15.bmp
Instead, there is one working copy looking like this:
directory
│   .git (a hidden directory)
│   a.txt
│   Important-Document.pdf
│   Properly-Named-Invoice.docx
assuming that
a.txtis actually needed. All the old junk and redundant copies have been pruned. However, nothing was lost. The entire history is contained in git, a Version Control System. The history is readily summoned anytime, if so required. Git calls this its log. Git works best (some would say only) on text-based files, but it can deal with images, PDFs etc., too.The history and everything else git needs is contained in its
.gitdirectory, which is hidden on both Linux and Windows. Everything else indirectory, so in this casea.txt,Important-Document.pdfandProperly-Named-Invoice.docx, are accessible as usual. There is no difference to how you would normally work with these files. They are on your local disk. Together, they are called the working tree.Therefore (provided that git is used correctly):
- Duplicate files are gone,
- The art of cumbersome file naming will finally be forgotten,
- Old stuff can be safely deleted; this cleans up the working tree and makes it clear which files are no longer needed. Only the currently needed files are visible, the rest is history.
-
File versioning and the ability to exactly match outputs (PDFs) to the source code that generated them.
-
Accelerated bug fixing through
git bisect, a binary search algorithm that helps pinpoint commits (stages of development) that introduced regressions. -
Collaboration: each contributor has a version of the source on their local machine. Adjustments are made there, and sent to a central, online repository if they are considered ready to be published. Git can also be used in a distributed fashion (its original strong suit), but we assume a remote repository on GitLab.
Developers can then also fetch the latest changes from the remote and incorporate them into their local copy.
-
The remote repository also serves as a back-up solution. So do all the distributed local copies. At all points, there will be a workable copy somewhere. In general, it is extremely hard to lose data using git.
GitLab is a platform to host git repositories. Projects on there can serve as git remotes. In this sense, it is like GitHub, the first large website to offer such a service. It is still the largest today. We use GitLab here because https://collaborating.tuhh.de/ is an instance of GitLab and therefore freely available to university members.
GitLab offers various features for each project. This includes a Wiki, an issue tracker and pull request management. Pull requests are requests from outside collaborators who have forked and subsequently worked on a project. Forking projects refers to creating a full copy of them in their own user space. As such, they can then work on it, or do whatever else they want. If for example they add a feature, their own copy is now ahead of the original by that feature. To incorporate the changes back to the original, the original repository's maintainers can be requested to pull in the changes. This way, anyone can collaborate and help, without ever interfering with the main development in the original.
Continuous Delivery refers to continuously shipping out the finished "product".
In this case, these are the compiled PDFs.
This is done using Docker containers.
The advantages are that all collaborators no longer rely on their local toolchain,
but on a unified, common one that was agreed upon.
If LaTeX documents become very long, full compilation runs can take dozens of minutes.
This is outsourced and silently done on the remote servers, if Continuous Delivery
is used.
As such, for example, every git push to the servers triggers a pipeline which
compiles the PDF and offers it for download afterwards.
The last part could be called Continuous Deployment, albeit a very basic version.
Docker is a tool providing so-called containers. These containers are light-weight virtual machines, providing isolated environments for applications to run in. They are created from corresponding images. These images are in turn generated using scripts, so-called Dockerfiles.
In summary, we create a Dockerfile with instructions on how the image should look like.
The image is then built accordingly, resulting in a large-ish file that contains an
executable virtual machine.
For example, if we install a complete TeXLive distribution, the image will be more than
5 Gigabytes in size.
Once the image is created, it can be run, creating the container.
We can then enter the container and use it like a normal (in this case Linux) machine,
for example to compile our tex files.
One concrete workflow to employ this chain is to have a Dockerfile repository on GitHub,
like this one.
GitHub integrates with DockerHub, the official service provided
by Docker themselves.
It allows users to share images.
As such, there is an image called
alexpovel/latex
on Dockerhub.
This image was built using the above GitHub Dockerfile and can be downloaded and run,
yielding a live container.
On every git push (that is, on every change) in the GitHub repo, this image is rebuilt.
Given the size of TeXLive, this takes about on hour.
The above example Dockerfile
(that Dockerfile is used to compile this very README to PDF via pandoc, as explained later)
can look like this:
FROM debian:bullseye

LABEL maintainer="Alex Povel"

ENV DEBIAN_FRONTEND noninteractive

RUN apt-get update -y \
  && apt-get install -y \
    texlive-full \
    default-jre \
    inkscape \
    gnuplot \
    pandoc \
    curl \
    wget \
    librsvg2-bin
The steps are as follows:
FROMpulls a base image, in this case a certain version of Debian (bullseye, Debian 11). This version will still be the same ten years from now, allowing for tight control over the build environment. Things are compiled in this fixed version, eliminating issues of incompatibilities across machines forever. No longer will you have to seek out that one coworker with that specific installation of a software that is the only remaining survivor still capable of compiling this one ancient piece of code. Alternatively, we can use a tag likelatestand getdebian:latest. That would also work just fine in most cases, and would get us the currently latest version.LABELadds metadata to an image. It is pretty self-explanatory. Note that before Docker 1.6, this would have readMAINTAINER <name>, which has since been deprecated.ENVdefines an environment variable, becausetexlive-fullwill usually prompt for Geographic Area.DEBIAN_FRONTEND=noninteractivesuppresses this dialog creation, to which we would be unable to respond in a Docker building process (which is why it then fails). This procedure is discouraged from in the FAQ, but that shouldn't be relevant here.RUNexecutes the given command to construct the image. This can be all sorts of complicated magic, but we onlyapt updatethe package cache, which downloads package information from the respective sources. Afterwards,install(automatically agree to prompts with 'yes' using-y, since the build process has to be able to run autonomously) packages.
For more information on the LaTeX packages mentioned here, refer to the accompanying cookbook.
-
texlive-fullfor a truly full LaTeX distribution. The resulting version ofTeXLive(e.g.2019) depends on what is available in the package repositories of the operating system. Fordebian:bullseye, we get TeXLive 2019. A full distribution includes Arabic, Chinese and many other fonts and supporting packages that we are exceedingly unlikely to ever need. However, the alternative is to only install the currently needed packages. This would mean to only gettexlive-baseand usetlmgr, the package manager of TeXLive, to install packages on an as-needed basis. It is quickly apparent how that gets out of hand fast: whenever we want to use a new package, we have to update the entire Docker image. A middle ground is installingtexlive-most(Arch repositories), ortexlive-latex-extra(Debian repositories). -
default-jrefor thebib2glstool from theglossaries-extrapackage.jrestands for Java Runtime Environment, which is exactly whatbib2glsneeds. -
inkscapebecause thesvgpackage needs it.Using that package, the required PDFs and PDF_TEXs are only generated at build-time on the server, and afterwards discarded. If you work locally, they will be kept in
images/vectors/svk-inkscape/, so that they do not have to be regenerated each time. This is somewhat important since PDFs are binary and should not occur in git repositories. Git can only accept PDFs as single blobs and cannot diff them properly. If git cannot efficiently store only the changes between two versions of a file, like it can with text-based ones, the repository might absolutely explode in size. That is not a proper usage of git. It works, but should be avoided.Neatly, SVGs are text-based (try it out yourself: open an SVG file in a text editor). They are
XMLfiles, extensible markup language. So next to Markdown and LaTeX, a third markup language! We don't really care for that though, other than that it means that SVGs are source-controllable (to an extent) through git. A nice bonus, further strengthening the argument of only using plain SVGs in the repository. -
gnuplotforcontour gnuplotcommands foraddplot3inpgfplots. So essentially, an external add-on for the magnificentpgfplotspackage. Being an external tool,gnuplotalso requiresshell-escape. -
pandocis a very convenient, universal markup converter. For example, it can convert Markdown (like this very README) to PDF via LaTeX:pandoc README.md -o README.pdf
The default output is usable, but not very pretty. This is where templates come into play. A very tidy and well-made such template is Eisvogel. Its installation is not via a package, so we have to download the archive and unpack it. For this, we additionally require:
curlto transfer data from a server,wgetto download,librsvg2-binfor thersvg-converttool. This is used bypandocto convert SVGs when embedding them into the new PDF. This README itself contains such SVGs, it is therefore required.
The full chain in
bashcan be seen in the GitLab CI config file, under the job nameget_pandoc_template.Lastly,
pandocand its Eisvogel template draw metadata from the YAML header. In this very README, the Markdown version has metadata in the form:--- title: "Title" author: [Author] date: "YYYY-MM-DD" subject: "Subject" keywords: [Keyword1, Keyword2] lang: "en" ...
among other metadata variables. This info is detected and not rendered by many Markdown rendering engines. However, GitLab still displays it. Eisvogel uses it to fill the document with info, e.g. the PDF header and footer.
This concludes the Docker section. For more Docker images for LaTeX, see:
To get the same, or at least a similar environment running on Windows, the elements can be installed individually:
- MiKTeX; for a closer match to the Docker, install TeXLive instead
- Java Runtime Environment
- InkScape
- gnuplot
These are required to compile the LaTeX document.
If InkScape and gnuplot ask to put their respective binaries into the $PATH
environment variable, hit yes.
If they do not, add the path yourself to the directory containing the binaries
(.exe) in Edit environment variables for your account -> Path -> Edit... -> New.
To build anything, we need someone to build for us.
GitLab calls these build-servers runners.
Such a runner does not materialize out of thin air.
Luckily, in the case of collaborating.tuhh.de, runner tanis is available to us.
Enable it (him? her?) for the project on the GitLab project homepage]:
Settings -> CI/CD -> Runners -> Enable Shared Runners.
Otherwise, the build process might get 'stuck'.
After retrieving a built PDF, it might get lost in the nether. That is, the downloader loses track of what commit it belongs to, or even what release. This is circumvented by injecting the git SHA into the PDF metadata. In git, every object is uniquely identified by its hash (SHA):
412ba291b6980ab21f912b5cdf01a13c6268d0ed
It is convenient to abbreviate the full SHA to a short version:
412ba291
Since a collision of even short hashes is impossible for our modest uses,
we can uniquely identify states of the project by this short SHA.
This is why commands like git show 412ba291 work (try it out; the SHA exists in this repository!).
(As a side note: GitLab picks up on those hashes automatically, as shown in
commit ccedcda0.)
So if we have this SHA available in the PDF, never again will there be confusion about versions.
The PDF will be be assignable to an exact commit.
It can look like this (in Adobe Reader, evoke file properties with CTRL + D):

But how do we get it there?
We have a chicken-and-egg problem: if we want to insert the current SHA into the current PDF, we can't. While building the current PDF, we can only know the SHA of the previous commit. But, fear not, for GitLab has you covered:
During build-time, GitLab provides environment variables.
These include things like CI_COMMIT_SHORT_SHA, which is exactly what we want.
Now, we only need to get the contents of that variable into the LaTeX source,
and finally the compiled PDF.
The LaTeX package hyperref can modify PDF metadata.
In the LaTeX preamble, we can then use
\usepackage[pdfusetitle]{hyperref}% pdfusetitle reads from \author and \title
    \hypersetup{%
        pdfcreator={LaTeX with hyperref (\GitVersion{}, \GitShortHash{})},
    }
to get metadata like in the PDF above.
Navigate to the hyperref line in the class file to the see
current implementation.
Note that in LaTeX, you likely used \author{<author's name>} and \title{<document title>}
somewhere in the preamble to generate a title page.
hyperref's pdfusetitle option will use those values for the PDF metadata.
Lastly, pdfcreator will fill the Application field we see above.
However, \GitVersion{} and \GitShortHash{}} need to be defined.
These are defined earlier in the preamble:
\newcommand*{\GitVersion}{n.a.}
\newcommand*{\GitShortHash}{n.a.}
(Side note: use the starred variant of newcommand,
unless you need paragraph breaks, which is mostly not the case).
Using the above definition, the fields will just show up as not available if for example
compiling locally ("at home").
The server has a script employing sed (since we're using GNU/Linux there),
specified in .gitlab-ci.yml, that seeks GitVersion and GitShortHash
and replaces whatever comes in the curly braces of those commands.
See the script of the replace_git_metadata job in that file.
On the top of the project page, we can add badges. That's how GitLab calls the small, clickable buttons. For real software developers, these might display code coverage and similar things. For, well... us, they can be used as a convenient way to download the built PDF. It can look like this (center left):

A little image (svg format) can be generated using shields.io.
That only needs to be done once, and if you want to reuse the existing ones, here they are:


They have been embedded directly into the repository to not have to download them
each time.
They could also be embedded via their URL, for example
https://img.shields.io/badge/Cookbook-Download-informational.svg.
To add them to the project, go to:
Settings -> General -> Badges.
Give it a Name, enter the above file path or URL for the Badge image URL
(or do whatever you want here), and finally enter the Link.
This part is a bit tricky, since we need a dynamic URL that adapts to our path.
For this, GitLab provides variables like %{project_path}.
As such, the URL is (the hyphen in the middle is intentional):
https://collaborating.tuhh.de/%{project_path}/-/jobs/artifacts/%{default_branch}/raw/<filename>.pdf?job=compile_pdfThe project_path is clear, the default_branch is just master.
It visits the job artifacts on master and gets the PDF with the supplied filename.
This filename has to be adjusted accordingly.
Note that the download is unavailable while a job is running.
To avoid this, work on a git branch and leave master alone.
Treat the PDF (or whatever it is) on master as the current stable version that only changes sometimes,
not with every commit.
For example, you can do your continuous business on a dev branch and then add a second button,
https://collaborating.tuhh.de/%{project_path}/-/jobs/artifacts/dev/raw/<filename>.pdf?job=compile_pdfMany nights were lost over issues involving GitLab CI/CD, but also plain LaTeX. Here is a non-exhaustive list --- a bit like a gallery of failure --- of the most common ones. Hopefully, it spares you some despair.
-
The job is working on
Pulling docker imagelink to docker imagefor a while, and finally fails withERROR: Job failed (system failure): Error response from daemon: No such container <some long container ID>
Since, after we ensured the image indeed exists, know that cannot be the case, we Retry the job from the job page's top right corner:
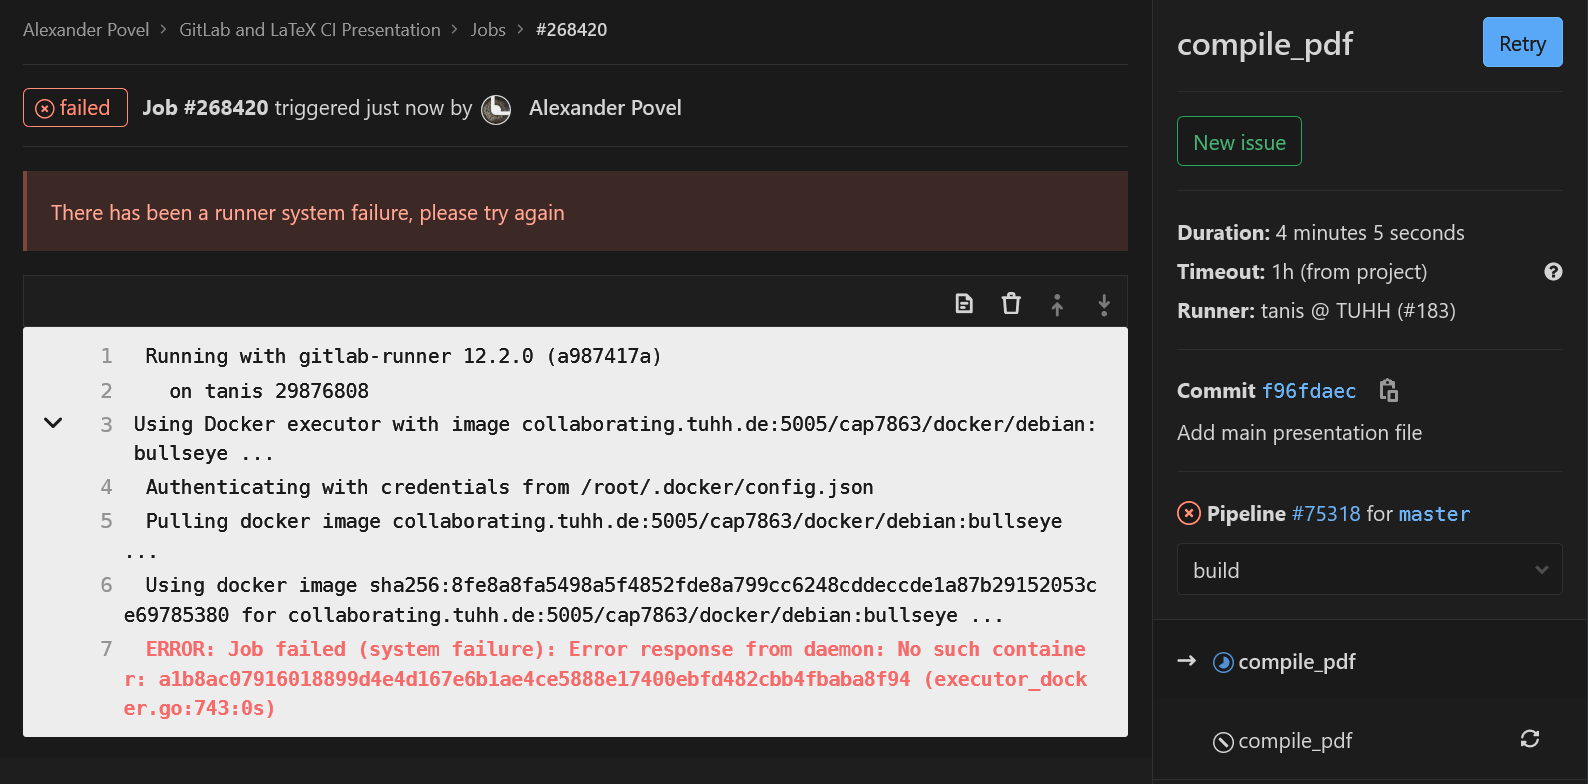
It should work afterwards (it never failed to restart after retrying for me). This will happen once in a while for some reason, perhaps caching. This has been an active issue for over two years now, with (at time of writing) the most recent comment within the last 24 hours. So, it is still in active discussion. It seems to have to do with caching. There does not seem to be a solution yet.
-
When using package
fontspec(or its derivativeunicode-math), compilation fails with! error: (type 2): cannot find file '' ! ==> Fatal error occurred, no output PDF file produced!It is possible that the font cache is corrupted after moving fonts around. For example, if previously all fonts were in a flat
./fonts/subdirectory of your document root, and then you decide to sort them into./fonts/sans/etc., the luatex cache will still point to the old ones.See here and also, similarly, here for a solution: delete the
.luaand.lucfiles of the fonts in question fromluatex-cache/generic/fonts/. For MiKTeX 2.9 on Windows 10, this was found in%USERPROFILE%\AppData\Local\MiKTeX\2.9\luatex-cache. -
When using package
pgf-spectracompilation fails withLaTeX Error: File 'spectra.data.tex' not found.For a solution, see here, where it says:
Hi
texlive/2016/texmf-dist/tex/latex/pgf-spectra/pgf-spectra.sty
ends with
\input{spectra.data.tex}
which generates a missing file error if the package is used, the data file is on ctan but it's misplaced in texlive as
texlive/2016/texmf-dist/doc/latex/pgf-spectra/spectra.data.tex
It should be in the tex tree not doc,
David
So, get
spectra.data.texfrom CTAN and place it accordingly. This can mean placing it in the project root. It would be better to put it next to the package file itself,pgf-spectra.sty, but this did not work even after refreshing the package database. This occurred on MiKTeX 2.9. TeXLive seemed fine in version 2019. -
The error is or is similar to:
! Undefined control sequence.
l.52 \glsxtr@r
With an
*.auxfile mentioned in the error message as well. Here, an auxiliary file got corrupted in an unsuccessful run and simply needs to be deleted. Do this manually or usinglatexmk -c.

These are valid not only for LaTeX files, but most text-based source files:
- For the love of God, use
UTF-8or higher for text encoding. Stop usingWindows 1252,Latinetc. Existing files can be easily updated to UTF-8 without much danger for regression (i.e., introducing errors). - Put each sentence, or even part of a sentence, and each instruction onto its own line.
This is very important to
difffiles properly, akagit diff. Generally, keep lines short. - In a similar vein, use indentation appropriately. Indent using 4 spaces. There are schools of thought that advocate two spaces, or also one tab. Ultimately, that does not really matter. 'Four spaces' just seems to generally win the fight for a common coding style, bringing us to the next point.
- Be consistent. Even if you pull your own custom stuff, at least be consistent in doing so.
This makes things predictable, the code will be easier to read, and also more easily
changed programmatically.
GNU/Linux and by extension Windows using
Windows Subsystem for Linux
has a very wide range of tools that make search, and search-and-replace, and various other
operations for plain text files easy.
The same is true for similar tools in IDEs.
However, if the text is scattered and the style was mangled and fragmented into various
sub-styles, this becomes very hard.
For example, one person might use
$<math>$for inline-LaTeX math, another the (preferred)\(<math>\)style. Suddenly, you would have to search for both versions to find all inline-math. So stay consistent. If you work on pre-existing documents, use the established style. If you change it, change it fully, and not just for newly added work.